In March this year, we had written a post on how to increase the internal storage on Android devices using adaptable storage. If you recollect, we had mentioned that not all phone makers — including Samsung and Xiaomi — give the option to increase the internal memory. That’s quite a bummer, isn’t it?
But all is not lost yet, we have been tweaking our Xiaomi devices since then, and have come up with this cool solution to increase internal memory on any Xiaomi phone.
This solution (as the old one) also makes use of an SD card to borrow the said memory, however, it also includes flashing a custom ROM to enable the adaptable storage.
Conditions for this Trick to Work
- The phone must have the support for external memory.
- The Android version must be Marshmallow or above.
- The SD card used in the process must be a high-speed class 10 SD card. Just a fair point of warning — if you proceed ahead with a slow speed memory card, it might result in your Android slowing down in the long run.
- ADB and Fastboot installed on your computer.
So, without further ado, let’s get started.
#1. Backup All the Data
Aforesaid, the process includes flashing a custom ROM into the device which means that you are essentially wiping all the data of the device. So before you proceed, make sure that all the apps, data and contacts have been backed up safely on a computer or cloud.
#2. Create an MI Account
Yet again, this is a prerequisite for flashing your phone as creating an MI account helps you to unlock the bootloader.
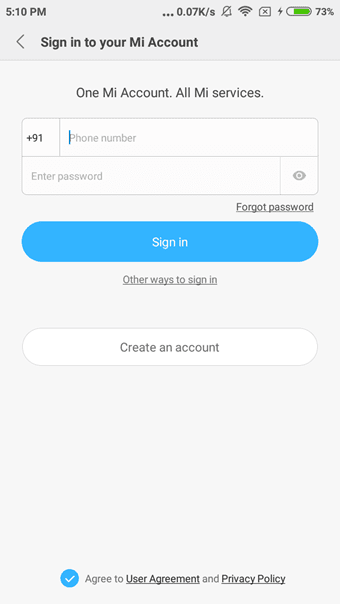
This process usually takes 3-4 days and requires you to write to the Mi admins to let you have the developer rights. Xiaomi keeps the bootloader locked to keep the user’s private data safe from counterfeited ROMs or devices.
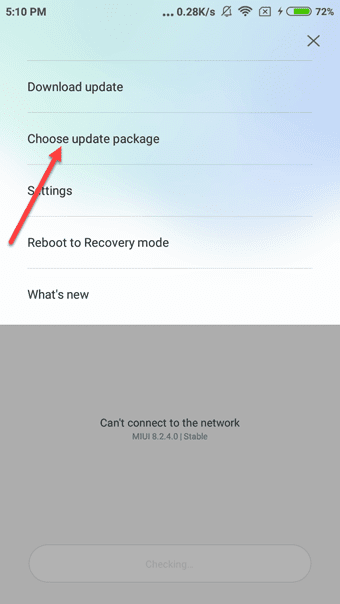
#3. Download Developer ROM
As you might already know, each Xiaomi device has two or more types of ROM associated with it — a Global ROM and a Chinese ROM. As obvious, the Global ROM runs only on phones with Snapdragon processors and the Chinese ROM will run on the MediaTek processors.

In this step, all you need to do is select your phone (In our case, it’s a Redmi Note 3) and choose the developer ROM. Clicking on download will automatically download a zip file onto your computer.
#4. Transfer the ROM
Now that the ROM has been downloaded to the computer, transfer the zip file to your phone using a data cable. Here, make sure that the file is copied to the internal storage of your device. Once that’s done, head over to the Updater app (in Tools), tap on on the three-dot menu and manually select the ROM from internal storage.

This process usually takes about 8-10 minutes to complete after which the phone will boot in the new developer mode.
Important point:The bootloader controls how the device in question will boot and getting into the bootloader is what is known as Fastboot.
#5. Enter the Fastboot Mode
The next steps call for another tool which goes by the name of Mi Unlock. This tool helps to enter the Fastboot mode. Once downloaded, Mi Unlock also requires you to sign-in using the same Mi credentials.
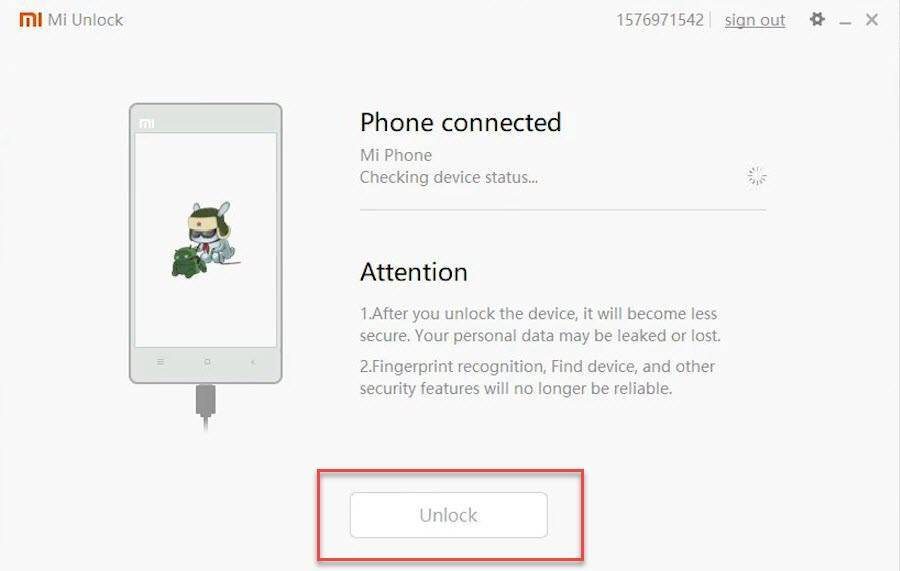
Upon verification of the Mi account, switch off your phone and hold down the volume down key and power button simultaneously until you see a bunny on the screen.

After entering the Fastboot mode, connect your phone to PC using a data cable and click “Unlock” (on the unlock tool).
#6. ADB and Custom Recovery
Unlocking the device completes the first half of the process. The second half makes use of another set of tools,
- ADB and Fastboot
- TWRP Custom Recovery
- Lineage ROM
- GApps (Google Apps)
The popular forum XDA Developers features an installer called “15 seconds ADB Installer v1.4.3” which suggestive of its name, makes sure that all the necessary files are copied inside the program files folder of your PC in a jiffy.
These files will be inside a folder called Minimal ADB and Fastboot.
Navigate over to the folder, right-click to open command prompt and type in the below command,
fastboot oem unlock-go
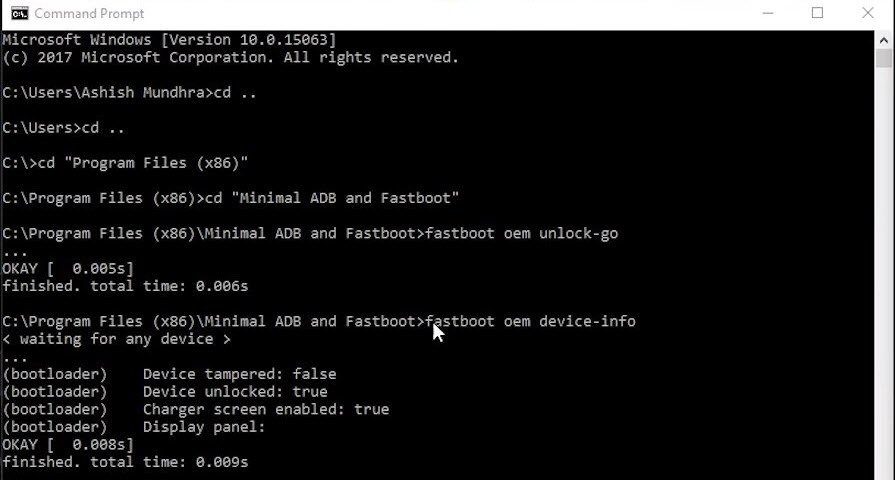
If your system doesn’t let you open command prompt from within the folder, then click here. The oem unlock command helps to ascertain if the device has been successfully unlocked.
A device unlocked message of True indicates that we are good to go to the next step — copying the TWRP image file inside the Minimal ADB folder to change the recovery type of the device.
To copy the files, type in the below command:
fastboot flash recovery [TWRP image name]
Here, replace the image name with the name of the TWRP file which you downloaded.
Also See: How to Root LeEco Le 2 and Install TWRP: Step by Step, Detailed Guide#7. Install Lineage ROM
Copy the Lineage ROM file (downloaded in step 6) to the internal memory of the phone. Now, boot the phone in recovery mode i.e., hold down the power button and the volume up button until you see TWRP flashing on the screen. Tap on Backup option which will take an NANDroid backup of your Android device

An NANDroid backup is a clone of an Android device’s file system and is usually created using a custom Android recovery but it may be also be created using an app. Once the backup is taken, it’s time to wipe the device.

Do make sure that you wipe the cache too along with the system data and internal storage. Now that everything’s fresh and clean, tap on install and install both the zip files — Lineage ROM and then the GApps.
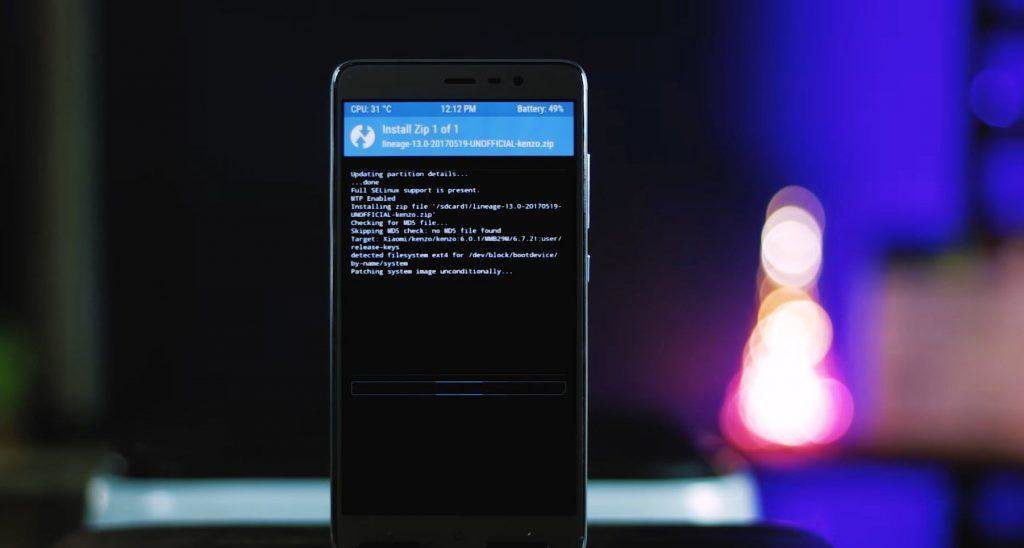
After both the zip files have been installed, the device will reboot again. This process will take approximately 10-12 minutes after which your phone will take up the stock Android look similar to the one found on the OnePlus3 or Moto G5 Plus.
Speaking of Moto G5 Plus, check out the difference between the Redmi Note 4 and Moto G5 Plus#8. Enable Adaptable Storage
As they say, that patience always pays off well and this holds absolutely true to this case. Once everything has been completed successfully — and your phone has adorned an entirely new look — you’ll be able to enable the adaptable storage.


Head over to Settings > Storage, then USB > Portable storage and tap on the hamburger menu on the upper right corner. Tap on settings and select Format as Internal storage > Erase and format. Once done, the device storage will show a cumulative of both the memories.
This point calls for a fair bit of warning — as the phone treats the SD card as part of the internal storage now, an unplanned ejection may result in an unstable phone and may cause a forceful shutdown of apps.
That’s All!
So that was how you can increase the internal memory of your Xiaomi device. Undoubtedly, it’s a tad long process but at the end of the day, you get a significantly increased memory and a relief from the memory related issues. Of course, flashing a new ROM means that you’ll have to bid farewell to the built-in IR blaster. But hey, more storage, remember?
Also See: How to Increase Resolution of your Android Device without Root
Was this helpful?
Last updated on 03 February, 2022
Read Next
 10 Fixes for ‘Video Memory Management Internal’ Error on Windows
Video Memory Management Internal is a Blue Screen of Death (BSOD) error that shows that the video memory manager, responsible for managing the memory used by the graphics card, has
10 Fixes for ‘Video Memory Management Internal’ Error on Windows
Video Memory Management Internal is a Blue Screen of Death (BSOD) error that shows that the video memory manager, responsible for managing the memory used by the graphics card, has
 How to Increase Virtual Memory in Windows 11
Random Access Memory (RAM) is an integral part of any computer that allows the processor to access temporary files used by programs quickly.
How to Increase Virtual Memory in Windows 11
Random Access Memory (RAM) is an integral part of any computer that allows the processor to access temporary files used by programs quickly.
 4 Ways to Increase Dedicated Video Memory (VRAM) in Windows 10 and 11
Is your system struggling to handle graphics-intensive tasks such as running video editors or playing video games?
4 Ways to Increase Dedicated Video Memory (VRAM) in Windows 10 and 11
Is your system struggling to handle graphics-intensive tasks such as running video editors or playing video games?
 Top 7 Fixes For ‘Not Recognized as an Internal or External Command’ Error in Windows 10 or 11
Windows offers quite a friendly interface when you've to tinker around most settings.
Top 7 Fixes For ‘Not Recognized as an Internal or External Command’ Error in Windows 10 or 11
Windows offers quite a friendly interface when you've to tinker around most settings.
 Top 5 Fixes for the Video Scheduler Internal Error on Windows 11
Some Windows users have encountered a Video Scheduler Internal error while performing different device tasks.
Top 5 Fixes for the Video Scheduler Internal Error on Windows 11
Some Windows users have encountered a Video Scheduler Internal error while performing different device tasks.
 Top 20 POCO Launcher Tips and Tricks to Increase Your Productivity
A launcher plays an important role in Android phones.
Top 20 POCO Launcher Tips and Tricks to Increase Your Productivity
A launcher plays an important role in Android phones.
 10 Best Ways to Increase Download Speeds in Google Chrome on Windows
While Google Chrome is touted as the fastest web browser among the competition, it isn't unusual to see slow download speeds on the browser.
10 Best Ways to Increase Download Speeds in Google Chrome on Windows
While Google Chrome is touted as the fastest web browser among the competition, it isn't unusual to see slow download speeds on the browser.
 Top 3 Ways to Increase or Decrease Touchpad Sensitivity on Windows 11 Laptops
When it comes to touchpad sensitivity, everyone has different preferences.
Top 3 Ways to Increase or Decrease Touchpad Sensitivity on Windows 11 Laptops
When it comes to touchpad sensitivity, everyone has different preferences.
The article above may contain affiliate links which help support Guiding Tech. The content remains unbiased and authentic and will never affect our editorial integrity.