As far as system issues go, getting a “Windows 11 no internet access but internet works” error is relatively minor, as you will typically be able to go online anyway. However, it can be a nuisance if you’re trying to diagnose other issues or if it is combined with laggy internet, which might indicate a deeper problem. Here’s what to do when the Windows 11 no internet access icon shows with internet still available.
Quick Fixes for Windows 11 No Internet Access but Internet Works
Before trying comprehensive troubleshooting steps, these quick fixes might solve the issue entirely:
- Disconnect from a VPN or proxies, since they can create a virtual network that your device detects as having priority over the existing connection but not having actual internet access.
- Restart your PC or internet router, as this can solve temporary glitches.
- Reconnect to another network, then back to the original one. If your PC has multiple Ethernet slots (typically as a result of using an extender), try to use another one.
- Temporarily disable your Antivirus software.
- Make sure your Windows is fully updated, even with optional updates.
- Go to “Network and Internet” settings and click on “Network Reset.”
Fix 1 – Disable TCP/IP v6
Despite IPv6 becoming standard way back in 2025, many ISPs don’t use it for PCs due to various factors (including higher costs). However, some setups might be trying to detect your IPv6 status and reporting it as not having an IP address (which is why the Windows 11 no internet access icon shows with internet).
Step 1. Open the “Run” utility. You can right-click on the Start icon and select it, or press “Windows + R.”
Step 2. Type in or paste “ncpa.cpl” and hit “Enter.”

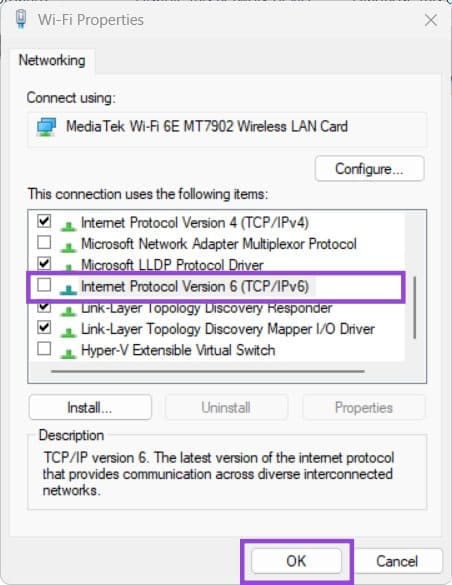
Step 3. Right-click on the currently-active network and select “Properties.” The active network will show the network name as the status.

Step 4. Scroll down and uncheck “Internet Protocol Version 6 (TCP/IP v6),” then click on “OK.”
Step 5. Flush your DNS cache. This is done by opening the Command Prompt (Terminal) as an Admin (also available from the Start icon’s right-click menu), then running the command “ipconfig /flushdns” or “ipconfig -flushdns.”

Fix 2 – Edit the Registry
An invalid registry (usually caused by updates or system settings) can force your PC to check wrong IPs for internet access. This can be solved in the Registry Editor by using Google’s rather than Microsoft’s DNS.
Step 1. Open the Run utility and type in “regedit” then hit “Enter.” Confirm the User Account Control prompt.
Step 2. Navigate to the following address (you can paste it into the navigation textbox at the top, but will need to drag over the existing address to select it):
HKEY_LOCAL_MACHINE\SYSTEM\CurrentControlSet\Services\NlaSvc\Parameters\Internet
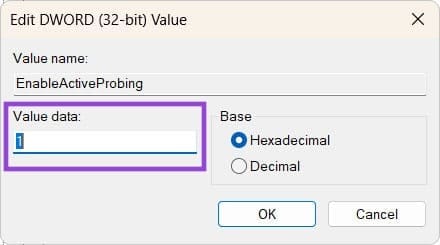
Step 3. In the right pane, double-click on “EnableActiveProbing” and make sure the value is at 1, then click “OK.”
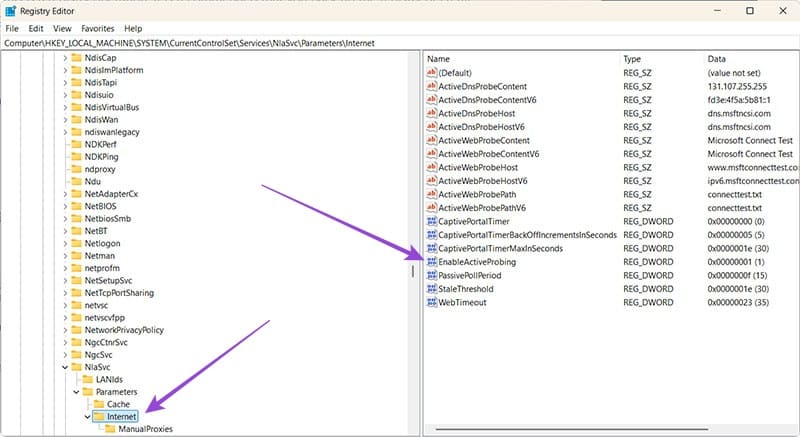
Step 4. Modify the following entries on that panel as follows:
ActiveDnsProbeContent: 131.107.255.255
ActiveDnsProbeContentV6: fd3e:4f5a:5b81::1
ActiveDnsProbeHost: dns.msftncsi.com
ActiveDnsProbeHostV6: dns.msftncsi.com
ActiveWebProbeContent: Microsoft Connect Test
ActiveWebProbeContentV6: Microsoft Connect Test
ActiveWebProbeHost: www.msftconnecttest.com
ActiveWebProbeHostV6: ipv6.msftconnecttest.com
Step 4b: You can use the following alternative entries:
ActiveDnsProbeContent (REG_SZ): 8.8.4.4
ActiveDnsProbeContentV6 (REG_SZ): 2001:4860:4860::8844
ActiveDnsProbeHost (REG_SZ): dns.google
ActiveDnsProbeHostV6 (REG_SZ): dns.google
ActiveWebProbeHostV6 (REG_SZ): www.msftconnecttest.com
Step 5. Go to:
HKEY_LOCAL_MACHINE\SOFTWARE\Policies\Microsoft\Windows\NetworkConnectivityStatusIndicator

Step 6. If there’s an entry named “NoActiveProbe,” put its value to 0 or remove it.
Step 7. Close the Registry Editor. You may need to restart your PC.
Fix 3 – Repair Corrupted Files
If you get the issue where Windows 11 shows no internet but connected normally for a while, then you might have a corrupted file. This can be potentially solved via the Terminal.
Step 1. Open the Terminal as an Admin.
Step 2. Run the following commands one by one, waiting until the previous one completes:
sfc /scannow
dism /online /cleanup-image /restorehealth
If Windows can’t repair corrupted files (but detects them), you may need to perform a clean install.
Was this helpful?
Last updated on 12 August, 2025
Read Next
 4 Ways to Fix Wi-Fi Connected but No Internet on Windows 11
Common Fixes Let's begin with some basic solutions to fix the Wi-Fi connected but no internet issue on your Windows machine: Check your internet plan - If you have exceeded
4 Ways to Fix Wi-Fi Connected but No Internet on Windows 11
Common Fixes Let's begin with some basic solutions to fix the Wi-Fi connected but no internet issue on your Windows machine: Check your internet plan - If you have exceeded
 4 Fixes for iPhone Connected to Wi-Fi but Internet Not Working Issue
Basic Fixes: Restart the iPhone and modem: Long-press the power button and turn off your iPhone.
4 Fixes for iPhone Connected to Wi-Fi but Internet Not Working Issue
Basic Fixes: Restart the iPhone and modem: Long-press the power button and turn off your iPhone.
 6 Ways to Fix iPad Connected to Wi-Fi but No Internet
Basic Fixes: Restart the router and iPad: Power off your iPad and Wi-Fi router.
6 Ways to Fix iPad Connected to Wi-Fi but No Internet
Basic Fixes: Restart the router and iPad: Power off your iPad and Wi-Fi router.
 4 Ways to Fix Wi-Fi Connected But No Internet on Android
https://youtu.be/tuxyxswCbWI Try Basic Fixes Sign in to the network: Although most public Wi-Fi networks are free to use, some require you to sign in with your email address or phone
4 Ways to Fix Wi-Fi Connected But No Internet on Android
https://youtu.be/tuxyxswCbWI Try Basic Fixes Sign in to the network: Although most public Wi-Fi networks are free to use, some require you to sign in with your email address or phone
 Top 7 Ways to Fix Samsung Galaxy Phone Connected to Wi-Fi But No Internet
Most Samsung Galaxy phone users prefer a robust Wi-Fi connection to download large apps, games, TV shows, movies, and playlists from the likes of Netflix, Disney Plus, and Spotify.
Top 7 Ways to Fix Samsung Galaxy Phone Connected to Wi-Fi But No Internet
Most Samsung Galaxy phone users prefer a robust Wi-Fi connection to download large apps, games, TV shows, movies, and playlists from the likes of Netflix, Disney Plus, and Spotify.
 5 Best Tools for Tracking Movies and TV Shows Online
We all subscribe to more than one streaming service for our entertainment needs.
5 Best Tools for Tracking Movies and TV Shows Online
We all subscribe to more than one streaming service for our entertainment needs.
 7 Best Lawyer Shows on Netflix You Must Watch
Courtroom dramas can be a gripping tale of facts, lies, and deceit all mixed up into one.
7 Best Lawyer Shows on Netflix You Must Watch
Courtroom dramas can be a gripping tale of facts, lies, and deceit all mixed up into one.
 Top 5 Ways to Fix Bluetooth Headphones Connected but No Sound on Windows 10
On a usual day, you'd hook your wireless Bluetooth headphones to your PC to listen to a song.
Top 5 Ways to Fix Bluetooth Headphones Connected but No Sound on Windows 10
On a usual day, you'd hook your wireless Bluetooth headphones to your PC to listen to a song.
The article above may contain affiliate links which help support Guiding Tech. The content remains unbiased and authentic and will never affect our editorial integrity.