If you use your Windows 11 computer a great deal, you know that sometimes you’ll have to get up from the computer to deal with some other issue – an important phone call, a crying baby – which might require you to put your computer to sleep for a while. When you do that, your computer should lock so no key on the keyboard can be pressed and ruin all your valuable work.
But what if you’ve got a PC or laptop that won’t lock after it enters sleep mode? Not doing so leaves your computer vulnerable to unfriendly eyes seeing your work on the screen and strange fingers tapping on your keyboard. In this article, we’ll show you how to re-enable this setting so your computer locks as it should.
Windows 11 Doesn’t Lock While Sleeping – How to Fix
If your screen isn’t locking when your machine sleeps, you need to enable this ability ASAP to protect your machine. We’ve got a few fixes below for you to try.
Lock via Keyboard
Let’s start with a quick fix. If you ever want to lock your screen, you can do so by pressing the keyboard shortcut (Win + L). You won’t be signed out, and all your programs and processes will keep running in the background. But it should also keep the lock screen in place even if your machine enters and leaves sleep mode.
Enable via Settings
This fix uses Settings to enable the lock screen on sleep and is pretty easy to apply. Here’s what to do:
Step 1. Open up Settings (Win + I) and click on “Accounts” in the sidebar.

Step 2. In the next screen, click “Sign-in options.”

Step 3. Navigate down to the “Additional settings” subsection and next to the “If you’ve been away, when should Windows require you to sign in again?” option, choose When PC wakes up from sleep.

Fix via the Registry
The Registry holds many of the key settings that allow your operating system to run smoothly. You should always be careful when editing files inside it if you don’t know what you’re doing. Don’t worry, though, we’ve got instructions.
This fix will adjust the time before your computer locks the screen due to inactivity. It’s a good way to ensure your machine’s safety. To enable the lock screen:
Step 1. Open the Run Dialog and type “regedit” before pressing (Ctrl + Shift + Enter) to run the utility as an Administrator.
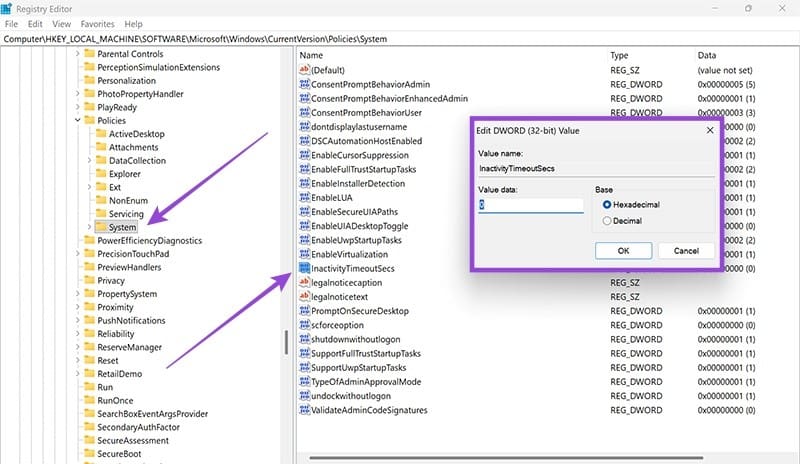
Step 2. In the Registry, navigate to the following path HKEY_LOCAL_MACHINE\SOFTWARE\Microsoft\Windows\CurrentVersion\Policies\System
Step 3. Navigate to “InactivityTimeoutSecs” and double-click it. If it doesn’t exist, create a new keyword by right-clicking in the main window and creating a new DWORD file.

Step 4. In the pop-up that appears when you click it, change the number of seconds (not minutes) before your screen locks when inactive. You can make it coincide with your Sleep Mode timer if you want.
Using Command Prompt
Another quick, yet powerful way to fix the lock screen is via the ever-versatile Command Prompt. Here’s what to do:
Step 1. Open the Run dialog (Win + R), type “cmd” and press (Ctrl + Shift + Enter) instead of clicking “OK” to run as admin.
Step 2. In the Command prompt, type the following: “powercfg.exe /SETACVALUEINDEX SCHEME_CURRENT SUB_VIDEO VIDEOCONLOCK [seconds number].” The last part is how many seconds before the screen locks. Press “Enter.”

Step 3. To finalize, type “powercfg.exe /SETACTIVE SCHEME_CURRENT” and press “Enter”.

Was this helpful?
Last updated on 21 September, 2025
Read Next
 8 Ways to Fix Wi-Fi Doesn’t Connect After Sleep in Windows 10
Typically, when you restart your computer or wake it up from sleep or hibernate, the Wi-Fi connects automatically.
8 Ways to Fix Wi-Fi Doesn’t Connect After Sleep in Windows 10
Typically, when you restart your computer or wake it up from sleep or hibernate, the Wi-Fi connects automatically.
 How to Fix Windows 10 Shuts Down Instead of Going to Sleep or Hibernating
Windows operating system comes with a lot of simple features that are a real time saver.
How to Fix Windows 10 Shuts Down Instead of Going to Sleep or Hibernating
Windows operating system comes with a lot of simple features that are a real time saver.
 10 Best Ways to Fix Windows 10 Won’t Wake up From Sleep Mode Error
The sleep mode in Windows 10 is useful for saving battery juice when taking those much-needed short breaks.
10 Best Ways to Fix Windows 10 Won’t Wake up From Sleep Mode Error
The sleep mode in Windows 10 is useful for saving battery juice when taking those much-needed short breaks.
 4 Ways to Disable Login Screen After Sleep on Windows 11
Method 1: Disable Login After Sleep From Settings The easiest way to skip the login screen after sleep mode is by modifying the sign-in options in the Settings app.
4 Ways to Disable Login Screen After Sleep on Windows 11
Method 1: Disable Login After Sleep From Settings The easiest way to skip the login screen after sleep mode is by modifying the sign-in options in the Settings app.
 7 Ways to Fix Sleep Mode Not Working on Windows 11
Fix 1: Verify Screen and Sleep Settings Your first step is to check the screen and sleep settings in Windows 11 and ensure that you haven’t disabled sleep mode accidentally.
7 Ways to Fix Sleep Mode Not Working on Windows 11
Fix 1: Verify Screen and Sleep Settings Your first step is to check the screen and sleep settings in Windows 11 and ensure that you haven’t disabled sleep mode accidentally.
 5 Fixes for Windows 11 PC Going to Sleep Randomly
Fix 1: Reset and Change the Power Plan If your computer is randomly going to sleep, there may be something wrong with the power plan settings.
5 Fixes for Windows 11 PC Going to Sleep Randomly
Fix 1: Reset and Change the Power Plan If your computer is randomly going to sleep, there may be something wrong with the power plan settings.
 4 Ways to Disable Sleep Mode in Windows 11
Method 1: Using the Settings App Whether it's something as simple as changing your desktop background or more advanced tasks like turning off sleep mode, you can accomplish it all
4 Ways to Disable Sleep Mode in Windows 11
Method 1: Using the Settings App Whether it's something as simple as changing your desktop background or more advanced tasks like turning off sleep mode, you can accomplish it all
 5 Ways to Fix Windows PC Randomly Waking Up From Sleep
Basic Fixes Disable Awake From Powertoys: Open Powertoys and disable the Awake option.
5 Ways to Fix Windows PC Randomly Waking Up From Sleep
Basic Fixes Disable Awake From Powertoys: Open Powertoys and disable the Awake option.
The article above may contain affiliate links which help support Guiding Tech. The content remains unbiased and authentic and will never affect our editorial integrity.