Windows 11 is here, and Windows 10 has reached the end of its support. Or has it? Windows 10 is a handy way for users reluctant or unable to make the shift to continue receiving security and performance patches for another year with the Windows 10 ESU.
If, however, you have the Windows 10 ESU option not showing on your PC, then we’re here to help you out.
What Are the Requirements for the ESU?
Before we look at Windows 10 not showing extended service options, it’s important to know what you need to qualify for them:
- You need to have Windows 10 and the option for ESU, which was automatically rolled out.
- To fix this, check your copy of Windows and its update status.
- You can also force the option to appear through Command Prompt or the Registry.
How to Fix the Windows 10 ESU Option Not Showing
If you aren’t seeing the option to extend your security updates through the ESU, there are a few ways to troubleshoot the problem:
Is Your Windows 10 Legit?
If you have a bootleg or inactivated copy of Windows 10, then the option for ESU won’t appear. It’s important to have a legitimate or activated version of the operating system in order to benefit from continued security updates.
Ensure Your PC Is Fully Up to Date
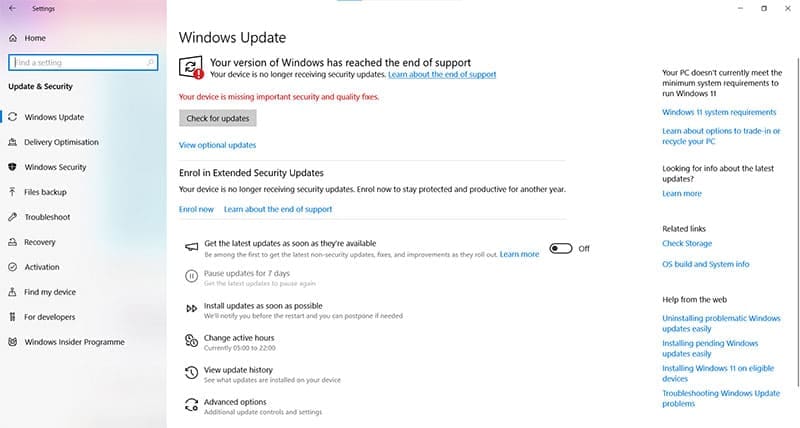
While you might not be receiving regular updates anymore, it’s still important that you’re as fully updated as possible before the end of service kicks in. In particular, you need to be updated to Windows 10 22H2 for the ESU to be visible.
Edit the Registry
Another way to ensure the ESU notice pops up is to adjust the registry to give you the notice. Here’s what to do:
Step 1. Open the Run Dialog (Win + R) and type in “regedit” and hit (Ctrl + Shift + Enter) to run as Admin.
Step 2. In the Registry, enter the following path in the top address bar: “HKEY_CURRENT_USER\SOFTWARE\Microsoft\Windows NT\CurrentVersion\Windows”
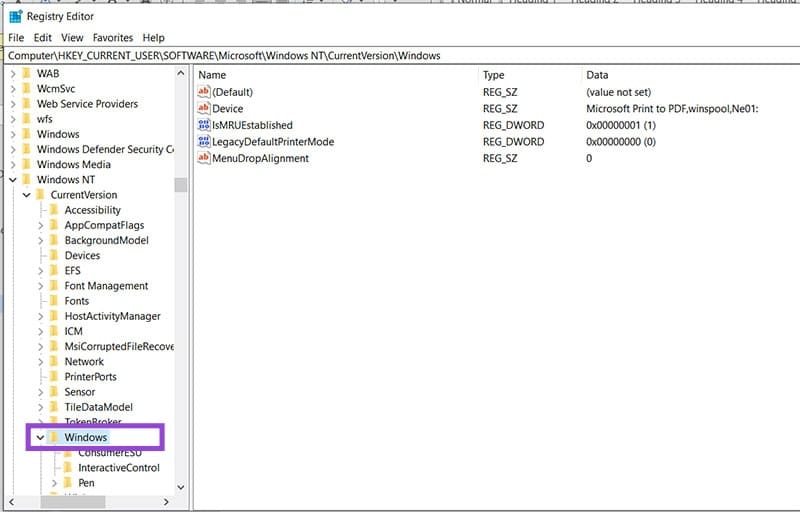
Step 3. If the “Windows” folder in the sidebar doesn’t contain “Consumer ESU,” you’ll need to create it. Right-click the folder, and go to “New” and “Key.”
Step 4. Name the key “ConsumerESU” and press “Enter.”
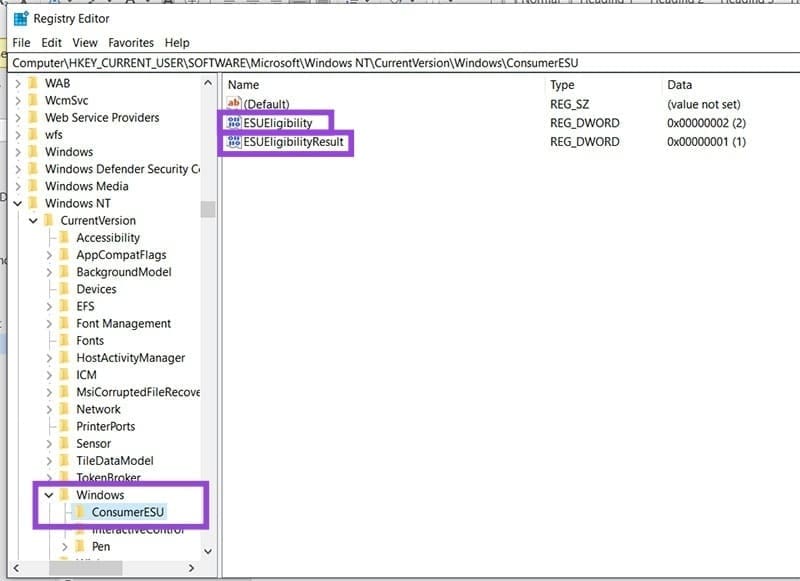
Step 5. Click the new key. In the main window, right-click anywhere and select “New” and “DWORD (32-bit) Value. Name this “ESUEligibility.”
Step 6. In the same way, create another DWORD and name it “ESUEligibilityResult.”
Step 7. Double-click “ESUEligibility” and change the “Value data” to “2.”
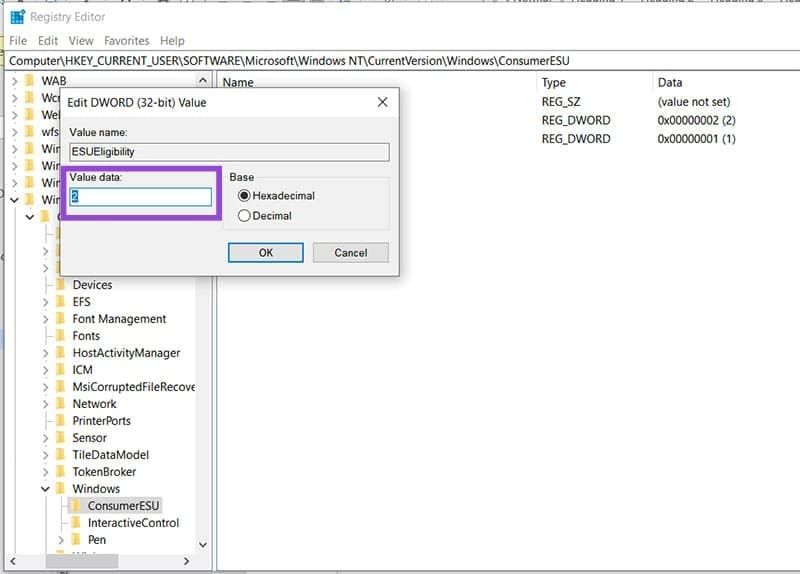
Step 8. In the same way, change “ESUEligibilityResult” to “1” under “Value data” and click “OK.”
Step 9. Restart your machine and see if the option is now visible.
Was this helpful?
Last updated on 11 December, 2025
Read Next
 5 Ways to Fix Dual Boot Option Not Showing on Windows 11
Fix 1: Enable Dual Boot Option Using Command Prompt Sometimes, the dual boot option goes missing when upgrading the operating system.
5 Ways to Fix Dual Boot Option Not Showing on Windows 11
Fix 1: Enable Dual Boot Option Using Command Prompt Sometimes, the dual boot option goes missing when upgrading the operating system.
 7 Ways to Fix No Wi-Fi Option in Windows 11
Try Basic Fixes Perform a power cycle: Performing a power cycle can help discharge residual power from the capacitor and reset all the temporary configurations.
7 Ways to Fix No Wi-Fi Option in Windows 11
Try Basic Fixes Perform a power cycle: Performing a power cycle can help discharge residual power from the capacitor and reset all the temporary configurations.
 5 Ways to Fix Background Apps Permissions Option Missing on Windows 11
Fix 1: Configure Background App Permissions via Battery Settings You can manage background app permissions in various ways in Windows 11.
5 Ways to Fix Background Apps Permissions Option Missing on Windows 11
Fix 1: Configure Background App Permissions via Battery Settings You can manage background app permissions in various ways in Windows 11.
 6 Ways to Fix Windows Hello Fingerprint Option Unavailable or Not Working
Basic Fixes Restart PC: Restart your PC to fix any temporary bugs and glitches.
6 Ways to Fix Windows Hello Fingerprint Option Unavailable or Not Working
Basic Fixes Restart PC: Restart your PC to fix any temporary bugs and glitches.
 4 Fixes for “Compress to ZIP File” Option Not Working in Windows 11
Try Basic Fixes Try another file or folder: Compressing another file or folder should help confirm if it's a system-wide issue.
4 Fixes for “Compress to ZIP File” Option Not Working in Windows 11
Try Basic Fixes Try another file or folder: Compressing another file or folder should help confirm if it's a system-wide issue.
 5 Fixes for Windows Security App Showing White Screen on Windows 11
Common Fixes Reboot PC: Press the Windows + X shortcut to open the Power User Menu, select Shut down or sign out, and click Restart.
5 Fixes for Windows Security App Showing White Screen on Windows 11
Common Fixes Reboot PC: Press the Windows + X shortcut to open the Power User Menu, select Shut down or sign out, and click Restart.
 Instagram Restrict vs. Block: Which Privacy Option Should You Use
What Does Restrict Mean on Instagram Touted as an anti-bullying feature, restrict on Instagram helps avoid unwanted interactions without letting the other person know about it.
Instagram Restrict vs. Block: Which Privacy Option Should You Use
What Does Restrict Mean on Instagram Touted as an anti-bullying feature, restrict on Instagram helps avoid unwanted interactions without letting the other person know about it.
 Missing Cast Option in Chrome? Here’s How to Add It Back to the Toolbar
Chrome lets you cast your browser tabs or the entire screen to all the nearby devices with Chromecast support.
Missing Cast Option in Chrome? Here’s How to Add It Back to the Toolbar
Chrome lets you cast your browser tabs or the entire screen to all the nearby devices with Chromecast support.
The article above may contain affiliate links which help support Guiding Tech. The content remains unbiased and authentic and will never affect our editorial integrity.

