There are a lot of things to consider and keep track of when running a virtual machine. There’s always the chance that things don’t run well or at all. If you’re trying to run Teams on your virtual desktop and are getting a note that things aren’t optimized, then this article is for you. We’ll be looking at fixes to try when Teams won’t optimize.
What Happens When Teams Won’t Optimize
If Teams isn’t optimizing on your virtual machine, not only will you receive the error banner at the top of the app window, but you might also encounter other error notifications, such as “Error code 2000.”

What does this mean for the experience? Well, all features that make Teams a smooth, hassle-free communication experience are hamstrung, and you’ll be getting choppy audio and high CPU usage due to a lack of media optimization.
How to Fix Optimization Problems
Optimization helps virtual machines such as Azure Virtual Desktops or Citrix run Teams properly. If you’re wondering how to optimize Microsoft Team’s performance, we’ve got a few fixes below for you to try to get things working:
Restart Teams
The easiest fix and your first port of call should be restarting the app in your virtual machine. If you see the “Not optimized” banner, click the three dots next to it, and choose “Restart Teams to optimize” from the dropdown menu. If the banner disappears on restarting, you should be good to go.
Install Plugin for Citrix
Missing software may be the reason for Teams not working as well as it can. If you’re getting the error code 2000, then you are missing vital software, and most likely the plugin required. For Citrix, Microsoft has a plugin for you to install on your main PC and not the virtual machine that’ll help your Teams be optimized. Install this and try running Teams again.
Update Your Software

If you’re using Azure Virtual Desktop or Windows 365, make sure you’re using the latest Windows App (or the supported Remote Desktop client where applicable). You can download the latest version from the Microsoft Store easily.
In addition, ensuring that Windows 11 itself is regularly kept up to date is just as important.
Allow Teams to Access Your Hardware
Virtual machines might not automatically have access to important Teams hardware like microphones and cameras to communicate properly. If you’re getting no input, then try granting permissions for use on your actual desktop and not the virtual machine. Here’s how to do so:
Step 1. Open “Settings” (Win + I) and select “Privacy & Security” from the sidebar.
Step 2. Click on “Microphone” in the “App permissions” section.
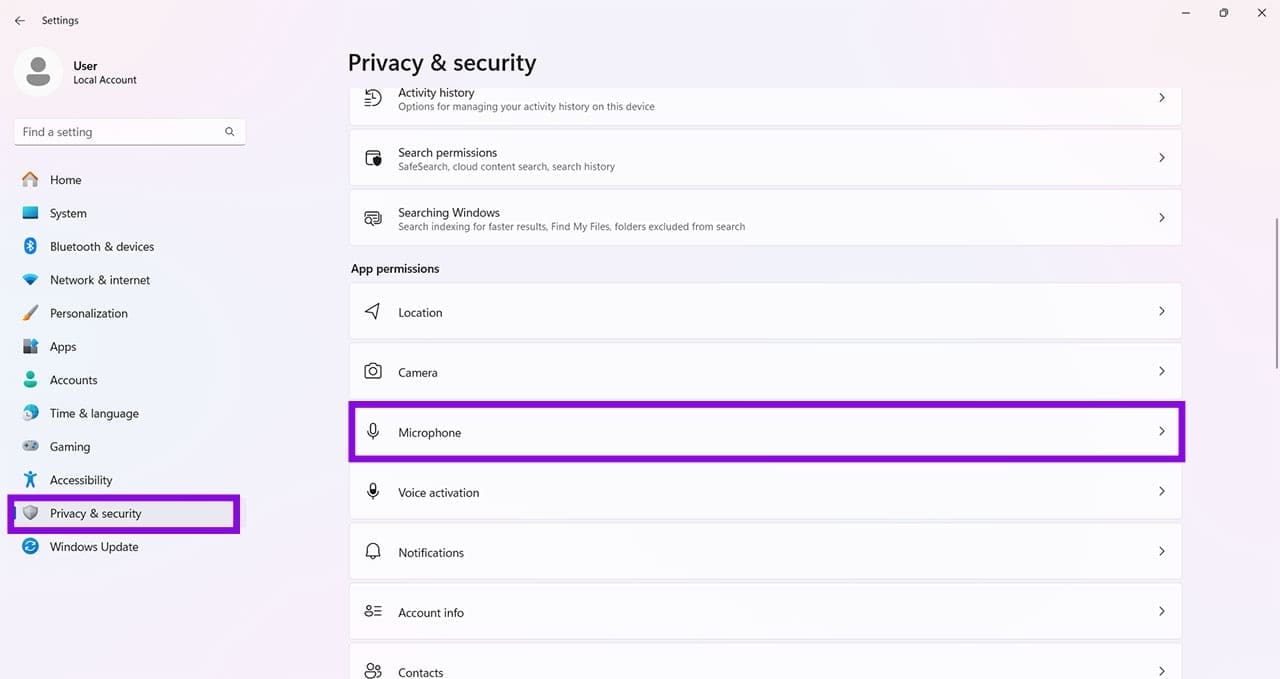
Step 3. Toggle “Let Desktop apps access your microphone” to “On” and ensure that “Microsoft Teams VDI” is properly listed and toggled too.
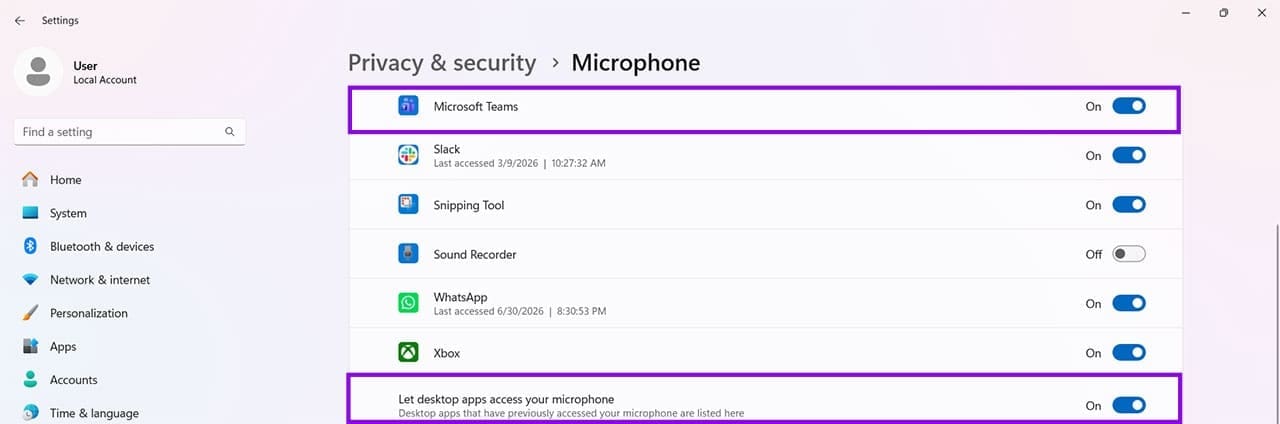
Step 4. Once this is done, back out and toggle the Camera in the same way.

Was this helpful?
Last updated on 15 July, 2026
Read Next
 7 Best Ways to Fix Microsoft Teams Won’t Share Screen
Microsoft Teams has come a long way since its inception, and they keep adding new features to their product all the time.
7 Best Ways to Fix Microsoft Teams Won’t Share Screen
Microsoft Teams has come a long way since its inception, and they keep adding new features to their product all the time.
 Optimize Windows 11 Startup Using System Configuration Tool (MSConfig)
How to Use System Configuration Tool on Windows 11 The System Configuration Tool is divided into five tabs for easy navigation, each with different functions.
Optimize Windows 11 Startup Using System Configuration Tool (MSConfig)
How to Use System Configuration Tool on Windows 11 The System Configuration Tool is divided into five tabs for easy navigation, each with different functions.
 How to Optimize FaceTime Audio and Video Settings on iPhone
The FaceTime app is commonly available across all Apple devices, including the iPhone.
How to Optimize FaceTime Audio and Video Settings on iPhone
The FaceTime app is commonly available across all Apple devices, including the iPhone.
 How to Optimize Steam Deck’s Performance in Games
Valve's Steam Deck is easily one of the best handheld gaming consoles.
How to Optimize Steam Deck’s Performance in Games
Valve's Steam Deck is easily one of the best handheld gaming consoles.
 How to Use Preferred Band Settings to Optimize Wi-Fi for Windows 11
Wi-Fi networks typically use two distinct frequency bands – 2.4GHz and 5GHz.
How to Use Preferred Band Settings to Optimize Wi-Fi for Windows 11
Wi-Fi networks typically use two distinct frequency bands – 2.4GHz and 5GHz.
 How to Optimize Windows 11 for Gaming
Optimizing Windows 11 for gaming isn’t as “plug-and-play” as Microsoft would have you believe.
How to Optimize Windows 11 for Gaming
Optimizing Windows 11 for gaming isn’t as “plug-and-play” as Microsoft would have you believe.
 4 Ways to Fix Microsoft Teams Meeting Add-in Won’t Appear in Outlook for Windows
Fix 1: Enable the Teams Add-In A common reason the Microsoft Teams meeting option may disappear from Outlook is if you have accidentally disabled the related add-in.
4 Ways to Fix Microsoft Teams Meeting Add-in Won’t Appear in Outlook for Windows
Fix 1: Enable the Teams Add-In A common reason the Microsoft Teams meeting option may disappear from Outlook is if you have accidentally disabled the related add-in.
 4 Fixes for Microsoft Teams Notification Won’t Go Away on Windows
Fix 1: Open the Chat App and Clear Notifications (Windows 11 Only) Your Windows 11 PC includes a dedicated Chat app that can help you access and respond to your
4 Fixes for Microsoft Teams Notification Won’t Go Away on Windows
Fix 1: Open the Chat App and Clear Notifications (Windows 11 Only) Your Windows 11 PC includes a dedicated Chat app that can help you access and respond to your
The article above may contain affiliate links which help support Guiding Tech. The content remains unbiased and authentic and will never affect our editorial integrity.