Transferring Excel table to Word sounds simple in theory. All you have to do is select the table and copy it. But that often changes the formatting, and you might not get the full table. Here are the most common methods for transferring a table from Excel to Word that give you more options.
Option 1 – Use a Basic Table for Transferring an Excel Table to Word
Word has its own table formatting system, so pasting data into a Word table helps preserve the table structure but not necessarily all Excel formatting. For this, you first need to make a table that looks the same as your Excel one.
Step 1. Determine how many rows and columns your table has. For our sample, we’ll use a 10×4 table.
Step 2. In Word, go to “Insert.” Click on the “Table” option and select “Insert Table…”
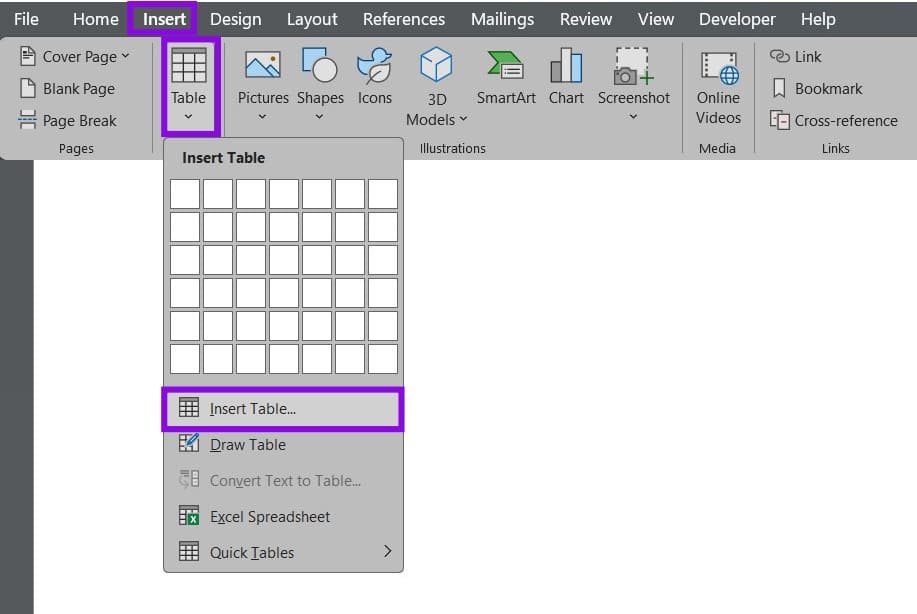
Step 3. In the dialog, enter the numbers of rows and columns, then click on “OK.”

Step 4. Go to Excel, then select the range you want to copy and hit “Ctrl + C.”

Step 5. Go back to Word, select the entire table, and hit “Ctrl + V.”
Note that if the original letters or numbers were white, you’ll need to select those cells and change the font color. Additionally, this won’t work if your table has merged cells, so you’ll need to unmerge them.
Here’s how the resulting table looks.

Option 2 – Use an Advanced Method of Transferring a Table from Excel to Word to Keep Formulas
Copying the table to Word usually removes all cell links and formulas. But Word can technically create a separate instance of Excel within itself to allow you to edit a table.
Step 1. Go to Excel and copy the table with “Ctrl + C.”
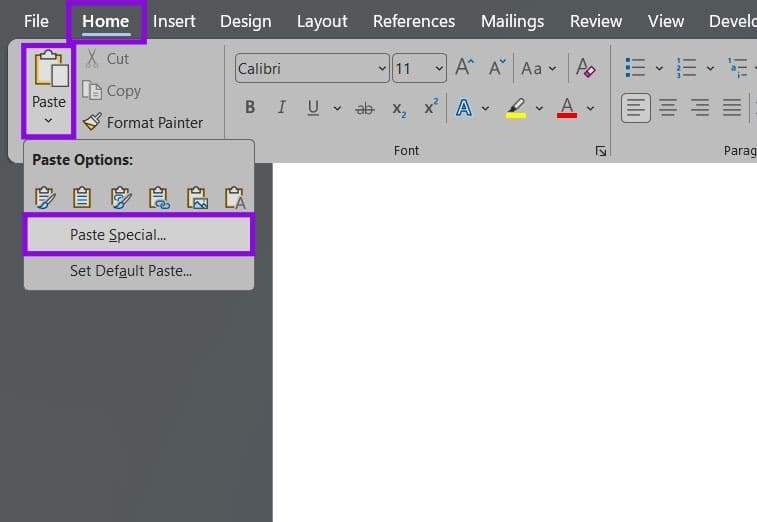
Step 2. Go to Word, find a space where you want the table, then go to “Paste” in the Home tab and select “Paste Special.”
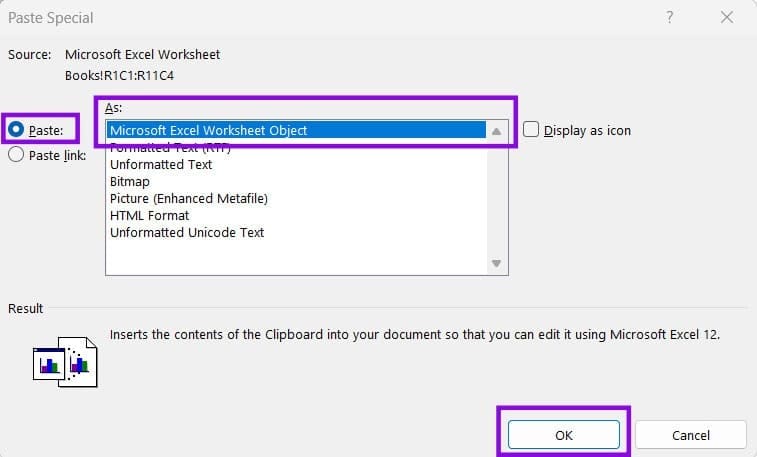
Step 3. Check the “Paste” option on the left, select the option “Microsoft Excel Worksheet Object” from the list, and click on “OK.”
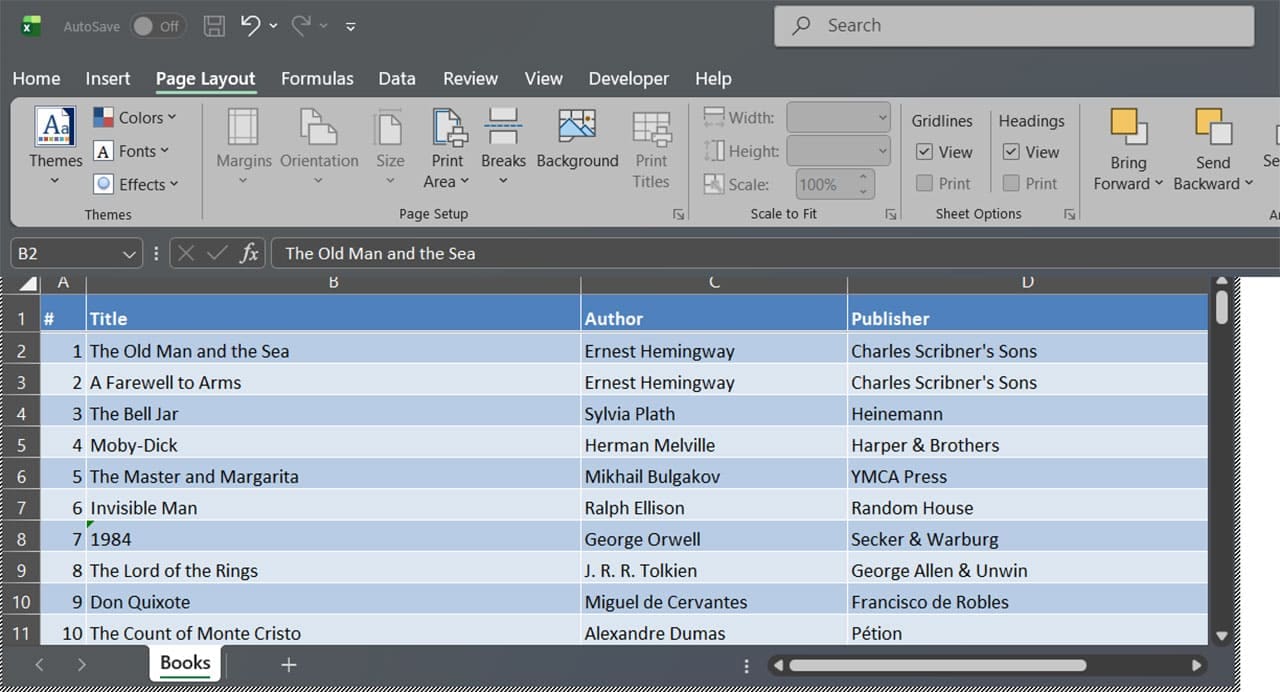
Step 4. If you’re working in Print View, you may need to switch to Web Layout (in the View tab) to see the entire table.

Step 5. Click inside the table to start editing it. You can drag the columns to make them shorter. Otherwise, dragging the table’s edges will scale down the entire table to fit. Click outside of the editor to return to Word.
Option 3 – Link the Tables Between Excel and Word
If you want to keep the Word table updated as soon as the Excel version is changed, you’ll need to link the two documents together.
Step 1. Copy the table from Excel.
Step 2. In Word, go to “Paste Special.” In the options, select “Paste Link” on the left and “Microsoft Excel Worksheet Object.”

Step 3. This pastes the table as a linked object in Word, and clicking on a cell will open Excel to edit it.
Step 4. If you make a change to the table, right-click on the Word version and select “Update Link.” You may need to change the columns to make the table fit if you plan to print it.
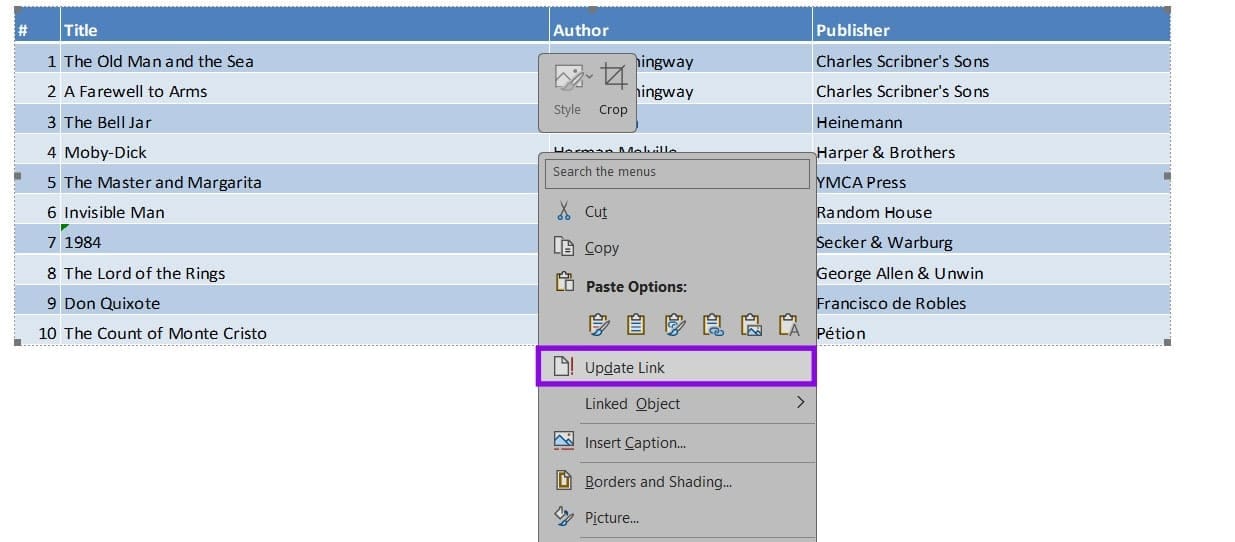
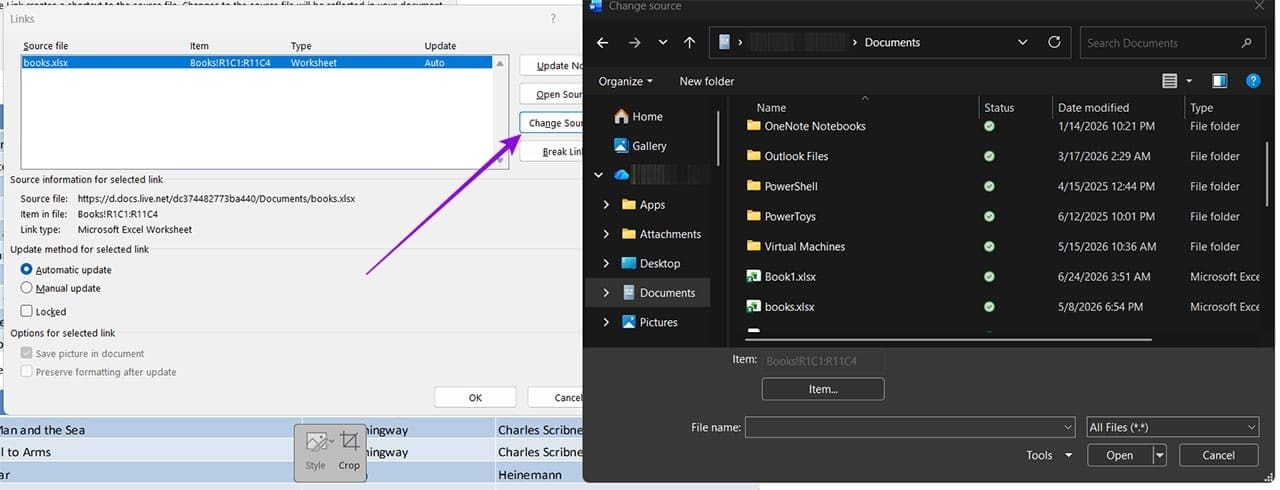
If you’re sending the table to someone, you’ll need to send both files, or it will be treated as an image or stop working altogether. Then, they will need to re-link the table. This can be done by right-clicking on the table, then going to “Linked Object” and “Links.” In the dialog, go to “Change source” and find the document. Alternatively, they can repeat the process for transferring.
Was this helpful?
Last updated on 27 July, 2026
Read Next
 5 Steps to Convert a Word Table to Microsoft Excel
Although Microsoft Word has definitely improved its functionality for dealing with numbers and tables over the years, there are times when you need the advanced functionality of Microsoft Excel.
5 Steps to Convert a Word Table to Microsoft Excel
Although Microsoft Word has definitely improved its functionality for dealing with numbers and tables over the years, there are times when you need the advanced functionality of Microsoft Excel.
 How to Convert an Excel Sheet to an HTML Table
Method 1: Save as Webpage Excel lets you save your documents in different formats.
How to Convert an Excel Sheet to an HTML Table
Method 1: Save as Webpage Excel lets you save your documents in different formats.
 How to Remove Table Formatting in Excel
Method 1: Clear Table Style When working with data tables, Excel often applies predefined styles that include various formatting elements such as colors, borders, and fonts.
How to Remove Table Formatting in Excel
Method 1: Clear Table Style When working with data tables, Excel often applies predefined styles that include various formatting elements such as colors, borders, and fonts.
 How to Create a Dynamic Table of Contents in Excel
A table of contents is a total game-changer when working with large files – it keeps everything organized and easy to navigate.
How to Create a Dynamic Table of Contents in Excel
A table of contents is a total game-changer when working with large files – it keeps everything organized and easy to navigate.
 How to Insert a Table of Contents in Microsoft Word
 (Windows and Mac) As a part of the Office redesign, Microsoft revamped the Word app on the desktop.
How to Insert a Table of Contents in Microsoft Word
How to Insert a Table of Contents in Microsoft Word (Windows and Mac) As a part of the Office redesign, Microsoft revamped the Word app on the desktop.
 How to Create and Use Custom Table Templates in Microsoft Word
How to Create a Custom Table Template in Microsoft Word On Microsoft Word, there is a feature called Quick Tables.
How to Create and Use Custom Table Templates in Microsoft Word
How to Create a Custom Table Template in Microsoft Word On Microsoft Word, there is a feature called Quick Tables.
 Microsoft Word Table Goes Off Page – How to Fix
Microsoft Word doesn’t have the best reputation when it comes to moving images around on a document.
Microsoft Word Table Goes Off Page – How to Fix
Microsoft Word doesn’t have the best reputation when it comes to moving images around on a document.
 6 Best Table-Top TV Stands For Large TVs
A large-screen TV is one of the building pillars of a great entertainment room.
6 Best Table-Top TV Stands For Large TVs
A large-screen TV is one of the building pillars of a great entertainment room.
The article above may contain affiliate links which help support Guiding Tech. The content remains unbiased and authentic and will never affect our editorial integrity.