Method 1. Use AirDrop to Share Individual Notes Between Macs
AirDrop is the easiest way to share some notes quickly. But note,
- The Macs should be in proximity, within Bluetooth and Wi-Fi range.
- AirDrop, Wi-Fi, and Bluetooth should be enabled on both devices.
- Receivers AirDrop should be set to receive from Contacts Only or Everyone.
Step 1: Launch the Notes app on your Mac. Right-click the note and select Share Note.

Step 2: Select Send Copy and click AirDrop.
Step 3: Select the other Mac to which you want to share.


A prompt will appear on the other app, Accept the send request. That’s it! The note will directly appear in the Notes app of the other Mac.
Tip: Try these fixes if AirDrop is not showing up on your MacBook.
Method 2. Use Collaboration to Share Notes From Mac to Mac
Another method of sharing notes with someone is to collaborate with them. Like sharing on Google Drive, the feature allows users to view or edit the notes in real time.
You can either share individual notes or share a Notes folder with multiple notes with this method.
Step 1: Open the Note you want to share. Tap the Share icon from the top bar.
Note: To share a Folder, tap the three-dot icon next to the folder name on the sidebar and tap Share.
Step 2: Select Collaborate from the drop-down menu.


Step 3: You can edit the sharing preferences before sharing. To do so, click ‘Only invited people can edit‘ under the collaborate tab.
Step 4: Here, you can decide,
- Who can access the note
- Permission – Who can make changes
- Allow others to invite


Step 5: Once you’ve set the sharing preferences, select the sharing method. You can either AirDrop, send the link in Mail or Messages.
Method 3. Send via Mail, Message, Freeform, or Reminders
You can use other apps on Mac to transfer notes from Mac to Mac. Whether you want to collaborate or just send a copy of the note, both can be managed. To do so, simply right-click the note, followed by Share Note, or click the Share icon from the top bar.
The apps you can use are,
- Mail or Messages – If you select Send Copy, the note with its formatting is sent as text in the mail or message. As for collaboration, an invite link along with the note’s text is sent.


- Freeform – The note’s text is added to a new or existing Freeform board. You can invite others to view or collaborate on the Freeform board.


- Reminders – It creates a reminder with a link to the note. You can share the reminder with others as needed.

Note: If you share a locked note while viewing it, others can view it without entering the password.
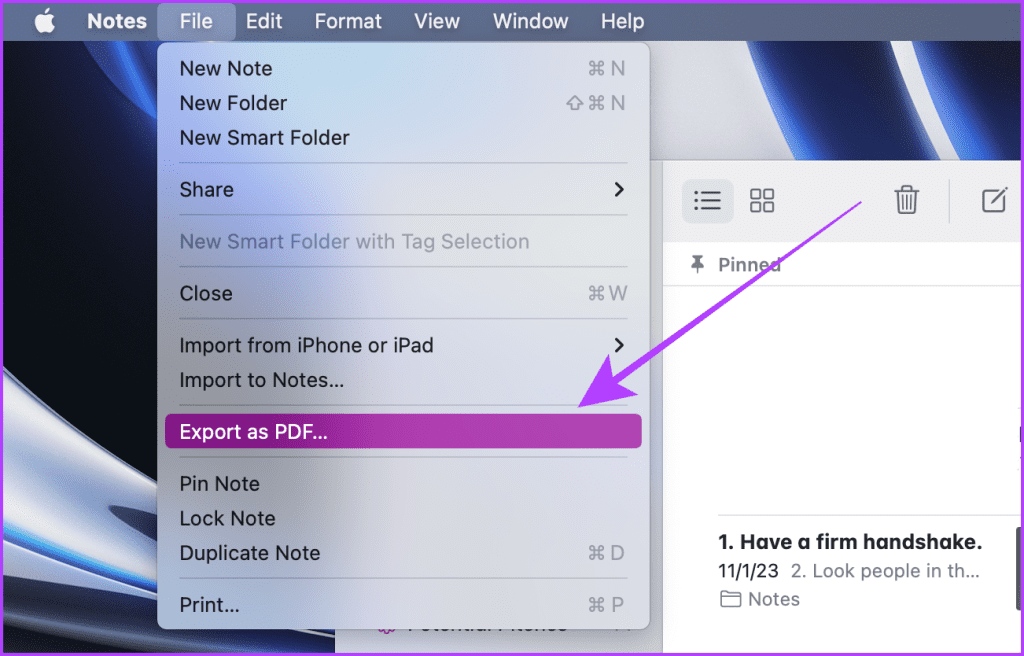
Method 4. Export and Transfer Notes as PDF
Don’t want to import notes to the Notes app on your Mac but still need access to them? No worries! You can effortlessly convert and share individual notes as PDFs directly from your Mac, eliminating the need for a third-party app.
Step 1: Open Notes and select a note that you want to export. Click File from the menu bar.
Step 2: Click Export as PDF.
Step 3: Select a directory for the export and then click Save.

The note will appear as a PDF on the selected location. Now you can use either an external drive, AirDrop, or email to share this note with the other Mac.
Method 5. Sync Notes With iCloud
If you are switching from one Mac to another and are wondering how to share notes between Macs, no need to worry. macOS allows you to back up notes and many other things on iCloud, which you can restore quickly on your new Mac.
Step 1: Launch System Settings on your Mac.
Step 2: Go to Apple ID > iCloud. Now, click Show All.
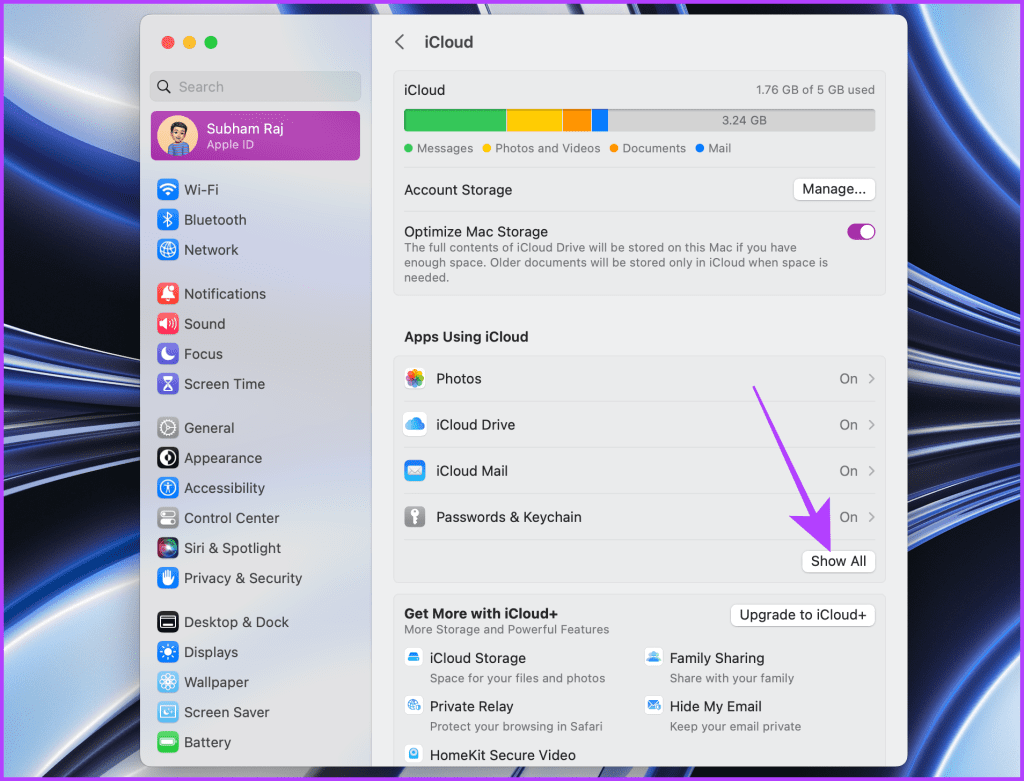
Step 3: Click Notes.

Step 4: Enable the toggle next to Sync this Mac and click Done.

Now go to the new Mac, sign in with the same Apple ID, and repeat the same steps to sync all the notes to your new Mac from the previous one.
Was this helpful?
Last updated on 29 August, 2024
Read Next
 How to Transfer Google Keep Notes to Another Account
Method 1: Send to Another Google Account On Google Keep's mobile apps, you get the option to share individual notes across different apps.
How to Transfer Google Keep Notes to Another Account
Method 1: Send to Another Google Account On Google Keep's mobile apps, you get the option to share individual notes across different apps.
 4 Ways to Transfer Files Between Mac and Android Wirelessly
1.
4 Ways to Transfer Files Between Mac and Android Wirelessly
1.
 5 Easiest Ways to Transfer Files From iPhone to Mac
AirDrop is the most popular way to transfer files from an iPhone to a Mac.
5 Easiest Ways to Transfer Files From iPhone to Mac
AirDrop is the most popular way to transfer files from an iPhone to a Mac.
 3 Fixes for Apple Notes Crashing on Mac Issue
Basic Fixes Check internal storage: Your Mac needs enough internal storage to run apps smoothly.
3 Fixes for Apple Notes Crashing on Mac Issue
Basic Fixes Check internal storage: Your Mac needs enough internal storage to run apps smoothly.
The article above may contain affiliate links which help support Guiding Tech. The content remains unbiased and authentic and will never affect our editorial integrity.