Method 1: Format a Hard Drive With File Explorer
The File Explorer in Windows 11 makes it simple to format a hard drive on your PC. The following steps will work for both internal and external drives.
Step 1: Press the Windows key + E to open File Explorer.
Step 2: Navigate to This PC. Under Devices and drives, right-click on your drive, and select Format.

Step 3: In the Format window that opens, select your preferred file system. Select NTFS if you intend to use the drive solely on a Windows computer. If you want to use the drive on Windows or Mac, select exFAT instead.

Step 4: In the Volume label text box, enter a name for your drive and check the Quick Format box. Then, click the Start button.
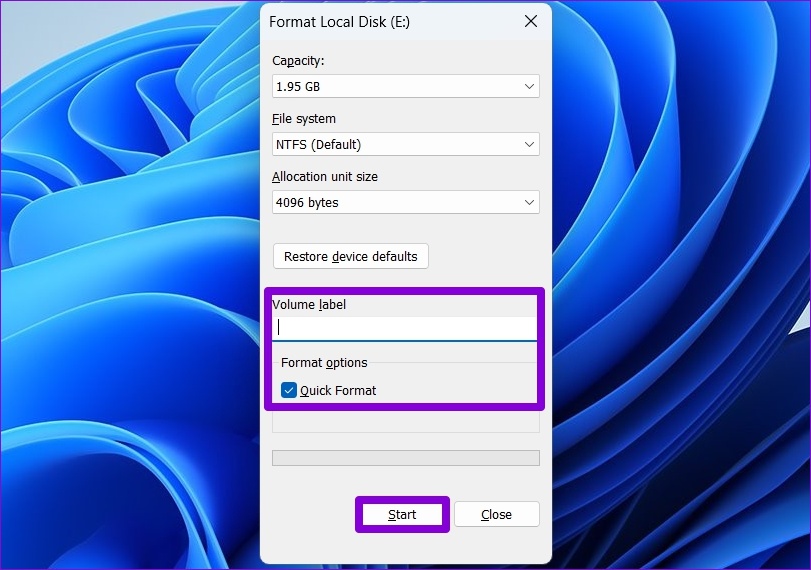
Note: When you select Quick Format, Windows skips checking your drive for errors to expedite the process. However, if you’re planning to retire the storage drive, uncheck the Quick Format box to make your data irrecoverable.
Step 5: Click OK to confirm.

Method 2: Format a Hard Drive Using the Settings App
Windows 11’s Settings app has a dedicated Storage section to let you manage and format the drives connected to your PC. Here’s how to access it.
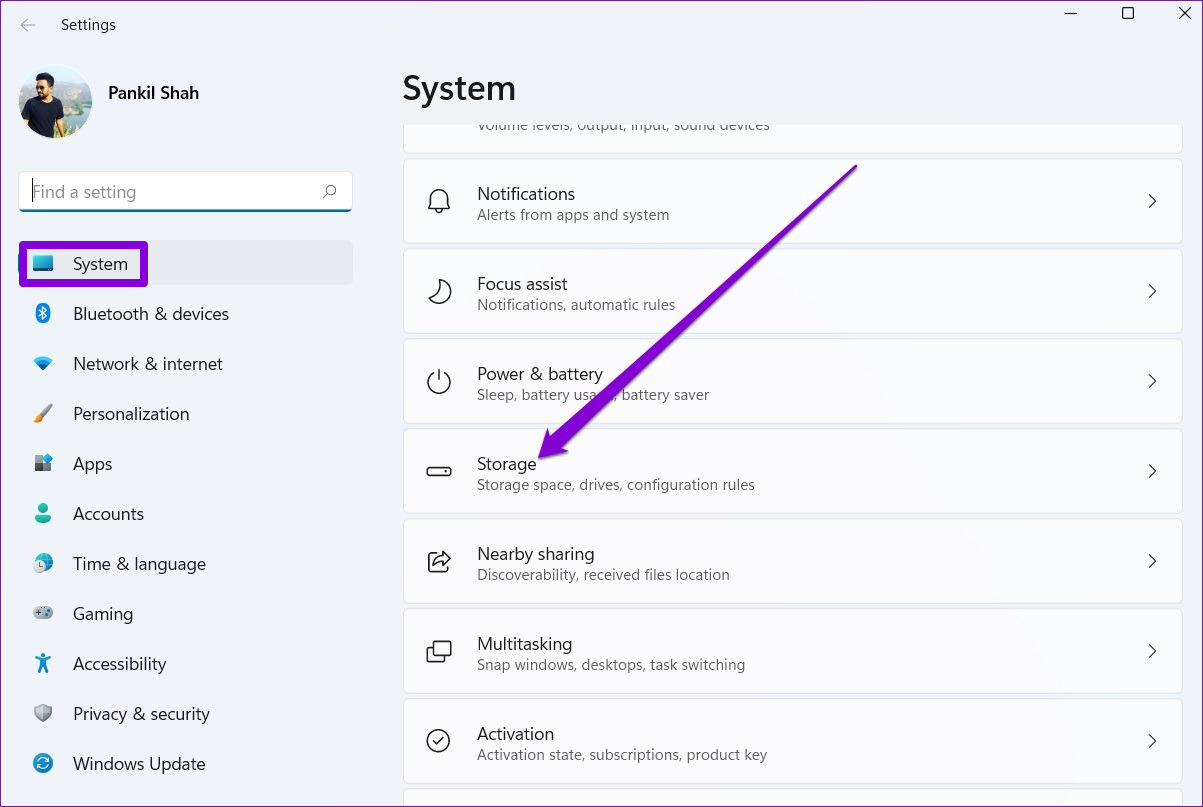
Step 1: Press the Windows key + I to launch the Settings app and head to System > Storage.
Step 2: Click on Advanced storage settings to expand it. Then, select Disk & volumes.

Step 3: Click the Properties button next to the drive you wish to format.

Step 4: Click on Format.

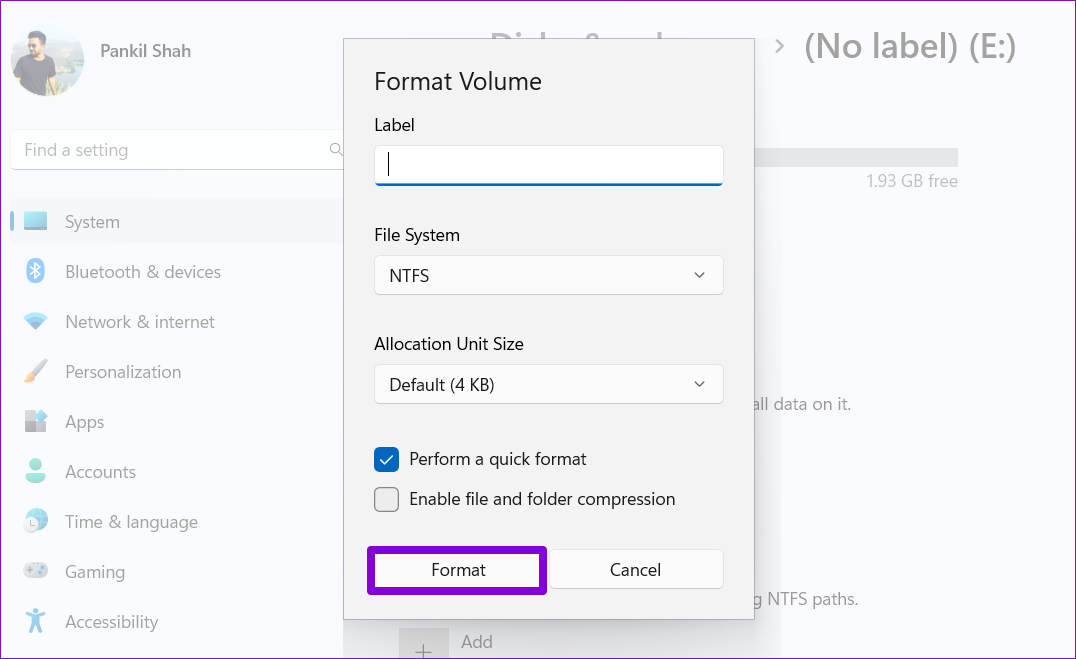
Step 5: In the Format Volume window, name your drive and select a File System. Then, click on Format.
Method 3: Format a Hard Drive Using Disk Management Utility
Disk Management is a handy Windows utility that allows you to change drive letters, manage partitions, and perform other storage-related tasks. You can also use this tool to format an internal or external drive on Windows 11. Here’s how.
Step 1: Press the Windows key + R to open the Run dialog box. Type diskmgmt.msc in the Open field and press Enter.
Step 2: All the drives are in the bottom half of the window. Right-click on your drive and select Format.

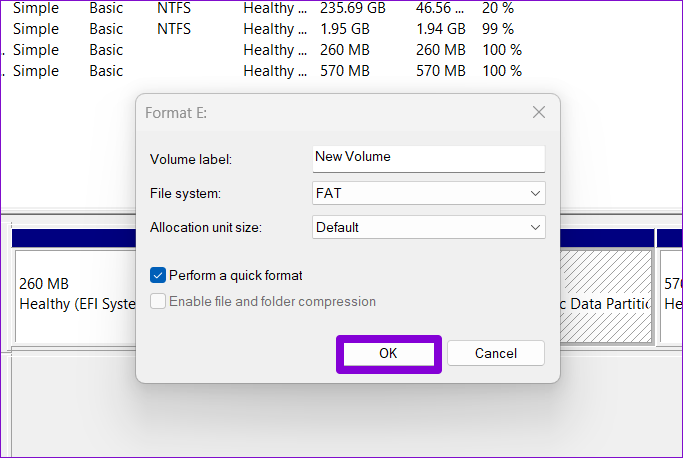
Step 3: In the Volume label field, enter the drive’s name and select the preferred file system. Then, check the Perform a quick format option and click OK.
Method 4: Format a Hard Drive With Command Prompt
Typically, the Command Prompt is used to process batch files, perform advanced administrative tasks, and repair corrupt system files. However, you can also use it to format a drive.
Step 1: Click the search icon on the taskbar, type command prompt, and select Run as administrator.

Step 2: In the console, run the following commands to view all the available drives. Then, note down your drive’s disk number in the first column.
diskpart

list disk

Step 3: Type the following command to select the drive you wish to format.
select disk N
Replace N in the above command with the disk number noted in the last step.

Step 4: Run the following commands one by one to format your drive.
clean

create partition primary

format FS=NTFS quick

Step 5: Assign a drive letter with the following command.
assign letter=A
Replace A in the above command with any available letter you want to use.

Method 5: Format a Hard Drive With Windows PowerShell
Like Command Prompt, you can also run a few commands in Windows PowerShell to format a hard drive on Windows 11. Here’s what to do.
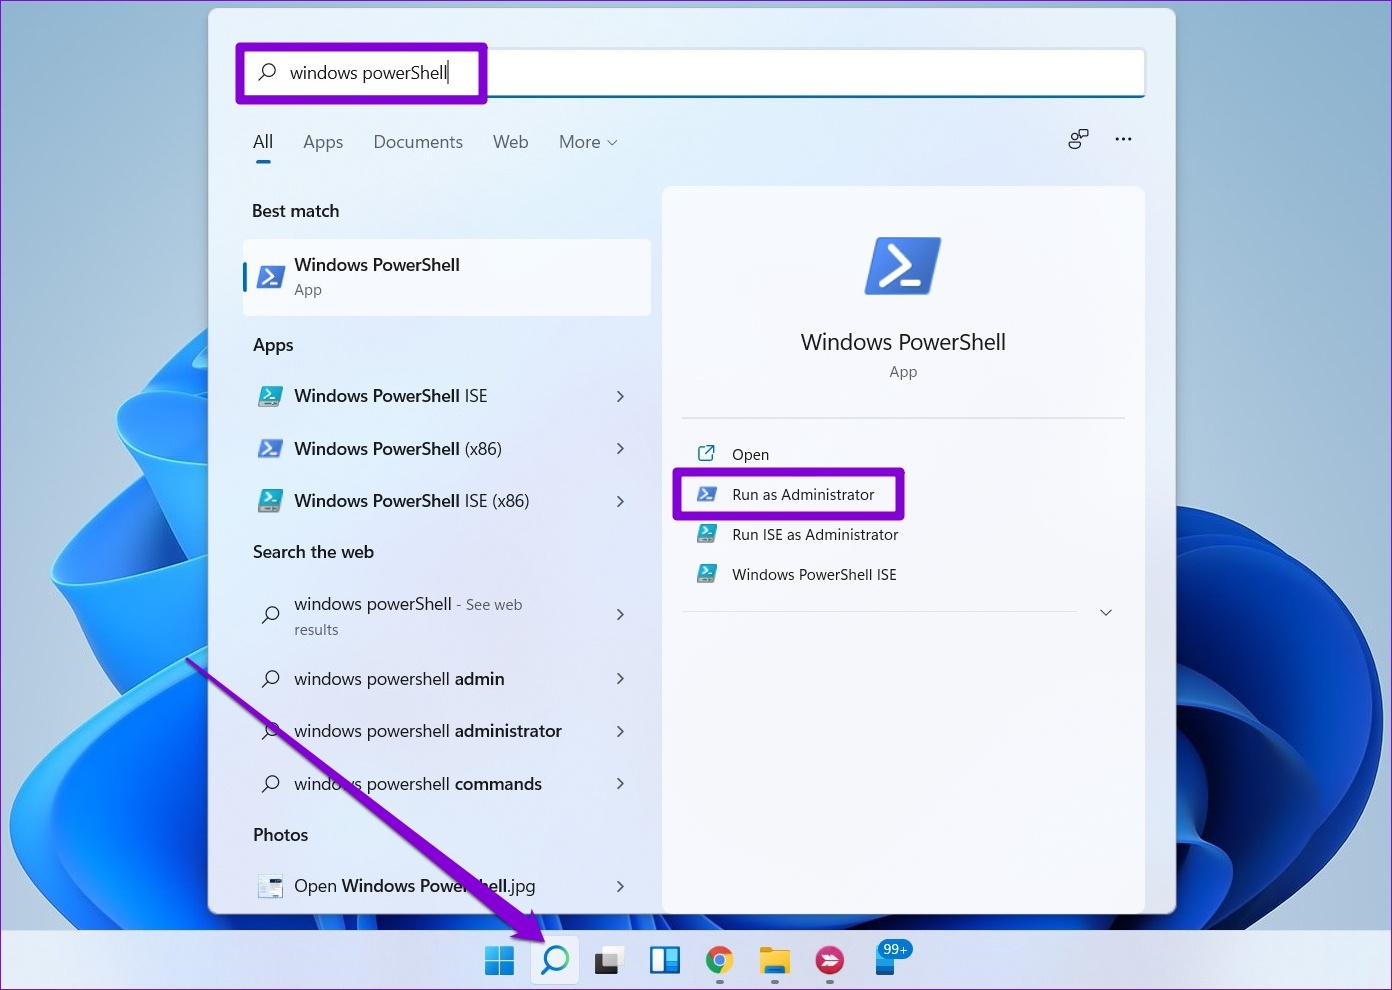
Step 1: Open the search menu, type Windows PowerShell, and click on Run as Administrator.
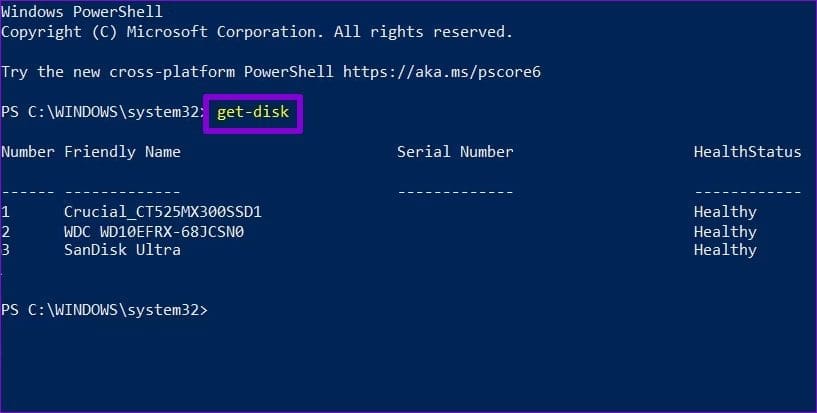
Step 2: Run the following command to view a list of drives connected to your PC. Then, note the drive’s number in the first column.
get-disk
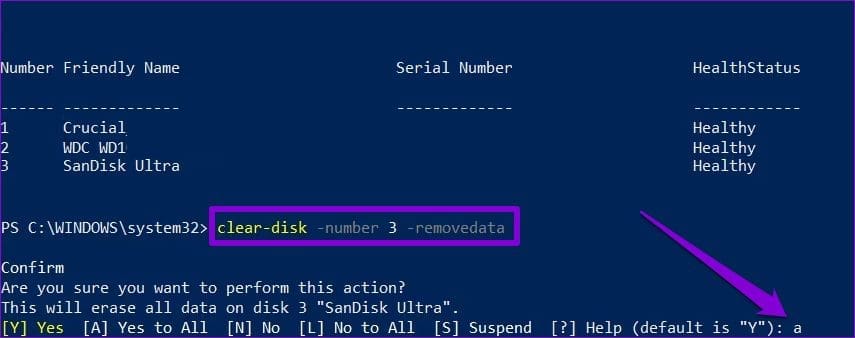
Step 3: Enter the following command to erase all data from your drive.
clear-disk -number N -removedata
Replace N in the above command with the drive number noted in the last step.
Step 4: Type A and press Enter.
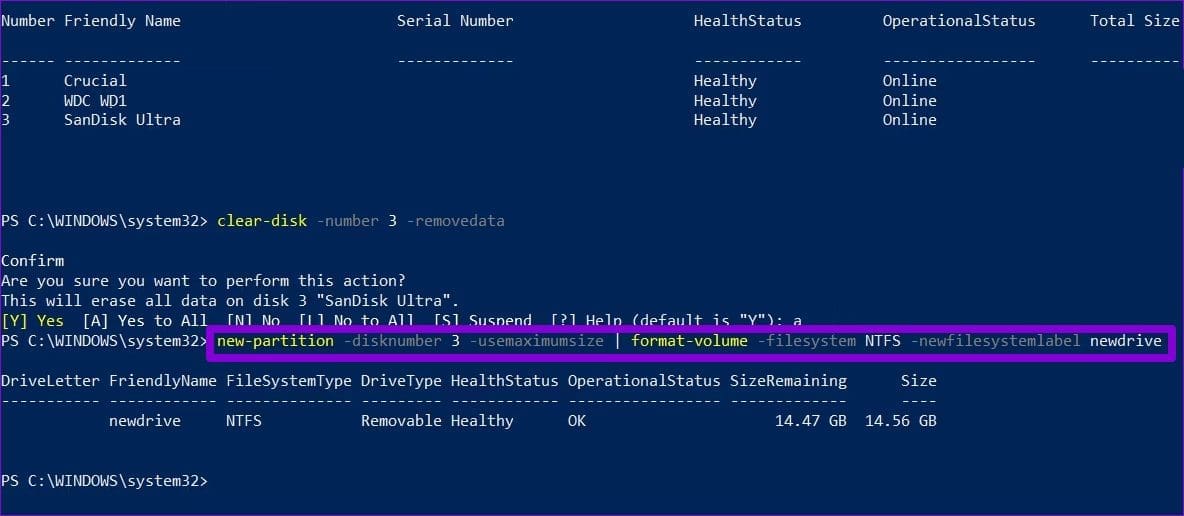
Step 5: Run the following command to create a new partition.
new-partition -disknumber N -usemaximumsize | format-volume -filesystem NTFS -newfilesystemlabel DriveName
Replace N in the above command with the drive number noted in Step 2. Replace DriveName with the actual name you wish to use.
Step 6: Enter the following command to assign a drive letter.
get-Partition -disknumber N | set-partition -newdriveletter A
Replace N with the drive number and A with the drive letter you want to assign.

Was this helpful?
Last updated on 03 September, 2024
1 Comment
Leave a Reply
Read Next
 Top 5 Ways to Format a USB Drive on Windows 11
Formatting a USB drive might seem easy as you can click the delete button to erase all the files the USB drive might store.
Top 5 Ways to Format a USB Drive on Windows 11
Formatting a USB drive might seem easy as you can click the delete button to erase all the files the USB drive might store.
 5 Ways to Format SD Card on Windows 11
Method 1: Format SD Card Using File Explorer The primary method for formatting your SD card is using File Explorer in Windows.
5 Ways to Format SD Card on Windows 11
Method 1: Format SD Card Using File Explorer The primary method for formatting your SD card is using File Explorer in Windows.
 3 Ways to Format Tables in Google Sheets
Method 1.
3 Ways to Format Tables in Google Sheets
Method 1.
 How to Check File Format of a Photo or Video on iPhone
Method 1: Using the Info Option in the Files App The Files app on your iPhone gives you ready access to files stored in iCloud Drive and other third-party cloud
How to Check File Format of a Photo or Video on iPhone
Method 1: Using the Info Option in the Files App The Files app on your iPhone gives you ready access to files stored in iCloud Drive and other third-party cloud
 4 Ways to Fix Firefox Not Opening on Windows 10 and Windows 11
Fix 1: Force Close Firefox Processes Sometimes, Firefox processes may become unresponsive on your PC, resulting in such issues.
4 Ways to Fix Firefox Not Opening on Windows 10 and Windows 11
Fix 1: Force Close Firefox Processes Sometimes, Firefox processes may become unresponsive on your PC, resulting in such issues.
 3 Ways to Launch Windows Terminal on Windows 11
Method 1: Launch Windows Terminal Using the Run Dialog The Run dialog lets you execute any program or command within the same network on your computer.
3 Ways to Launch Windows Terminal on Windows 11
Method 1: Launch Windows Terminal Using the Run Dialog The Run dialog lets you execute any program or command within the same network on your computer.
 5 Ways to Check RAM Type in PC on Windows 10 and Windows 11
Method 1: Check the PC or Laptop Model From the Manufacturer's Site If you use a pre-built rig from a PC maker or have a laptop, the first course of
5 Ways to Check RAM Type in PC on Windows 10 and Windows 11
Method 1: Check the PC or Laptop Model From the Manufacturer's Site If you use a pre-built rig from a PC maker or have a laptop, the first course of
 7 Ways to Make Windows 11 Look Like Windows 10
Method 1: Bring the Windows 10 Start Menu to Windows 11 The start menu is one of the first elements you interact with on a Windows device.
7 Ways to Make Windows 11 Look Like Windows 10
Method 1: Bring the Windows 10 Start Menu to Windows 11 The start menu is one of the first elements you interact with on a Windows device.
The article above may contain affiliate links which help support Guiding Tech. The content remains unbiased and authentic and will never affect our editorial integrity.


Pankil, thank you, thank you, thank you!
Having spent hours trying to find how to make a Toshiba drive show up on explorer, I almost gave up.
I decided to try once more….and found your instructions. Unlike all the others, which seem to skate around the issue, you set out the process, I followed it, and it worked!!!