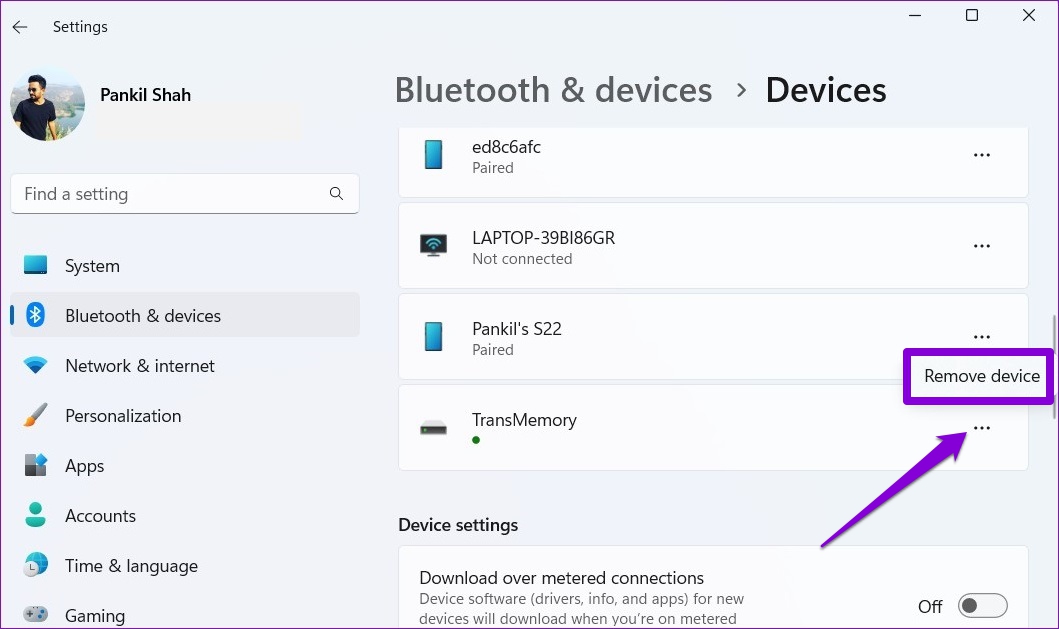
Fix 1: Eject Drive Using the Settings App
Windows provides several options for removing a USB drive. So, if you can’t eject a USB drive from the system tray or File Explorer, use the Windows 11 Settings app instead.
Step 1: Press the Windows key + I to launch the Settings app and navigate to Bluetooth & devices > Devices.

Step 2: Locate your USB drive on the list. Click the three-dot menu icon next to it and select Remove device.
Step 3: Select Yes to confirm.

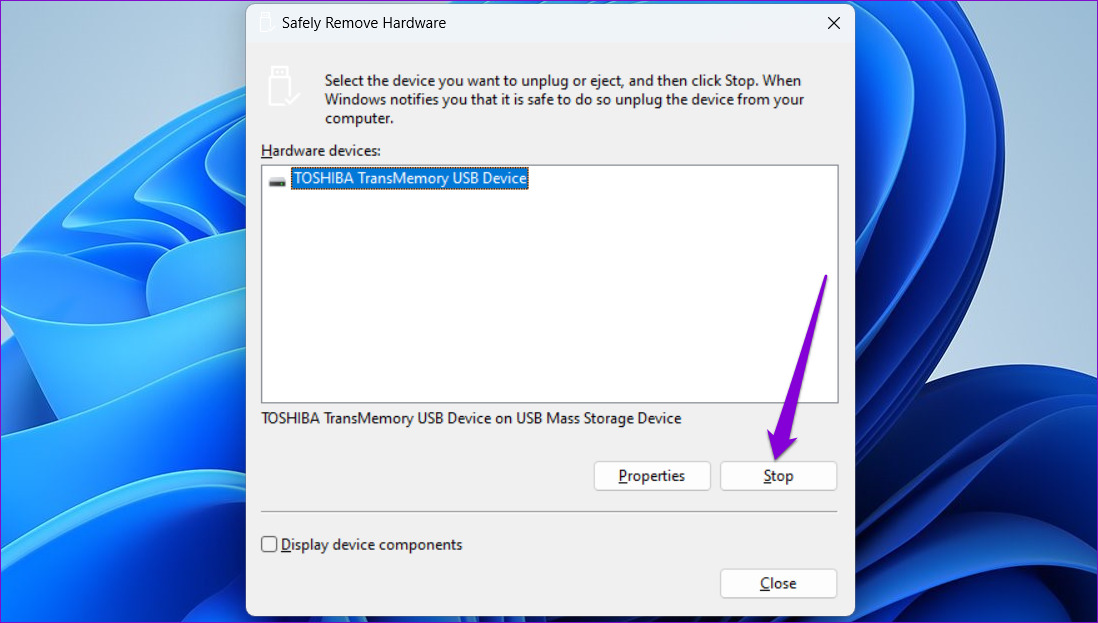
Fix 2: Use Safely Remove Hardware Utility
If the issue persists, you can also use the Safely Remove Hardware utility on Windows to eject a USB drive.
Step 1: Press the Windows key + R to open the Run dialog. Type the following command in the box and press Enter:
RunDll32.exe shell32.dll,Control_RunDLL hotplug.dll

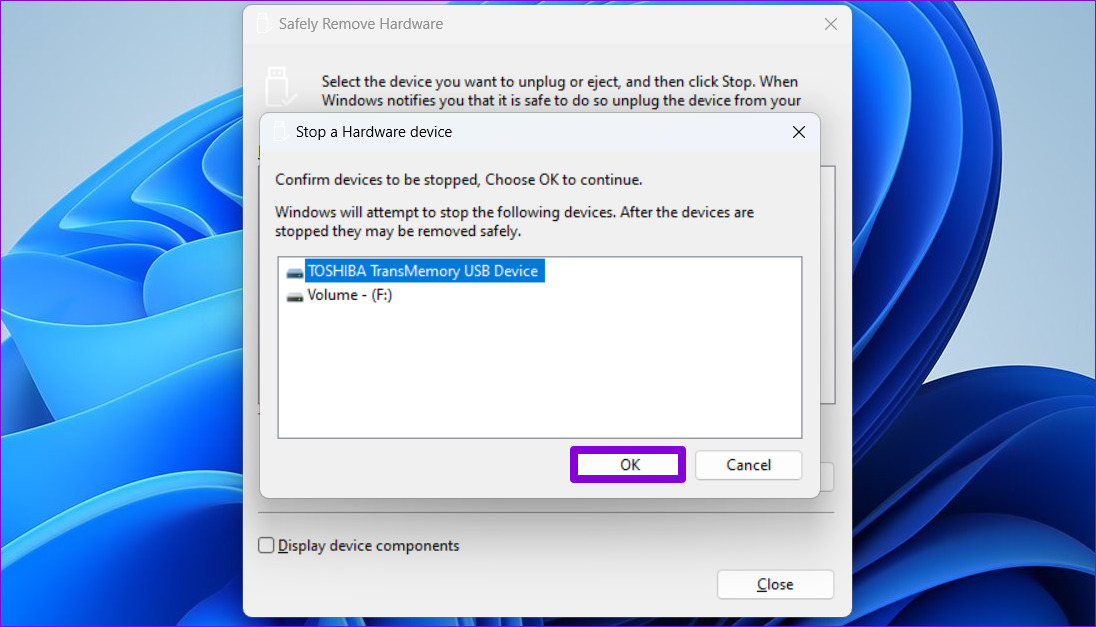
Step 2: Select the USB drive you want to eject and click the Stop button.
Step 3: Select your USB drive again and click OK to confirm.
Fix 3: Configure Device Removal Policy
Windows 11 employs the quick removal policy for all USB devices by default. However, if you wish to eject your drives manually, you must configure its removal policy by following the steps below.
Step 1: Press the Windows key + S to open the search menu, type device manager, and press Enter.
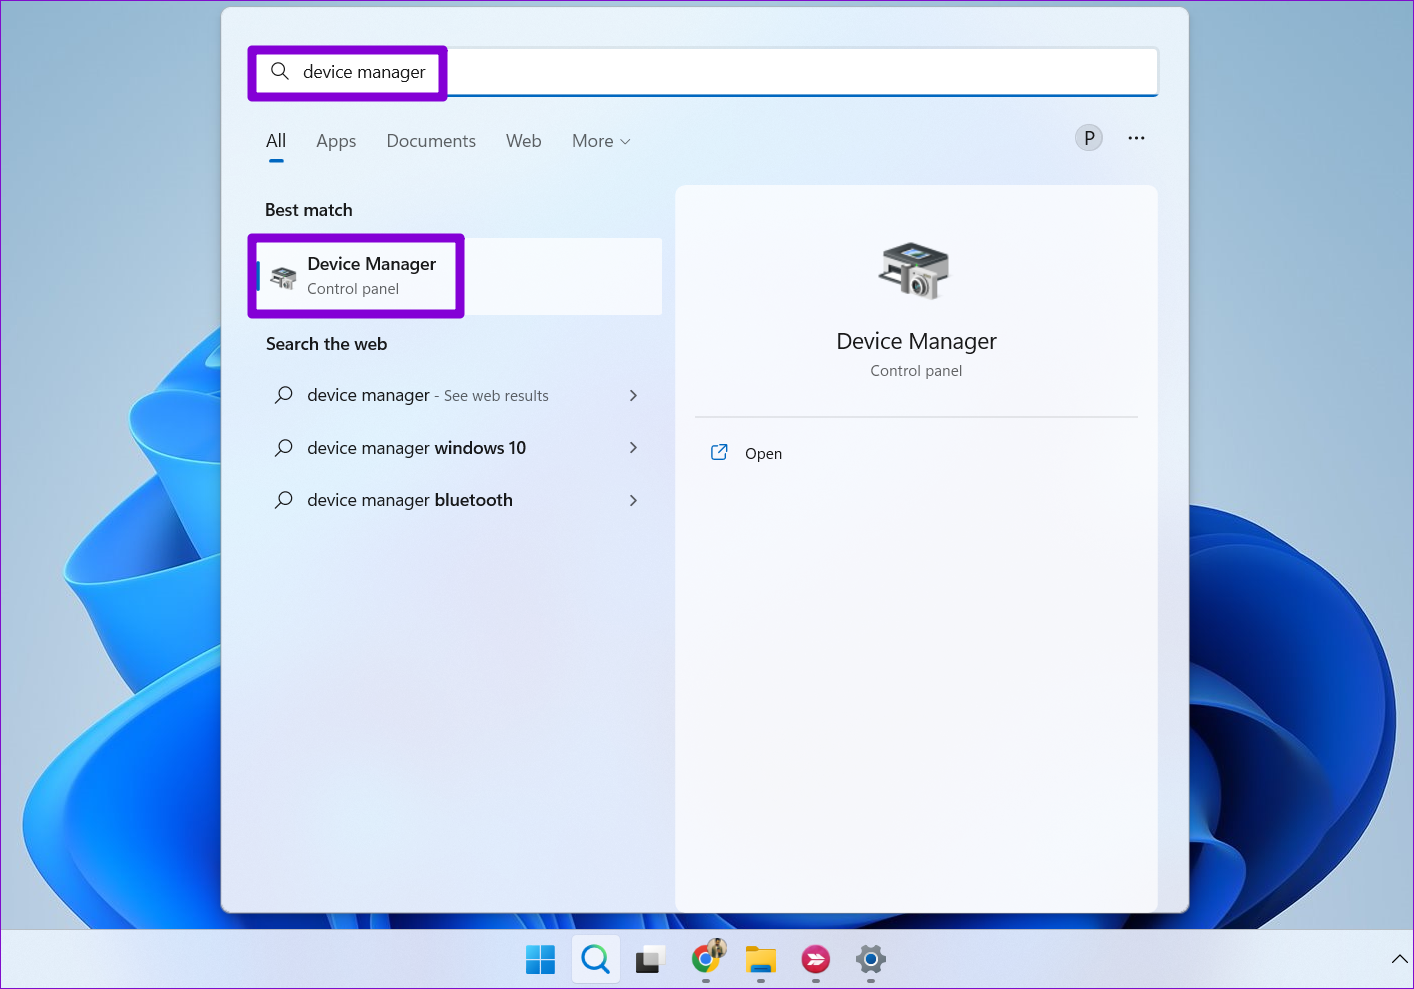
Step 2: Expand Disk drives, right-click on your USB drive, and select Properties.

Step 3: In the Device Properties window, navigate to the Policies tab and select Better performance. Then, hit OK.

Windows will prompt you to restart your PC for the policy change to take effect. After that, you should see the eject option for your USB drive.
Fix 4: Run Hardware and Devices Troubleshooter
Windows has a dedicated Hardware and Devices troubleshooter that can come in handy in such situations. Running it will allow Windows to scan all the devices connected to the system, including your USB drive, and fix any issues affecting its removal.
Step 1: Open the search menu, type command prompt, and select Run as administrator.

Step 2: In the console, type or copy and paste the following command and press Enter:
msdt.exe -id DeviceDiagnostic
Step 3: In the Hardware and Devices window, click Next to run the troubleshooter.

If the automatic repair pops up, apply the suggested fixes. Try to eject the USB drive to see if it works.
Fix 5: Update USB Drivers
Windows 11 may not eject a USB drive due to faulty or corrupted drivers. You can try updating those drivers using the Device Manager to see if that fixes the issue.
Step 1: Open Device Manager using the search menu.
Step 2: Double-click Universal Serial Bus Controllers to expand it. If there’s a yellow exclamation mark next to an entry, right-click on it and select Update driver.

From there, follow the on-screen prompts to finish updating the drivers. After that, you should eject USB drives as usual.
Was this helpful?
Last updated on 25 April, 2024
Read Next
 6 Ways to Safely Eject a USB Drive on Windows 11
Method 1: Eject a USB Drive From System Tray The easiest way to eject a USB drive on Windows 11 is via the System Tray.
6 Ways to Safely Eject a USB Drive on Windows 11
Method 1: Eject a USB Drive From System Tray The easiest way to eject a USB drive on Windows 11 is via the System Tray.
 How to Eject Water From iPhone
Method 1: Use the Water Eject Shortcut Shortcuts on iPhone are an excellent utility.
How to Eject Water From iPhone
Method 1: Use the Water Eject Shortcut Shortcuts on iPhone are an excellent utility.
 Top 9 Ways to Fix Unable to Change Default Programs in Windows 10
The apps offered by Microsoft are great.
Top 9 Ways to Fix Unable to Change Default Programs in Windows 10
The apps offered by Microsoft are great.
 4 Ways to Fix Unable to Install Programs or Software on Windows 11
Try Basic Fixes Check program compatibility: Programs and games that worked perfectly on Windows 10 may not necessarily be compatible with Windows 11.
4 Ways to Fix Unable to Install Programs or Software on Windows 11
Try Basic Fixes Check program compatibility: Programs and games that worked perfectly on Windows 10 may not necessarily be compatible with Windows 11.
 5 Ways to Fix Unable to Print From Microsoft Excel on Windows 11
Fix 1: Save Your Excel File in XPS Format and Try Again If Excel can't respond to print requests, save your file in the XPS format and try again.
5 Ways to Fix Unable to Print From Microsoft Excel on Windows 11
Fix 1: Save Your Excel File in XPS Format and Try Again If Excel can't respond to print requests, save your file in the XPS format and try again.
 4 Ways to Fix Unable to Switch Out of S Mode on Windows 11
Try Basic Fixes Switch out of S mode using the Microsoft Store page link: If you don't see an option to exit S mode in the Settings app, visit the
4 Ways to Fix Unable to Switch Out of S Mode on Windows 11
Try Basic Fixes Switch out of S mode using the Microsoft Store page link: If you don't see an option to exit S mode in the Settings app, visit the
 6 Ways to Fix NVIDIA’s ‘Unable to Change Display Mode’ Error on Windows 11
Method 1: Terminate and Restart the NVIDIA Control Panel It is common for apps and their associated processes to encounter glitches and stop working properly.
6 Ways to Fix NVIDIA’s ‘Unable to Change Display Mode’ Error on Windows 11
Method 1: Terminate and Restart the NVIDIA Control Panel It is common for apps and their associated processes to encounter glitches and stop working properly.
 3 Ways to Fix Unable to Sign in to Microsoft OneNote on Windows
Fix 1: Remove OneNote Credentials From Credential Manager The Credential Manager in Windows stores login details for all your apps.
3 Ways to Fix Unable to Sign in to Microsoft OneNote on Windows
Fix 1: Remove OneNote Credentials From Credential Manager The Credential Manager in Windows stores login details for all your apps.
The article above may contain affiliate links which help support Guiding Tech. The content remains unbiased and authentic and will never affect our editorial integrity.