Fix 1: Verify Screen and Sleep Settings
Your first step is to check the screen and sleep settings in Windows 11 and ensure that you haven’t disabled sleep mode accidentally. Here’s how you can go about it.
Step 1: Press the Windows key + I to open the Settings app and head to System > Power & battery.

Step 2: Click on Screen and sleep to expand it.
Step 3: Set your preferred sleep mode duration using the drop-down menus next to each option.

Once you make the above changes, Windows should enter sleep mode after the specified amount of time.
Fix 2: Disable Wake Timers and Hybrid Sleep Mode
Such issues can also arise if your PC is set to wake up from sleep after a set duration or if the hybrid sleep mode is enabled. Here’s what you can do to fix it.
Step 1: Click the search icon on the taskbar, type control panel in the box, and press Enter.

Step 2: In the Control Panel window, use the drop-down menu in the top-right corner to change the view type to Large icons. Then, go to Power Options.

Step 3: Click the Change plan settings option next to your active power plan.

Step 4: Click the Change advanced power settings option.

Step 5: In the Power Options window, go to Sleep > Allow wake timers.

Step 6: Use the drop-down menu next to On battery and Plugged in to select Disable from the list. Then, hit Apply to save changes.

Step 8: Open the Power Options window again and expand the Allow hybrid sleep menu. Set the On battery and Plugged in values to Off and hit Apply.

Fix 3: Prevent Your Mouse and Network Adapter From Waking Your PC
If your computer won’t go to sleep on Windows 11, it could be because your mouse or the network adapter is configured to wake your PC from sleep. Here’s what you can do to stop that.
Step 1: Press the Windows key + S to open the search menu, type in device manager, and press Enter.
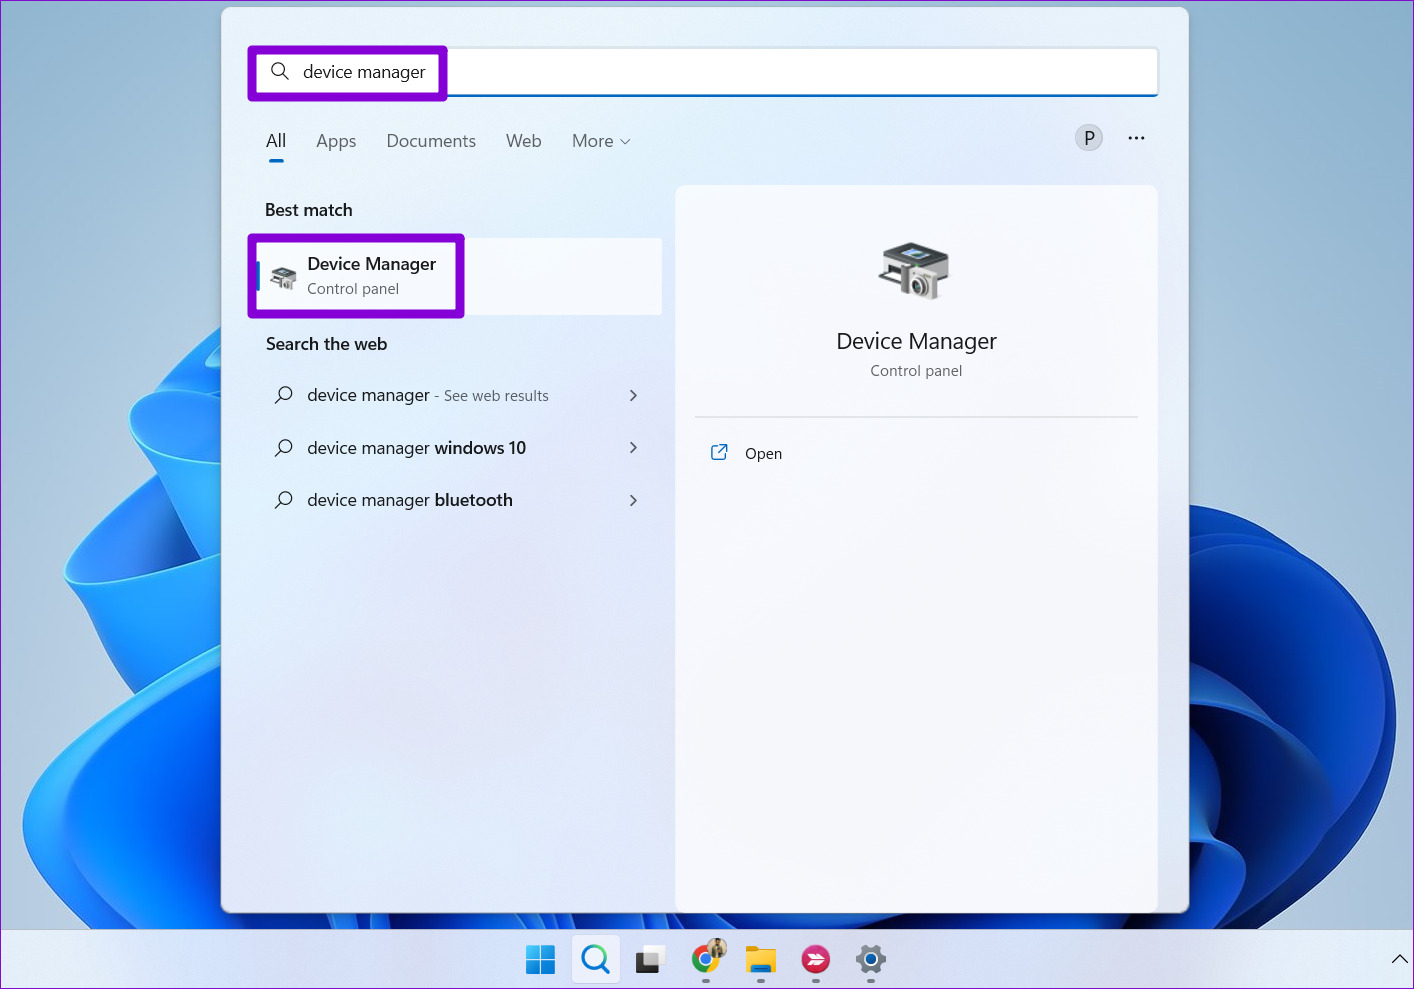
Step 2: Click on Mice and other pointing devices to expand it.
Step 3: Right-click on your mouse and select Properties from the list.

Step 4: Under the Power Management tab, uncheck the box that reads Allow this device to wake the computer option. Then, click OK.

You’ll need to repeat the above steps for your network adapter as well. For that, expand the Network adapters in the Device Manager window. Then, right-click on your network adapter and select Properties. Then, uncheck the Allow this device to wake the computer option, and hit OK.

Fix 4: Disable Fast Startup
The fast startup feature can occasionally interfere with the sleep timer and prevent Windows from entering sleep mode. So, if the problem persists, you can try disabling fast startup on your PC.
Step 1: Open the Control Panel and select Power Options.
Step 3: Click the Choose what the power buttons do option on the left sidebar.

Step 3: Click on Change settings that are currently unavailable.

Step 4: Uncheck the box that reads Turn on fast startup (recommended), and click the Save Changes button at the bottom.

Restart your PC after this and check if the sleep mode works.
Fix 5: Identify and Close Programs Keeping Your PC Awake
There’s a chance that one of your background apps or processes is preventing Windows from going to sleep. If that seems to be the case, you can use the command prompt to identify those apps and close them manually. Here’s how.
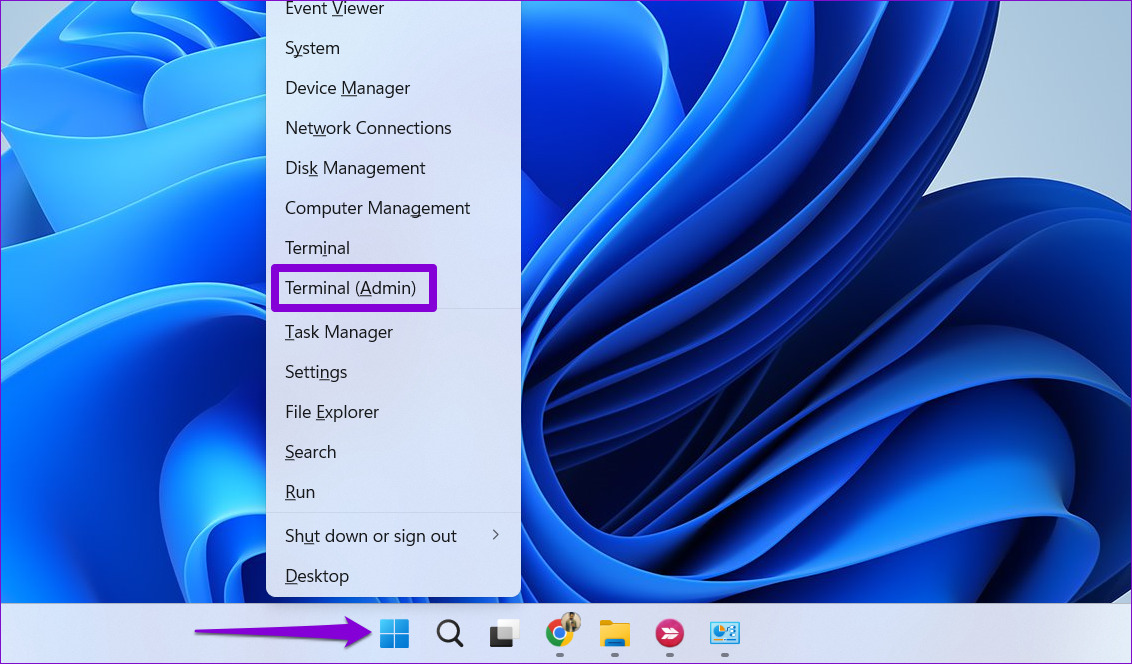
Step 1: Right-click on the Start icon and select Terminal (Admin) from the list.
Step 2: In the console, paste the following command and press Enter.
Powercfg /Requests

From the results, close any apps or programs that may be keeping your PC from activating sleep mode. After that, sleep mode should work normally.
Fix 6: Disable Your Screen Saver
At times, the screen saver settings on Windows can interfere with the computer entering sleep mode. To check for this possibility, you can try disabling your screen saver and see if that helps.
Step 1: Press the Windows key + I to open the Settings app and go to Personalization > Lock screen.

Step 2: Under Related settings, click on Screen saver.

Step 3: Use the drop-down menu under Screen saver and select None. Then, click Apply followed by OK.

Fix 7: Reset Your Power Plan
If the sleep mode is still not working in Windows, you can try resetting your power plan to its default configuration. Here are the steps for the same.
Step 1: Press the Windows key + R to open the Run dialog box. Type powercfg.cpl in the box and press Enter.
Step 2: Click on Change plan settings next to your power plan.

Step 3: Click the Restore default settings for this plan option. Then, select Yes to confirm.

Was this helpful?
Last updated on 20 June, 2024
Read Next
 10 Best Ways to Fix Windows 10 Won’t Wake up From Sleep Mode Error
The sleep mode in Windows 10 is useful for saving battery juice when taking those much-needed short breaks.
10 Best Ways to Fix Windows 10 Won’t Wake up From Sleep Mode Error
The sleep mode in Windows 10 is useful for saving battery juice when taking those much-needed short breaks.
 4 Ways to Disable Sleep Mode in Windows 11
Method 1: Using the Settings App Whether it's something as simple as changing your desktop background or more advanced tasks like turning off sleep mode, you can accomplish it all
4 Ways to Disable Sleep Mode in Windows 11
Method 1: Using the Settings App Whether it's something as simple as changing your desktop background or more advanced tasks like turning off sleep mode, you can accomplish it all
 8 Ways to Fix Wi-Fi Doesn’t Connect After Sleep in Windows 10
Typically, when you restart your computer or wake it up from sleep or hibernate, the Wi-Fi connects automatically.
8 Ways to Fix Wi-Fi Doesn’t Connect After Sleep in Windows 10
Typically, when you restart your computer or wake it up from sleep or hibernate, the Wi-Fi connects automatically.
 5 Ways to Fix Windows PC Randomly Waking Up From Sleep
Basic Fixes Disable Awake From Powertoys: Open Powertoys and disable the Awake option.
5 Ways to Fix Windows PC Randomly Waking Up From Sleep
Basic Fixes Disable Awake From Powertoys: Open Powertoys and disable the Awake option.
 4 Ways to Fix Mac Display Not Working After Waking From Sleep
Basic Fixes Check screen brightness levels using the keyboard: If your Mac's display doesn't work properly after going into sleep mode, start pressing the Function keys on your Mac to
4 Ways to Fix Mac Display Not Working After Waking From Sleep
Basic Fixes Check screen brightness levels using the keyboard: If your Mac's display doesn't work properly after going into sleep mode, start pressing the Function keys on your Mac to
 3 Ways to Fix Spotify Sleep Timer Missing or Not Working
Basic Fixes Check Spotify server status: If Spotify is currently facing issues in the backend, it might cause issues with the app.
3 Ways to Fix Spotify Sleep Timer Missing or Not Working
Basic Fixes Check Spotify server status: If Spotify is currently facing issues in the backend, it might cause issues with the app.
 4 Ways to Disable Login Screen After Sleep on Windows 11
Method 1: Disable Login After Sleep From Settings The easiest way to skip the login screen after sleep mode is by modifying the sign-in options in the Settings app.
4 Ways to Disable Login Screen After Sleep on Windows 11
Method 1: Disable Login After Sleep From Settings The easiest way to skip the login screen after sleep mode is by modifying the sign-in options in the Settings app.
 How to Fix Windows 10 Shuts Down Instead of Going to Sleep or Hibernating
Windows operating system comes with a lot of simple features that are a real time saver.
How to Fix Windows 10 Shuts Down Instead of Going to Sleep or Hibernating
Windows operating system comes with a lot of simple features that are a real time saver.
The article above may contain affiliate links which help support Guiding Tech. The content remains unbiased and authentic and will never affect our editorial integrity.