Fix 1: Run Printer Troubleshooter
Windows comes with a dedicated printer troubleshooter that can automatically diagnose and fix any printing issues on your PC. It checks all of your printer configurations and corrects any inconsistencies. Here’s how to run it.
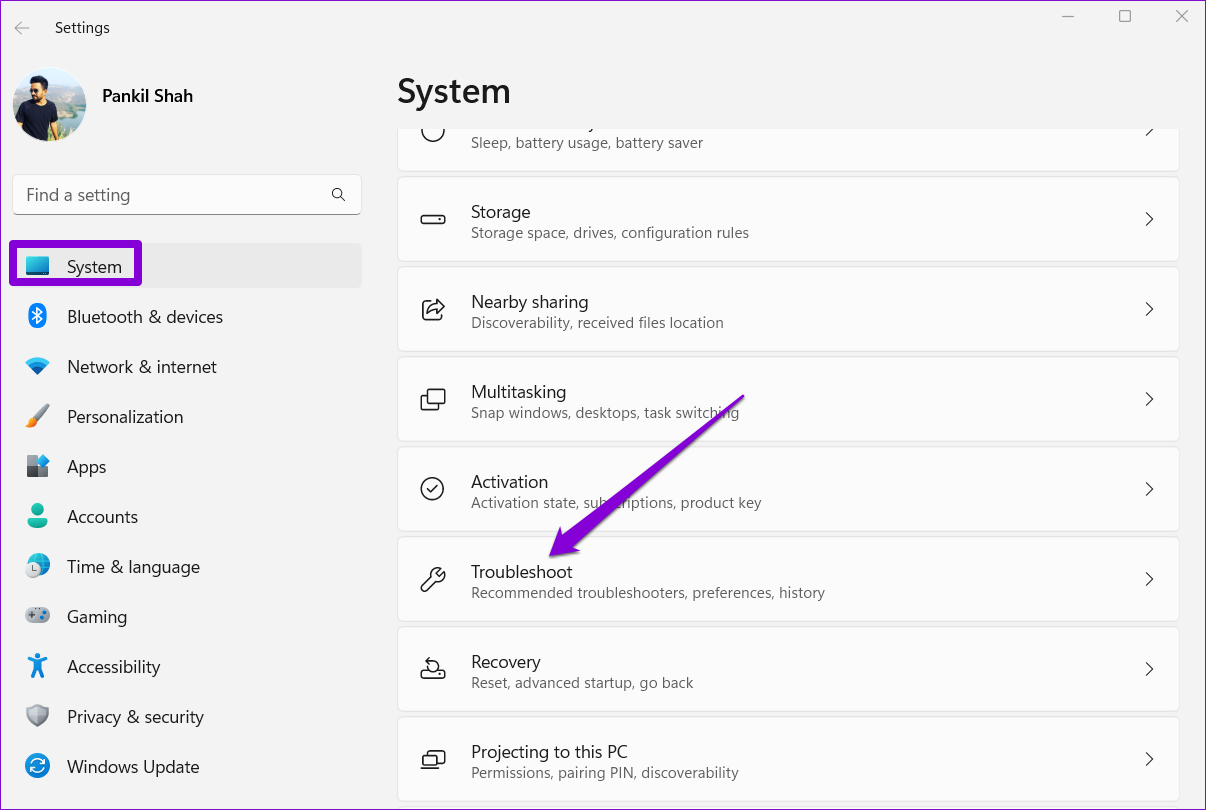
Step 1: Press the Windows key + I to launch the Settings app and head to System > Troubleshoot.
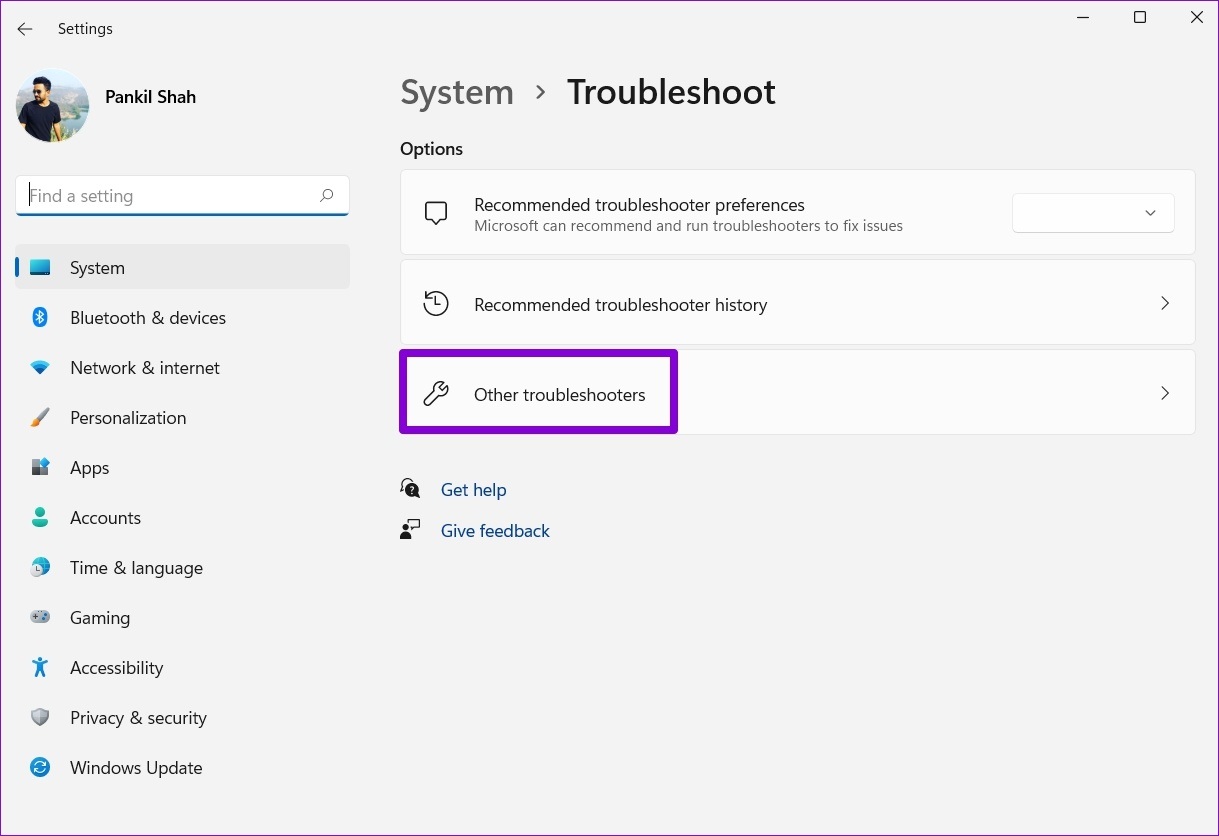
Step 2: Go to Other troubleshooters.
Step 3: Click the Run button next to Printer to begin troubleshooting.
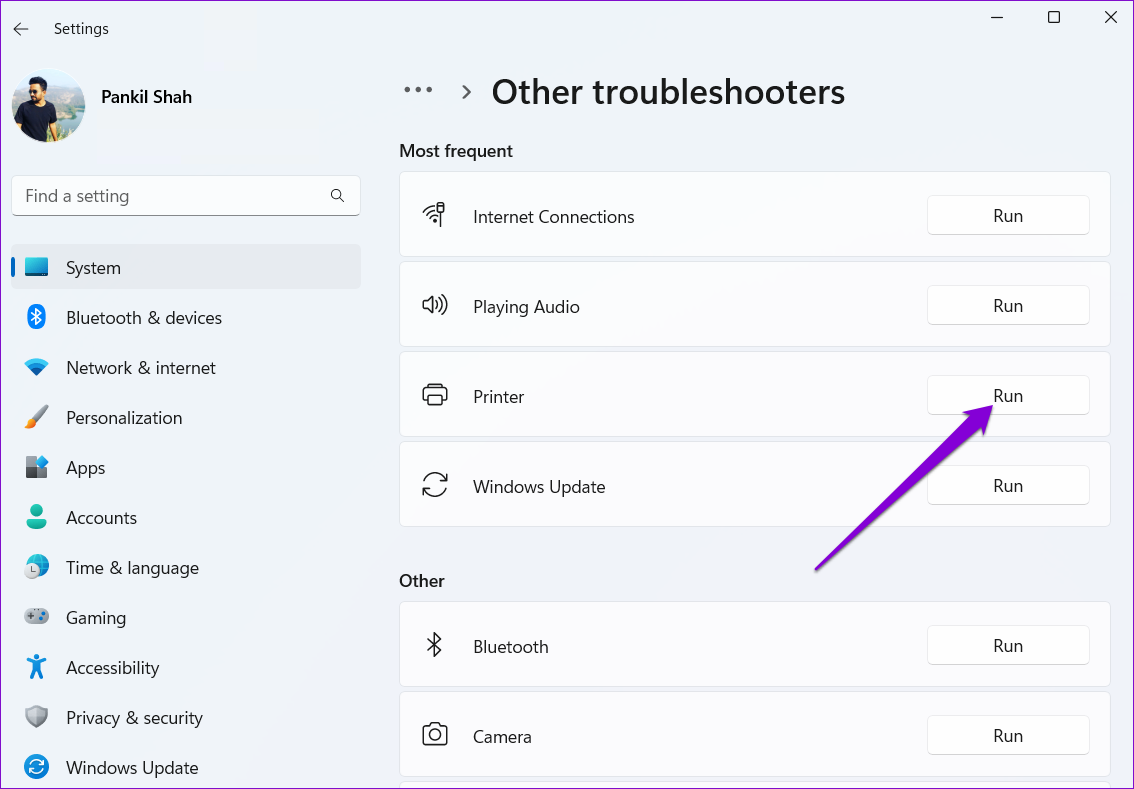
From there, follow the on-screen prompts to finish the troubleshooting process.
Fix 2: Check Print Spooler Service
If the Windows troubleshooter fails to identify any issues, you can check the Print Spooler service on Windows to see if it is properly configured. Here’s how.
Step 1: Press the Windows key + R to open the Run dialog. Type services.msc in the box next to the Open field and press Enter.
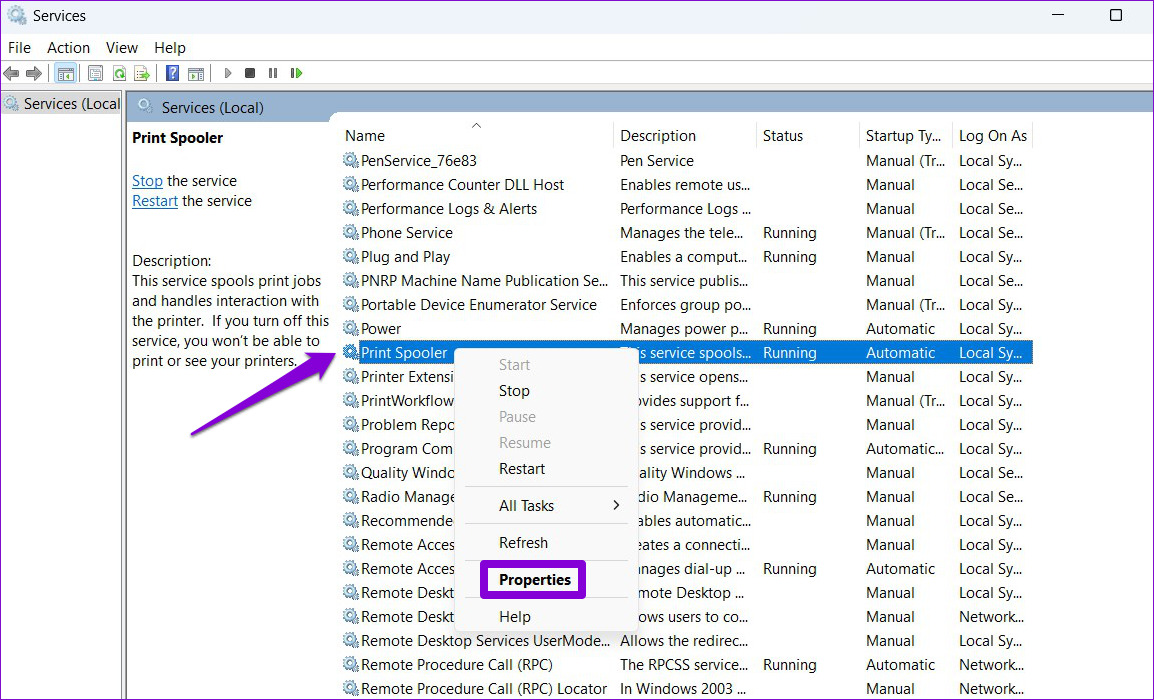
Step 2: In the Services window, scroll down to locate Print Spooler. Right-click on it and select Properties.
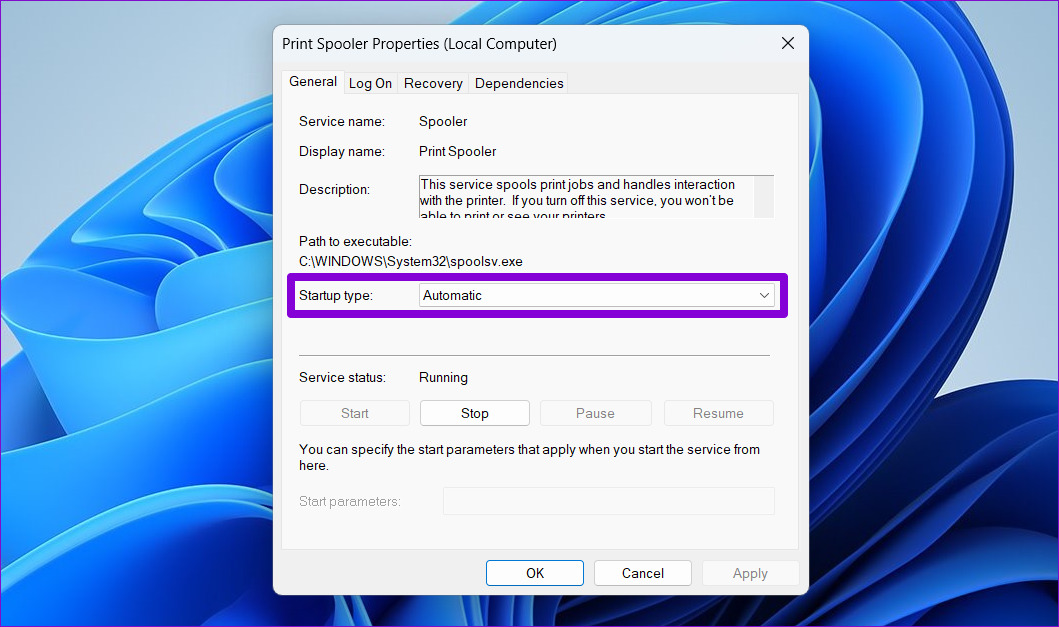
Step 3: Set the Startup type to Automatic from the drop-down, if it isn’t set already.
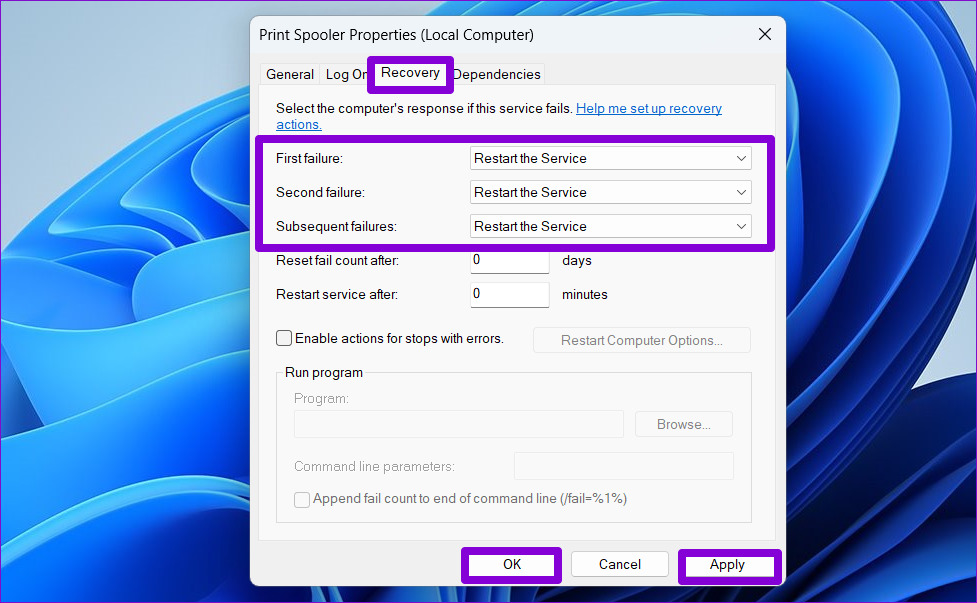
Step 4: On the Recovery tab, use the drop-down menus next to First failure, Second failure, and Subsequent failures to select Restart the Service. Then, click on Apply followed by OK.
Restart your PC and check if the print spooler stops again.
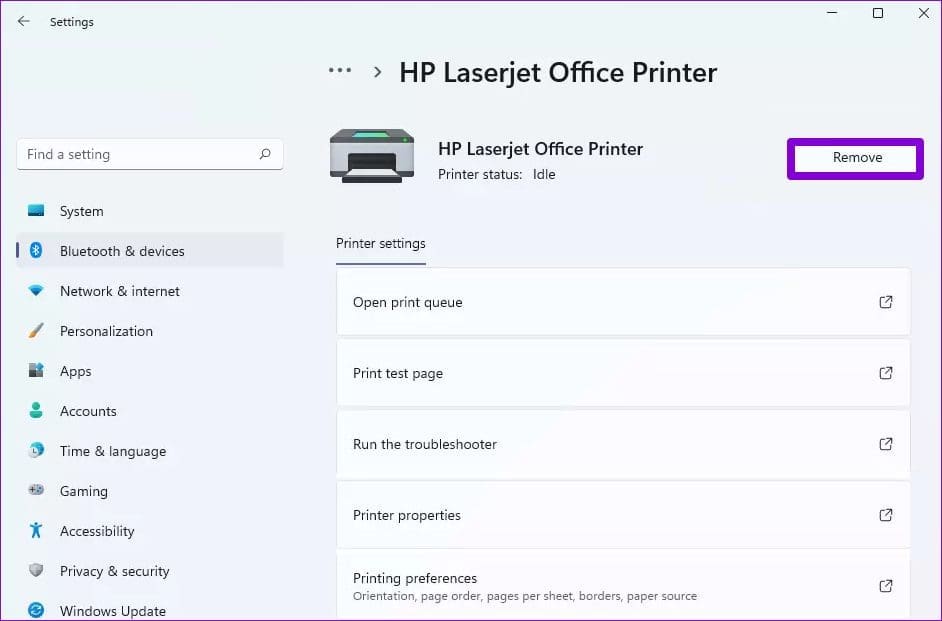
Fix 3: Remove Old Printers
Sometimes, the print spooler service may also stop working if several printers are connected to your PC. You can try deleting some of your old printer devices to see if that helps.
Step 1: Click on the search icon on the taskbar, type in printers & scanners and press Enter.

Step 2: Select the printer you want to remove.
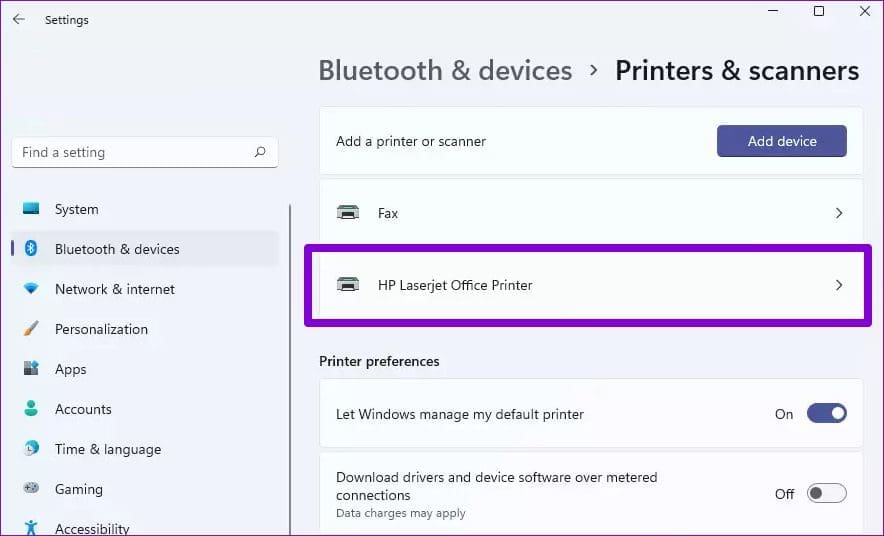
Step 3: Click on the Remove button in the top right corner. Repeat this process to remove unwanted printers and try using the printing services again.
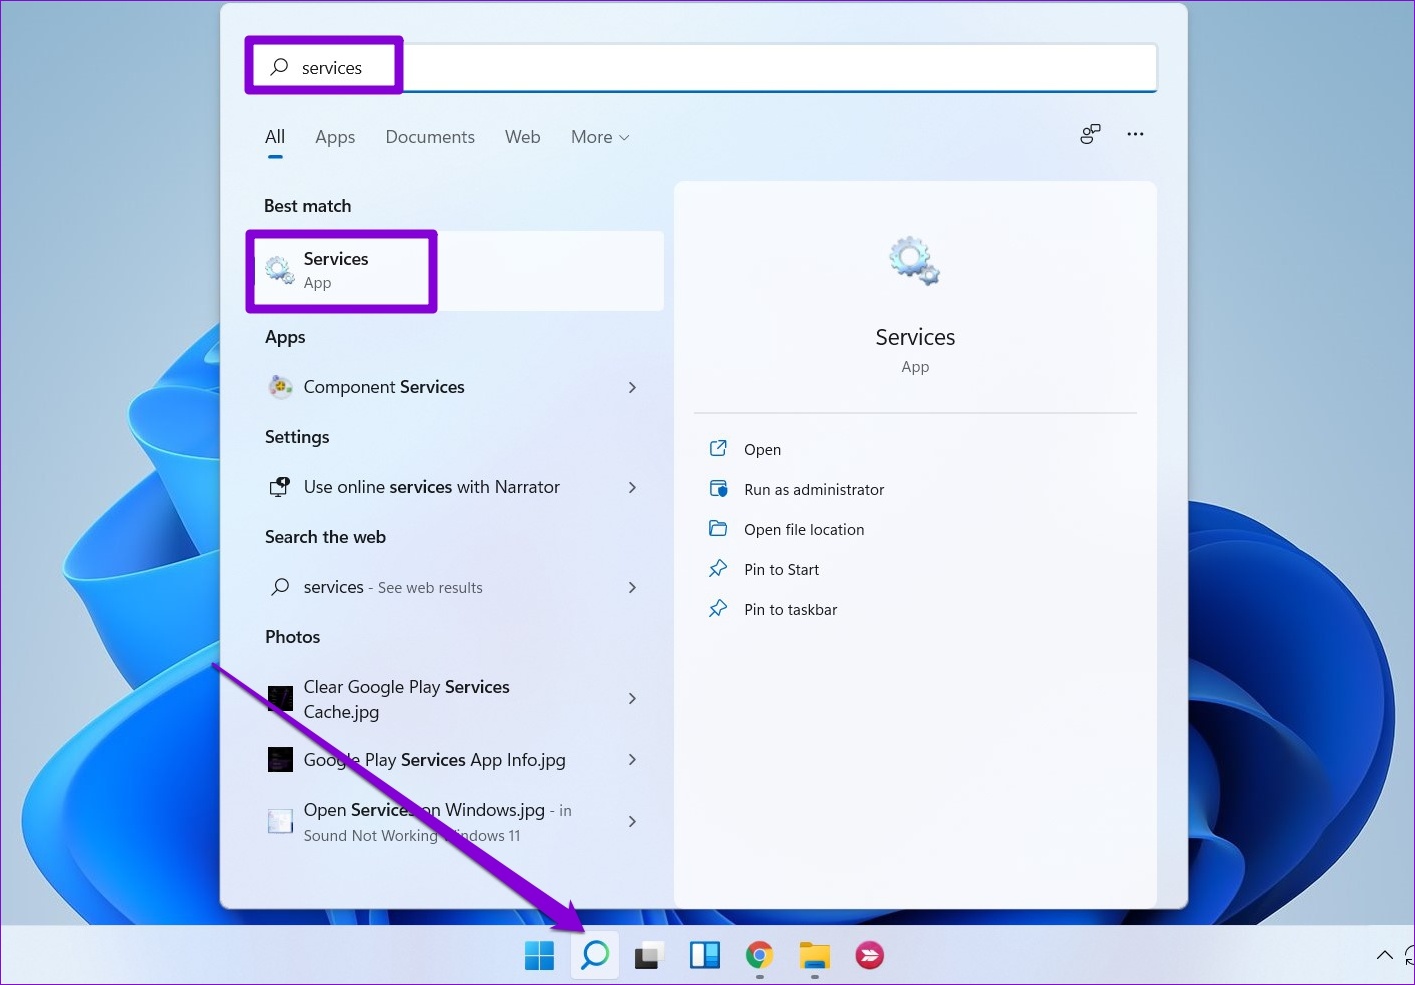
Fix 4: Delete Old Print Spooler Files
Existing print spooler cache data can also interfere with the service and cause it to crash repeatedly when corrupted. In that case, you can delete those old print spooler files to fix the issue.
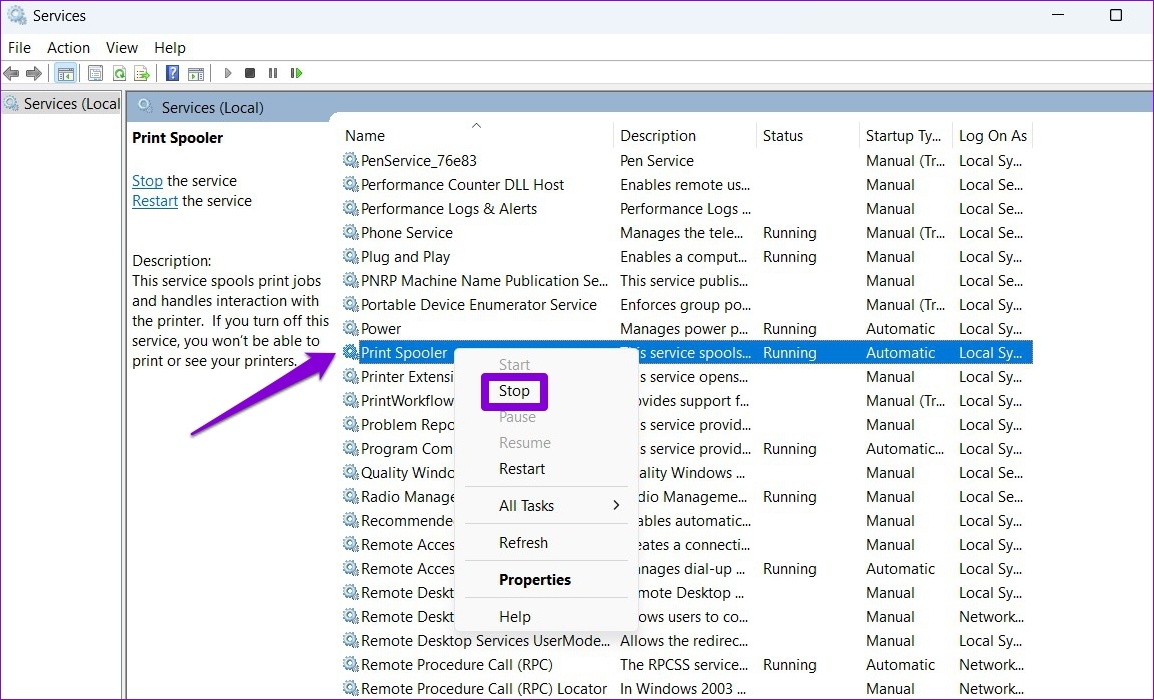
Step 1: Press the Windows key + S to open Windows Search. Type services in the box and select the first result that appears.
Step 2: Right-click on Print Spooler and select Stop.
Step 3: Press the Windows key + E to launch File Explorer on your PC and navigate to the following folder:
C:\Windows\System32\spool\PRINTERS
Step 4: Select all folders and click on the trash icon at the top to delete them.
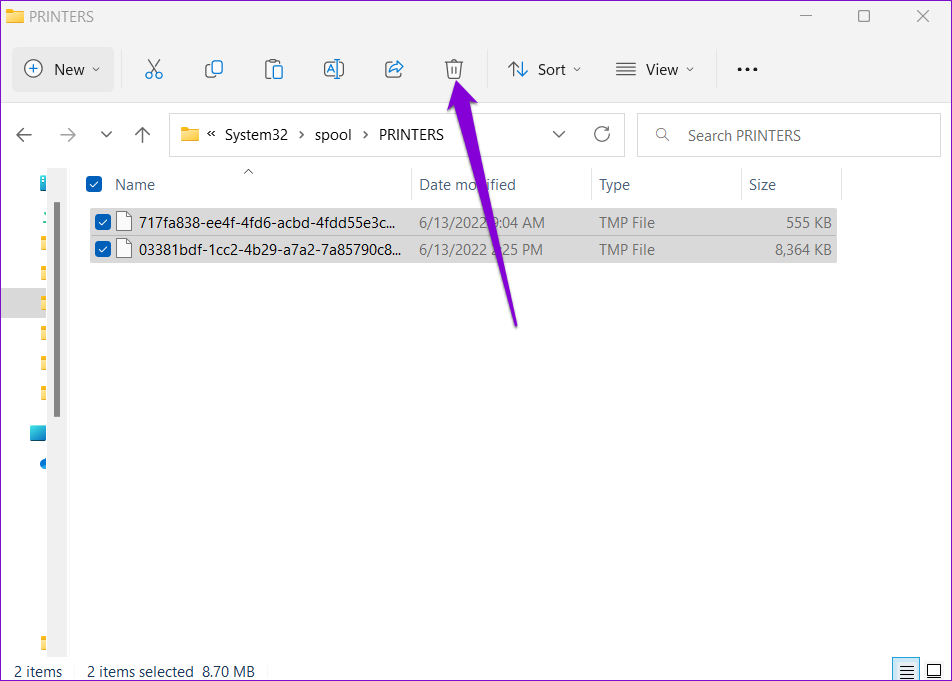
Restart your PC after you delete the files. The print spooler service should start automatically upon reboot.
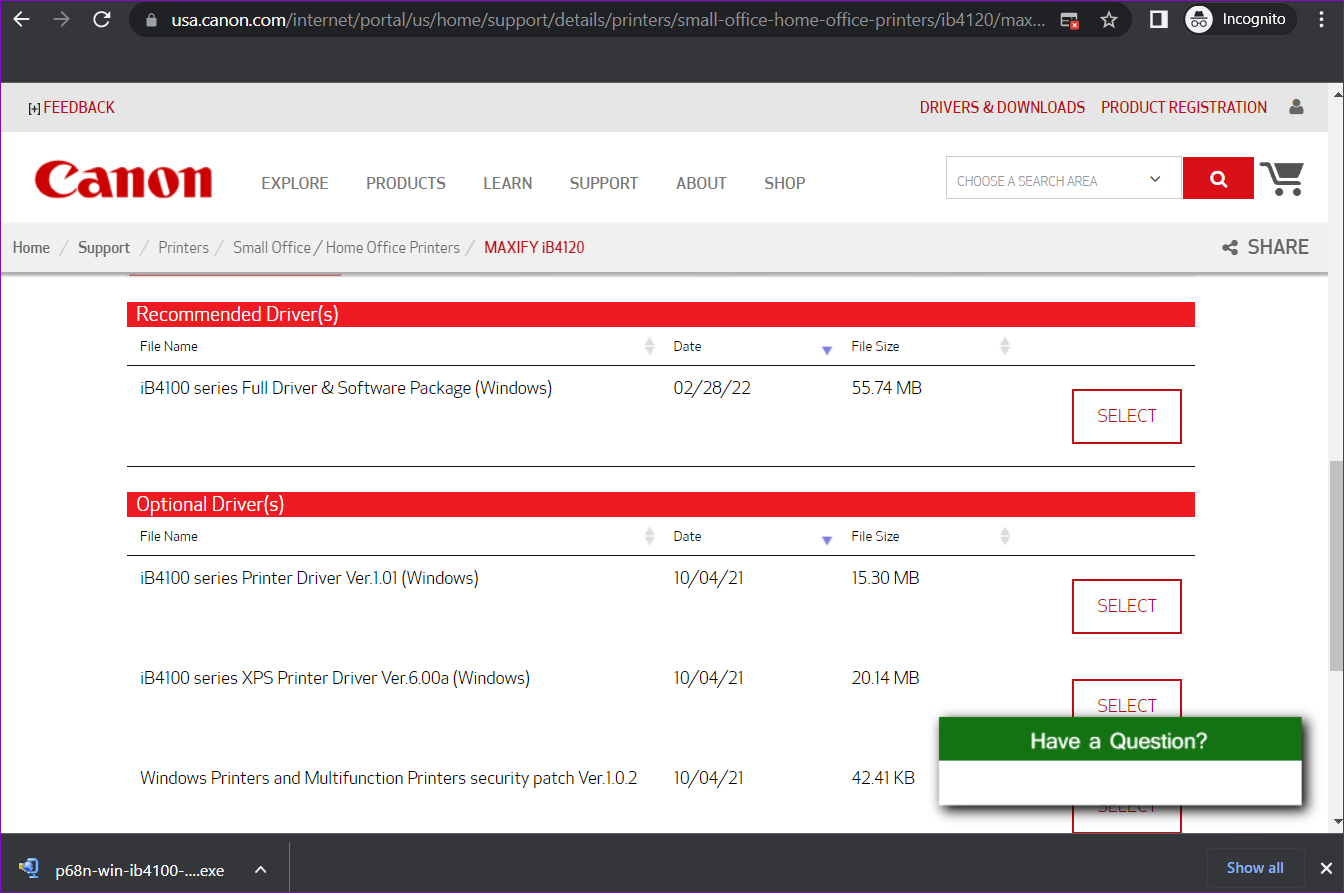
Fix 5: Update Printer Drivers
Issues with your current printer drivers can also cause the print spooler to stop abruptly. If the printer drivers on your PC are outdated or corrupted, then updating them should help more often than not.
To update printer drivers, download the most recent drivers from the respective manufacturer’s website. Then, open the downloaded file to begin the installation.
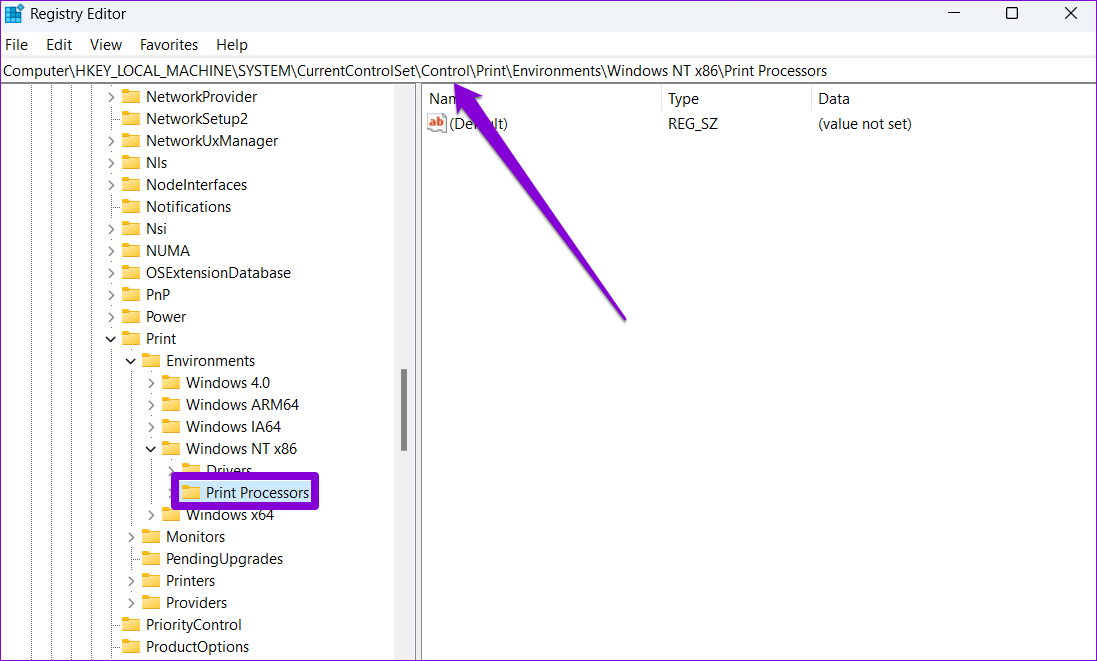
Fix 6: Delete Print Spooler Registry Keys
If none of the above solutions work, you can try deleting a few registry keys associated with the print spooler. Here’s how:
Step 1: Press the Windows key + R to launch the Run dialog box. Type regedit in the box and press Enter.
Step 2: Paste the following path in the address bar at the top to navigate to Print Processors:
Computer\HKEY_LOCAL_MACHINE\SYSTEM\CurrentControlSet\Control\Print\Environments\Windows x64\Print Processors
If you’re using a 32-bit version of Windows, use the following path:
HKEY_LOCAL_MACHINE\SYSTEM\CurrentControlSet\Control\Print\Environments\Windows NT x86\Print Processors
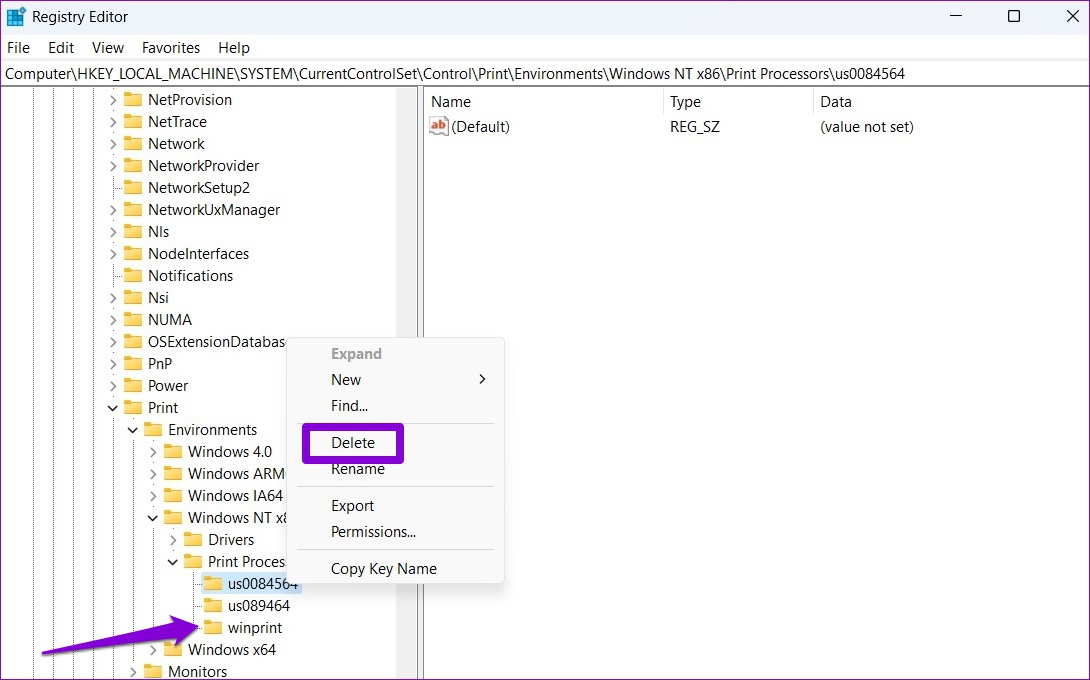
Step 3: Delete all keys inside Print Processors except winprint. To delete a key, right-click on it and select Delete. Click on Yes on the prompt.
Was this helpful?
Last updated on 25 July, 2024
Read Next
 Fix: Background Intelligent Transfer Service (BITS) Keeps Stopping
Fix 1: Set Background Intelligent Transfer Service to Automatic (Delayed Start) If the Background Intelligent Transfer Service or its related services are misconfigured, you must reset them to their default
Fix: Background Intelligent Transfer Service (BITS) Keeps Stopping
Fix 1: Set Background Intelligent Transfer Service to Automatic (Delayed Start) If the Background Intelligent Transfer Service or its related services are misconfigured, you must reset them to their default
 Top 7 Ways to Fix Samsung One UI Home Keeps Stopping Issue
What can be more annoying than the random errors popping up on your Android phone?
Top 7 Ways to Fix Samsung One UI Home Keeps Stopping Issue
What can be more annoying than the random errors popping up on your Android phone?
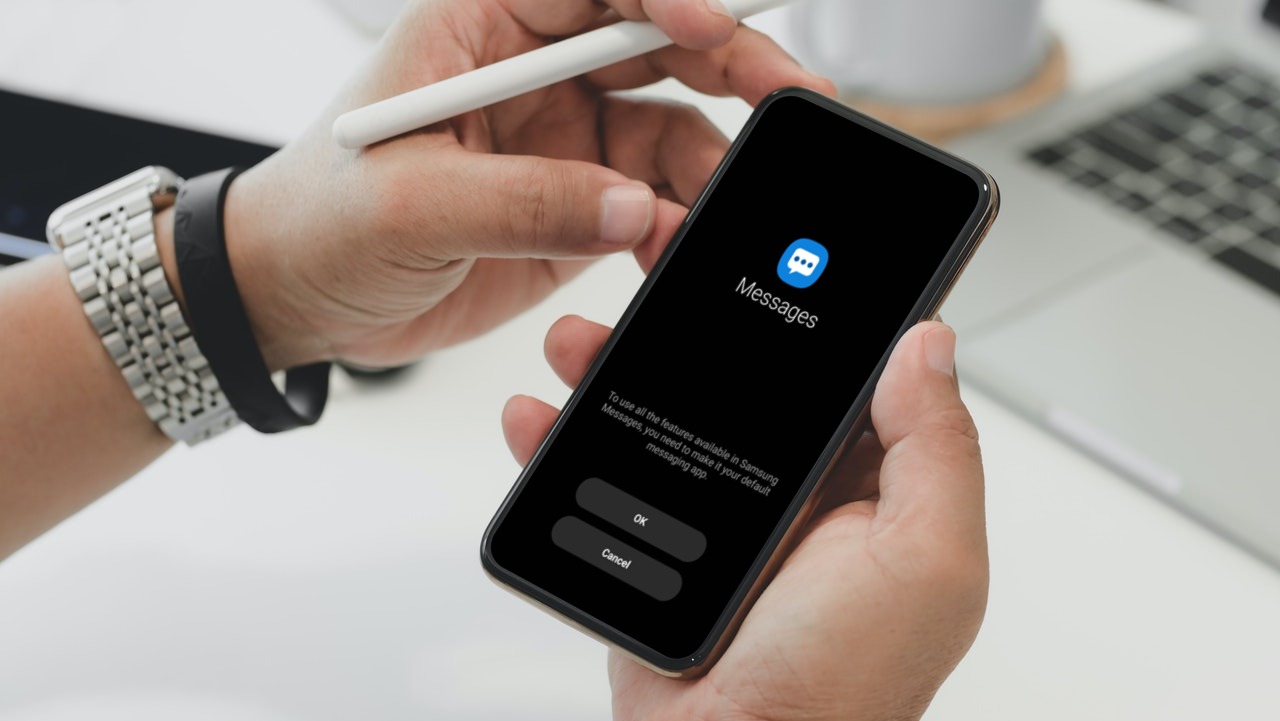 4 Ways to Fix Samsung Messages App Keeps Stopping
Try Basic Fixes Force stop the Messages app: When an app on your phone fails to work properly or stops for no apparent reason, force stop the app and open
4 Ways to Fix Samsung Messages App Keeps Stopping
Try Basic Fixes Force stop the Messages app: When an app on your phone fails to work properly or stops for no apparent reason, force stop the app and open
 5 Ways to Fix Samsung Internet Browser Keeps Stopping on Android
Fix 1: Check Permissions and Force Stop Samsung Internet App Samsung Internet browser requires a few permissions to run on your Android.
5 Ways to Fix Samsung Internet Browser Keeps Stopping on Android
Fix 1: Check Permissions and Force Stop Samsung Internet App Samsung Internet browser requires a few permissions to run on your Android.
 How to Fix if File Manager Keeps Stopping on Android
Basic Fixes: Restart Android phone: Long-press the power button and tap on Restart.
How to Fix if File Manager Keeps Stopping on Android
Basic Fixes: Restart Android phone: Long-press the power button and tap on Restart.
 Top 6 Ways to Fix Print Screen on Windows Not Working Error
Every keyboard, whether external or laptop, comes with a print screen button abbreviated as PrtScr.
Top 6 Ways to Fix Print Screen on Windows Not Working Error
Every keyboard, whether external or laptop, comes with a print screen button abbreviated as PrtScr.
 4 Ways to Fix Microsoft Print to PDF Not Working on Windows 11
Fix 1: Ensure Print to PDF Is Enabled in Windows Features Microsoft Print to PDF integrates into the Print dialog box on your PC.
4 Ways to Fix Microsoft Print to PDF Not Working on Windows 11
Fix 1: Ensure Print to PDF Is Enabled in Windows Features Microsoft Print to PDF integrates into the Print dialog box on your PC.
 5 Ways to Fix Unable to Print From Microsoft Excel on Windows 11
Fix 1: Save Your Excel File in XPS Format and Try Again If Excel can't respond to print requests, save your file in the XPS format and try again.
5 Ways to Fix Unable to Print From Microsoft Excel on Windows 11
Fix 1: Save Your Excel File in XPS Format and Try Again If Excel can't respond to print requests, save your file in the XPS format and try again.
The article above may contain affiliate links which help support Guiding Tech. The content remains unbiased and authentic and will never affect our editorial integrity.