Method 1: Use the Settings App
The easiest way to prevent apps from running in the background is via the Settings app on Windows 11. So, let’s start with that.
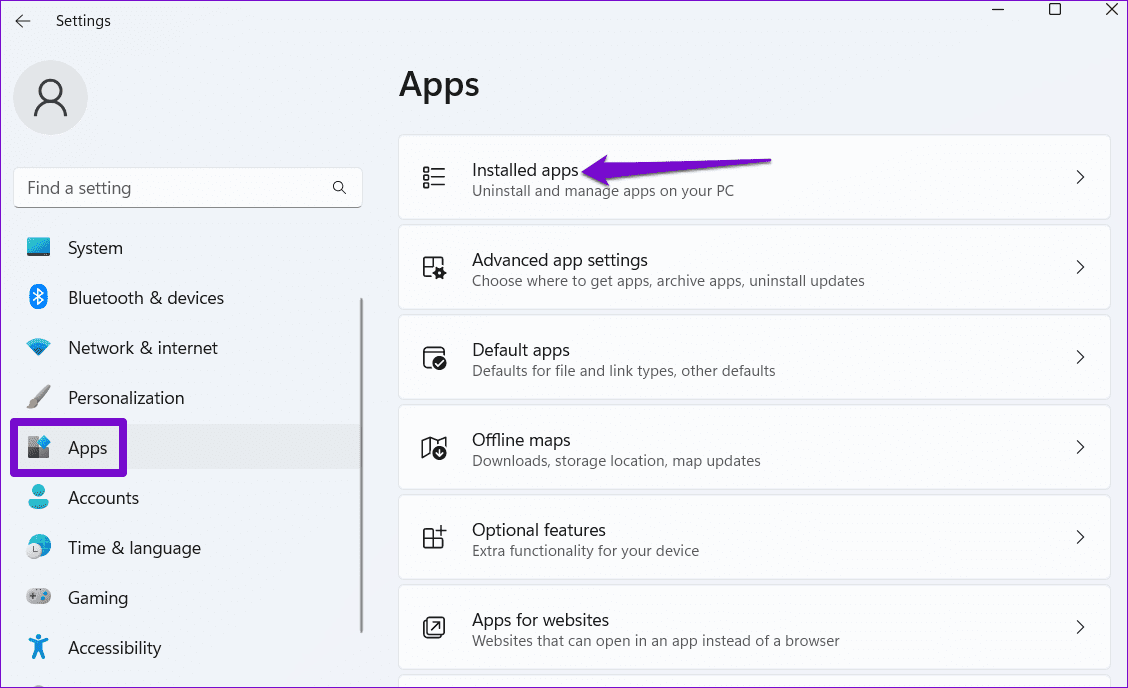
Step 1: Press the Windows key + I to launch the Settings app and head to Apps > Installed apps.
Step 2: Scroll down or use the search bar at the top to locate the app you wish to disable. Click the three-dot menu next to it and select Advanced options.

Step 3: Under Background apps permissions, use the drop-down menu and choose Never.

You can repeat the same steps above to prevent other apps from running in the background.
Method 2: Edit Group Policy
Group Policy on Windows is a useful tool for making system-wide changes in Windows. You can also use the Group Policy Editor to disable all the apps from running in the background at once.
Note: Group Policy Editor is not available in the Windows 11 Home edition.
Step 1: Press the Windows key + R to open the Run dialog. Type in gpedit.msc and press Enter.
Step 2: In the Group Policy window, use the left pane to navigate to the following folder.
Computer Configuration\Administrative Templates\Windows Components\App Privacy
Step 3: On your right, double-click on Let Windows apps run in the background policy.

Step 4: Select Disabled and click Apply followed by OK.

Method 3: Tweak Windows Registry
You can also modify a few registry files to disable background apps on Windows 11. Here’s how.
Step 1: Press the Windows key + R, type in regedit, and press Enter.
Step 2: Use the address bar at the top to navigate to the following key:
HKEY_LOCAL_MACHINE\SOFTWARE\Policies\Microsoft\Windows
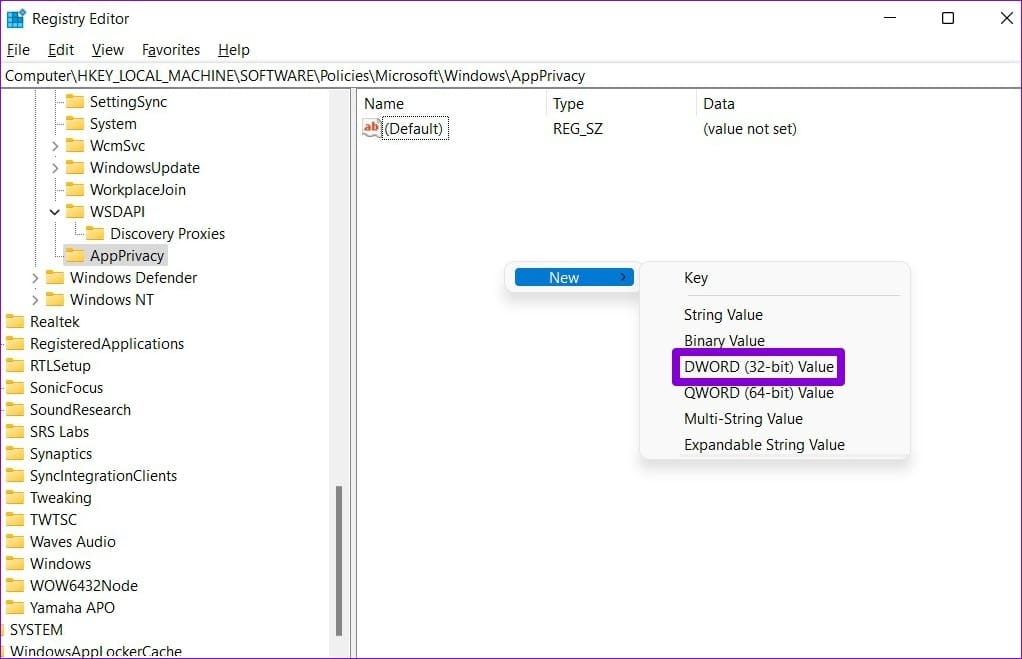
Step 3: Right-click on the Windows key, go to New and select Key. Name it AppPrivacy.

Step 4: Inside the AppPrivacy key, right-click anywhere on the empty space, go to New, and select DWORD (32-bit) Value. Name it LetAppsRunInBackground.
Step 5: Double-click the newly created key and change its value to 2. Then click OK.

Was this helpful?
Last updated on 26 July, 2024
Read Next
 5 Ways to Fix Background Apps Permissions Option Missing on Windows 11
Fix 1: Configure Background App Permissions via Battery Settings You can manage background app permissions in various ways in Windows 11.
5 Ways to Fix Background Apps Permissions Option Missing on Windows 11
Fix 1: Configure Background App Permissions via Battery Settings You can manage background app permissions in various ways in Windows 11.
 5 Ways to Fix Desktop Background Keeps Changing in Windows 11
Fix 1: Check Desktop Background Settings Enabling wallpaper slideshow in Windows can cause your desktop background to change at regular intervals.
5 Ways to Fix Desktop Background Keeps Changing in Windows 11
Fix 1: Check Desktop Background Settings Enabling wallpaper slideshow in Windows can cause your desktop background to change at regular intervals.
 5 Ways to Change Background in a Word Document
Method 1: Using a New Background Color Changing the background color of your Word document is a little similar to the process you would take when changing the font color.
5 Ways to Change Background in a Word Document
Method 1: Using a New Background Color Changing the background color of your Word document is a little similar to the process you would take when changing the font color.
 3 Ways to Fix Microsoft Edge Keeps Running in Background Issue
Basic Fixes: Stop Edge using Task Manager: You can use Task Manager to check Edge's resource usage and stop it from running in the background if it is using too
3 Ways to Fix Microsoft Edge Keeps Running in Background Issue
Basic Fixes: Stop Edge using Task Manager: You can use Task Manager to check Edge's resource usage and stop it from running in the background if it is using too
 How to Change Background Color of the Windows Photos App
Method 1: Change Background Through the Photos App By default, the Photos app displays the color mode specified by the operating system.
How to Change Background Color of the Windows Photos App
Method 1: Change Background Through the Photos App By default, the Photos app displays the color mode specified by the operating system.
 How to Fix the Black Folder Background Issue in Windows 10
Do you have black squares show up all of a sudden behind certain folders in Windows 10?
How to Fix the Black Folder Background Issue in Windows 10
Do you have black squares show up all of a sudden behind certain folders in Windows 10?
 5 Fixes for Unable to Change Desktop Background on Windows
Fix 1: Ensure Windows Is Activated Although you can use an unactivated version of Windows 10 or 11, there are a few limitations.
5 Fixes for Unable to Change Desktop Background on Windows
Fix 1: Ensure Windows Is Activated Although you can use an unactivated version of Windows 10 or 11, there are a few limitations.
The article above may contain affiliate links which help support Guiding Tech. The content remains unbiased and authentic and will never affect our editorial integrity.