Method 1: Send in Apps Directly
The Notes app automatically creates a PDF file when you scan documents.
Step 1: Tap on the scanned document in your note to open it in full-screen view.
Step 2: Press the Share button at the top and select the app, such as Mail, to share scanned documents from your iPhone Notes.
If your PDF is too big for email, here’s how to reduce PDF size on iPhone.

Tip: Check out other ways to share PDF files from iPhone
Method 2: Download as PDF
You can easily download scanned documents from notes as PDFs and then send them by opening the app of your choice.
Step 1: Tap on the document in the note and press the Share icon. Select Save to Files from the menu.
Step 2: Choose the folder where you want to save the PDF. Tap on the Save button.
Step 3: Open the app where you want to send the scanned document and attach the PDF from the Files app.

Alternatively, open the Files app and go to the folder (in our example, the Downloads folder). Tap on the document to open it, use the Share icon, and select the app where you want to send it.

Pro Tip: You can scan documents on your iPhone directly in the Files app as well. Open the Files app and go to any folder. Tap on the three-dot icon at the top and select Scan Documents. The scanned document will be saved as a PDF in the Files app in the same folder from where you scanned the document.
Method 3: By Sharing as an Image
If you want to share the scanned document as an image file, you can take a screenshot of the scanned document page in the Notes app. However, if the quality isn’t fine, download the document pages as individual pictures.
For that, you will need to use the iCloud website. We have divided the steps into two sections.
Save Document in iCloud
Step 1: First, scan and save the document in the iCloud folder of the Notes app.
To check, open the Notes app and tap on Folders at the top. Select any folder under iCloud. Then, scan the document.

Step 2: Now, ensure that iCloud sync is enabled for notes. Open iPhone Settings.
Step 3: Tap on your name at the top, followed by iCloud.

Step 4: Then, tap on Show All. Now, select Notes.
Step 5: Finally, enable the toggle next to Sync this iPhone. Wait for a minute or two to let the iPhone sync the notes.

Download Scanned Documents as Picture
Step 1: Open iCloud in a browser and log in to your Apple ID.
Step 2: Click on the notes section.

Step 3: Open the note where your scanned document is saved. Then, double-click on the document to open it.

Step 4: Click on the Download icon at the top to download all the pictures.

Step 5: Once the scanned document is downloaded as pictures on your device, share pictures in any app.
Bonus: Save Scanned Documents Automatically in the Photos App
Apple offers a feature where you can automatically save your scanned documents from the Notes app as images in the Photos app. However, remember that the Photos app will save each scanned page as an individual image.
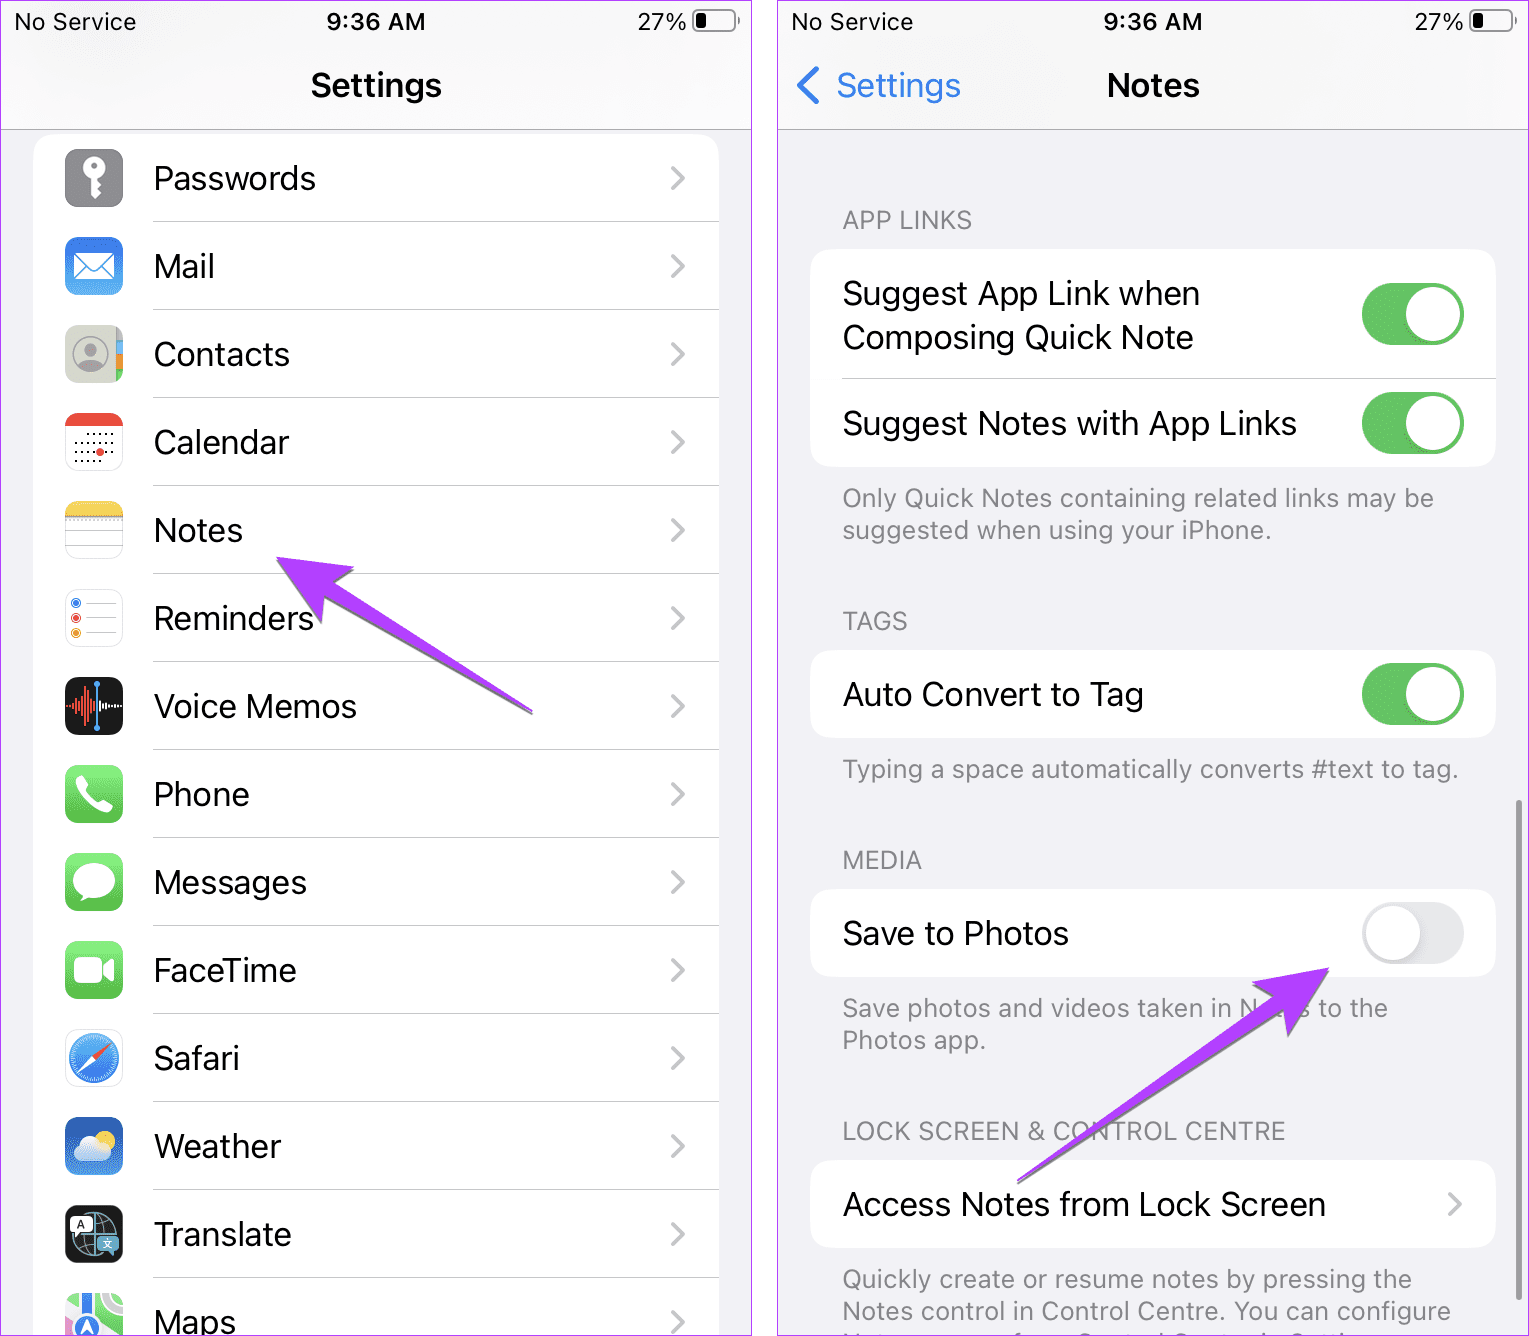
To enable this feature, go to iPhone Settings, followed by Notes. Enable the toggle next to Save to Photos.
Was this helpful?
Last updated on 26 June, 2024
Read Next
 4 Ways to Send Photos as Documents on WhatsApp Using iPhone
If you have recently started using WhatsApp on your iPhone, sending photos as documents can seem slightly more challenging than on Android, but worry not.
4 Ways to Send Photos as Documents on WhatsApp Using iPhone
If you have recently started using WhatsApp on your iPhone, sending photos as documents can seem slightly more challenging than on Android, but worry not.
 3 Fixes for Notes App Not Scanning Documents on iPhone
Basic Fixes Check camera permission: Go to Settings > Notes > enable the app to use iPhone Camera.
3 Fixes for Notes App Not Scanning Documents on iPhone
Basic Fixes Check camera permission: Go to Settings > Notes > enable the app to use iPhone Camera.
 3 Ways to Fix Unable to Send Multiple Documents on WhatsApp on Android
Basic Fixes: Check document size: WhatsApp allows you to send documents only up to 2GB.
3 Ways to Fix Unable to Send Multiple Documents on WhatsApp on Android
Basic Fixes: Check document size: WhatsApp allows you to send documents only up to 2GB.
 How to Insert a Scanned Document in Google Docs
Types of Attachments Supported by Google Docs Besides charts, tables, and drawings, you can add images in all formats, such as JPG, PNG, GIFs, etc., to Docs.
How to Insert a Scanned Document in Google Docs
Types of Attachments Supported by Google Docs Besides charts, tables, and drawings, you can add images in all formats, such as JPG, PNG, GIFs, etc., to Docs.
 Top 4 Ways to Find and Recover Unsaved Word Documents
Have you ever found yourself in the frustrating situation of working on an important document only to have your computer unexpectedly shut down or the application crash -- leaving you
Top 4 Ways to Find and Recover Unsaved Word Documents
Have you ever found yourself in the frustrating situation of working on an important document only to have your computer unexpectedly shut down or the application crash -- leaving you
 4 Ways to Fix Printer Says Documents Are Waiting Error
Preliminary Fixes Check Printer Connection: You should first try power cycling both your computer and printer.
4 Ways to Fix Printer Says Documents Are Waiting Error
Preliminary Fixes Check Printer Connection: You should first try power cycling both your computer and printer.
 Where Are WhatsApp Documents or Images Stored on iPhone and Android
Where Are WhatsApp Images and Videos Stored on iPhone WhatsApp servers store the images and videos you receive in WhatsApp.
Where Are WhatsApp Documents or Images Stored on iPhone and Android
Where Are WhatsApp Images and Videos Stored on iPhone WhatsApp servers store the images and videos you receive in WhatsApp.
The article above may contain affiliate links which help support Guiding Tech. The content remains unbiased and authentic and will never affect our editorial integrity.

