Method 1: Use QuickTime Player
QuickTime Player gives you the option to record your screen and audio on your Mac. You can use this default app to perform live microphone monitoring. Having this feature is important for testing out your microphone’s volume level, the proximity to the speaker, audio quality and more.
Open QuickTime Player > Right-click the app icon > Choose New Audio Recording > Push the volume slider to the right side > You can now listen to your audio.

Method 2: Use GarageBand
GarageBand is typically used for musical instruments and recording projects, but if you don’t want to download a new app, GarageBand also has a live monitoring feature.
Step 1: Open GarageBand after downloading the app. Select Empty Project > Choose. .
Step 2: Select Mic or Line and then enable the option of I want to hear my instrument as I play and record.
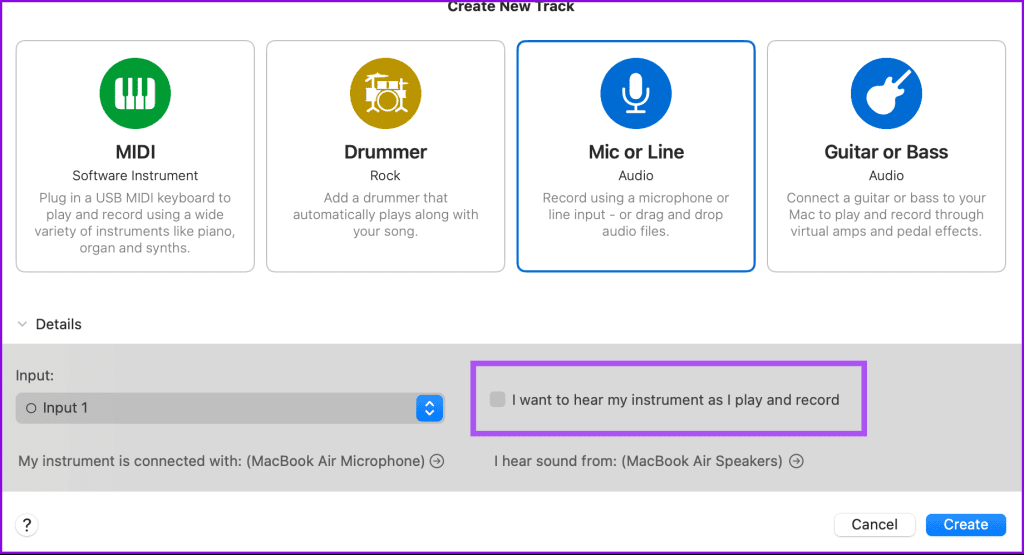
Proceed to your new project and then you’ll notice your first track has a lit icon that looks like an upside Wi-Fi signal. That’s live monitoring, enabled. Make sure you have a pair of headphones ready, then try speaking into your mic to test out hearing your voice.
Was this helpful?
Last updated on 23 July, 2024
Read Next
 How to Enable Blood Pressure Monitoring on Samsung Galaxy Watch 4
The Apple Watch dominates the wearable industry in terms of popularity and features.
How to Enable Blood Pressure Monitoring on Samsung Galaxy Watch 4
The Apple Watch dominates the wearable industry in terms of popularity and features.
 5 Best Smartwatches With Blood Pressure Monitoring
Smartwatches are getting smarter by the day.
5 Best Smartwatches With Blood Pressure Monitoring
Smartwatches are getting smarter by the day.
 How to Tell if Your Employer Is Monitoring Your Computer
How to Know if Your Computer Is Being Monitored at Work There are a few signs you are being monitored at work that you can watch out for.
How to Tell if Your Employer Is Monitoring Your Computer
How to Know if Your Computer Is Being Monitored at Work There are a few signs you are being monitored at work that you can watch out for.
 How to Perform a Clean Boot in Windows and Why It Matters
What Is Clean Boot on a Windows PC A clean boot in Windows is a troubleshooting technique that helps you identify software conflicts causing issues with your computer.
How to Perform a Clean Boot in Windows and Why It Matters
What Is Clean Boot on a Windows PC A clean boot in Windows is a troubleshooting technique that helps you identify software conflicts causing issues with your computer.
 How to Use an Android Device as Mic for Bluetooth Speakers
1.
How to Use an Android Device as Mic for Bluetooth Speakers
1.
 5 Ways to Fix Discord Mic Not Working on Android and iPhone
https://youtu.be/24cdhNs1yIU Try Basic Fixes Disconnect any Bluetooth devices: Make sure your phone isn't connected to any Bluetooth devices.
5 Ways to Fix Discord Mic Not Working on Android and iPhone
https://youtu.be/24cdhNs1yIU Try Basic Fixes Disconnect any Bluetooth devices: Make sure your phone isn't connected to any Bluetooth devices.
 How to Fix Valorant Voice Chat or Mic Not Working on Windows
Voice communication is important in multiplayer games like Valorant, enable you to effectively communicate and strategize your next move.
How to Fix Valorant Voice Chat or Mic Not Working on Windows
Voice communication is important in multiplayer games like Valorant, enable you to effectively communicate and strategize your next move.
 5 Ways to Make Your Mic Sound Better on Windows
Basic Fixes Place the Microphone Properly: One of the first things to ensure is that your microphone is placed properly.
5 Ways to Make Your Mic Sound Better on Windows
Basic Fixes Place the Microphone Properly: One of the first things to ensure is that your microphone is placed properly.
The article above may contain affiliate links which help support Guiding Tech. The content remains unbiased and authentic and will never affect our editorial integrity.

