A OneNote that’s in sync means a happy user. If you’re getting a message with error code 0xE000005E, it means your app is not syncing correctly. In this article, we’ll be looking at OneNote error 0xE000005E and different ways to get things back in sync.
Fixing OneNote Error 0xE000005E
The OneNote syncing error 0xE000005E, also known as “ReferencedRevisionNotFound” is an issue caused when a notebook can’t sync and is usually a temporary error. If things persist, we’ve got some fixes for you to try below:
Obvious Fixes
Before anything else, it helps to do some obvious but important preliminary fixes:
- Restart the OneNote app and perhaps even your PC.
- Check that your machine is connected to the internet and that your internet connection itself is stable.
- Ensure that OneNote and Windows are up to date.
Check Your Profile
If a particular notebook isn’t syncing, check that the account you’re currently using with OneNote is the correct one. Some users report that logging out and back in again solves the syncing issue as things refresh. To do this, simply click your profile in the top-right corner of the app and log yourself out before signing back in again.
Try the Browser Version
If using Microsoft 365, instead of using your desktop app, try the browser version instead. Any browser should do the trick and could help with syncing issues.
Manually Sync Notebooks
Rather than rely on automatic syncing, you can easily sync any notebook manually by quickly hitting (Shift + F9). Alternatively, you can sync a group as follows:
Step 1. Click the “File” tab and then select “Info” from the sidebar.
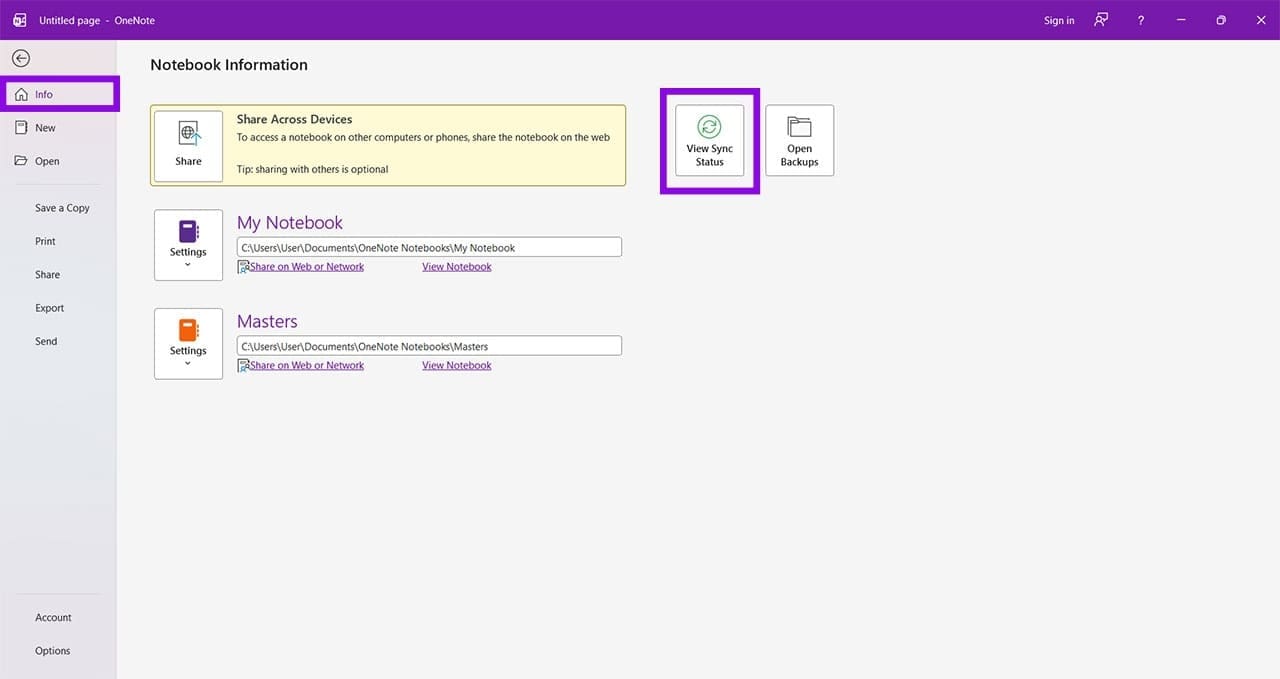
Step 2. Click “View Sync Status.”
Step 3. Ensure that “Sync manually” is selected. You’ll see your remote notebooks listed below. Click “Sync All” to manually sync the group or “Sync Now” next to the ones you want to sync.
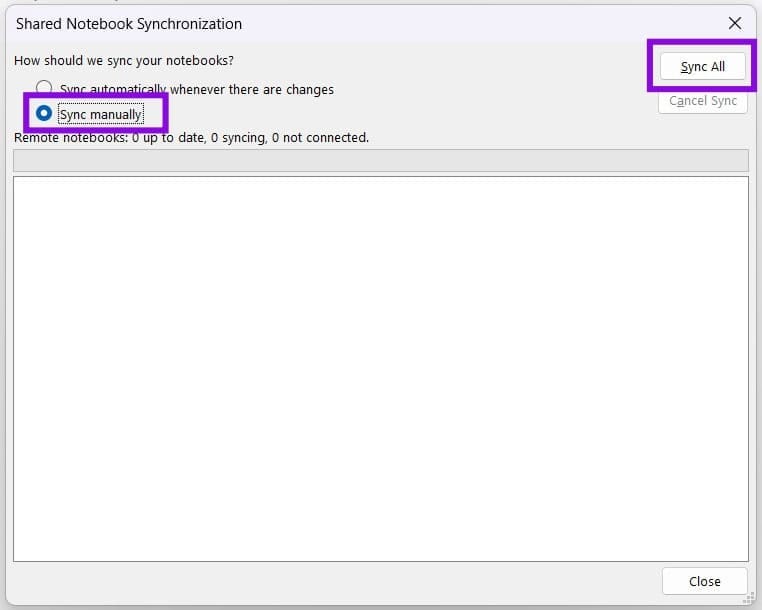
Step 4. Click “Close” once done.
Split Notes Further
Larger size sections can make for tougher syncing jobs and cause the sync to fail outright at times. To check that this isn’t the case, try splitting your larger sections into multiple smaller ones.
Create a New Section
If a notebook fails to sync – but only a section of it – you can try copying everything to a new section. Here’s what you need to do:
Step 1. In the side panel, right-click the problematic selection and choose “Move or Copy” from the context menu that appears.
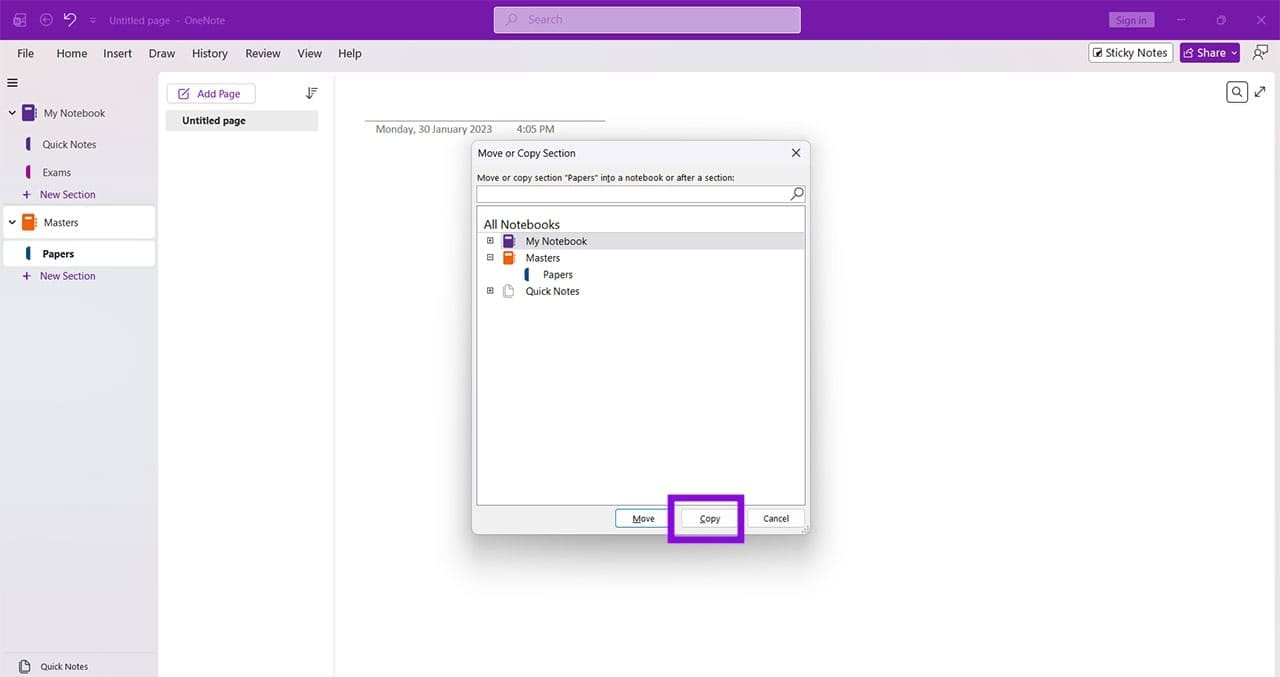
Step 2. In the new window that pops up, select your section and click “Copy”
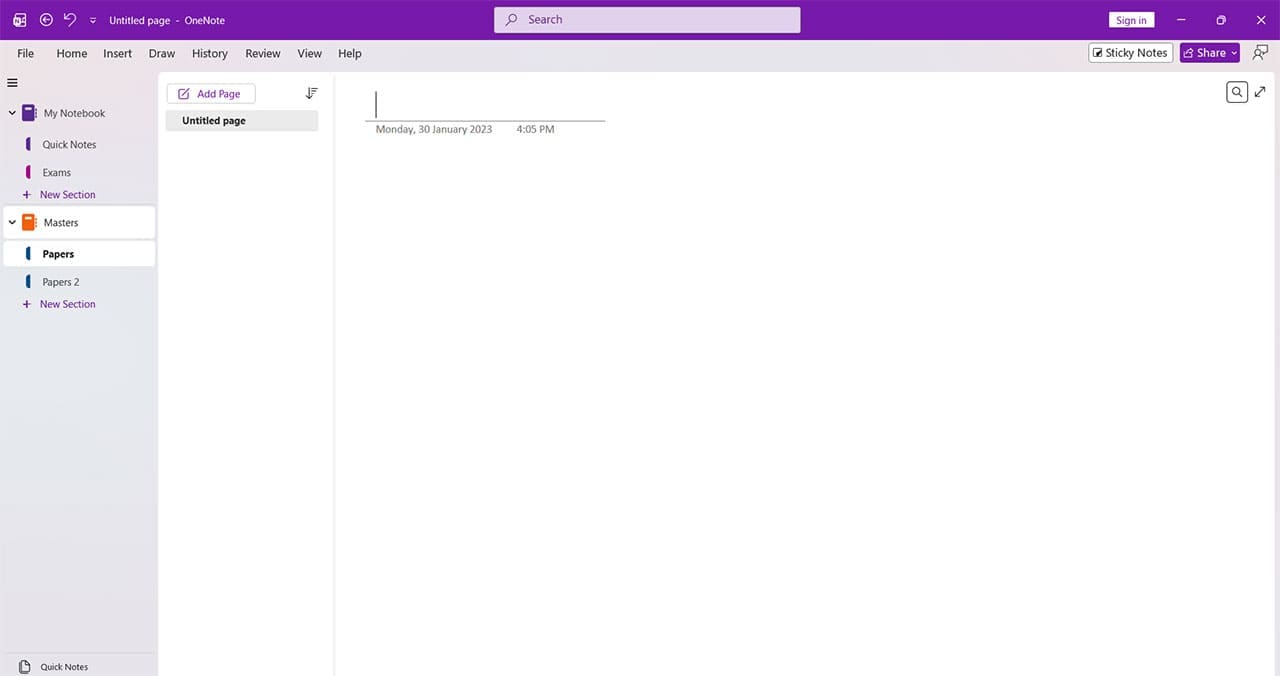
Step 3. Your section should be copied. You can simply rename it to fit the old section and then see if it syncs.
Was this helpful?
Last updated on 24 July, 2026
Read Next
 OneNote Common Issues and How to Troubleshoot Them
OneNote is an excellent tool for creating, storing, and sharing notes between devices and with others.
OneNote Common Issues and How to Troubleshoot Them
OneNote is an excellent tool for creating, storing, and sharing notes between devices and with others.
 How to Fix “OneNote Can’t Connect to the Server” Error
For people on the go, OneNote is a fantastic way to make and check notes on the fly, no matter the location or device.
How to Fix “OneNote Can’t Connect to the Server” Error
For people on the go, OneNote is a fantastic way to make and check notes on the fly, no matter the location or device.
 How to Fix OneNote Error Code 0xE000002E
If you’re receiving the OneNote error code 0xE000002E, it means you’re experiencing a OneNote sync error.
How to Fix OneNote Error Code 0xE000002E
If you’re receiving the OneNote error code 0xE000002E, it means you’re experiencing a OneNote sync error.
 7 Top Ways to Fix OneNote Notebook Disappearing Error on Windows
Microsoft OneNote has gone through a number of iterations.
7 Top Ways to Fix OneNote Notebook Disappearing Error on Windows
Microsoft OneNote has gone through a number of iterations.
 7 Best Ways to Fix OneNote Won’t Let Me Type Error in Windows 10
Microsoft OneNote is one of the oldest note-taking apps and a key component of Microsoft's Office Suite.
7 Best Ways to Fix OneNote Won’t Let Me Type Error in Windows 10
Microsoft OneNote is one of the oldest note-taking apps and a key component of Microsoft's Office Suite.
 How to Fix OneNote “Saved Offline” Error
Basic Fixes: Ensure OneDrive is not full: OneNote stores data using Microsoft’s OneDrive storage.
How to Fix OneNote “Saved Offline” Error
Basic Fixes: Ensure OneDrive is not full: OneNote stores data using Microsoft’s OneDrive storage.
 15 Best Ways to Organize Notes Effectively in Microsoft OneNote
Microsoft OneNote is a powerful note-taking tool if you know how to use it.
15 Best Ways to Organize Notes Effectively in Microsoft OneNote
Microsoft OneNote is a powerful note-taking tool if you know how to use it.
 How to Share OneNote Notebook on Desktop and Mobile
How to Share OneNote Notebook on Mobile (Android or iOS) OneNote's Android app doesn't let you share the notebook.
How to Share OneNote Notebook on Desktop and Mobile
How to Share OneNote Notebook on Mobile (Android or iOS) OneNote's Android app doesn't let you share the notebook.
The article above may contain affiliate links which help support Guiding Tech. The content remains unbiased and authentic and will never affect our editorial integrity.