Would you like to encourage your email recipients to respond quickly to your emails or appointment invitations? Or maybe you need everyone to vote on the next meeting time to ensure that it suits everyone? Setting up a calendar poll in Outlook allows you to perform these tasks.
Learn how to set up a calendar poll in Outlook and ensure you get an RSVP to invites and polls with these simple steps. This feature only works on Microsoft Exchange accounts, and these instructions are for desktop-based Outlook only. Check with your administrator that the option to create a calendar poll in Outlook is switched on for your account.
How to Set Up a Calendar Poll in Outlook — Step-by-Step Guide
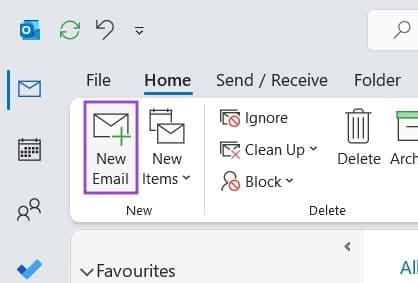
Step 1. Create a new email by clicking the “New Email” button.
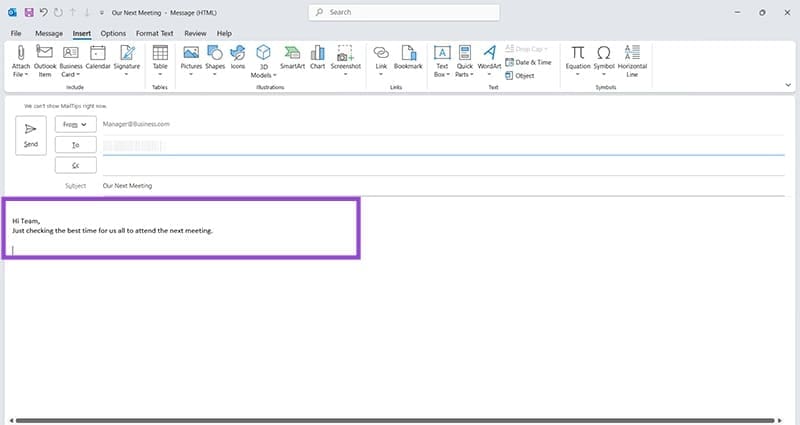
Step 2. Add content and recipients to your email.
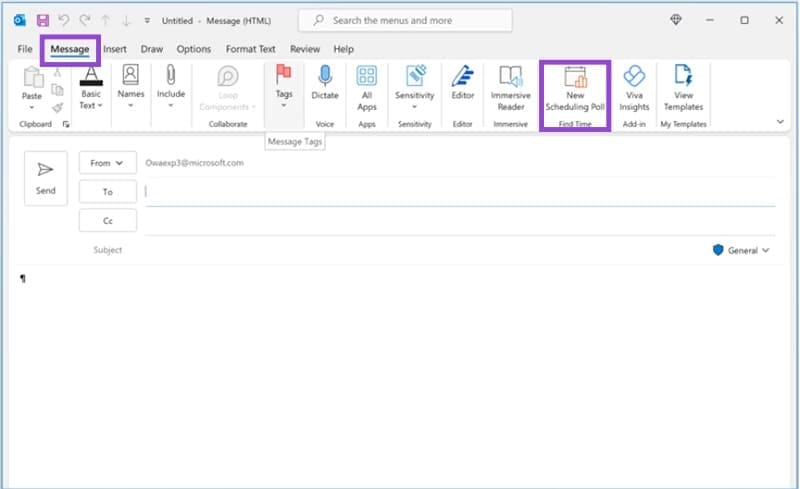
Step 3. Go to the “Message” tab and look for “New Scheduling Poll.”
Step 4. You can also find this option in the “Calendar” section of Outlook, by setting up a new appointment/meeting and looking for “New Scheduling Poll” under the “Meeting” tab. To set up a new appointment, simply open your Outlook calendar and double-click on the day you’re proposing to have your meeting. This creates a new window where you can find the relevant scheduling option, as shown.

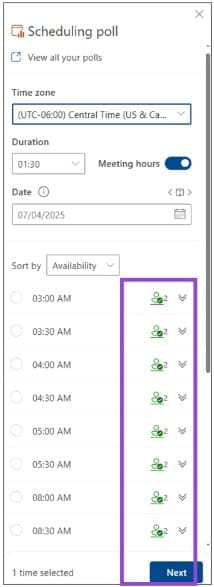
Step 5. With both methods, you’ll see a “Scheduling poll” window appear. This gives you the option to choose the date and duration of the meeting, and choose various times. If the recipients also use Outlook, you will see an indication of whether they are available or not next to each time slot. In the example shown, both recipients are available at all the given time slots. You can see this by the marker indicating a person and the number “2” beside it.
Step 6. Finish composing your email or calendar invite with any relevant information. Don’t forget to attach any documents or an agenda that your recipients may need. Once you send the invite or email, the recipients can click on the poll option that makes the most sense for them. You will receive responses directly in your email inbox. If you toggle on “Schedule when attendees reach consensus,” the calendar invite will automatically update to the time most suitable for your recipients. To make changes, simply double-click the appointment in your calendar and manually change the date and time as required.
Note: You may be able to add a scheduling poll on web-based Outlook as well as desktop-based Outlook, but your Microsoft network administrator will need to set this feature up.
Was this helpful?
Last updated on 31 December, 2025
Read Next
 How to Create an RSVP Form Using Google Forms
Here's how to create an RSVP invite on Google Forms, share it with your guests, and collect their responses in a few steps.
How to Create an RSVP Form Using Google Forms
Here's how to create an RSVP invite on Google Forms, share it with your guests, and collect their responses in a few steps.
 How to Connect Outlook Calendar With Google Calendar: 4 Best Ways
Note: The methods recommended in the article allow two-way syncs in the calendar.
How to Connect Outlook Calendar With Google Calendar: 4 Best Ways
Note: The methods recommended in the article allow two-way syncs in the calendar.
 How to Add Zoom Meetings to Outlook Calendar and Google Calendar
How to Add Zoom Meetings to Google Calendar The easiest way is using the Zoom for Google Workspace Google calendar add-on.
How to Add Zoom Meetings to Outlook Calendar and Google Calendar
How to Add Zoom Meetings to Google Calendar The easiest way is using the Zoom for Google Workspace Google calendar add-on.
 How to Create Poll in Telegram on Desktop and Mobile
How to Make a Poll on the Telegram Channel or Group On Desktop or Web Step 1: Launch the Telegram app or open the Telegram web.
How to Create Poll in Telegram on Desktop and Mobile
How to Make a Poll on the Telegram Channel or Group On Desktop or Web Step 1: Launch the Telegram app or open the Telegram web.
 2 Best Ways to Create a Poll on Discord for Desktop and Mobile
Want a quick and easy way to gain input from friends, family, or a community on Discord?
2 Best Ways to Create a Poll on Discord for Desktop and Mobile
Want a quick and easy way to gain input from friends, family, or a community on Discord?
 How to Send a Poll in iMessage Group Chats
How to Send a Poll in iMessage Group Chat Using Polls As of now, there are no native options available to add polls in iMessage group chats.
How to Send a Poll in iMessage Group Chats
How to Send a Poll in iMessage Group Chat Using Polls As of now, there are no native options available to add polls in iMessage group chats.
 How to Add and Remove Holidays Calendar in Apple Calendar App
How to Use Holidays Calendar on iPhone The Apple Calendar app offers a built-in regional calendar, displaying the common holidays (occasions and festivals) from that area.
How to Add and Remove Holidays Calendar in Apple Calendar App
How to Use Holidays Calendar on iPhone The Apple Calendar app offers a built-in regional calendar, displaying the common holidays (occasions and festivals) from that area.
 How to Share Your Outlook Calendar and Manage Permissions
How to Share Your Microsoft Outlook Calendar Note: To share your Microsoft Outlook calendar, you must have a Microsoft 365 or Exchange account.
How to Share Your Outlook Calendar and Manage Permissions
How to Share Your Microsoft Outlook Calendar Note: To share your Microsoft Outlook calendar, you must have a Microsoft 365 or Exchange account.
The article above may contain affiliate links which help support Guiding Tech. The content remains unbiased and authentic and will never affect our editorial integrity.

