It’s good to update your PC once a cumulative Windows update has finished installing, but sometimes things have to wait for a bit longer. If you’re constantly being nagged by Windows to actually restart your machine, things can get annoying quickly.
In this article, we’ll be showing you how to remove “Restart to Update” warning on your computer.
How to Remove “Restart to Update” Warning
If you’re tired of being reminded to restart your machine after an update, it’s time to remove notification for updates. Here are some solutions:
Disable Restart Notifications
Perhaps the quickest and easiest way to disable update notifications, like those next in the Power Menu, is to do so via Settings. Doing this will see that you’re only notified 24 hours later rather than immediately. Here’s how:
Step 1. Open Settings (Win + I).
Step 2. Navigate to “Windows Updates” in the sidebar.
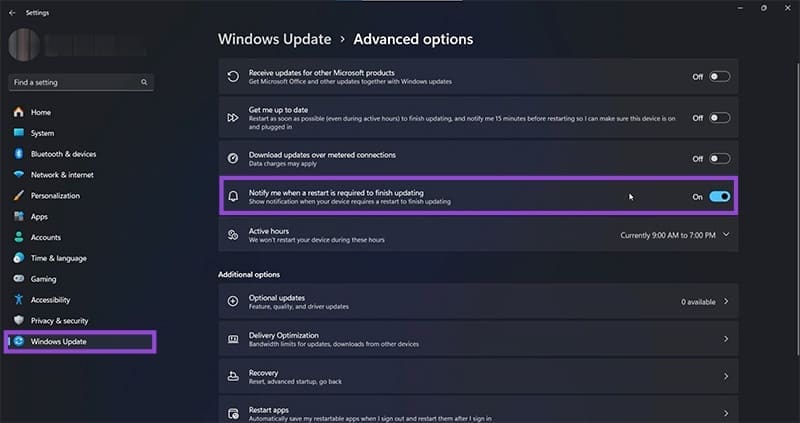
Step 3. Drag the slider of “Notify me when a restart is required to finish updating” to Off.
Stop Auto-Restart Warnings Through Group Policy
If you want to put an end to “It’s almost time to restart” in Windows messages and the automatic restarts that follow for good, then you can edit the group policy to change this. This option isn’t available for Windows Home Edition, be it 10 or 11. Here’s what you need to do:
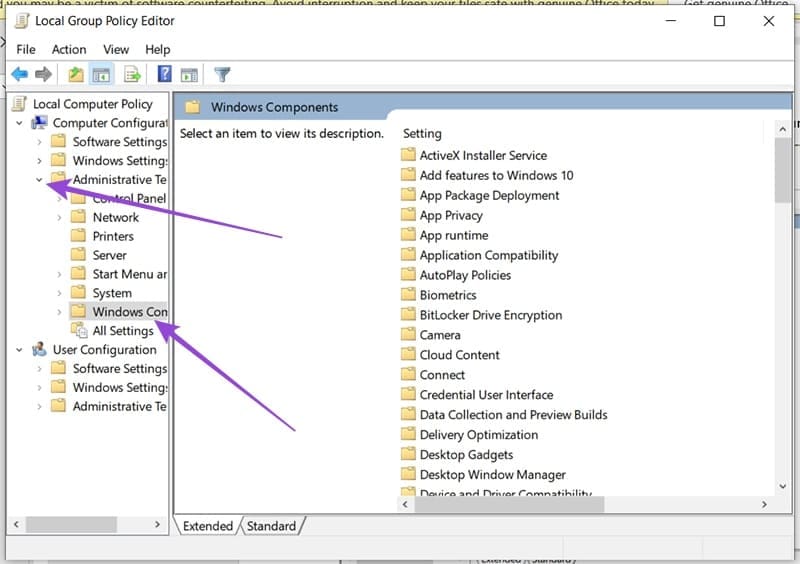
Step 1. Open the Run Dialog (Win + R) and type “gpedit.msc” before hitting OK.
Step 2. In the Group Policy Editor window, navigate to “Computer Configuration” in the sidebar.

Step 3. Click “Administrative Templates” in the main window, followed by “Windows Components.”
Step 4. Navigate down to “Windows Update” and double-click it. If using Windows 11, many of the following settings are grouped in a subfolder in “Windows Update” called “Manage end user experience.” Some of these policies are also ignored by Windows 11 in favor of “Active Hours” and “Compliance Deadlines.”
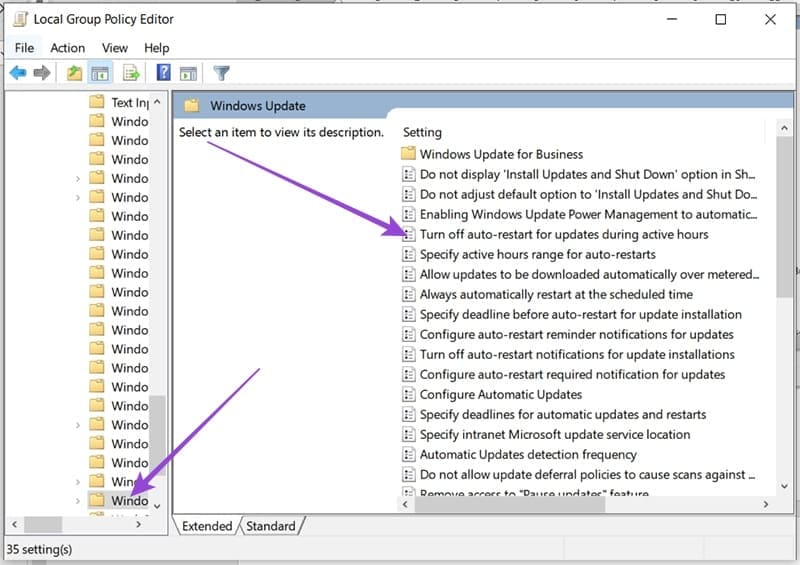
Step 5. In this window, navigate to “Turn off auto-restart for updates during active hours” and double-click it.
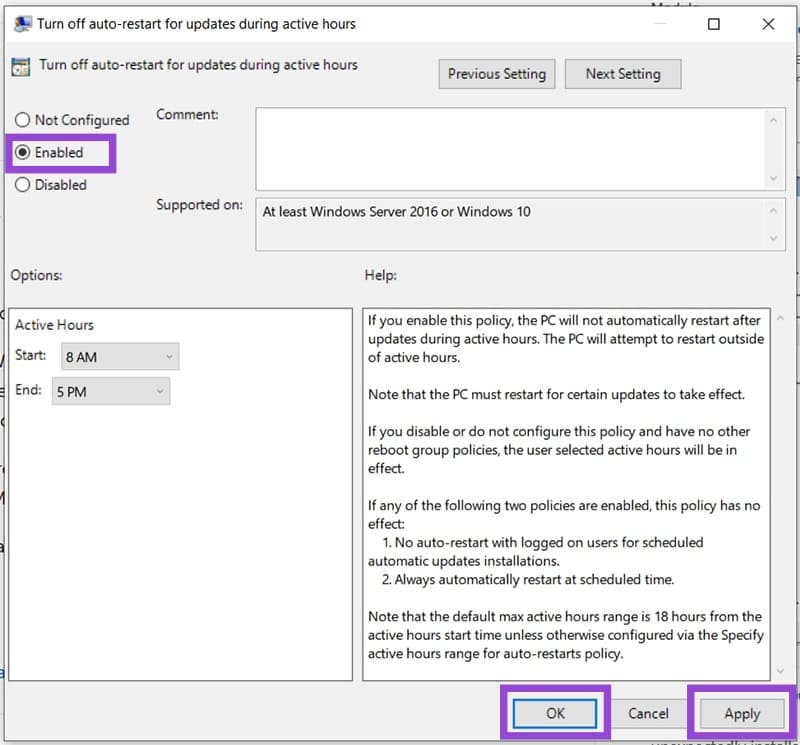
Step 6. Change the option to “Enabled” and click “Apply” and “OK” to confirm the change.
Step 7. If this doesn’t work, you might need to ensure that “Configure Automatic Updates” (also in the same folder) is enabled. Double-click the option and enable it to do so.
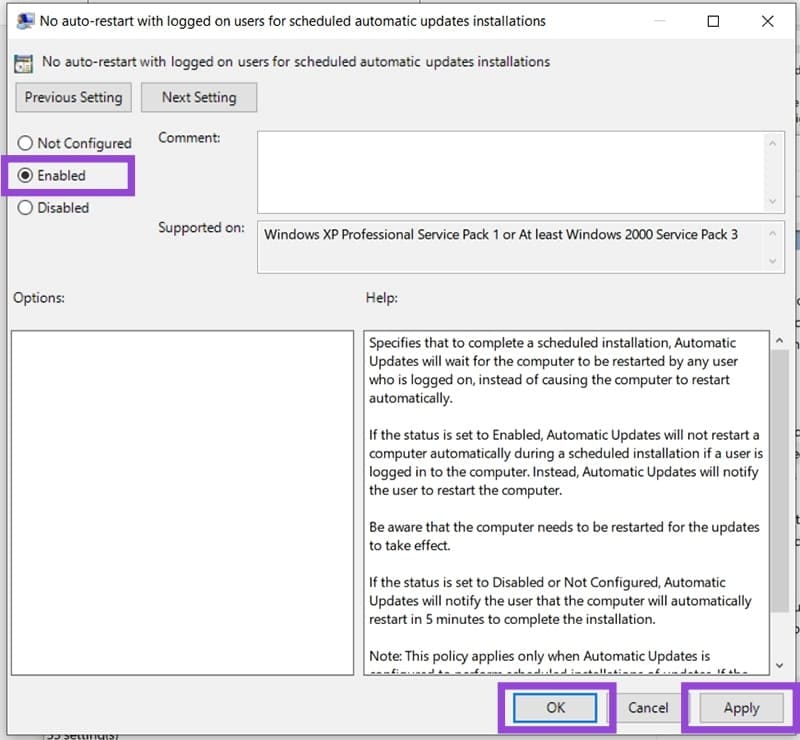
Step 8. Finally, if this still doesn’t work, then you can also enable “No auto-restart with logged on users for scheduled automatic updates installations. This will ensure that no updates take place without your explicit say so, regardless of the time.
Remove a Persistent Restart Message with PowerShell
Sometimes an update can be stuck in a “pending restart” state, due to a failed or buggy update process. To clear the message in this case, you can cancel the pending restart via PowerShell. Here’s how:
Step 1. Restart your computer in Recovery Mode and open PowerShell.
Step 2. In PowerShell, check for pending update packages by typing in “dism /online /get-packages /format:table | Select-String “Pending”” and hitting Enter.
Step 3. If this is a result of a buggy update that won’t go away no matter how many times you restart, you can remove it by typing “DISM /image:C:\ /ScratchDir:C: /cleanup-image /RevertPendingActions” and then Enter. Step 4. If this doesn’t work, you can clear the update cache by typing “del C:\Windows\SoftwareDistribution\Download\*.*” and pressing Enter.
Was this helpful?
Last updated on 22 December, 2025
Read Next
 Disable Low Disk Space Warning (Windows 11)
Have you been running out of disk space on one of your drives?
Disable Low Disk Space Warning (Windows 11)
Have you been running out of disk space on one of your drives?
 How to Enable Sensitive Content Warning on iPhone, iPad, and Mac
Apple provides the best security features for iPhone, iPad, and Mac.
How to Enable Sensitive Content Warning on iPhone, iPad, and Mac
Apple provides the best security features for iPhone, iPad, and Mac.
 2 Fixes for “We’ve Detected Automated Behavior on Your Account” Warning on Instagram
Try Basic Fixes Avoid engaging in spammy behavior: Activities such as following, unfollowing, or sending direct messages to a large number of people in a short time can trigger this
2 Fixes for “We’ve Detected Automated Behavior on Your Account” Warning on Instagram
Try Basic Fixes Avoid engaging in spammy behavior: Activities such as following, unfollowing, or sending direct messages to a large number of people in a short time can trigger this
 Quickly Auto-Restart a Windows Process or Program that Crashes
No one’s ever been killed in a Windows crash, so the Microsoft jokes don’t die down.
Quickly Auto-Restart a Windows Process or Program that Crashes
No one’s ever been killed in a Windows crash, so the Microsoft jokes don’t die down.
 4 Ways to Restart Windows Explorer (After Killing It)
Restarting the Windows Explorer on your PC is an effective method to troubleshoot glitches, performance issues, and bugs in the user interface.
4 Ways to Restart Windows Explorer (After Killing It)
Restarting the Windows Explorer on your PC is an effective method to troubleshoot glitches, performance issues, and bugs in the user interface.
 11 Easy Ways to Restart Windows With or Without Keyboard
While Windows PCs have improved over the years, it's still not free from app crashes, software bugs, and many other issues.
11 Easy Ways to Restart Windows With or Without Keyboard
While Windows PCs have improved over the years, it's still not free from app crashes, software bugs, and many other issues.
 How to Restart Numbering in Microsoft Word
Lists and tables of contents are practically a given in any extensive Word document.
How to Restart Numbering in Microsoft Word
Lists and tables of contents are practically a given in any extensive Word document.
 How to Restart Outlook on Windows or Mac
Microsoft Outlook is a widely used email and productivity application, but like any software, it can encounter issues or become unresponsive.
How to Restart Outlook on Windows or Mac
Microsoft Outlook is a widely used email and productivity application, but like any software, it can encounter issues or become unresponsive.
The article above may contain affiliate links which help support Guiding Tech. The content remains unbiased and authentic and will never affect our editorial integrity.