Wake on LAN (or Windows 11 WOL) can remotely wake up or power on a computer over a network connection. Though its full potential is limited without advanced networking knowledge like port forwarding, it remains a useful feature for occasional PC access. Here’s how to enable Wake on LAN (Windows 11).
Part 1: Enable Wake on LAN (Windows 11) in BIOS/UEFI
The initial step is to enable Wake on LAN within your PC’s firmware settings (i.e. BIOS).
Step 1. Restart your computer and enter the BIOS/UEFI setup. This usually involves pressing “F2,” “F12,” “Delete,” or “Esc” during startup (the exact key varies by manufacturer). Alternatively, head to “Advanced startup” in Settings and select “Restart now,” then choose “Advanced Options” and “UEFI Firmware Settings.”
Step 2. Navigate to the “Power Management,” “Advanced,” or “Integrated Peripherals” section, which will vary depending on your motherboard or laptop manufacturer.
Step 3. Look for options related to Wake on LAN, which might be labeled as:
- “Wake on LAN”
- “Wake on PCI-E”
- “Power on by PCI-E device”
- “Resume by PCI device”
- “Wake on Network”
Step 4. Enable the Wake on LAN option by toggling it on or changing the setting.
Step 5. Some systems also have a “Deep Sleep” or “ErP Ready” setting, which may need to be disabled for Wake on LAN to work properly.
Step 6. Save the changes and exit the BIOS/UEFI (usually by pressing “F10” and confirming).
Part 2: Configure Network Adapter Settings in Windows 11
Once BIOS/UEFI is configured, you need to adjust the network adapter settings in Windows.
Step 1. Right-click the “Start” button and select “Device Manager.”

Step 2. Expand the “Network adapters” section and locate your Ethernet adapter.

Step 3. Right-click on your Ethernet adapter and select “Properties.”

Step 4. Go to the “Advanced” tab.
Step 5. Look for Wake on LAN related settings in the Property list, which may include:
- Wake on Link Settings
- Wake on Magic Packet
- Wake on Pattern Match
Step 6. Select each “Wake on” LAN property and set the Value to “Enabled.”
Step 7. Click “OK” to apply the changes.

Part 3: Configure Power Management Settings
You will also need to ensure your PC can shut itself down and restart via LAN.
Step 1. In the same Network adapter Properties dialog from Part 2, click on the “Power Management” tab.
Step 2. Check the following boxes:
- “Allow the computer to turn off this device to save power”
- “Allow this device to wake the computer”
- “Only allow a magic packet to wake the computer”
Step 3. Click “Apply” and “OK” to save the settings.

Part 4: Adjust Windows 11 Power Settings
Some Windows power settings can interfere with Wake on LAN functionality.
Step 1. Press “Windows + X” and select “Settings.”
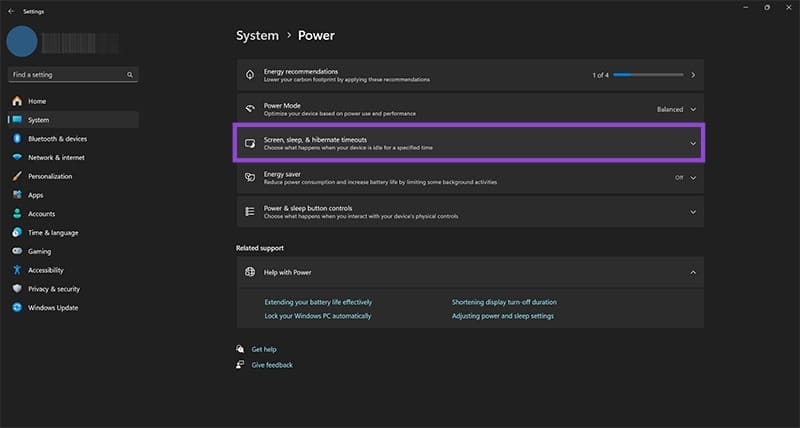
Step 2. Click on “System” in the left sidebar, then select “Power” (for laptops that have an Ethernet connection, this may be named “Power & battery” and subsequent steps will differ a bit)

Step 3. Click on “Power Mode” and set it to “Balanced” (for laptops, use this on both plugged in and on-battery options).

Step 4. For “Screen, sleep & hibernate timeouts,” choose times you wish, as these don’t really matter much.
Step 5. Go back to Settings and search for “Edit power plan” in the search box.
Step 6. Click “Edit power plan” and then “Change advanced power settings.”
Step 7. Expand “Sleep” and then “Allow hybrid sleep,” and set it to “Off.”
Step 8. Expand “USB settings” and “USB selective suspend setting,” and set it to “Disabled.”
Step 8. Click “OK” to apply the changes.
Part 5 (Optional): Disable Fast Startup or Set Up Windows Firewall
Fast Startup can sometimes interfere with Wake on LAN functionality.
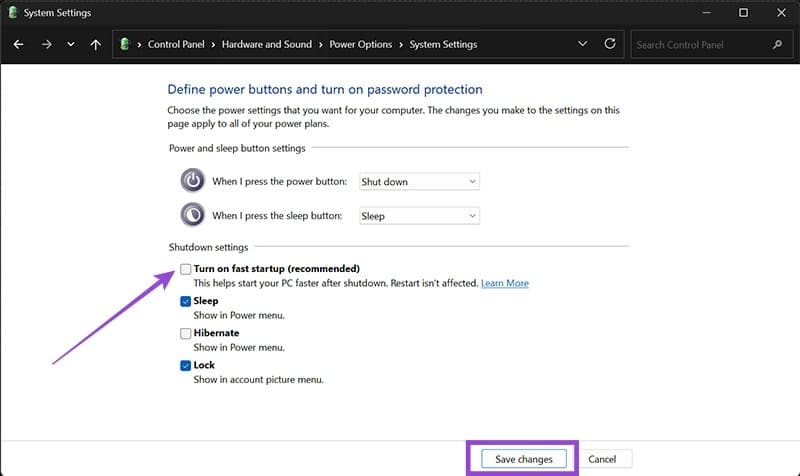
Step 1. Press “Windows + R,” type “powercfg.cpl,” and press “Enter.”

Step 2. Click “Choose what the power buttons do” on the left sidebar.

Step 3. Choose “Change settings that are currently unavailable.”

Step 4. Under “Shutdown settings,” uncheck “Turn on fast startup (recommended).”
Step 5. Click on “Save changes” and exit.
For some Wake on LAN applications, you may also need to configure your Windows 11 firewall settings.
Step 1. Press “Windows + R,” type “wf.msc,” and press “Enter” to open Windows Defender Firewall.

Step 2. Click “Inbound Rules” in the left panel.
Step 3. Click “New Rule” in the right panel.

Step 4. Select “Port” and click “Next.”
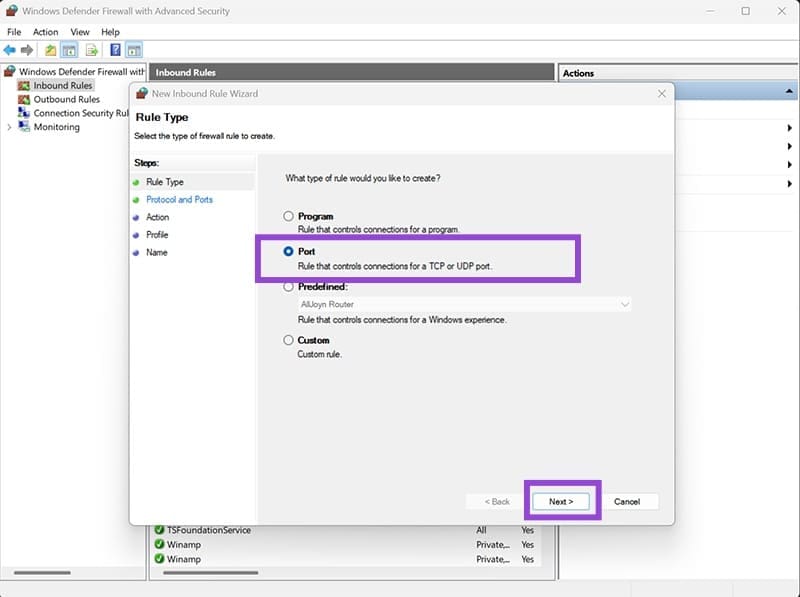
Step 5. Select “UDP” and enter port “9” (the standard Wake on LAN port).

Step 6. Select “Allow the connection” and click “Next.”

Step 7. Choose all options for setting when the rule applies, go to “Next,” then give it a name like “Wake on LAN.”
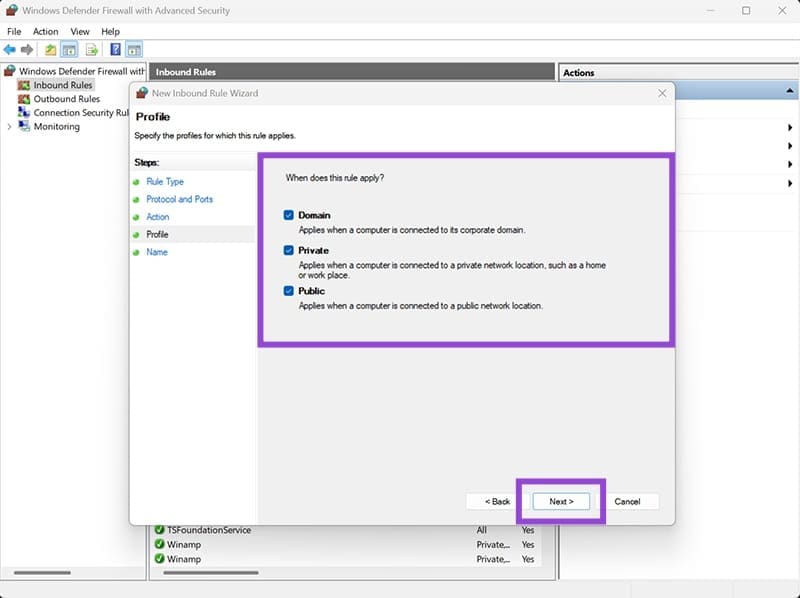
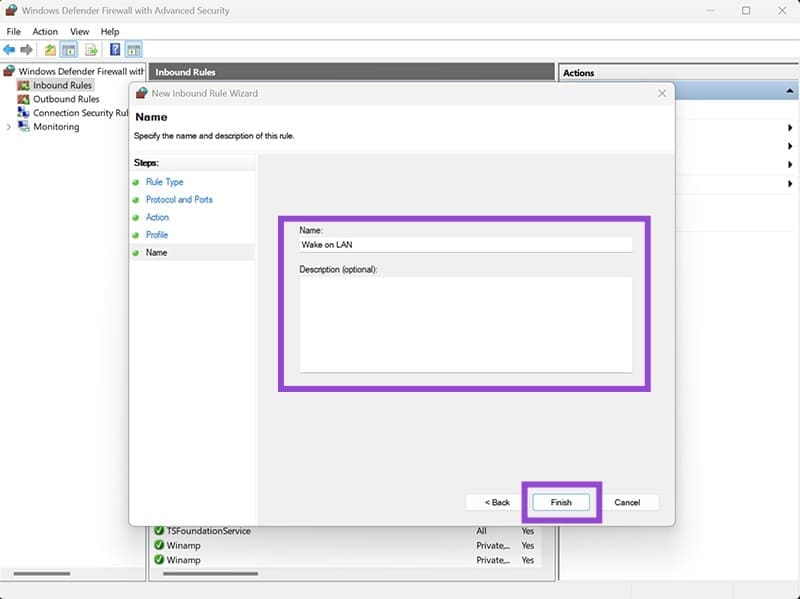
Step 8. Click “Finish.”
How to Use Windows 11 Wake on LAN
Once set up, the feature is automatically applied, but you can test to see if it works.
Step 1. Note down your computer’s MAC address. You can get it via the Command Prompt, with the command “ipconfig /all.”
Step 2. Shut down your computer (don’t use sleep or hibernate).
Step 3. From another device on the same network, use a Wake on LAN application or tool to send a magic packet to your computer’s MAC address.
Step 4. Your computer should power on within a few seconds if everything is configured correctly.
Was this helpful?
Last updated on 17 July, 2025
Read Next
 10 Best Ways to Fix Windows 10 Won’t Wake up From Sleep Mode Error
The sleep mode in Windows 10 is useful for saving battery juice when taking those much-needed short breaks.
10 Best Ways to Fix Windows 10 Won’t Wake up From Sleep Mode Error
The sleep mode in Windows 10 is useful for saving battery juice when taking those much-needed short breaks.
 4 Fixes for Tap to Wake Not Working on iPhone
Basic Fixes Turn off Voiceover: Open Settings > Accessibility > VoiceOver > turn off VoiceOver.
4 Fixes for Tap to Wake Not Working on iPhone
Basic Fixes Turn off Voiceover: Open Settings > Accessibility > VoiceOver > turn off VoiceOver.
 How to Wake Someone up Over the Phone: 4 Practical Ways
If you wish to wake someone up over the phone, a call is usually enough.
How to Wake Someone up Over the Phone: 4 Practical Ways
If you wish to wake someone up over the phone, a call is usually enough.
 3 Ways to Fix iPhone Lock/Wake Screen Delay
https://youtu.be/94mfnn8hCSw Why Is There a Delay When Locking or Waking up Your iPhone If you have mapped a double/triple click shortcut to the power button of your iPhone, and when
3 Ways to Fix iPhone Lock/Wake Screen Delay
https://youtu.be/94mfnn8hCSw Why Is There a Delay When Locking or Waking up Your iPhone If you have mapped a double/triple click shortcut to the power button of your iPhone, and when
 3 Ways to Disable or Enable Search Highlights in Windows 10 and Windows 11
Method 1: Disable or Enable Search Highlights From the Settings App The Settings app on Windows allows you to control most things on your PC.
3 Ways to Disable or Enable Search Highlights in Windows 10 and Windows 11
Method 1: Disable or Enable Search Highlights From the Settings App The Settings app on Windows allows you to control most things on your PC.
 How to Enable or Disable Smart App Control in Windows 11
Have you ever downloaded an app that was more trouble than it's worth?
How to Enable or Disable Smart App Control in Windows 11
Have you ever downloaded an app that was more trouble than it's worth?
 How to Enable Microsoft Recall for Windows 11
Microsoft Recall is an innovative way to get your search history modernized with the help of AI.
How to Enable Microsoft Recall for Windows 11
Microsoft Recall is an innovative way to get your search history modernized with the help of AI.
 How to Enable TPM 2.0 to Get Windows 11
When Windows 11 updates first rolled out, many users with kitted-out desktops were stumped to receive a notification that they couldn’t get the new Windows version.
How to Enable TPM 2.0 to Get Windows 11
When Windows 11 updates first rolled out, many users with kitted-out desktops were stumped to receive a notification that they couldn’t get the new Windows version.
The article above may contain affiliate links which help support Guiding Tech. The content remains unbiased and authentic and will never affect our editorial integrity.