A decluttered desk calendar can go a long way to making your life feel more organized, and the same is true for your digital ones, too. In this article, we’ll be looking at different ways of how to delete old calendar items in Outlook without throwing everything else into chaos.
A Note on Deleting Calendar Items in Outlook
When determining how to delete old calendar items in Outlook, it’s important to know that events will be removed depending on your privileges. This is particularly true for shared calendars, where those with Editor or Delegate rights can make changes to events, which includes deletion. For instance, if you’re an attendee, you can delete the item from your personal calendar only. If you are an Editor, deleting it will not remove it for everyone; you’ll have to cancel the event. If you really like a clean calendar, contact event organizers and ask them to remove you from the event.
How to Delete Old Calendar Items in Outlook in Different Ways
Let’s get to it. Below we have a few methods for taking care of outdated events and appointments in your Outlook calendar:
Manually Delete an Event
Let’s start simple. The easiest way of deleting calendar items in Outlook is via the right-click context menu. This is ideal for one or two events that you can do without. This deletion will apply not only to you, but also to all organizers and invitees. Here’s what to do:
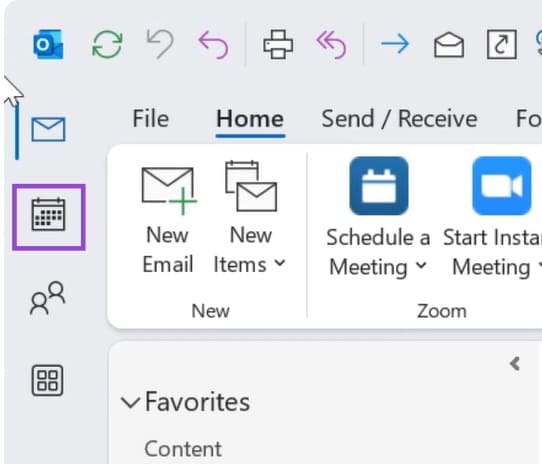
Step 1. Head to the Outlook Calendar (click the Calendar icon) and navigate to the appointment you want to delete.
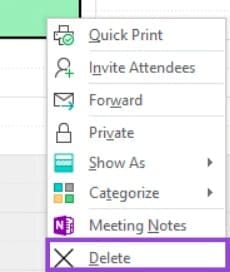
Step 2. Right-click the event and choose “Delete” from the context menu that appears.
Step 3. You can also click the “Delete” button in the Command Ribbon at the top of Outlook once your event is suggested.
Step 4. Confirm the deletion in the pop-up, and your event should disappear.
Delete Multiple Events
A more likely scenario is having to delete multiple events, in which case the above method becomes a little time-consuming. Deleting multiple events will require a different approach:
Step 1. Open Outlook and head to the calendar.
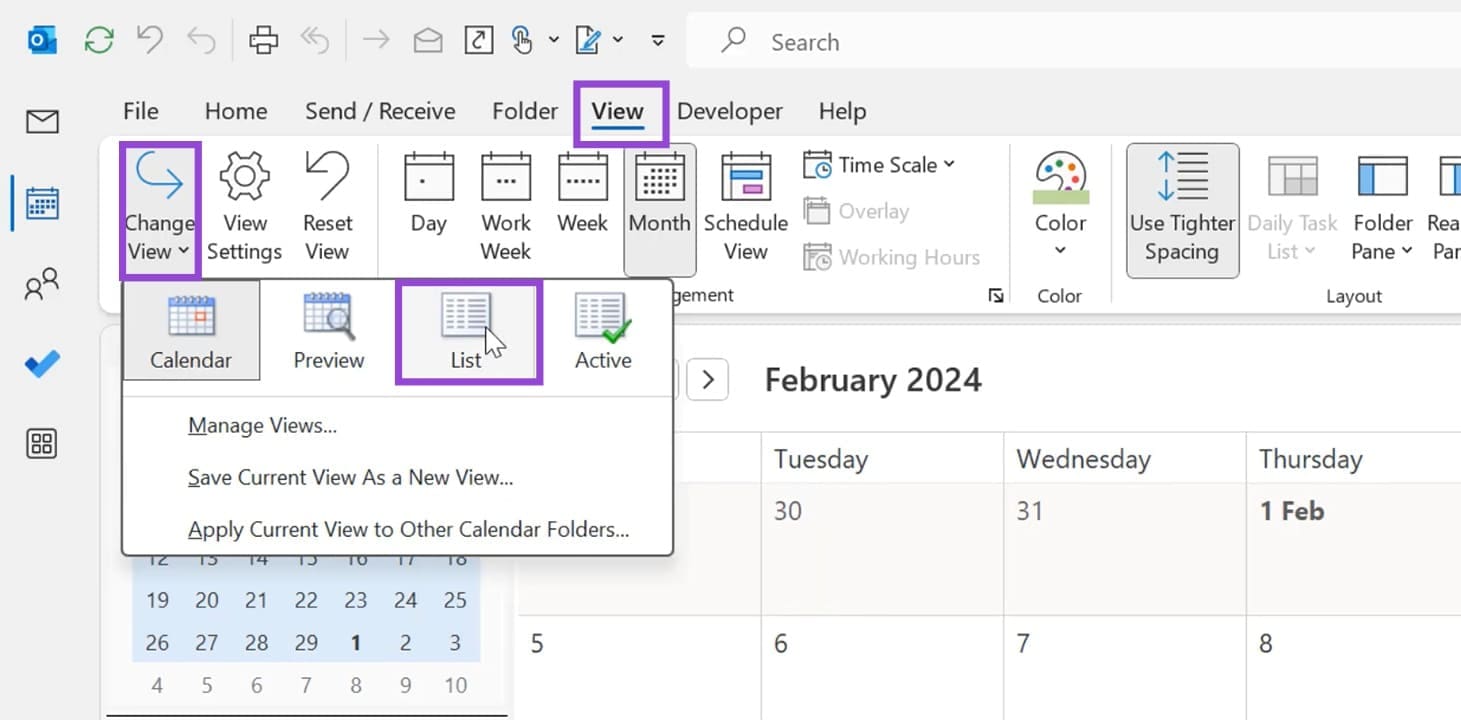
Step 2. Head to the “View” tab and press the “Change View” button, and set the Calendar layout to “List.”
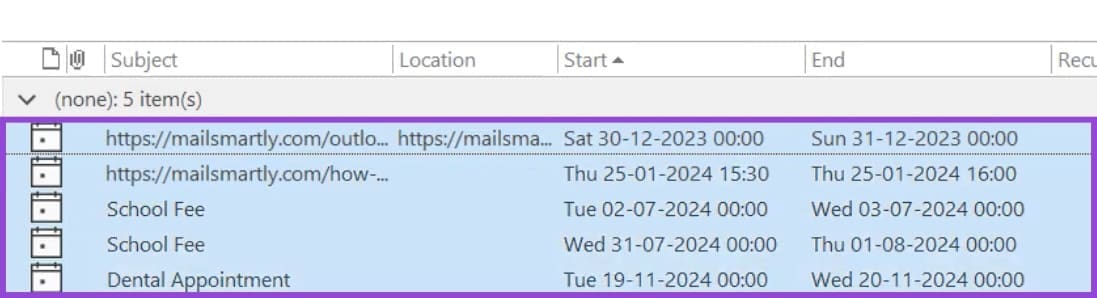
Step 3. To select multiple events, you can select all (Ctrl + A); select a chunk by clicking one event, then another (Shift + Click); or you can select (Ctrl + Click) to add events one by one to your selection.
Step 4. Once you’re happy with your selection, hit the (Del) key and confirm deletion via the pop-up.
Archive Calendar Items
If you’re looking to free up space and clear a large number of Calendar items at once, archiving is a great solution and creates a backup should you ever need it. Here’s what you need to do:
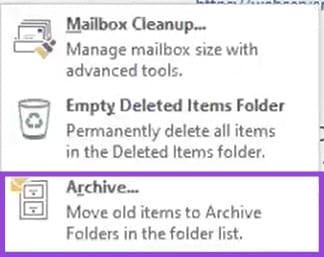
Step 1. Head to the “File” tab and click “Cleanup Tools.”
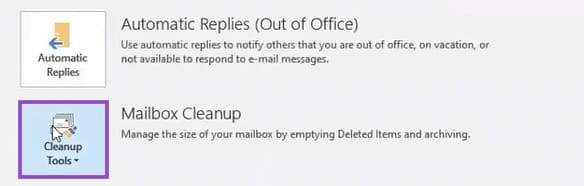
Step 2. Click “Archive.”
Step 3. In the window that pops up, select “Calendar.” This will select all your calendar events from all calendars.
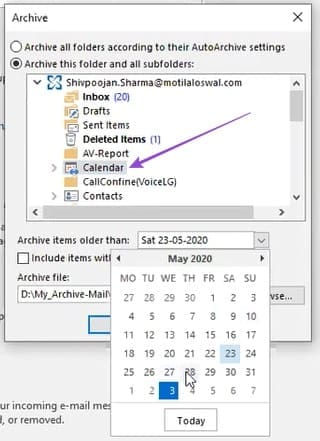
Step 4. To set a date to archive from, choose one from the dropdown menu next to “Archive items older than.”
Step 5. Choose the destination file for the .pst file and click “OK” once done, and allow the archiving process to run. Note: Microsoft is slowly moving away from .pst files of the classic desktop version and encouraging online cloud archiving.
Was this helpful?
Last updated on 21 March, 2026
Read Next
 How to Connect Outlook Calendar With Google Calendar: 4 Best Ways
Note: The methods recommended in the article allow two-way syncs in the calendar.
How to Connect Outlook Calendar With Google Calendar: 4 Best Ways
Note: The methods recommended in the article allow two-way syncs in the calendar.
 How to Add Zoom Meetings to Outlook Calendar and Google Calendar
How to Add Zoom Meetings to Google Calendar The easiest way is using the Zoom for Google Workspace Google calendar add-on.
How to Add Zoom Meetings to Outlook Calendar and Google Calendar
How to Add Zoom Meetings to Google Calendar The easiest way is using the Zoom for Google Workspace Google calendar add-on.
 6 Fixes for Sent Items Not Showing in Microsoft Outlook for Windows
Fix 1: Make Sure Outlook Is Configured to Save Sent Items Your sent emails may not show up in Outlook if you have previously configured the app to not save
6 Fixes for Sent Items Not Showing in Microsoft Outlook for Windows
Fix 1: Make Sure Outlook Is Configured to Save Sent Items Your sent emails may not show up in Outlook if you have previously configured the app to not save
 How to Add and Remove Holidays Calendar in Apple Calendar App
How to Use Holidays Calendar on iPhone The Apple Calendar app offers a built-in regional calendar, displaying the common holidays (occasions and festivals) from that area.
How to Add and Remove Holidays Calendar in Apple Calendar App
How to Use Holidays Calendar on iPhone The Apple Calendar app offers a built-in regional calendar, displaying the common holidays (occasions and festivals) from that area.
 How to Remove Cards, Tickets, and Other Items From Apple Wallet
Basic Fixes Remove Expired Tokens: Some tickets also expire after use, so removing something from your Apple Wallet is useful to eliminate these expired tokens taking up space.
How to Remove Cards, Tickets, and Other Items From Apple Wallet
Basic Fixes Remove Expired Tokens: Some tickets also expire after use, so removing something from your Apple Wallet is useful to eliminate these expired tokens taking up space.
 How to Restore Quarantined Items From Windows Defender
Windows Defender (technically named “Windows Security” in Windows 11) remains one of the most reliable built-in antivirus tools and should be sufficient for most users.
How to Restore Quarantined Items From Windows Defender
Windows Defender (technically named “Windows Security” in Windows 11) remains one of the most reliable built-in antivirus tools and should be sufficient for most users.
 How to Check Which Items Are Taking Up Space on Hard Drive
If your hard drive is starting to run out of space, your Windows updates (and many others) could fail and you may run into security issues.
How to Check Which Items Are Taking Up Space on Hard Drive
If your hard drive is starting to run out of space, your Windows updates (and many others) could fail and you may run into security issues.
 What to Do if You Can’t Add a Calendar to Outlook
Outlook gives you the option to add additional calendars to your workspace.
What to Do if You Can’t Add a Calendar to Outlook
Outlook gives you the option to add additional calendars to your workspace.
The article above may contain affiliate links which help support Guiding Tech. The content remains unbiased and authentic and will never affect our editorial integrity.