Check the Registered Owner and Organization Name
You can run the Winver command or use the Windows PowerShell terminal to inspect this quickly. Let’s begin.
Method 1: Winver Command
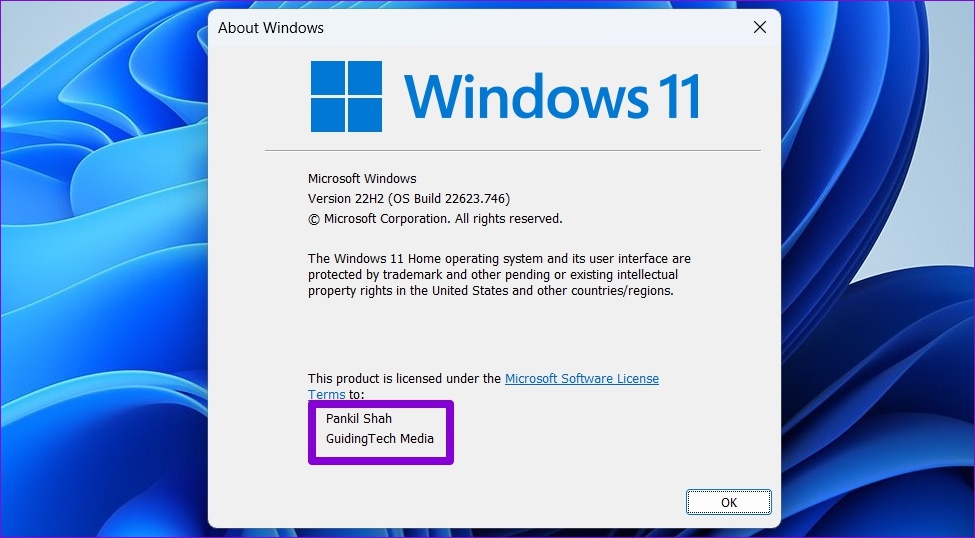
Winver (short for Windows Version) is a useful command to extract basic information about your Windows machine. You can run it to find the registered owner and organization name.
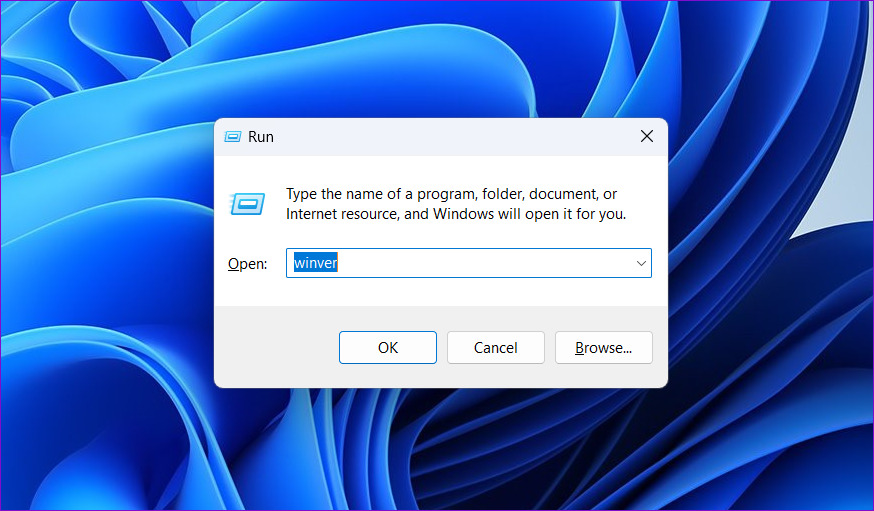
Step 1: Right-click the Start icon in the taskbar and select Run.
Alternatively, press the Windows + R keys simultaneously to launch the Run dialog.
Step 2: Type the following in the Run window and hit Enter.
winver
You’ll find the details of the registered owner and organization at the bottom of the About Windows panel.
Tip: You can also check other useful details with the winner command, such as OS edition, version, and build number.
Method 2: Windows PowerShell
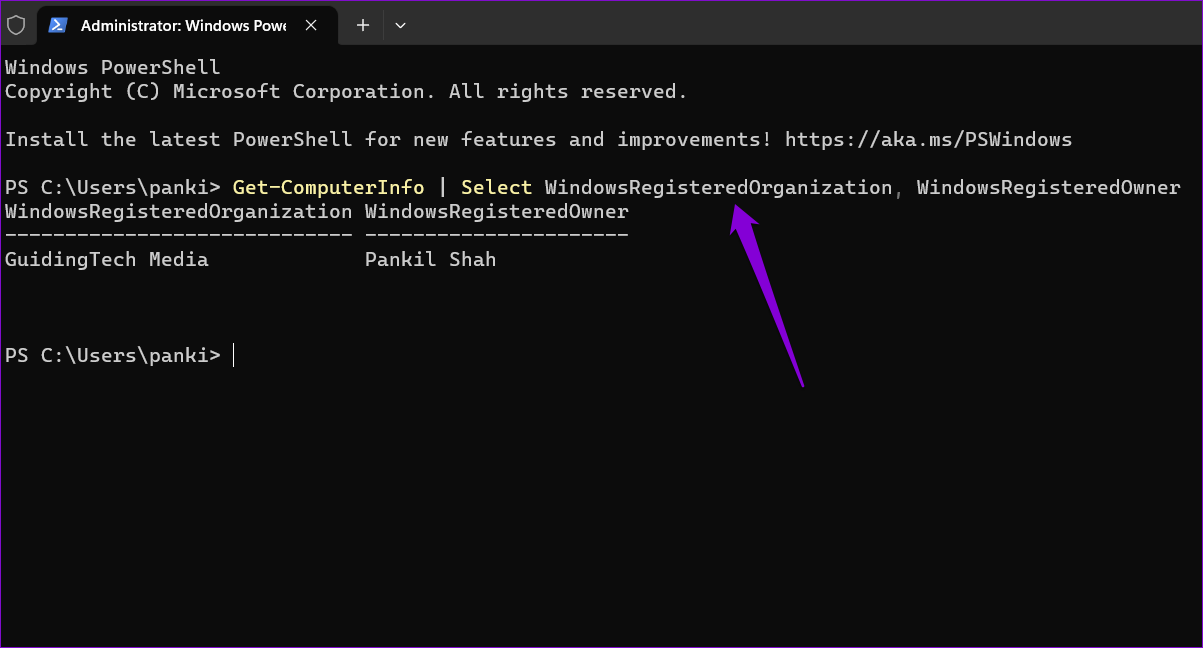
Besides Winver, you can execute certain terminal commands on Windows PowerShell to quickly fetch the owner details in Windows 11. Here’s how it works:
Step 1: Press the Windows key and search for Windows PowerShell to run it with administrative permissions.

Step 2: Paste the following command in the console and press Enter to view the registered owner and organization name.
Get-ComputerInfo | Select WindowsRegisteredOrganization, WindowsRegisteredOwner
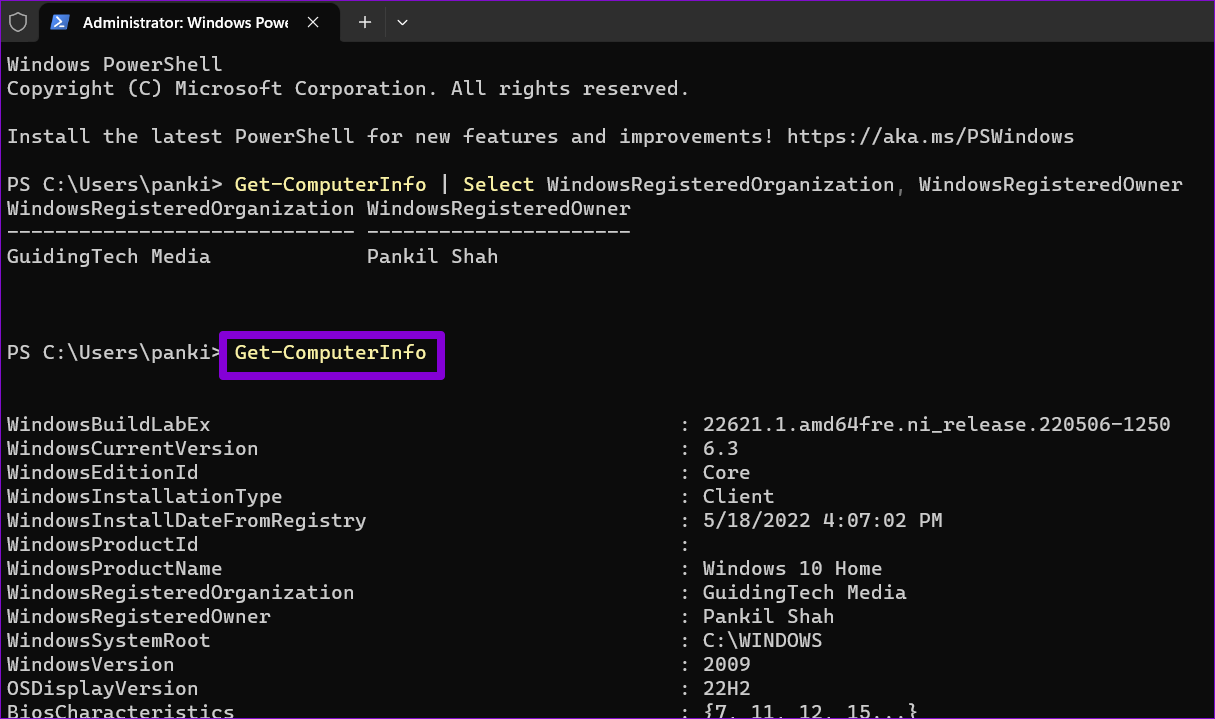
Alternatively, run the following command to view all the system details.
Get-ComputerInfo
Edit Registry to Change Owner Details in Windows 11
Changing Windows 11 owner details is a breeze with the Windows Registry Editor tool, given you’ve administrator rights.
Before you begin editing, we recommend backing up all registry files and creating a system restore point, as modifying the Windows registry is risky and can cause irreversible system damage.
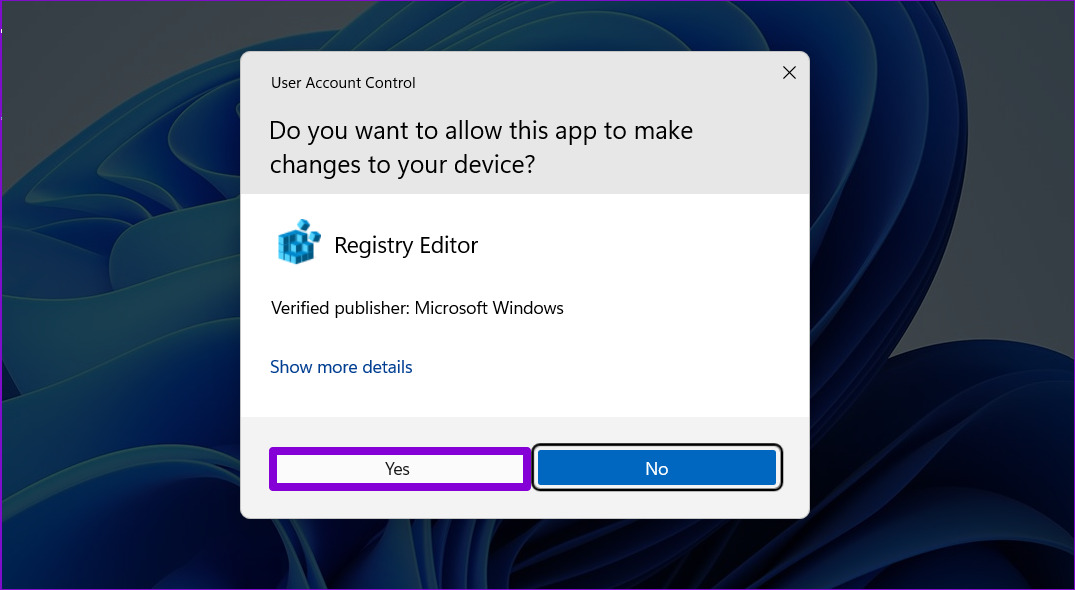
Step 1: Press the Windows key, search for Registry Editor, and click on Run as administrator.

Step 2: Click Yes to approve the User Account Control (UAC) prompt.
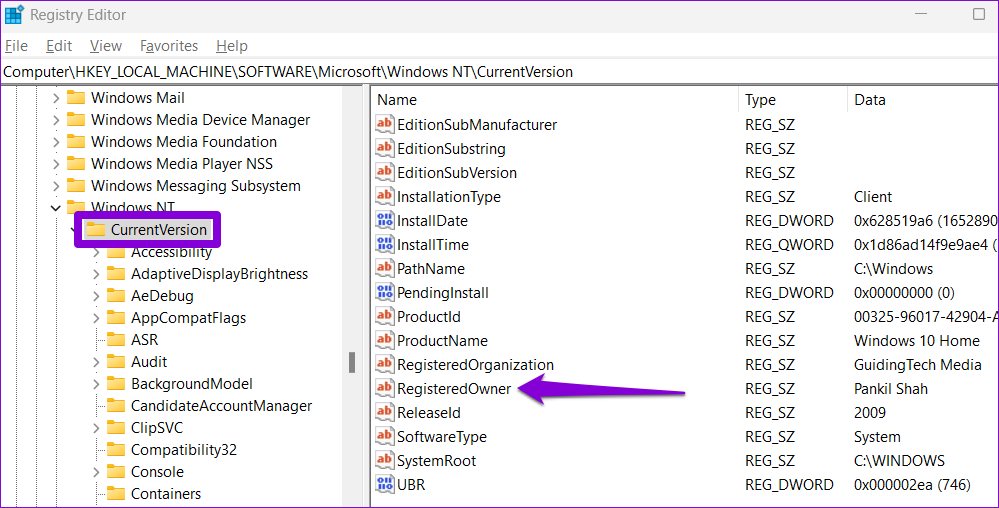
Step 3: In the Registry Editor window, paste the following path in the address bar at the top and press Enter. This will take you to the CurrentVersion key.
HKEY_LOCAL_MACHINESOFTWAREMicrosoftWindows NTCurrentVersion

Step 4: In the right pane, double-click the string value named RegisteredOwner.
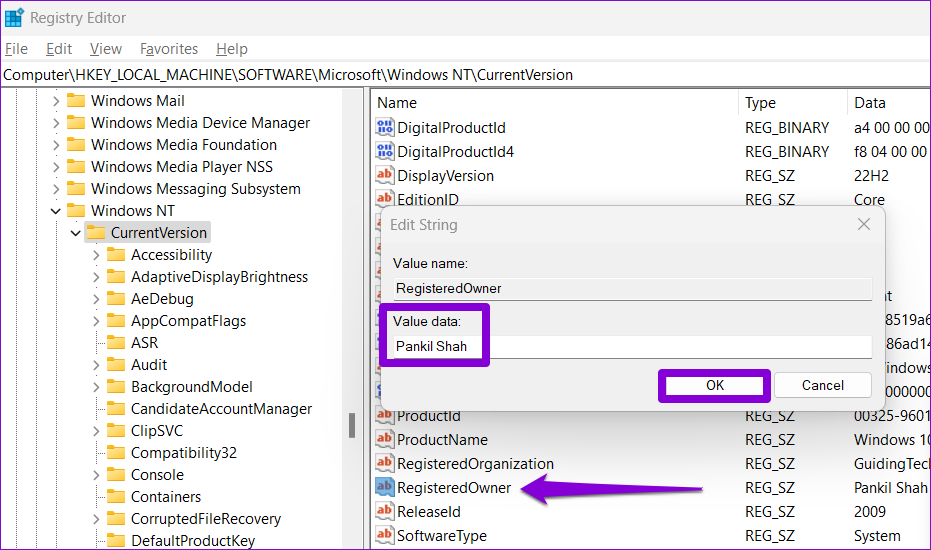
Note: If you can’t find it, right-click the CurrentVersion key, go to New, and select String Value from the submenu. Name it as RegisteredOwner.
Step 5: In the Value data field, type the name you want as the registered owner. Then, click OK.
Step 6: Next, double-click the RegisteredOrganization string value from the same section to edit it.
Note: Again, if the RegisteredOrganization string value is missing, you can create it yourself. For that, right-click on the CurrentVersion key, go to New, and select String Value. Name it as RegisteredOrganization.
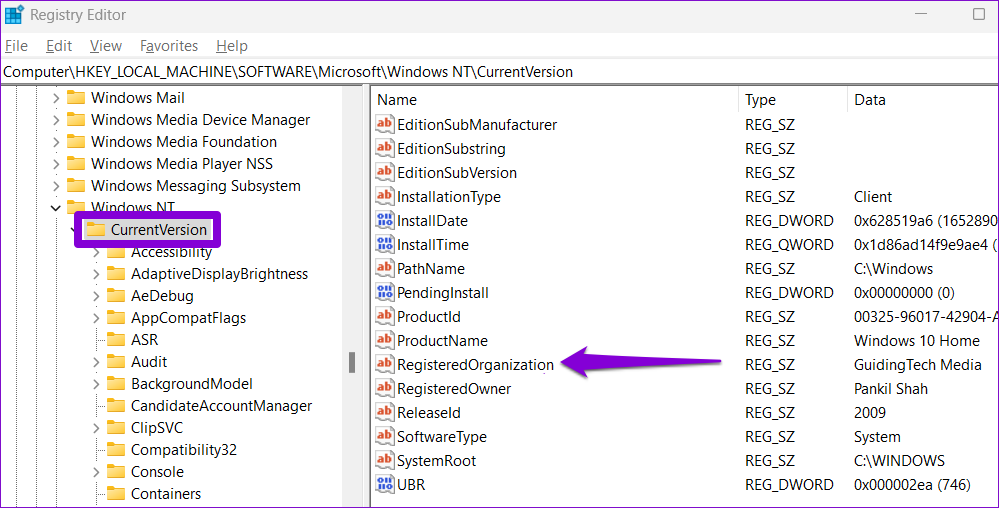
Step 7: Enter the name you want to display in the Value data field and hit OK.

Was this helpful?
Last updated on 04 April, 2024
1 Comment
Leave a Reply
Read Next
 How to Make Someone Server Admin or Owner on Discord
How to Make Someone Server Admin on Discord You can grant someone admin privileges on Discord via the PC or mobile app.
How to Make Someone Server Admin or Owner on Discord
How to Make Someone Server Admin on Discord You can grant someone admin privileges on Discord via the PC or mobile app.
 How to Add Location Details to Photos on iPhone
 Step 1: Launch the Photos app and select the photo to add location information.
How to Add Location Details to Photos on iPhone
How to Add Location Details to Photos on iPhone Step 1: Launch the Photos app and select the photo to add location information.
 How to Add Location Details to Photos on Android
Adding location information to your photos is a straightforward process.
How to Add Location Details to Photos on Android
Adding location information to your photos is a straightforward process.
 iPhone 15 Pro Max vs Samsung Galaxy S23 Ultra: Cameras Compared
Despite being a year old, the Samsung Galaxy S23 Ultra is still a very good phone to buy.
iPhone 15 Pro Max vs Samsung Galaxy S23 Ultra: Cameras Compared
Despite being a year old, the Samsung Galaxy S23 Ultra is still a very good phone to buy.
 5 Ways to Check RAM Type in PC on Windows 10 and Windows 11
Method 1: Check the PC or Laptop Model From the Manufacturer's Site If you use a pre-built rig from a PC maker or have a laptop, the first course of
5 Ways to Check RAM Type in PC on Windows 10 and Windows 11
Method 1: Check the PC or Laptop Model From the Manufacturer's Site If you use a pre-built rig from a PC maker or have a laptop, the first course of
 4 Ways to Check PC’s Uptime on Windows 11
Method 1: Check the PC's Uptime Using the Task Manager The Task Manager is usually the tool to manage background running programs, configure startup applications, and change the priority of
4 Ways to Check PC’s Uptime on Windows 11
Method 1: Check the PC's Uptime Using the Task Manager The Task Manager is usually the tool to manage background running programs, configure startup applications, and change the priority of
 5 Fixes for Spell Check Not Working in Microsoft Outlook for Windows
Fix 1: Check Spelling and Autocorrect Settings The first thing you should do is ensure that spell check is enabled and configured correctly in Outlook.
5 Fixes for Spell Check Not Working in Microsoft Outlook for Windows
Fix 1: Check Spelling and Autocorrect Settings The first thing you should do is ensure that spell check is enabled and configured correctly in Outlook.
 5 Ways to Check GPU Health on Windows
https://youtu.be/JGwJ-_hIzfg Method 1: Using Task Manager The Windows Task Manager can help you in checking GPU health.
5 Ways to Check GPU Health on Windows
https://youtu.be/JGwJ-_hIzfg Method 1: Using Task Manager The Windows Task Manager can help you in checking GPU health.
The article above may contain affiliate links which help support Guiding Tech. The content remains unbiased and authentic and will never affect our editorial integrity.

Thanks, it was useful.