How to Add Programs in the “Open With” Menu in Windows
Adding an app or program to the “Open With” menu is quick and simple. The process is nearly identical on both Windows 10 and 11, so you can use the following steps on any PC:
Step 1: Find a file of the type for which you want to add programs to the “Open With” menu.
Step 2: Right-click on the file, go to Open with, and then select Choose another app from the submenu.

Step 3: In the dialog box that appears, you should see a list of programs suggested by Windows. If the program you want to add is on the list, select it and move to Step 5. If not, click Choose an app on your PC.

Step 4: In the File Explorer window, locate and select the EXE file of the program you want to add to the “Open With” menu. Then, click Open.

Step 5: Select the Just once button.

Once you complete the above steps, Windows will open the file in the specified app or program. Subsequently, that app or program will appear in the “Open With” menu whenever you right-click on a file of that type.

How to Remove Programs From “Open With” Menu in Windows
While adding programs to the “Open With” menu is straightforward, removing them isn’t, as it requires you to delete a few registry files.
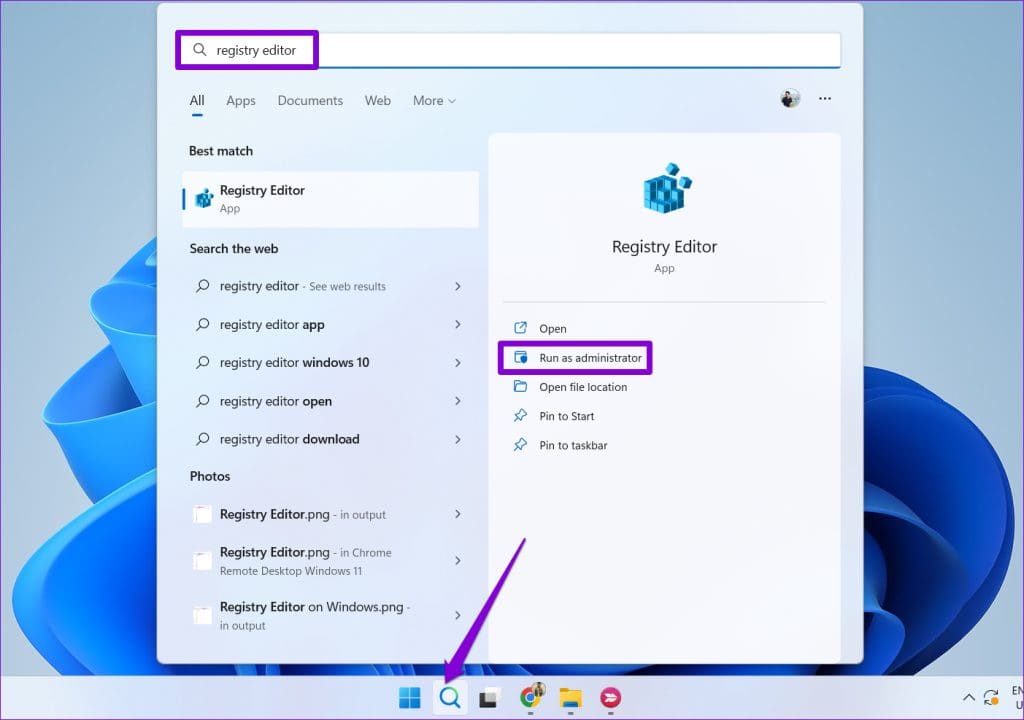
Step 1: Click the search icon on the taskbar, type in registry editor, and select Run as administrator.
Step 2: Paste the following path in the address bar at the top and press Enter. This will navigate you to the FileExts key.
Computer\HKEY_CURRENT_USER\Software\Microsoft\Windows\CurrentVersion\Explorer\FileExts
Step 3: Within the FileExts key, you will see several entries for different file types. Double-click the key with the relevant file extension to edit its “Open With” menu. In this example, we’ll select pptx.

Step 4: Click the OpenWithList subkey to view the associated programs with the file type in the right pane.

Step 5: Right-click on the program you want to remove and select Delete. Then, select Yes to confirm.

And that’s about it. Once you remove the string value associated with the program, it should not appear in the “Open With” menu for that particular file type.
Was this helpful?
Last updated on 14 August, 2024
Read Next
 How to Access the Old Add or Remove Programs Panel and Other Classic Features in Windows 10
Windows 10 is a dramatic improvement over its predecessors in terms of both speed and stability.
How to Access the Old Add or Remove Programs Panel and Other Classic Features in Windows 10
Windows 10 is a dramatic improvement over its predecessors in terms of both speed and stability.
 3 Ways to Change Priority Levels for Programs on Windows 10 and Windows 11
When Should You Change the Priority Level of a Program By default, Windows 11 assigns different priority levels to each process based on its importance.
3 Ways to Change Priority Levels for Programs on Windows 10 and Windows 11
When Should You Change the Priority Level of a Program By default, Windows 11 assigns different priority levels to each process based on its importance.
 Top 9 Ways to Fix Unable to Change Default Programs in Windows 10
The apps offered by Microsoft are great.
Top 9 Ways to Fix Unable to Change Default Programs in Windows 10
The apps offered by Microsoft are great.
 5 Ways to Fix Startup Programs Not Launching on Windows 10 or 11
Try Basic Fixes Install Windows updates: A buggy or outdated Windows build could cause such issues.
5 Ways to Fix Startup Programs Not Launching on Windows 10 or 11
Try Basic Fixes Install Windows updates: A buggy or outdated Windows build could cause such issues.
 4 Ways to Fix Unable to Install Programs or Software on Windows 11
Try Basic Fixes Check program compatibility: Programs and games that worked perfectly on Windows 10 may not necessarily be compatible with Windows 11.
4 Ways to Fix Unable to Install Programs or Software on Windows 11
Try Basic Fixes Check program compatibility: Programs and games that worked perfectly on Windows 10 may not necessarily be compatible with Windows 11.
 3 Ways to Run Old Programs in Compatibility Mode on Windows 11
Method 1: Modify Program Properties You can configure a program to run in compatibility mode by modifying its properties.
3 Ways to Run Old Programs in Compatibility Mode on Windows 11
Method 1: Modify Program Properties You can configure a program to run in compatibility mode by modifying its properties.
 7 Ways to Force Uninstall Programs on Windows 11
Method 1: Uninstall Programs Using the File Explorer Step 1: Firstly, open the Start Menu, type the name of the program you want to uninstall in the search bar, and choose
7 Ways to Force Uninstall Programs on Windows 11
Method 1: Uninstall Programs Using the File Explorer Step 1: Firstly, open the Start Menu, type the name of the program you want to uninstall in the search bar, and choose
 How to Prevent Users From Running Certain Programs on Windows 11
Method 1: Prevent Users From Running Certain Programs via the Group Policy Editor The Local Group Policy Editor on Windows makes it easy to apply system-wide changes on a computer.
How to Prevent Users From Running Certain Programs on Windows 11
Method 1: Prevent Users From Running Certain Programs via the Group Policy Editor The Local Group Policy Editor on Windows makes it easy to apply system-wide changes on a computer.
The article above may contain affiliate links which help support Guiding Tech. The content remains unbiased and authentic and will never affect our editorial integrity.

