

A few years ago, Microsoft modified how the “This PC” view looks, removing the default folders and leaving it as an overview of system and connected drives. However, you can still perform a few tweaks to add custom folders to “This PC.” Here’s what you need to know.
How to Add Custom Folders to This PC
One of the most reliable methods to include a new folder is to make it into a registered shell folder. This is somewhat different from how Windows traditionally organizes folders, which is why that folder might not show up as a regular shortcut.
Step 1. Create a new folder that will be linked to “This PC.” In our example, we’ll create a “Tools” folder in C:. This is easier than modifying an existing folder, and it helps it be empty and easy to find.
Step 2. Open PowerShell or Windows Terminal. You don’t need to run it as an administrator for this procedure because the Registry changes apply only to your current user account.
Step 3. Run the following command.
New-Guid

Step 4. Select and copy the alphanumeric string that popped up as a result. Open Notepad and store it on a single line (you’ll need to refer to it whenever you’re inserting a “GUID” value), then put curly brackets on each end.

Step 5. In a new Notepad file, enter the following code:
Windows Registry Editor Version 5.00
[HKEY_CURRENT_USER\Software\Classes\CLSID\{GUID}]
@=”My Tools”
“DescriptionID”=dword:00000003
“InfoTip”=”Opens the My Tools folder”
[HKEY_CURRENT_USER\Software\Classes\CLSID\{GUID}\InProcServer32]
@=hex(2):25,00,53,00,79,00,73,00,74,00,65,00,6d,00,52,00,6f,00,6f,00,74,00,25,00,5c,00,53,00,79,00,73,00,74,00,65,00,6d,00,33,00,32,00,5c,00,73,00,68,00,65,00,6c,00,6c,00,33,00,32,00,2e,00,64,00,6c,00,6c,00,00,00
“ThreadingModel”=”Both”
[HKEY_CURRENT_USER\Software\Classes\CLSID\{GUID}\Instance]
“CLSID”=”{0E5AAE11-A475-4c5b-AB00-C66DE400274E}”
[HKEY_CURRENT_USER\Software\Classes\CLSID\{GUID}\Instance\InitPropertyBag]
“Attributes”=dword:00000011
“TargetFolderPath”=”C:\\Tools”
[HKEY_CURRENT_USER\Software\Classes\CLSID\{GUID}\ShellFolder]
“Attributes”=dword:f080004d
“FolderValueFlags”=dword:00000029
“SortOrderIndex”=dword:00000000
[HKEY_CURRENT_USER\Software\Classes\CLSID\{GUID}\DefaultIcon]
@=hex(2):25,00,53,00,79,00,73,00,74,00,65,00,6d,00,52,00,6f,00,6f,00,74,00,25,00,5c,00,53,00,79,00,73,00,74,00,65,00,6d,00,33,00,32,00,5c,00,73,00,68,00,65,00,6c,00,6c,00,33,00,32,00,2e,00,64,00,6c,00,6c,00,2c,00,33,00,35,00,00,00
[HKEY_CURRENT_USER\Software\Microsoft\Windows\CurrentVersion\Explorer\MyComputer\NameSpace\{GUID}]
@=”My Tools”
Note that the quotes here have to be straight (Registry Editor can’t read curly quotes). For string values in quotes, you need to double up on any slashes in the address part.
Step 6. Change the value of GUID to the string you put in earlier (so it still has one layer of brackets). Replace “My Tools” at the end with whatever name you want File Explorer to display. You can open the “Replace” screen with “Ctrl + H.”
The “InfoTip” entry is what the tooltip will say, and you can customize it.

Step 7. Save the Notepad file with a .reg extension and whatever name you want.
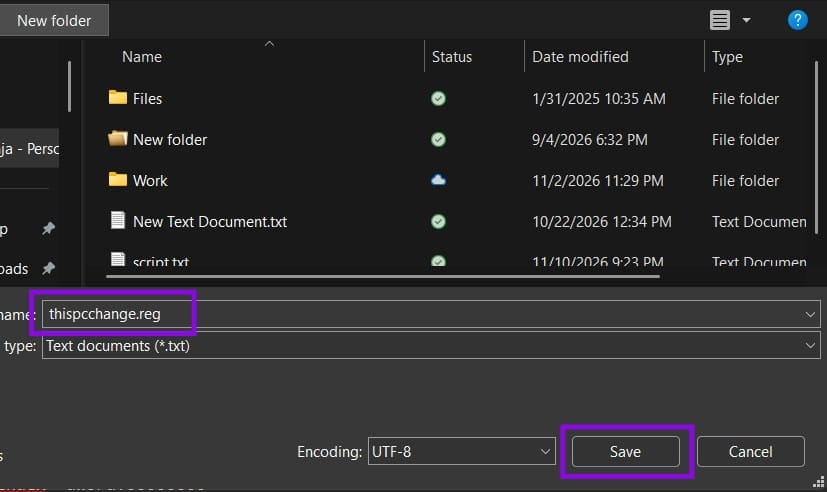
Step 8. Double-click on the saved file.
Step 9. Open Task Manager and find “Windows Explorer” or “explorer.exe.” Right-click on it and select “Restart.”
When you open the “This PC” folder, you should see a new folder with a default “Tools” icon.

If you want to change the icon, you can then use the Properties tab to find a new icon (it’s easier than tracking down the code for it).
Alternatively, you can create a custom .ico file.
Undoing the Custom Folder
You can’t revert Registry Editor to a pre-existing state to undo the changes here. To undo the changes, you’ll need to remove the two Registry keys you created. However, this won’t delete the actual folder or its contents, just the path to it in “This PC.”
Step 1. Go to HKEY_CURRENT_USER\Software\Microsoft\Windows\CurrentVersion\Explorer\MyComputer\NameSpace, right-click on the GUID you made (in our case, “{2f4dd244-05c5-4ca2-a080-bfe55ec943d6}”), and choose “Delete.”
Step 2. Go to HKEY_CURRENT_USER\Software\Classes\CLSID, find the same GUID, and delete it as well.
Was this helpful?
Last updated on 17 November, 2026
Read Next
 How to Add Columns Permanently to All Folders in Windows 10 File Explorer
File Explorer in Windows usually shows just a few columns such as name, date, and type.
 How to Add File Explorer and Folders to Taskbar in Windows 11
How to Add File Explorer to Taskbar in Windows 11 The Taskbar in Windows 11 has the File Explorer icon pinned to the Taskbar by default.
 How to Manage Files and Folders Efficiently on Windows 10
Files and folders tend to accumulate over time on our Windows computers.
 4 Ways to Fix Unable to Rename Folders on Windows 11
Try Basic Fixes Make sure the folder is not in use: You may have difficulty renaming a folder on your PC if it is already open in another program.
 How to Open Files and Folders in CMD on Windows
How to Open a File Using Command Prompt on Windows Here's how you can easily open Command Prompt on your PC and use it to access a file.
 How to Hide Files and Folders in Windows 11
Your computer houses a trove of personal data, from cherished photos to confidential documents.
 How to Show Hidden Files and Folders in Windows 11
Have you ever been in a situation where you hid some files on your Windows device while sharing them with friends or family and couldn't find them later?
 How to Create Multiple Folders in Windows From a List of Names
If you’ve got a list of folder names that need to be made into folders (for example, for filing), creating folders manually can take a while when the list gets
The article above may contain affiliate links which help support Guiding Tech. The content remains unbiased and authentic and will never affect our editorial integrity.

