How to Hide Past Posts on Facebook
The good news is that you can manage the visibility of previously posted content. Facebook facilitates several options, from creating a restricted list to hiding future or new and previous posts from Facebook timelines. You can either,
- Limit past posts – A handy option to limit the posts to your friends only. They will not be available to the public later.
- Change audience – You can set only me to all posts on Facebook to hide them or even make all of them Public or Friends only.
- Archive posts – Just like archiving messages in Facebook Messenger, you can hide the post for you and the audience. You can unarchive it anytime you want.
- Trash posts – If you want a clean slate or don’t want to see certain old posts, you can bulk delete Facebook posts.
- Hide from profile – As the name suggests, it simply hides previous posts from the Facebook timeline. You can consider it an alternative to the ‘Only me’ setting.
Method 1. Limit All Past Posts To Friends only on Facebook
Before we proceed, here are a few things to keep in mind,
- You can’t completely undo it – If you want to change the audience later, you’ll have to do it for individual posts.
- For previous posts with a custom audience – Say Close Friends or Friends except Acquaintances, etc., the feature will not affect their audience.
- Tagged posts – The tagged person (whether they are your friends or not) will still be able to see those posts. Plus, if you’ve allowed their audiences to view the post, they can.
- Posts you’re tagged in – You can’t control the audience for someone else’s post. The feature only controls the audience for your posts.
- Shared posts – If you’ve shared someone else’s post, the feature won’t affect the audience. They can be only altered by the person who has initially posted.
From the Facebook App on iPhone or Android Devices
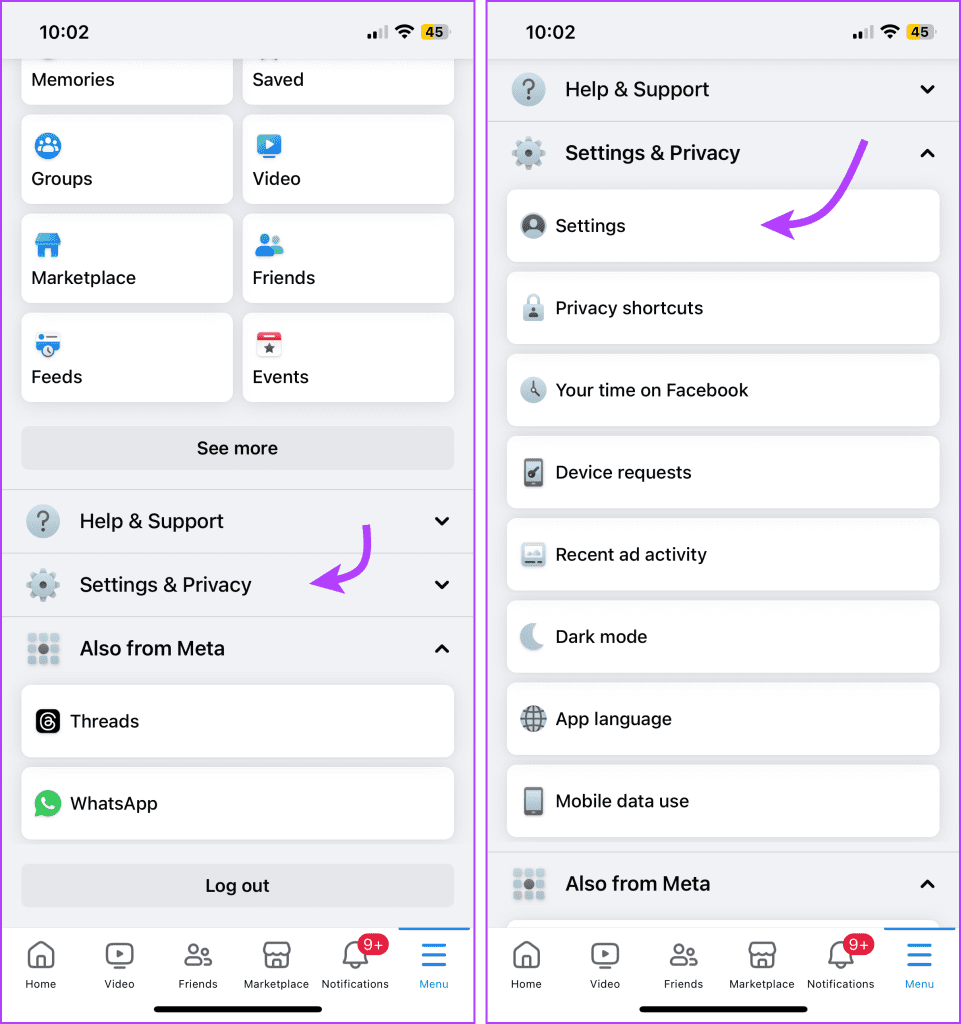
Step 1: Launch the Facebook app. Tap the three-line icon from bottom-right (iOS) or top-right (Android).
Step 2: Here, scroll down and select Settings & Privacy, then tap Settings.
Step 3: Scroll down to the Audience and Visibility section and tap Posts. Next, tap ‘Limit who can see past posts.’
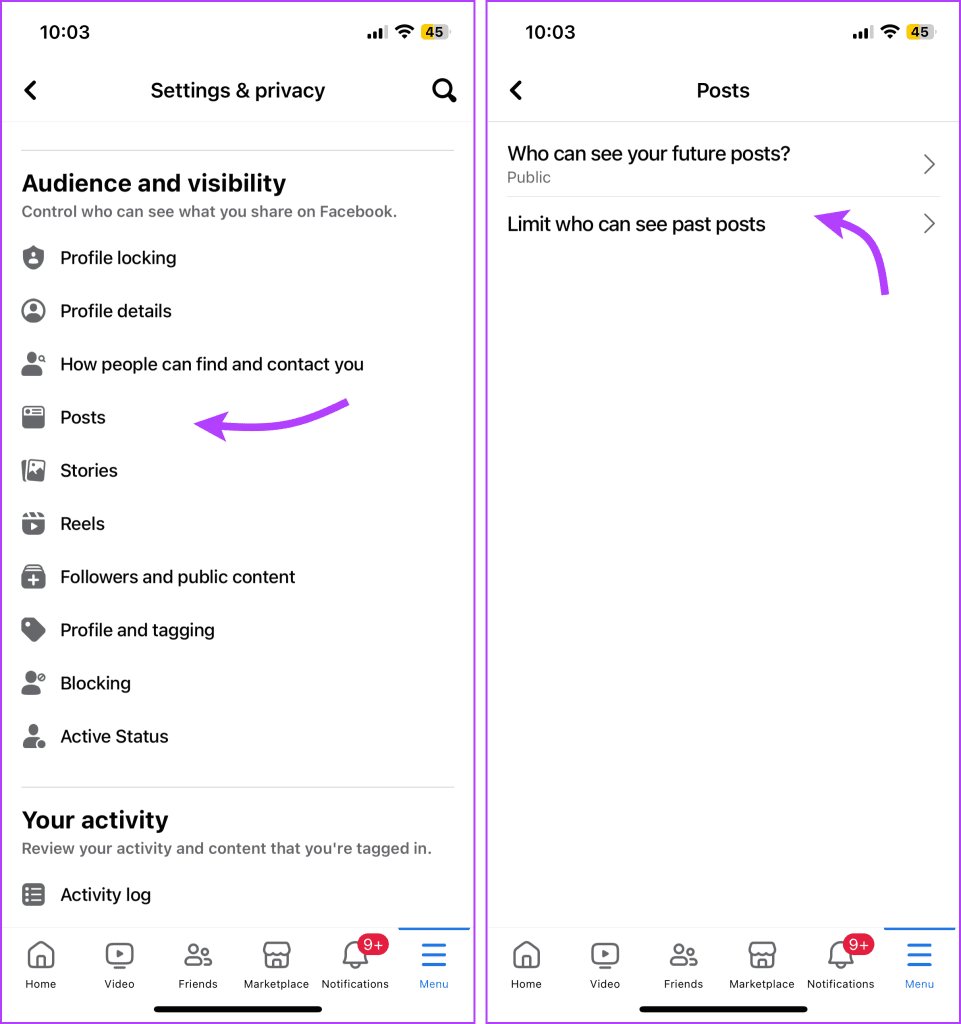
Step 4: Tap Limit Past Posts and then Limit Past Posts again to confirm the action.

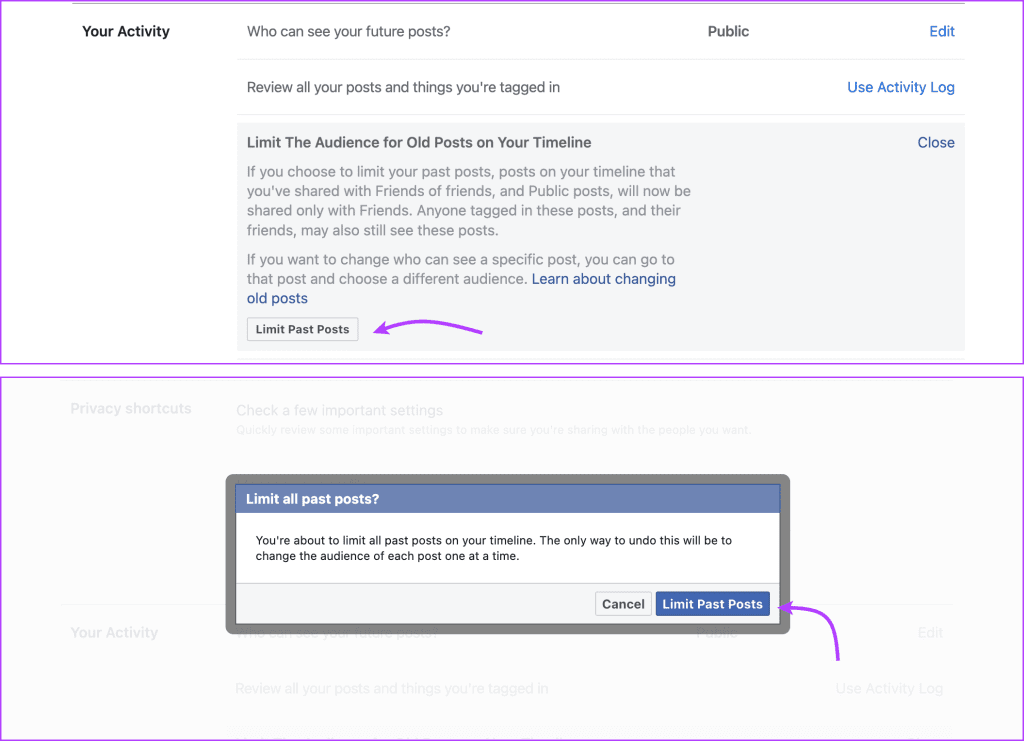
Limit Past Posts From Facebook Web
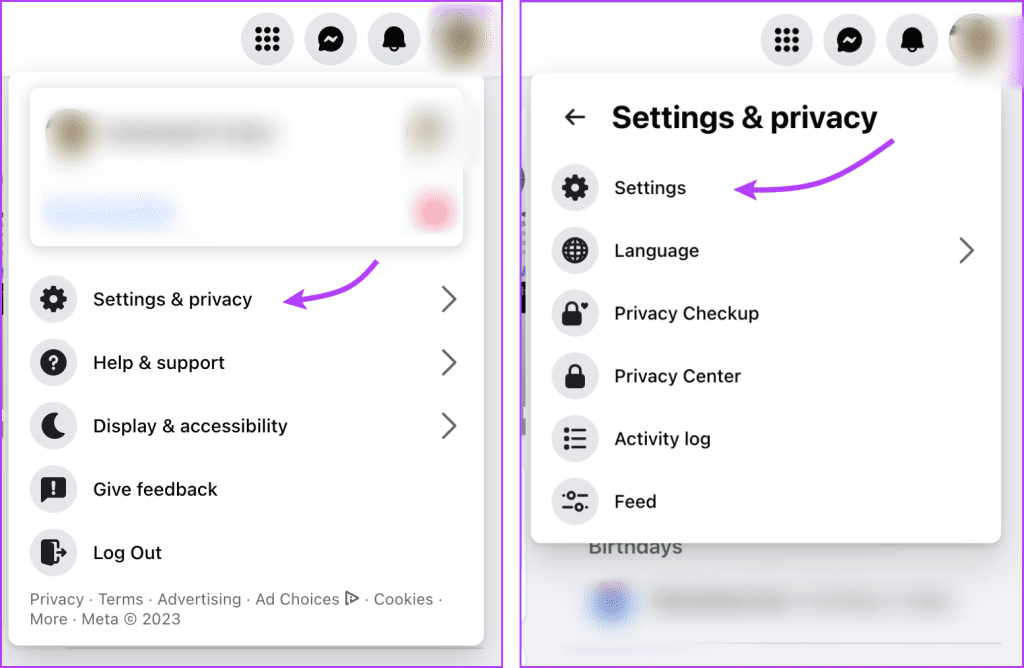
Step 1: Open Facebook in the browser of your choice. Click the profile picture from the top right corner.
Step 2: Select Settings & privacy → Settings.
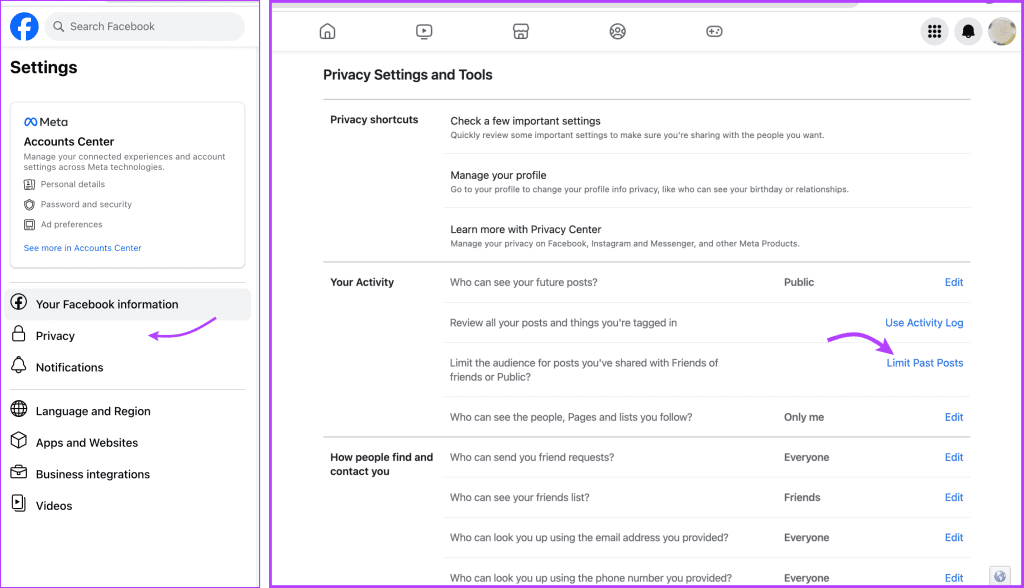
Step 4: In the Settings section, select Privacy from the left column.
Step 5: Here, under the Your Activity section, click Limit Past Posts next to the ‘Limit the audience for posts you’ve shared with friends of friends or Public?’ option.
Step 6: Click Limit Past Posts and then Limit Past Posts to confirm the action.
Method 2. Set ‘Only Me’ for the Past Posts on Facebook
Remember, you can only change the audience and hide the posts you’ve created on Facebook. And while you can’t change the audience of someone else’s post that you’ve shared, you can hide them from your profile.
Change Audience for All or Some Posts via the Facebook App
Step 1: Open Facebook → three-line icon → Settings & privacy → Settings.
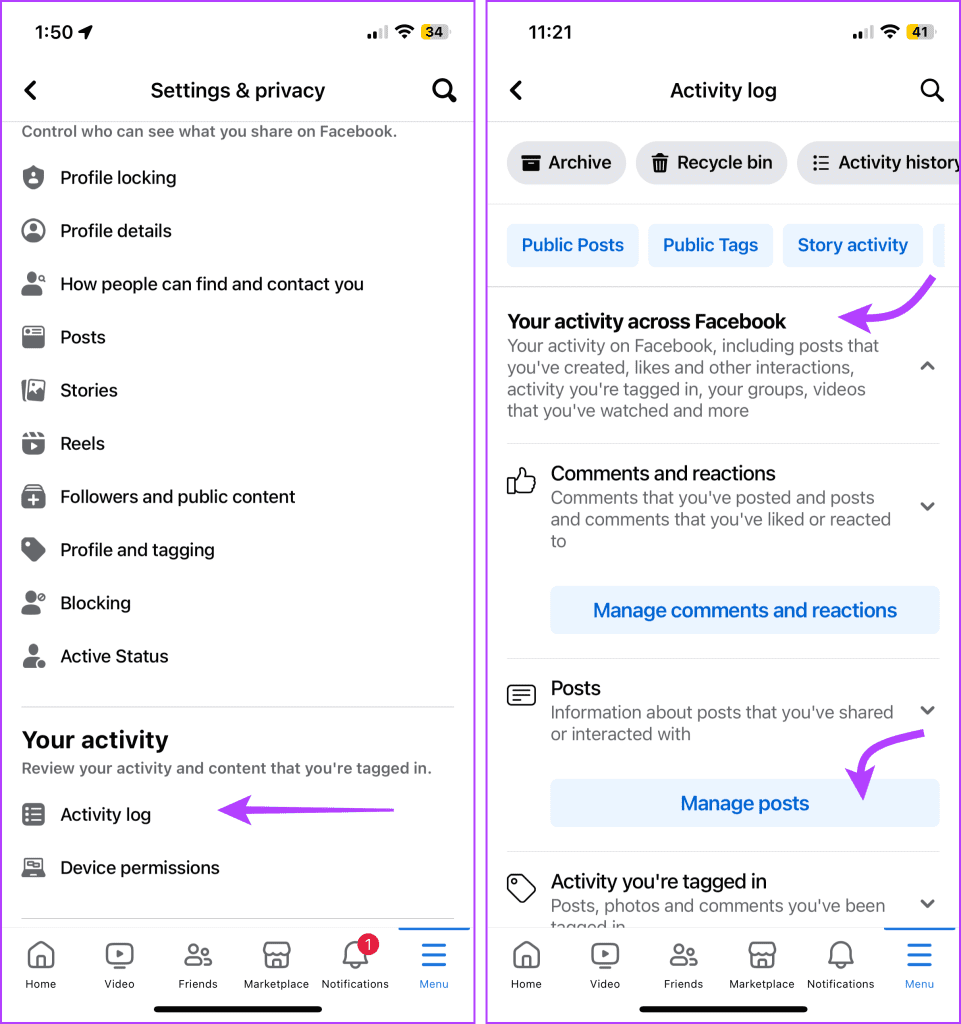
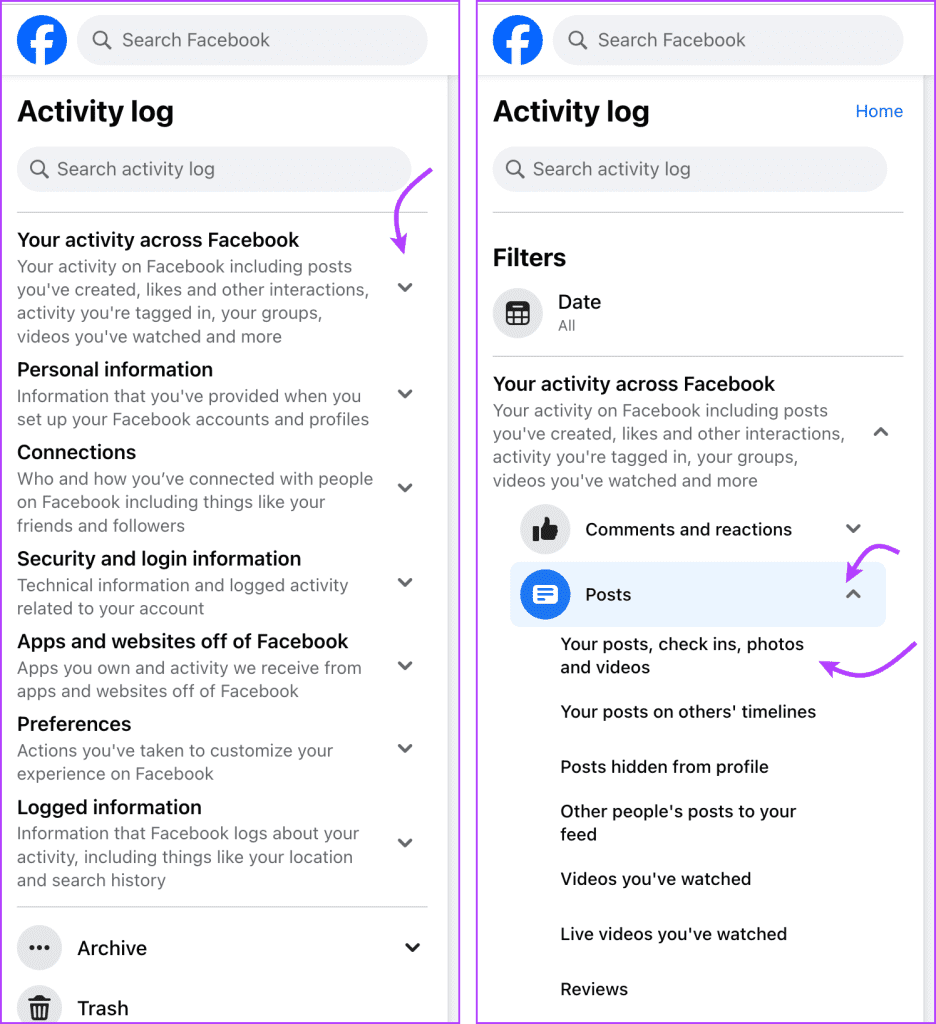
Step 2: Here, scroll down to Your Activity and select Activity Log.
Step 3: Tap ‘Your activity across Facebook’ to open the drop-down menu.
Step 4: Select Manage Posts.
Step 5: Here, tap Filters from the top of the page and select any of the options,
- Categories
- Date

Note: We choose Categories → ‘Your Posts, check-ins, photos, and videos’.
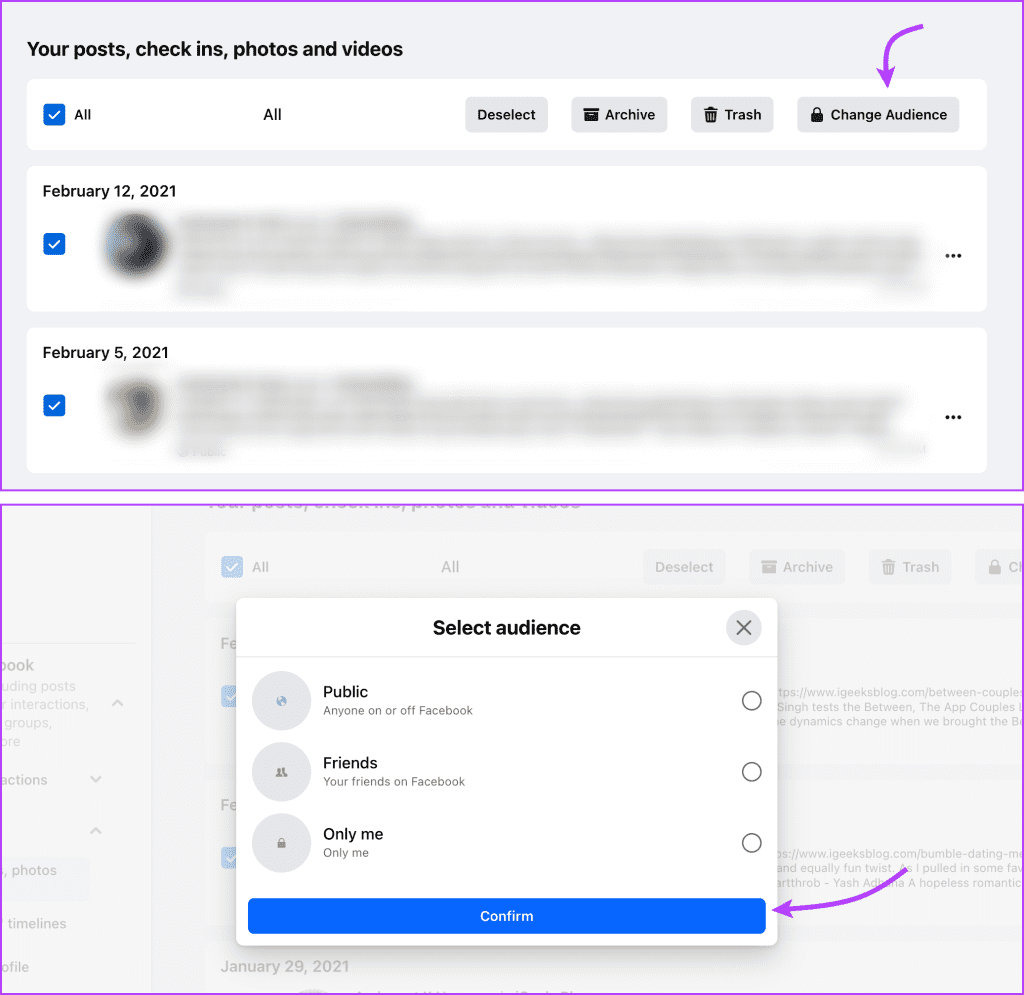
Step 6: Here, select All from the top of the page or you can select them individually.
Step 7: Tap the three-dot icon. Select Change audience.
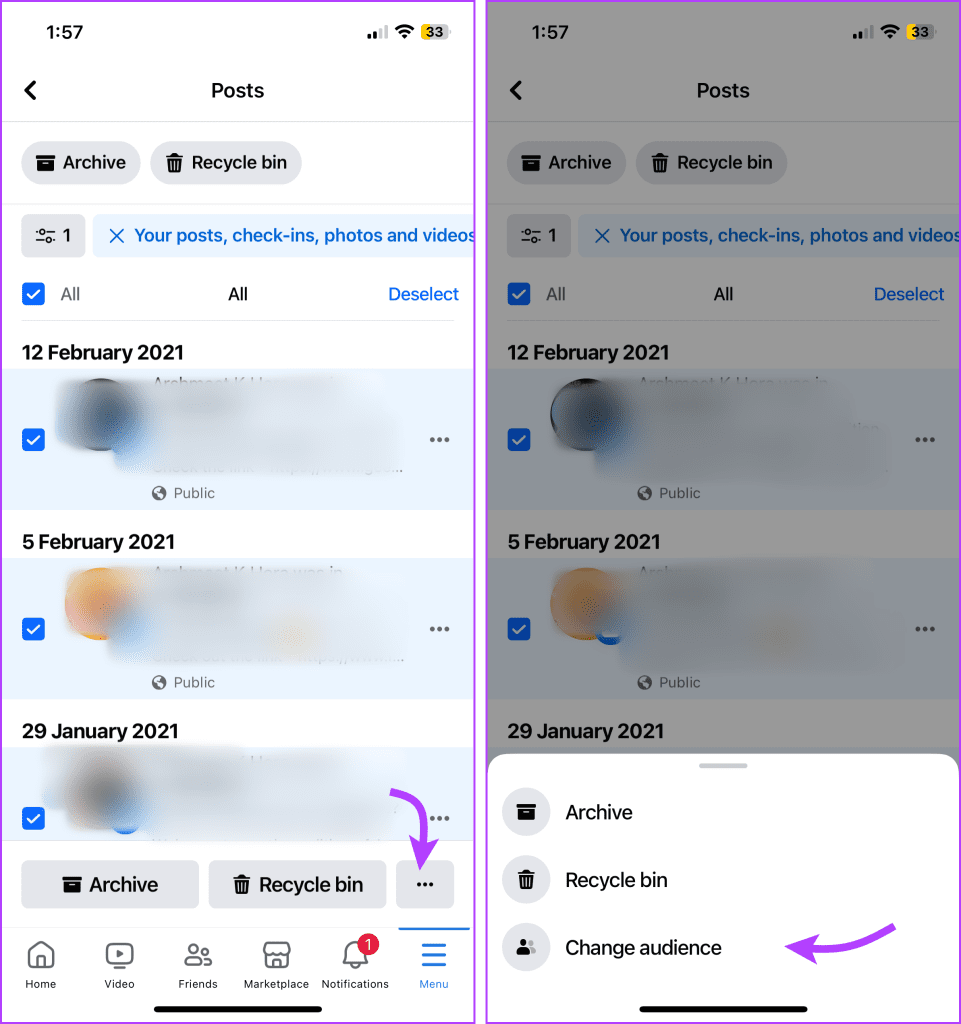
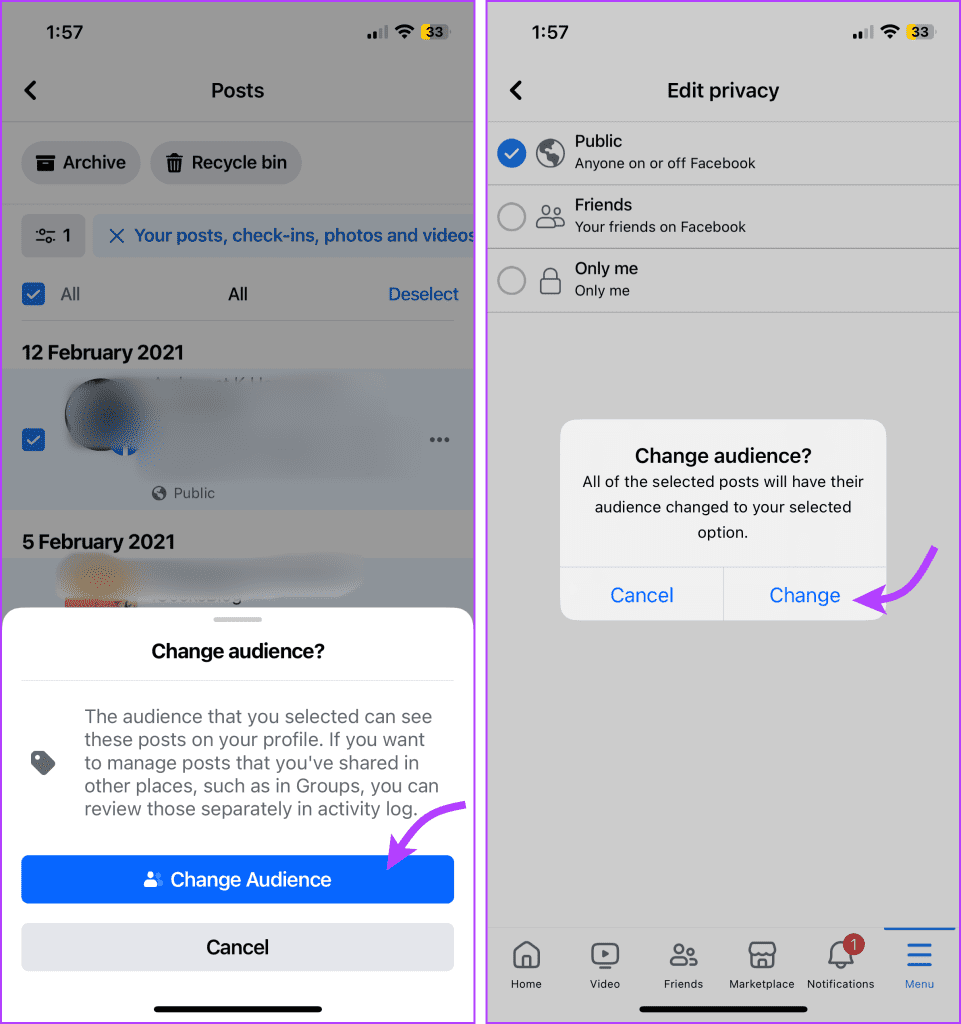
Step 8: Tap Change audience again and then select Only me. You can also choose between the following,
- Public
- Friends
Step 10: Select Change to confirm the action.
Make Previous Posts Only Me from Facebook Web
Step 1: Open Facebook → Profile picture → Settings & privacy → Activity log.
Step 2: Select ‘Your activity across Facebook’ and then select Posts.
Step 3: Here, select a category (we choose ‘Your Posts, check-ins, photos, and videos’).
Step 4: Click All from the top or select the posts.
Step 5: Select Change Audience and select one Only me. Or you can choose Public or Friends.
Method 3. Archive or Trash Old Posts on Facebook
Note: You can’t use archiving to hide all posts from your Facebook timeline. Content shared by others, comments, etc., can’t be archived. You can either delete them permanently or hide them from your profile. Here’s how.
Archive or Delete Old Posts From Facebook Mobile App
Step 1: Open Facebook → three-line icon → Settings & privacy → Settings.
Step 2: Go to Activity Log and tap ‘Your activity across Facebook’ to open the drop-down menu.
Step 3: Select Manage Posts and then Filters. Select any of the available options.
Step 4: Select All or some of the posts as per your preference.
Step 5: Here, tap
- Archive and then Move to Archive to confirm.
- Recycle bin and then Move to Trash to confirm.
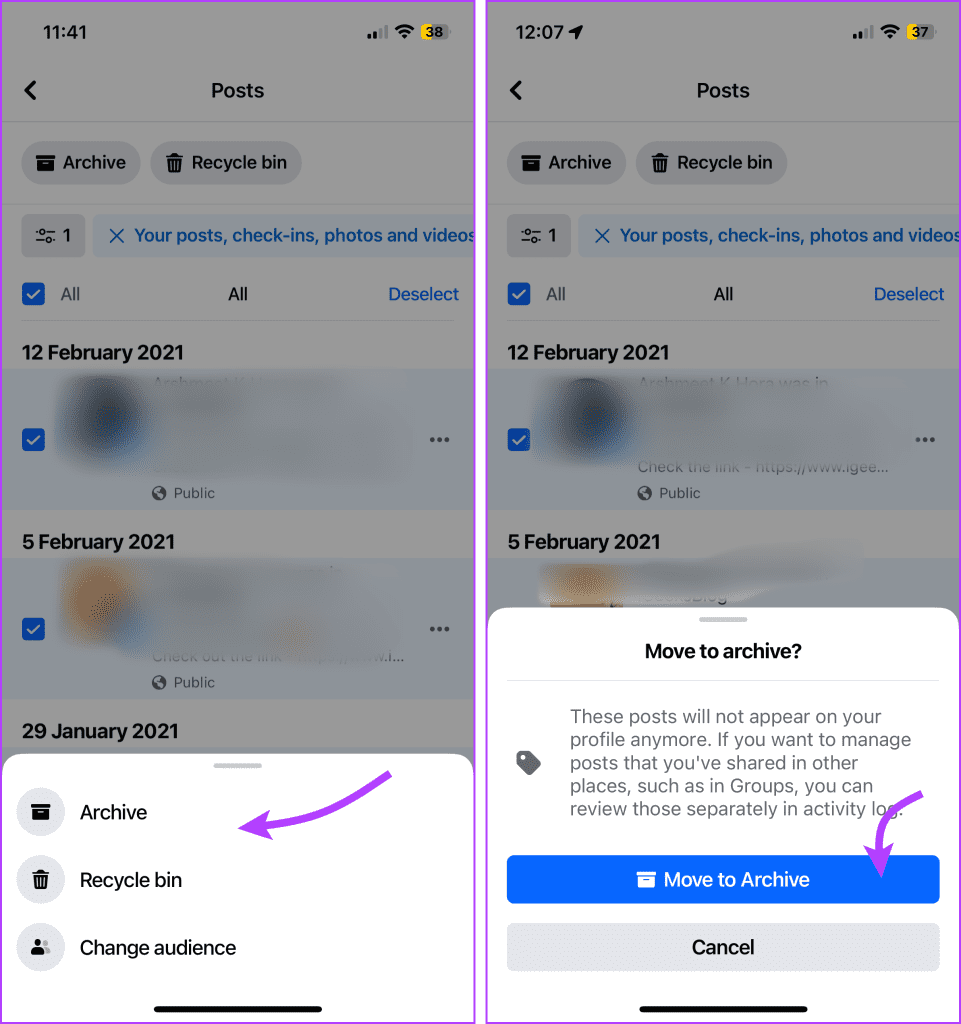
Things to remember,
- If you unarchive – The post will be visible to the selected audience before you move it to the Archive.
- Recover posts from trash – Facebook keeps the posts in the bin for a maximum of 30 days, after which it is automatically deleted. You can recover or archive the post within 30 days.
Use Facebook Web to Archive or Delete Posts
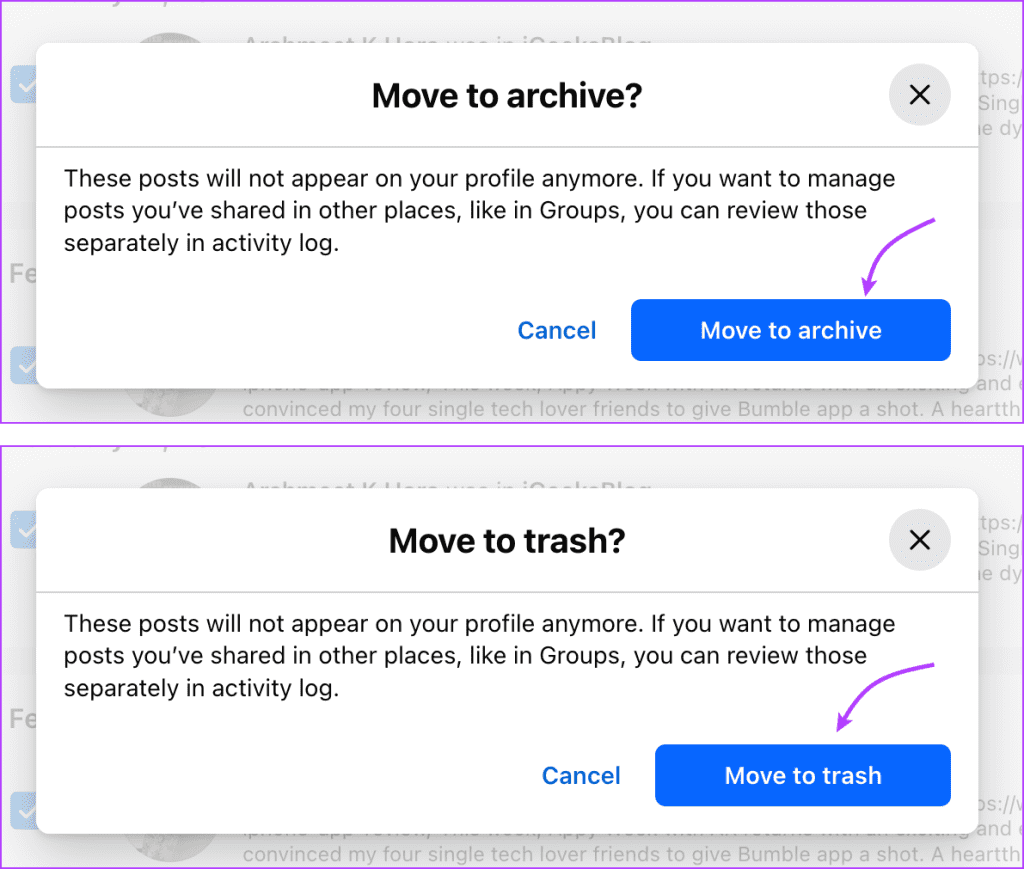
Open Facebook → profile picture → Settings & privacy → Settings → Activity log → ‘Your activity across Facebook’ → Posts → select a category → click All from the top or select the posts. Now select,
- Archive and then Move to archive, or
- Trash and then Move to trash.
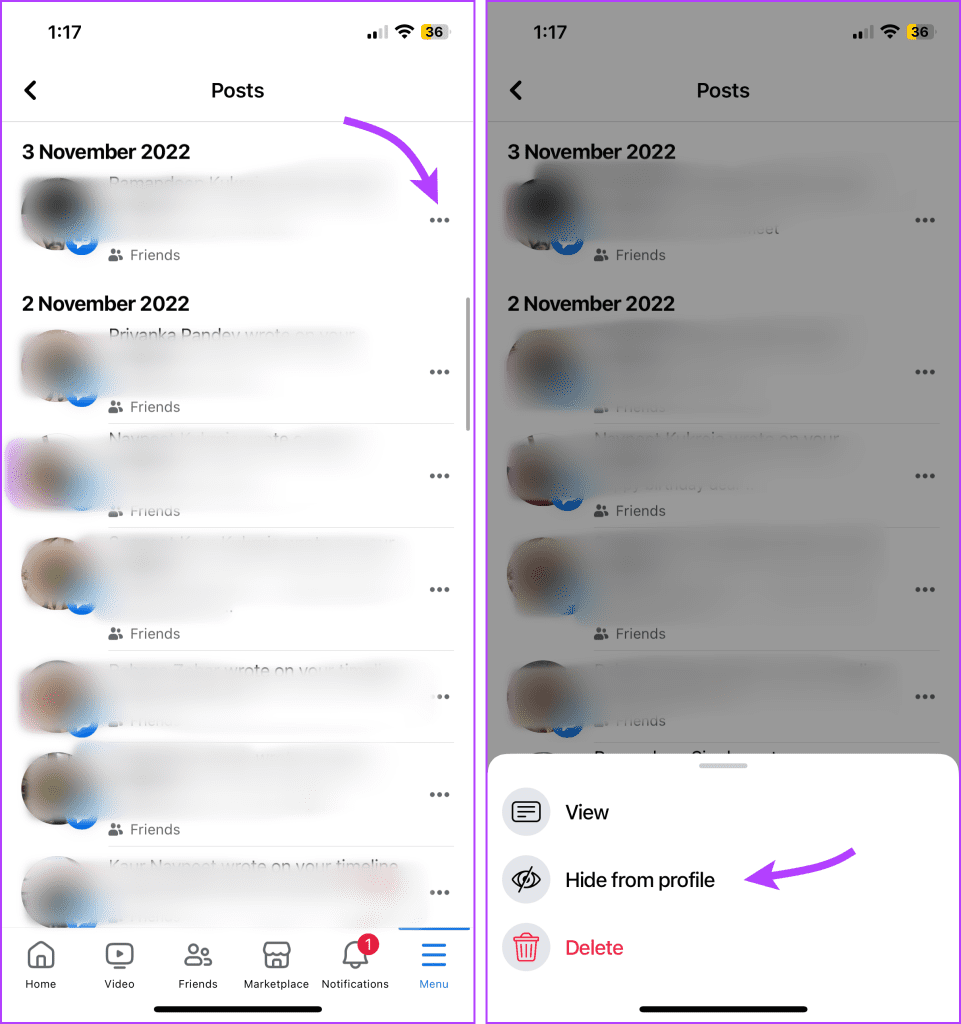
Method 4. Hide Previous Posts From Profile
The Hide from profile feature is a neat way to hide your activity, like videos watched, comments received, posts liked, etc. You can also hide previous posts from the Facebook timeline. Follow the instructions below to do so,
From Mobile App
Open Facebook → three-line icon → Settings & privacy → Settings → ‘Your activity across Facebook’ → Manage Posts. Here, tap the three-dot icon next to the content you want to hide and select Hide from Profile.
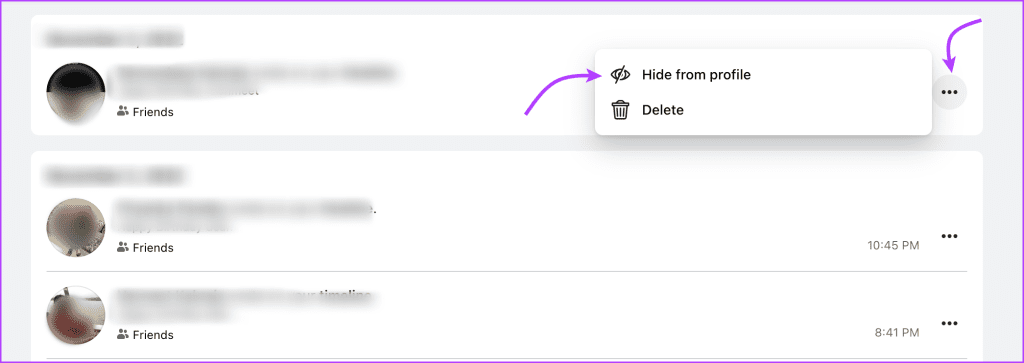
From Facebook Web
Open Facebook → profile picture → Settings & privacy → Settings → Activity log → ‘Your activity across Facebook’ → Posts. Click the three-dot icon next to the content and select Hide from Profile.
Manage New Posts Visibility Settings
While you can always manage the posts’ visibility before posting it, you can also set a default option. Whether you want to hide the post, i.e., set only me to all posts or limit your future Facebook posts to your close friends, all can be done. Here’s how.
On Mobile
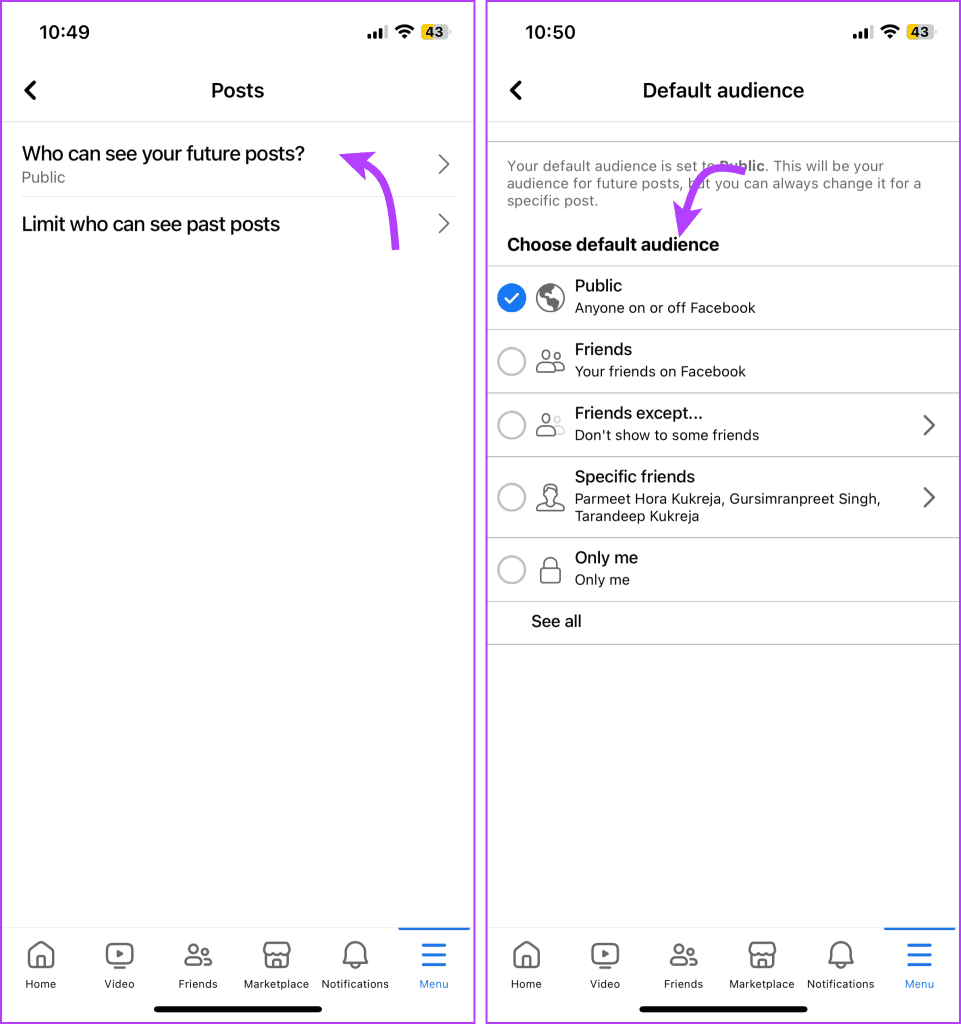
Open the Facebook app → three-line icon → Settings & Privacy → Settings → Posts under Audience and Visibility section → select ‘Who can see your future posts’. Here, you can choose between,
- Public
- Friends
- Friends except
- Specific friends (Tap more for these options)
- Only me
- See all (To see and select your custom list)
On Web
Open Facebook → profile picture → Settings & privacy → Settings → Privacy (from the left column). Here, click Edit next to ‘Who can see your future posts?’ and select one of the following from the drop-down option,
- Public
- Friends
- Friends except
- Specific friends
- Only me
- See all (To see and select your custom list)

As we conclude this guide, hopefully, you’ve gained valuable insights into managing the visibility of your Facebook posts.
Was this helpful?
Last updated on 24 July, 2024
1 Comment
Leave a Reply
Read Next
 Stop Facebook Friends from Seeing Your Activity and Hide It
How to Hide Your Friends List on Facebook On Desktop Step 1: Go to Facebook on your Windows or Mac computer and log in with your account credentials.
Stop Facebook Friends from Seeing Your Activity and Hide It
How to Hide Your Friends List on Facebook On Desktop Step 1: Go to Facebook on your Windows or Mac computer and log in with your account credentials.
 How to Collaborate on Instagram Posts With Your Friends
Note: Instagram Collaboration makes things easier as there’s no need to share the same post from two or more separate accounts while also allowing you to reach a wider audience.
How to Collaborate on Instagram Posts With Your Friends
Note: Instagram Collaboration makes things easier as there’s no need to share the same post from two or more separate accounts while also allowing you to reach a wider audience.
 3 Ways to Fix Instagram Feed Not Showing Friends Posts
Why Can’t I See My Friends’ Posts on My Instagram Feed?
3 Ways to Fix Instagram Feed Not Showing Friends Posts
Why Can’t I See My Friends’ Posts on My Instagram Feed?
 How to Make Your X Account Public and Unprotect Your Tweets
How to Make Your Tweets Public To unprotect your protected tweets, you must make your Twitter account public.
How to Make Your X Account Public and Unprotect Your Tweets
How to Make Your Tweets Public To unprotect your protected tweets, you must make your Twitter account public.
 How to Know if an Instagram Account Is Private or Public
Method 1: By Trying to Share the User’s Post This method will help you determine whether someone’s account is private or public on Instagram if you follow them.
How to Know if an Instagram Account Is Private or Public
Method 1: By Trying to Share the User’s Post This method will help you determine whether someone’s account is private or public on Instagram if you follow them.
 How to Unhide Posts on Reddit and What Happens When You Hide Them
No matter which social media platform you are on, there will be some loose ends in content moderation, and Reddit has it too - it lets you hide posts that
How to Unhide Posts on Reddit and What Happens When You Hide Them
No matter which social media platform you are on, there will be some loose ends in content moderation, and Reddit has it too - it lets you hide posts that
 3 Easy Ways to Hide Posts From Someone on Instagram
Note: Changing settings on your desktop automatically syncs to your mobile device, so you don't have to follow the same methods on your mobile device as you would on your
3 Easy Ways to Hide Posts From Someone on Instagram
Note: Changing settings on your desktop automatically syncs to your mobile device, so you don't have to follow the same methods on your mobile device as you would on your
 How to Find and Remove Deactivated Friends From Facebook
How to Unfriend Deactivated Friends on Facebook First, you must visit the Friends section to remove the deactivated profiles from your Facebook account.
How to Find and Remove Deactivated Friends From Facebook
How to Unfriend Deactivated Friends on Facebook First, you must visit the Friends section to remove the deactivated profiles from your Facebook account.
The article above may contain affiliate links which help support Guiding Tech. The content remains unbiased and authentic and will never affect our editorial integrity.

Please advise me how to turn on my friends notifications posts. I turned it off and can’t find the feature to turn it on back!