Typically, Safe Mode is designed to run without the bloat of installed programs and altered Windows utilities, which can help you troubleshoot persistent issues. But if Windows 11 Safe Mode goes to black screen, you might have to solve a few more issues before you can get back to work. Here are some common troubleshooting steps that should fix Windows 11 black screen in Safe Mode.
Fix 1: Change the Graphics Connection
If you’re using a PC that has a dedicated graphics card but also has a CPU with integrated graphics (common with AMD Ryzens), Safe Mode might inadvertently revert to the built-in graphics that use the motherboard’s connectors.
Therefore, if you’re seeing a black screen but the system seems to be running fine, change the connection from the monitor to go into the motherboard rather than the graphics card itself. Newer motherboards will typically have the same HDMI and DisplayPort options, which are located on the middle of the PC case (instead of further down as is the case with graphics cards).
Fix 2: Perform a Hard Reset
For laptops, a hard reset can resolve battery or power issues that might be preventing the screen from turning on. However, this can also apply to desktop PCs to solve temporary startup glitches.
Step 1. Turn off the PC. Disconnect the laptop from the charger.
Step 2. Press and hold the power button on the case or laptop for 30 seconds.
Step 3. Start the PC again and boot into Safe Mode like you previously did.
Fix 3: Boot Into Additional Safe Mode Options
The Windows Recovery Environment brings up additional boot settings that can help you temporarily get your system up and running while you solve the main issue.
Step 1. Restart your PC via the power button while the system is booting up.
Step 2. Repeat Step 1 until you see a blue screen with options. This is the WindowsRE (recovery environment).
Step 3. Go to “Advanced Settings,” then to “Troubleshoot” and “Advanced Options,” then choose “Startup Settings.” You may need to click on “Restart” to get the advanced Safe Mode options.
Step 4. Click on the buttons for either “Safe Mode with networking” or “Enable low-resolution video mode.” These should modify the Safe Mode just enough to update the graphics driver or display it using the built-in graphics.
Fix 4: Disable Fast Startup
Fast Startup (or Hibernate) ordinarily saves some of your app settings to allow you to boot Windows faster, but it might lead to display issues that result in the Windows 11 black screen in Safe Mode. You can disable this via the Command Prompt.
Step 1. In the WindowsRE (See previous fix), go to “Troubleshoot” and “Advanced Options,” then select “Command Prompt,” which should just display the command prompt on the screen.
Step 2. Enter and execute the following command:
powercfg.exe /hibernate off
Step 3. Close the Command Prompt, go back to the WindowsRE, and boot into Safe Mode.
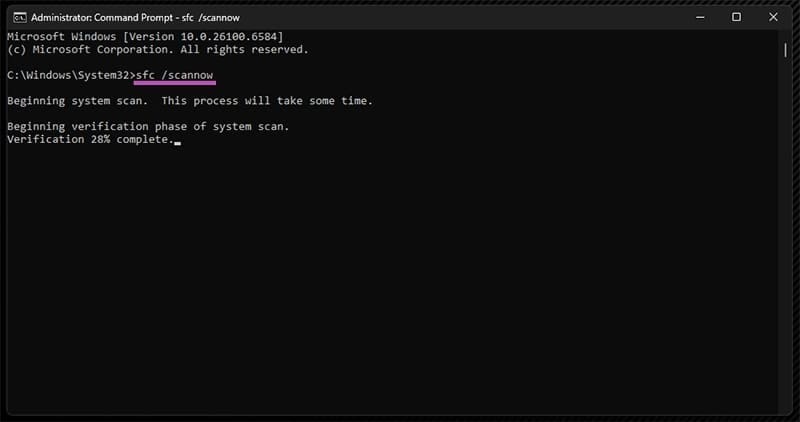
Fix 5: Repair Broken Files
The Windows 11 repair utility can also detect and repair broken files for the system without fully booting Windows.
Step 1. Either go into the Command Prompt through WindowsRE, or enter “Safe Mode with Command Prompt (see Fixes 3 and 4).
Step 2. In the Command Prompt, enter and execute this command:
sfc /scannow
Step 3. Wait for the entire process to complete, which might take a while.
Step 4. Enter Safe Mode with Command Prompt, then type in explorer.exe in the terminal and run it. This should display the taskbar.
Step 5. Press “Win + R,” type in “regedit,” then click “Ok” to go to the Registry Editor.
Step 6. Go to the following address: Computer -> HKEY_LOCAL_MACHINE -> SYSTEM -> CurrentControlSet -> Control -> Session Manager -> Environment

Step 7. Open or create a “windir” value (via “New” and “String value”), then put “C:\Windows” as the value (replace C with the drive where the system is installed if needed).
Step 8. Exit the Registry Editor and restart the PC.
Fix 6: Reset Windows
If nothing works, you can download bootable media from the Windows 11 website, mount it onto a USB, and reinstall Windows over the current installation. In most cases, this will save the files that are on other hard drives.
Was this helpful?
Last updated on 03 October, 2025
Read Next
 3 Fixes for Windows 11 Stuck in Safe Mode
Fix 1: Use System Configuration System Configuration is a utility used to define how your PC starts up and which programs and services run with it.
3 Fixes for Windows 11 Stuck in Safe Mode
Fix 1: Use System Configuration System Configuration is a utility used to define how your PC starts up and which programs and services run with it.
 How to Disable Tumblr Safe Mode or Bypass it Without an Account
Tumblr is a great place to get your daily fix of cool GIFs and memes.
How to Disable Tumblr Safe Mode or Bypass it Without an Account
Tumblr is a great place to get your daily fix of cool GIFs and memes.
 5 Fixes for Android Phone Stuck in Safe Mode
Try Basic Fixes Restart your phone: Restarting your Android is the most straightforward method for disabling Safe Mode.
5 Fixes for Android Phone Stuck in Safe Mode
Try Basic Fixes Restart your phone: Restarting your Android is the most straightforward method for disabling Safe Mode.
 Top 7 Useful Ways to Fix Windows 10 Photos Black Screen Error
Windows 10 got a lot of things right, but the Photos app was not one of them.
Top 7 Useful Ways to Fix Windows 10 Photos Black Screen Error
Windows 10 got a lot of things right, but the Photos app was not one of them.
 4 Ways to Fix Windows 11 Black Screen Issue
Try Basic Fixes Check connections: If you are using a Windows 11 desktop, check the wired connections between your CPU and the monitor.
4 Ways to Fix Windows 11 Black Screen Issue
Try Basic Fixes Check connections: If you are using a Windows 11 desktop, check the wired connections between your CPU and the monitor.
 2 Ways to Fix Discord Black Screen at Startup on Windows 11
Basic Fixes Check the Discord server: Head to the Discord Status page to check an active service outage.
2 Ways to Fix Discord Black Screen at Startup on Windows 11
Basic Fixes Check the Discord server: Head to the Discord Status page to check an active service outage.
 5 Ways to Fix the Black Screen Issue in Amazon Prime Video on Windows
Try Basic Fixes Temporarily disable your VPN connection: Although VPNs are great for maintaining privacy, they can often cause problems with streaming services such as Prime Video, especially if you
5 Ways to Fix the Black Screen Issue in Amazon Prime Video on Windows
Try Basic Fixes Temporarily disable your VPN connection: Although VPNs are great for maintaining privacy, they can often cause problems with streaming services such as Prime Video, especially if you
 6 Ways to Fix Black Screen on Pressing Alt + Tab on Windows
Fix 1: Change the Display Mode of the Application (Game) The black screen issue usually appears when tabbing out of a full-screen game.
6 Ways to Fix Black Screen on Pressing Alt + Tab on Windows
Fix 1: Change the Display Mode of the Application (Game) The black screen issue usually appears when tabbing out of a full-screen game.
The article above may contain affiliate links which help support Guiding Tech. The content remains unbiased and authentic and will never affect our editorial integrity.

