Fix 1: Check Spelling and Autocorrect Settings
The first thing you should do is ensure that spell check is enabled and configured correctly in Outlook. Here’s how to do it.
Step 1: Open the Outlook app on your PC and click the File menu in the top-left corner.
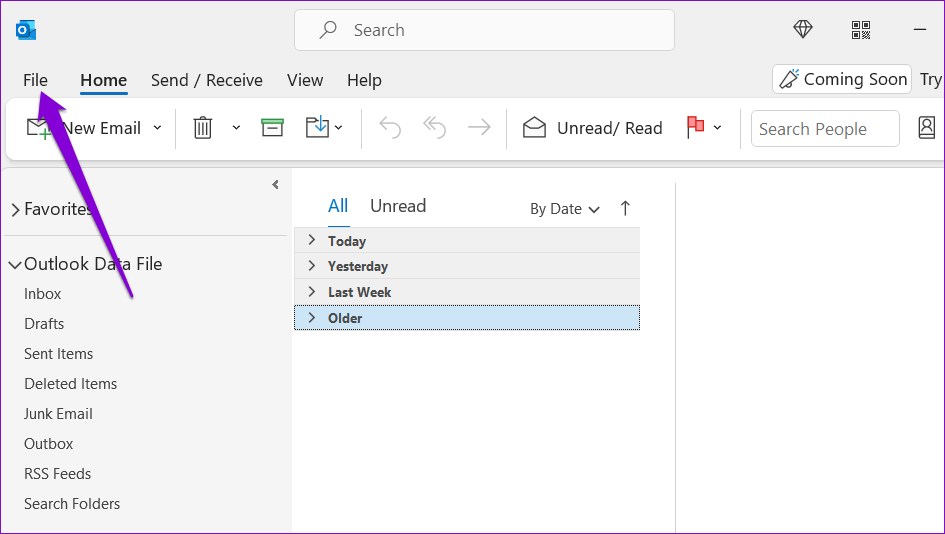
Step 2: Select Options from the left sidebar.
Step 3: Switch to the Mail tab and tick the checkbox that reads Always check spelling before sending. Then, clear the Ignore original message text in reply or forward checkbox.

Step 4: Click the Spelling and Autocorrect button.

Step 5: Tick the Check spelling as you type and Mark grammar errors as you type boxes. Then, click OK.

Fix 2: Check the Proofing Language
If the spell check is not working even after you turn it on, you may have set the wrong proofing language. Here’s how you can change that.
Step 1: Open Microsoft Outlook and click the New Email button.

Step 2: Under the Review tab, select Language > Set Proofing Language.

Step 3: Choose your preferred language from the list, and click the Set As Default button.

Step 4: Uncheck the Do not check spelling or grammar box. Then, click OK.

Fix 3: Run Spell Check Manually
Another thing you can do is run a spell check manually in Outlook. For that, compose an email as you normally would and intentionally type in a few misspelled words. Then, switch to the Review tab and click the Spelling and Grammar option at the top.

If Outlook’s spell check does not work even when you run it manually, a third-party add-in or corrupted files may be responsible for the issue.
Fix 4: Open Outlook in Safe Mode
An outdated or buggy third-party add-in can cause certain features, like spell check, to stop working in Outlook. To check for this possibility, you can open Outlook in Safe Mode.
Press and hold the Ctrl key on your keyboard and double-click the Outlook shortcut. Click Yes when the confirmation prompt appears. If the spell check feature works as expected while Outlook is in safe mode, you should disable all the add-ins and re-enable them one at a time.
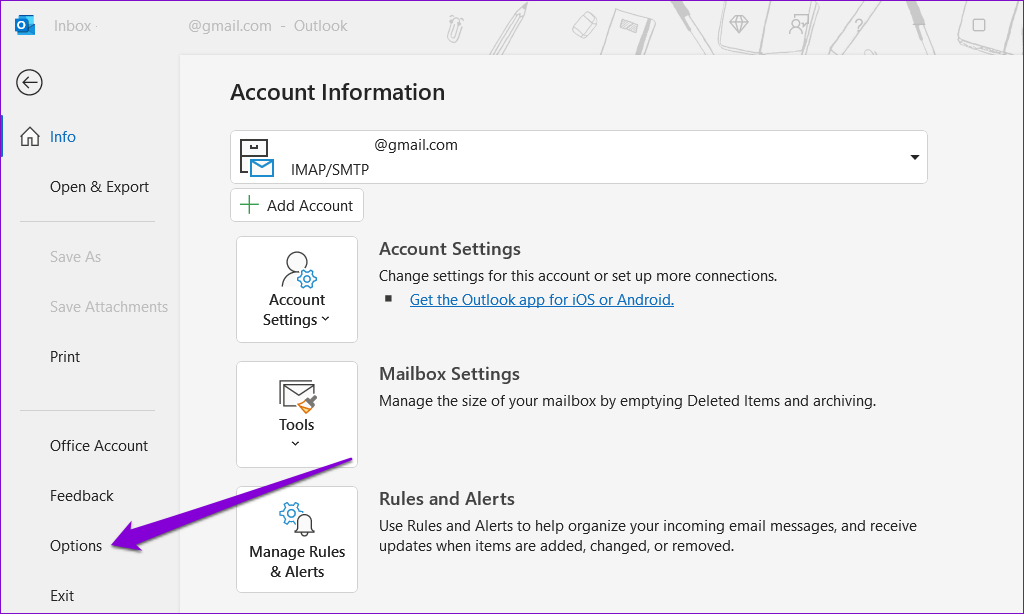
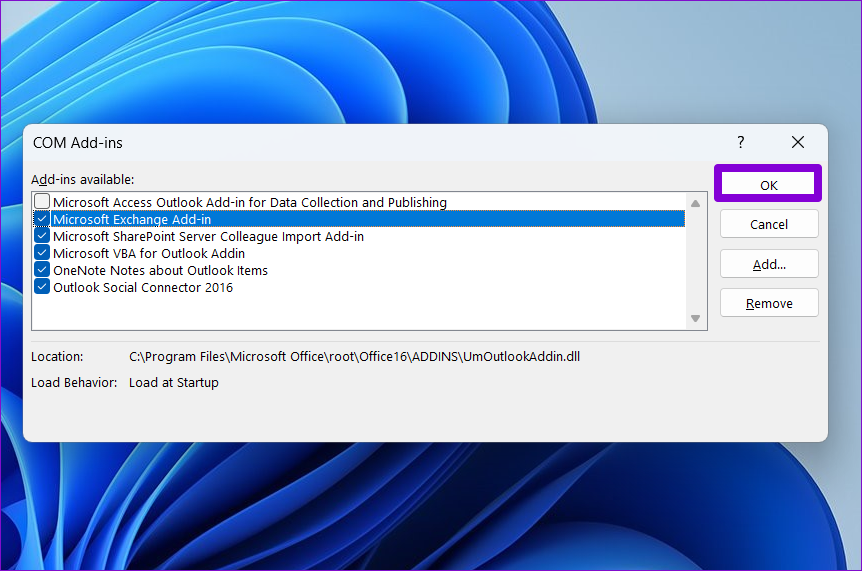
Step 1: In the Outlook app, go to File > Options.
Step 2: In the Outlook Options window, switch to the Add-ins tab. Click the drop-down menu next to Manage and select COM Add-ins. Then, click the Go button next to it.
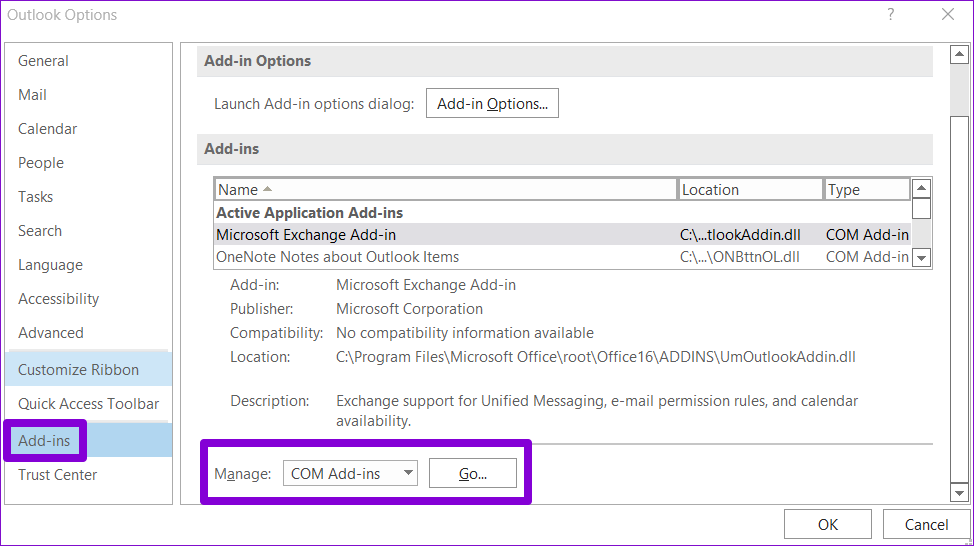
Step 3: Uncheck the boxes to disable add-ins and click OK.
Restart the Outlook app after this and enable your add-ins one by one until the problem occurs again. After you find the problematic add-in, consider updating or removing it.
Fix 5: Run the Office Repair Tool
Running the Office repair tool is an effective way to fix issues with Office apps like Outlook. The tool can automatically scan your Office apps for installation issues or corrupted files and fix them. Here’s how to run it.
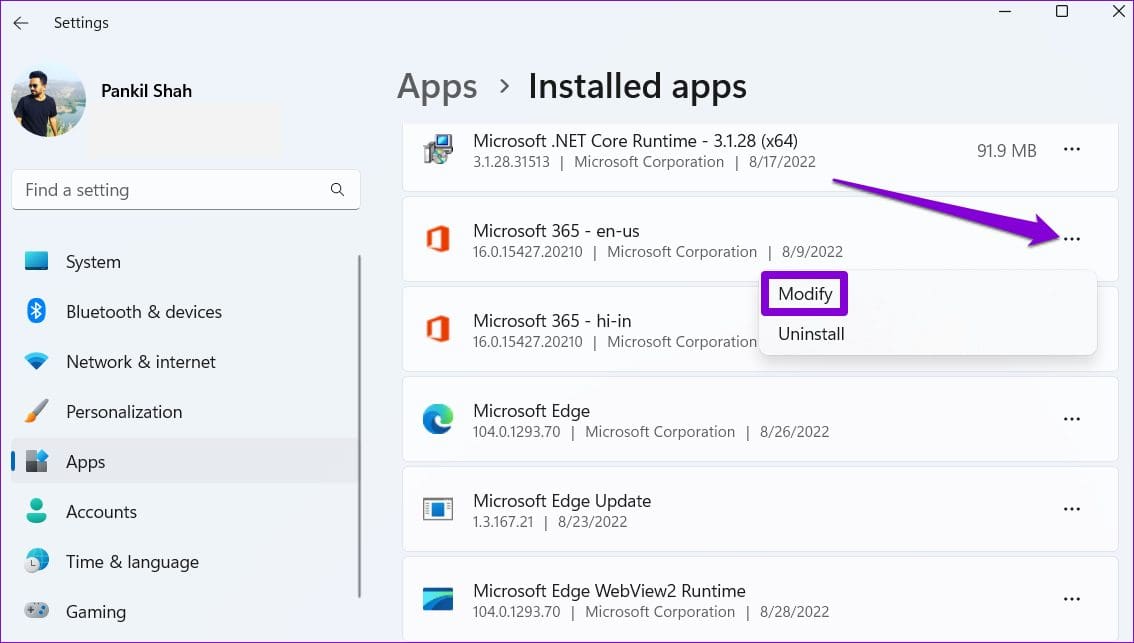
Step 1: Right-click on the Start icon and select Installed apps from the list.

Step 2: Scroll down to locate the Microsoft Office suite on the list. Click the three-dot menu icon next to it and select Modify.
Step 3: Select Online Repair and click on Repair.

Was this helpful?
Last updated on 04 July, 2024
Read Next
 5 Fixes for Spell Check Not Working in Microsoft Teams for Windows
Fix 1: Disable and Re-Enable Spell Check This may seem too simple, but disabling and re-enabling the spell check feature in Microsoft Teams can help.
5 Fixes for Spell Check Not Working in Microsoft Teams for Windows
Fix 1: Disable and Re-Enable Spell Check This may seem too simple, but disabling and re-enabling the spell check feature in Microsoft Teams can help.
 6 Ways to Spell Check Is Not Working in Microsoft Word
Before you begin, try to restart Microsoft Word to fix temporary bugs and glitches.
6 Ways to Spell Check Is Not Working in Microsoft Word
Before you begin, try to restart Microsoft Word to fix temporary bugs and glitches.
 3 Ways to Fix Spell Check Not Working in Google Docs
Basic Fixes Check network connectivity: Google Docs does not check for spelling in offline mode.
3 Ways to Fix Spell Check Not Working in Google Docs
Basic Fixes Check network connectivity: Google Docs does not check for spelling in offline mode.
 5 Ways to Fix Spell Check Not Working in Gmail
Fix 1: Make Sure Spell Check Is Enabled This may seem obvious, but it's worth double-checking that you haven't accidentally turned off the spell check feature in Gmail.
5 Ways to Fix Spell Check Not Working in Gmail
Fix 1: Make Sure Spell Check Is Enabled This may seem obvious, but it's worth double-checking that you haven't accidentally turned off the spell check feature in Gmail.
 How to Disable OneNote Spell Check
OneNote is simply fantastic at what it offers.
How to Disable OneNote Spell Check
OneNote is simply fantastic at what it offers.
 5 Fixes for Unable to Open Attachments in Microsoft Outlook on Windows
Fix 1: Check Attachment Handling Settings If Outlook is unable to open your email attachments, it may be because the file previewer option is disabled.
5 Fixes for Unable to Open Attachments in Microsoft Outlook on Windows
Fix 1: Check Attachment Handling Settings If Outlook is unable to open your email attachments, it may be because the file previewer option is disabled.
 5 Fixes for Microsoft Outlook Out of Memory or System Resources Error on Windows
Fix 1: Run the Inbox Repair Tool Damaged or corrupted PST or OST files can cause Outlook to run out of memory on your Windows computer.
5 Fixes for Microsoft Outlook Out of Memory or System Resources Error on Windows
Fix 1: Run the Inbox Repair Tool Damaged or corrupted PST or OST files can cause Outlook to run out of memory on your Windows computer.
 5 Fixes for “Not Implemented” Error in Microsoft Outlook for Windows
Fix 1: Rename the Send/Receive Settings File Is Outlook only showing the "Not Implemented" error when you click the "Send/Receive" tab?
5 Fixes for “Not Implemented” Error in Microsoft Outlook for Windows
Fix 1: Rename the Send/Receive Settings File Is Outlook only showing the "Not Implemented" error when you click the "Send/Receive" tab?
The article above may contain affiliate links which help support Guiding Tech. The content remains unbiased and authentic and will never affect our editorial integrity.