Fix 1: Configure Remote Desktop Connection Settings
A common reason you may be unable to copy and paste data during a Remote Desktop session is if you have previously disabled clipboard usage. Hence, it’s the first thing to check.
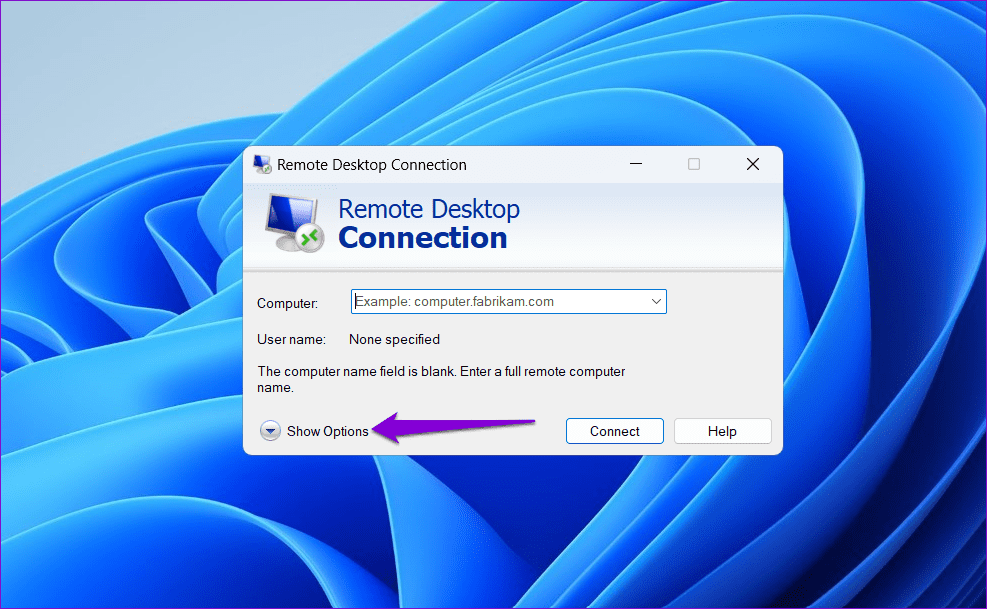
Step 1: Click the search icon on the taskbar > type remote desktop connection > press Enter.

Step 2: Click on Show Options.
Step 3: Switch to the Local Resources tab > check the Clipboard box. Then, click the More button.

Step 4: Select the Drives checkbox > click OK.

Fix 2: Enable Clipboard History
When you copy any text or image on Windows, it is automatically saved to the clipboard history. However, if you have disabled the clipboard history feature on Windows, it may stop the copy-paste function from working during Remote Desktop sessions. Here’s how to fix it.
Step 1: Press the Windows key + I to launch the Settings app > head to System > Clipboard.

Step 2: Turn on the toggle next to Clipboard history.
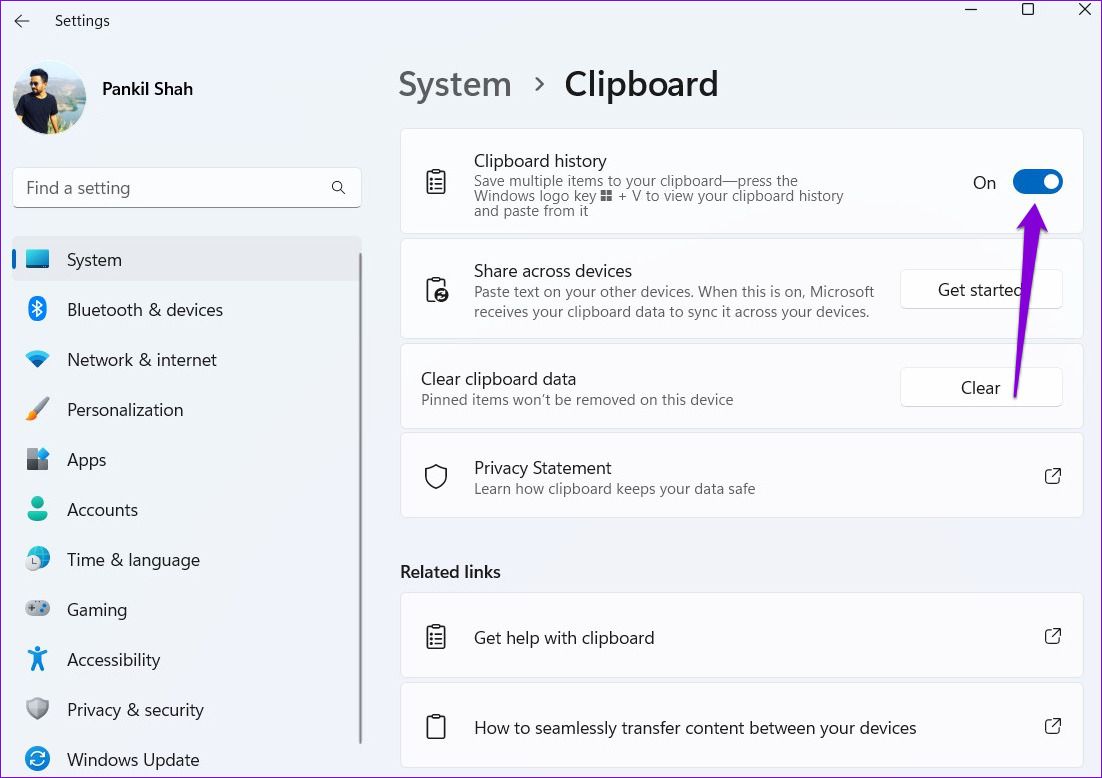
Step 3: Enable the toggle for Share across your devices.

Fix 3: Run the RDP Clipboard Monitor Process
The RDP Clipboard Monitor process (rdpclip.exe) on Windows manages the copy-paste function during Remote Desktop sessions. If this RDP clipboard service is not working properly for some reason, you cannot copy and paste data during your Remote Desktop session. Here’s how to fix that.
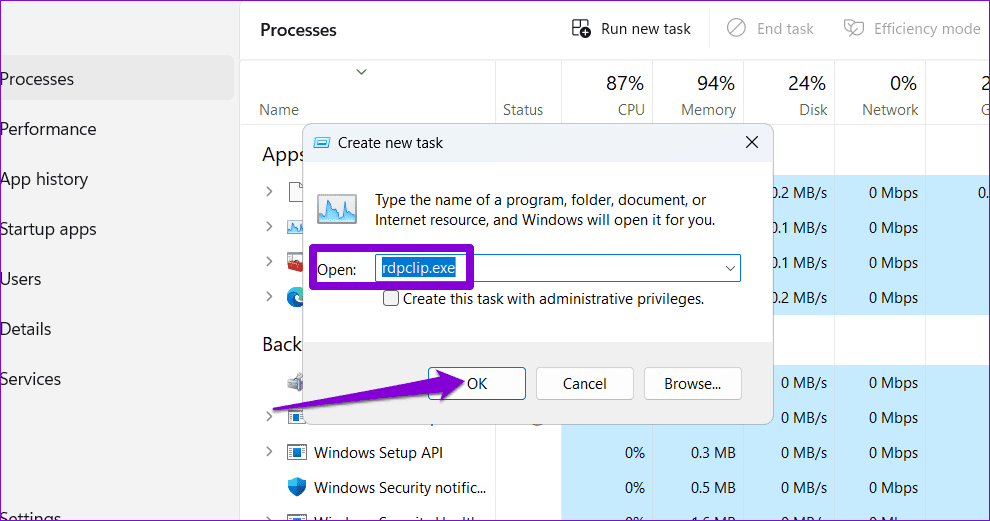
Step 1: Press Ctrl + Shift + Esc to open the Task Manager > click Run new task.

Step 2: Type rdpclip.exe in the Open field > click OK.
Fix 4: Modify Group Policy Settings
Incorrectly configured Group Policy settings can also stop the copy-paste functionality from working during Remote Desktop sessions on Windows. To rule this out, review the Group Policy settings on your PC using these steps:
Note: The Group Policy Editor is only accessible on Windows Pro, Enterprise, and Education editions. If your PC is running Windows Home, skip to the next solution.
Step 1: Press the Windows key + R to launch the Run dialog box > type gpedit.msc in the Open field > press Enter.
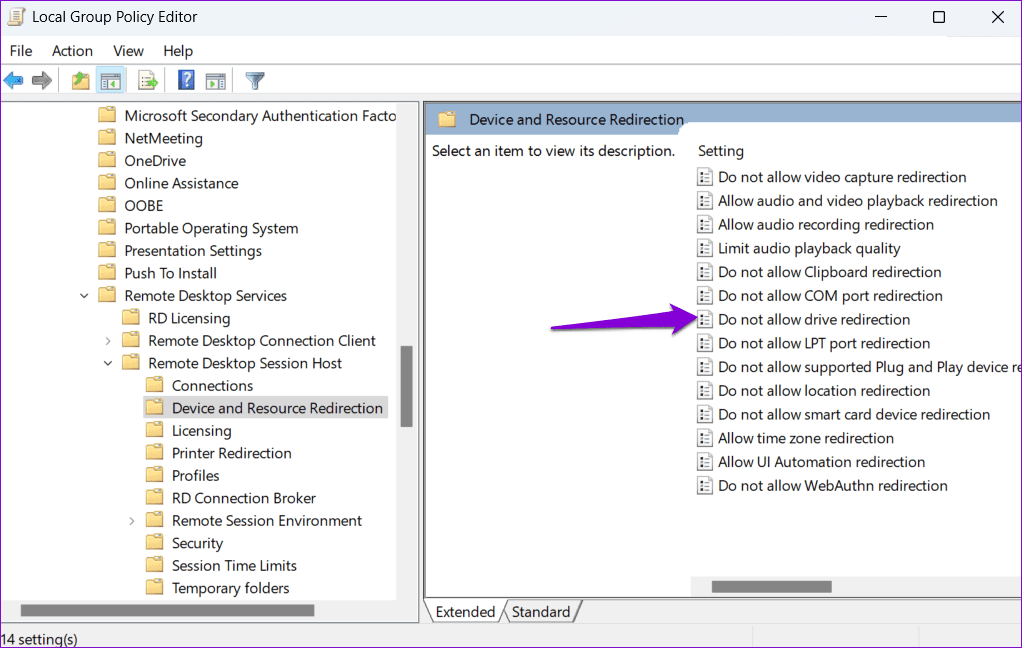
Step 2: In the Local Group Policy Editor window, use the left pane to navigate to the following folder:
Computer Configuration\Administrative Templates\Windows Components\Remote Desktop Services\Remote Desktop Session Host\Device and Resource Redirection
Step 3: Double-click the Do not allow Clipboard redirection policy in the right pane.

Step 4: Select Disabled > hit Apply > OK.

Step 5: Similarly, set the Do not allow drive redirection policy to Disabled.
Fix 5: Modify Registry Files
If you can’t access the Group Policy settings or if the issue persists, try modifying a few registry files to allow clipboard redirection.
Step 1: Press the Windows key + R to launch the Run utility. Type regedit in the Open field and press Enter.
Step 2: In the Registry Editor window, paste the following path in the address bar at the top and press Enter.
Computer\HKEY_LOCAL_MACHINE\SOFTWARE\Policies\Microsoft\Windows NT\Terminal Services
Step 3: Right-click on the Terminal Services key > go to New > select DWORD (32-bit) Value > name it DisableClipboardRedirection.

Step 4: Double-click the DisableClipboardRedirection DWORD > type 0 in the value data field > click OK.

Step 5: Right-click on the Terminal Services key again > go to New > select DWORD (32-bit) Value > name the DWORD DisableDriveRedirection.
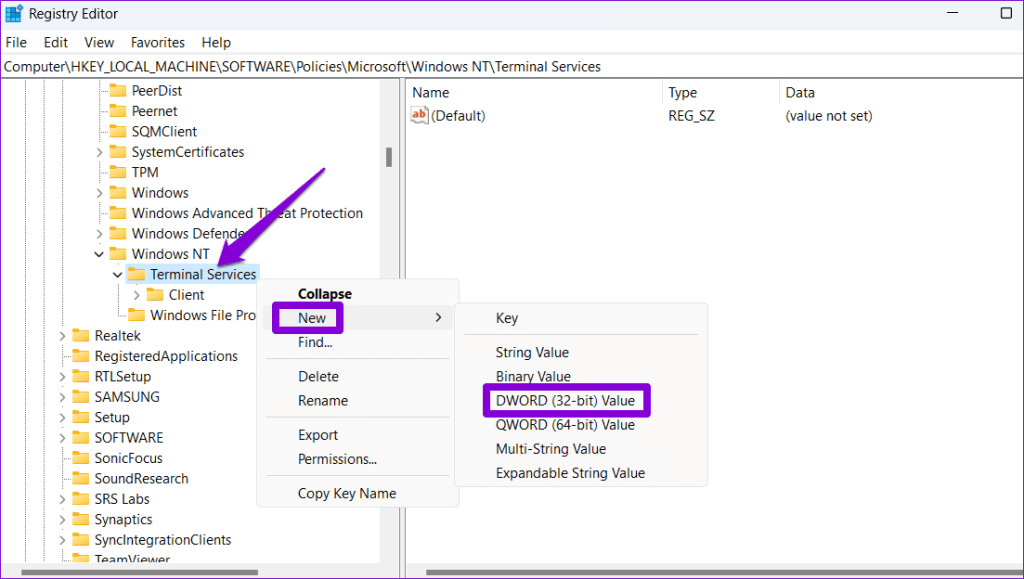
Step 6: Double-click the newly created DWORD > set the value data to 0 > click OK.

Restart your PC after this, and you should not experience any problems.
Was this helpful?
Last updated on 07 August, 2024
Read Next
 Top 9 Ways to Fix Copy-Paste Not Working on Windows 10 Issue
The copy-paste function in Windows 10 is often taken for granted.
Top 9 Ways to Fix Copy-Paste Not Working on Windows 10 Issue
The copy-paste function in Windows 10 is often taken for granted.
 4 Ways to Fix Copy and Paste Not Working in Windows 11
Try Basic Fixes Restart Windows Explorer: Problems with the Windows Explorer process can also prevent you from copying and pasting files in File Explorer.
4 Ways to Fix Copy and Paste Not Working in Windows 11
Try Basic Fixes Restart Windows Explorer: Problems with the Windows Explorer process can also prevent you from copying and pasting files in File Explorer.
 7 Ways to Fix Copy and Paste Not Working in Microsoft Word
Basic Fixes Restart PC: Restart your PC to eliminate any temporary bugs and glitches.
7 Ways to Fix Copy and Paste Not Working in Microsoft Word
Basic Fixes Restart PC: Restart your PC to eliminate any temporary bugs and glitches.
 4 Ways to Fix Copy and Paste Not Working on Mac
Fix 1: Force Quit the Pasteboard Server Pboard is the short form for Pasteboard Server.
4 Ways to Fix Copy and Paste Not Working on Mac
Fix 1: Force Quit the Pasteboard Server Pboard is the short form for Pasteboard Server.
 How to Fix Copy and Paste Not Working in Chrome
Note: While the article concentrates on solutions for the Chrome browser, you can use them to fix the issue in any other browser, such as Safari, Firefox, and Edge.
How to Fix Copy and Paste Not Working in Chrome
Note: While the article concentrates on solutions for the Chrome browser, you can use them to fix the issue in any other browser, such as Safari, Firefox, and Edge.
 5 Ways to Copy and Paste Text on Android
Method 1: Copy and Paste General Text To copy and paste text on your Android device, follow these steps: Step 1: Long-press the text you want to copy.
5 Ways to Copy and Paste Text on Android
Method 1: Copy and Paste General Text To copy and paste text on your Android device, follow these steps: Step 1: Long-press the text you want to copy.
 How to Copy and Paste Pictures on Android
Copying pictures on iPhones and PCs is easy.
How to Copy and Paste Pictures on Android
Copying pictures on iPhones and PCs is easy.
 4 Fixes if Chrome Remote Desktop Is Not Working on Windows 11
Fix 1: Disable PIN-Less Authentication Chrome Remote Desktop lets you pair your trusted devices with your computer.
4 Fixes if Chrome Remote Desktop Is Not Working on Windows 11
Fix 1: Disable PIN-Less Authentication Chrome Remote Desktop lets you pair your trusted devices with your computer.
The article above may contain affiliate links which help support Guiding Tech. The content remains unbiased and authentic and will never affect our editorial integrity.