Preliminary Fixes
- Check/Switch the USB Ports: One common cause of this error is the USB port being used. Some USB ports may not be compatible with the installation process, especially if they are USB 3.0 ports. Check and fix it.
- Check the USB Drive on Another System: Sometimes, the issue might be with the USB drive itself. Verifying the USB drive on another system can help determine if the drive is faulty or if the installation media is corrupted.
Method 1: Disable CSM and Secure Boot
CSM and Secure Boot features can interfere with the installations, so you must disable them using the BIOS settings. You can install Windows 11 without Secure Boot if you have TPM 2.0 and UEFI on your PC. Here’s how to disable Secure Boot in the BIOS:
Step 1: Restart your PC.
Step 2: Press the designated F-key (usually the F2 or Esc key) to access the BIOS.
You need to check the key assigned by the PC manufacturer to access the BIOS.
Step 3: After you enter the BIOS, switch to the Security tab.
Note: Your PC’s BIOS option may differ. Look for the Secure Boot option in all the tabs in the BIOS.

Step 4: Click on the Secure Boot option.

Step 5: Click on the Secure Boot Control option and select the Disabled option.

Step 6: Press the F10 key to save the changes and exit the BIOS.
Step 7: Your PC will reboot, and you must boot using the Windows USB installation media. Proceed with the installation and check if the Windows setup encounters the same error.
Similarly, disable the CSM mode, which is also a feature in the BIOS that enables support for installing older operating systems.
Method 2: Download and Install the Missing Drivers
If your PC uses an Intel processor, download and extract the Intel Rapid Storage Technology (IRST) driver for your PC model. AMD users will have to do the same and download and extract the AMD RAID Driver (SATA, NVMe RAID) drivers.

After that, copy the extracted drivers folder to the Windows USB installation media.

Repeat the following steps:
Step 1: Power on your PC and boot using the Windows USB installation media till you reach where the setup asks you to load drivers. If you copied the drivers to another USB drive, plug it in.
Step 2: Click on the Browse button.

Step 3: Select the appropriate driver folder and click on the OK button.

Step 4: Click on the driver to select it and then click on the Next button.

Step 5: After the driver installs successfully, pick a drive for installation and continue with the setup.
Method 3: Try Installing the 32-Bit Version (For Windows 10)
If you are having trouble with the Windows 10 installation, try the 32-bit version of the operating system instead of the 64-bit version. This is a temporary workaround that worked for many users, but you will have to stick with the 32-bit version on the OS. And whenever you wish to change, you’ll have to clean install the 64-bit version of Windows.
Method 4: Recreate the USB Installation Media
Corrupt USB installation media is also a reason why the error pops up when you try to select the drive and proceed with the Windows installation. So, you must recreate the Windows USB installation media with the help of either the Windows Media Creation tool or Rufus.
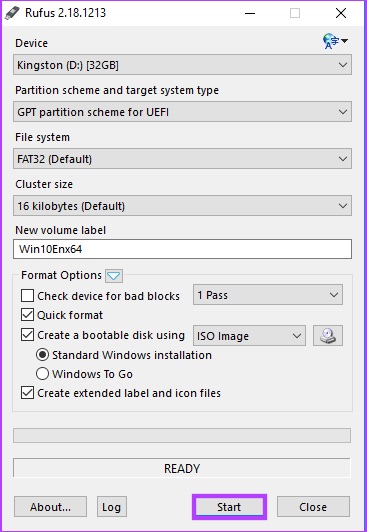
Ensure you download the latest ISO file from the official Windows website and use it to create the Windows USB installation media. Connect the USB drive to your PC and check if the installation proceeds without any errors.
Method 5: Convert Disk to GPT
Windows 11 requires the PC to support UEFI, and the storage drive must be in the GPT format. If the primary storage disk is in MBR format, you must convert it to GPT before installing the operating system.
Step 1: Press the Shift + F10 keyboard shortcut to open the Command Prompt on the Windows Setup page.
Step 2: Type the following command and press Enter to launch the Diskpart utility:
diskpart
Step 3: After that, execute the following command:
list disk
Step 4: You will see a list of all the disks, including the Windows USB installation media. Note the number of your system disk. The command to select the disk is:
select disk disknumberStep 5: Replace the disknumber part with the actual number of the disk from the list. So, the final command in our case becomes:
select disk 0
Step 6: After selecting the disk, execute the following command:
clean
Step 7: The selected disk is wiped clean. Execute the following command to convert it to GPT:
convert gpt
Step 8: After you see the successful command execution message, execute the following command:
list disk
Step 9: You will notice that an asterisk (*) appears in front of the disk under the GPT column. It indicates that the disk is in GPT format now.
Step 10: Close the Command Prompt window and continue the Windows installation.
That’s it. This should fix the no device drivers were found error from your Windows 10/11 PC once and for all.
Was this helpful?
Last updated on 20 July, 2024
Read Next
 7 Ways to Fix Windows 11 Updates Not Downloading or Installing
Fix 1: Run the Windows Update Troubleshooter Windows 11 includes a dedicated troubleshooter that can automatically scan, detect, and fix any issues with Windows Updates.
7 Ways to Fix Windows 11 Updates Not Downloading or Installing
Fix 1: Run the Windows Update Troubleshooter Windows 11 includes a dedicated troubleshooter that can automatically scan, detect, and fix any issues with Windows Updates.
 3 Ways to Prevent Users From Installing New Software on Windows 11
Method 1: Turn Off Windows Installer via Group Policy The Group Policy Editor on Windows lets you make various administrative-level changes.
3 Ways to Prevent Users From Installing New Software on Windows 11
Method 1: Turn Off Windows Installer via Group Policy The Group Policy Editor on Windows lets you make various administrative-level changes.
 How to Stop a Specific Windows Update From Installing
Method 1: Hide a Windows Update Using the Show or Hide Updates Troubleshooter Microsoft's "Show or hide updates" tool makes it simple to stop a specific Windows Update from installing
How to Stop a Specific Windows Update From Installing
Method 1: Hide a Windows Update Using the Show or Hide Updates Troubleshooter Microsoft's "Show or hide updates" tool makes it simple to stop a specific Windows Update from installing
 How to Fix Optional Features Missing or Not Installing on Windows 11
Fix 1: Disable Metered Connection Windows has a metered connection feature that reduces data consumption and helps save on internet bills.
How to Fix Optional Features Missing or Not Installing on Windows 11
Fix 1: Disable Metered Connection Windows has a metered connection feature that reduces data consumption and helps save on internet bills.
 3 Ways to Fix DirectX Not Installing Error on Windows 11
Basic Fixes Check the internet connection: The DirectX web installer requires internet connectivity to download files from the server.
3 Ways to Fix DirectX Not Installing Error on Windows 11
Basic Fixes Check the internet connection: The DirectX web installer requires internet connectivity to download files from the server.
 5 Ways to Fix Windows Keeps Installing the Same Update
Fix 1: Run the Windows Update Troubleshooter Whenever you encounter any issues with Windows Updates, you should first run the built-in troubleshooter.
5 Ways to Fix Windows Keeps Installing the Same Update
Fix 1: Run the Windows Update Troubleshooter Whenever you encounter any issues with Windows Updates, you should first run the built-in troubleshooter.
 Top 9 Ways to Fix Mac Apps Stuck on Installing
The macOS ecosystem has useful apps and services to elevate your experience.
Top 9 Ways to Fix Mac Apps Stuck on Installing
The macOS ecosystem has useful apps and services to elevate your experience.
 3 Ways to Fix Corrupt Drivers in Windows 11/10
Fix 1: Restore to the Previous Working State If this happened recently, you could also use System Restore to return to the date when the drivers worked well.
3 Ways to Fix Corrupt Drivers in Windows 11/10
Fix 1: Restore to the Previous Working State If this happened recently, you could also use System Restore to return to the date when the drivers worked well.
The article above may contain affiliate links which help support Guiding Tech. The content remains unbiased and authentic and will never affect our editorial integrity.