Fix 1: Check if the Extension Is Installed by Your Administrator
It’s essential to determine whether the extension you’re trying to remove was installed by your administrator. Maybe your office, university, or school has installed the said extension for monitoring or administrative purposes.
Notably, you can’t remove Chrome extensions installed by an administrator unless they permit it or do it themselves. However, you can check if the extension is installed by an administrator and contact the IT department accordingly.
Note: To gather this information, enable Developer mode in Chrome. Check the tutorial below to learn how.
Step 1: Open Chrome, click the three-dot icon → Extensions → Manage extensions.
Step 2: Toggle on Developer mode from the top-right corner.

Once enabled, the window will auto-refresh and show you additional options. You’ll notice that all extension boxes are displaying an extension ID. If you notice an Installed by enterprise policy message, you can’t remove it unless permitted by the administrator.

If you don’t spot such a message but still can’t remove the extension from Chrome, try the following troubleshooting methods.
Fix 2: Delete Chrome Extensions via File Explorer or Finder
If you can’t remove extensions from Chrome’s extension page, here’s an alternative method:
Using Windows File Explorer
Before you can do so, you’ll need to enable two settings,
- Enable Developer mode in Chrome (follow the steps mentioned above).
- Show Hidden Files (Open File Explorer → View → Show → Hidden items).

Step 1: Open Chrome, click the three-dot icon → Extensions → Manage extensions.
Step 2: Scroll to the extension you want to remove and observe the ID.
Step 3: Open File Explorer and copy-paste the following in the address bar. Replace ‘your username’ with your username on the computer.
C:\Users\your username\Appdata\Local\Google\Chrome\User Data\Default\ExtensionsStep 4: Here, look for the folder that matches the ID on the Chrome Extensions page and delete the folder.

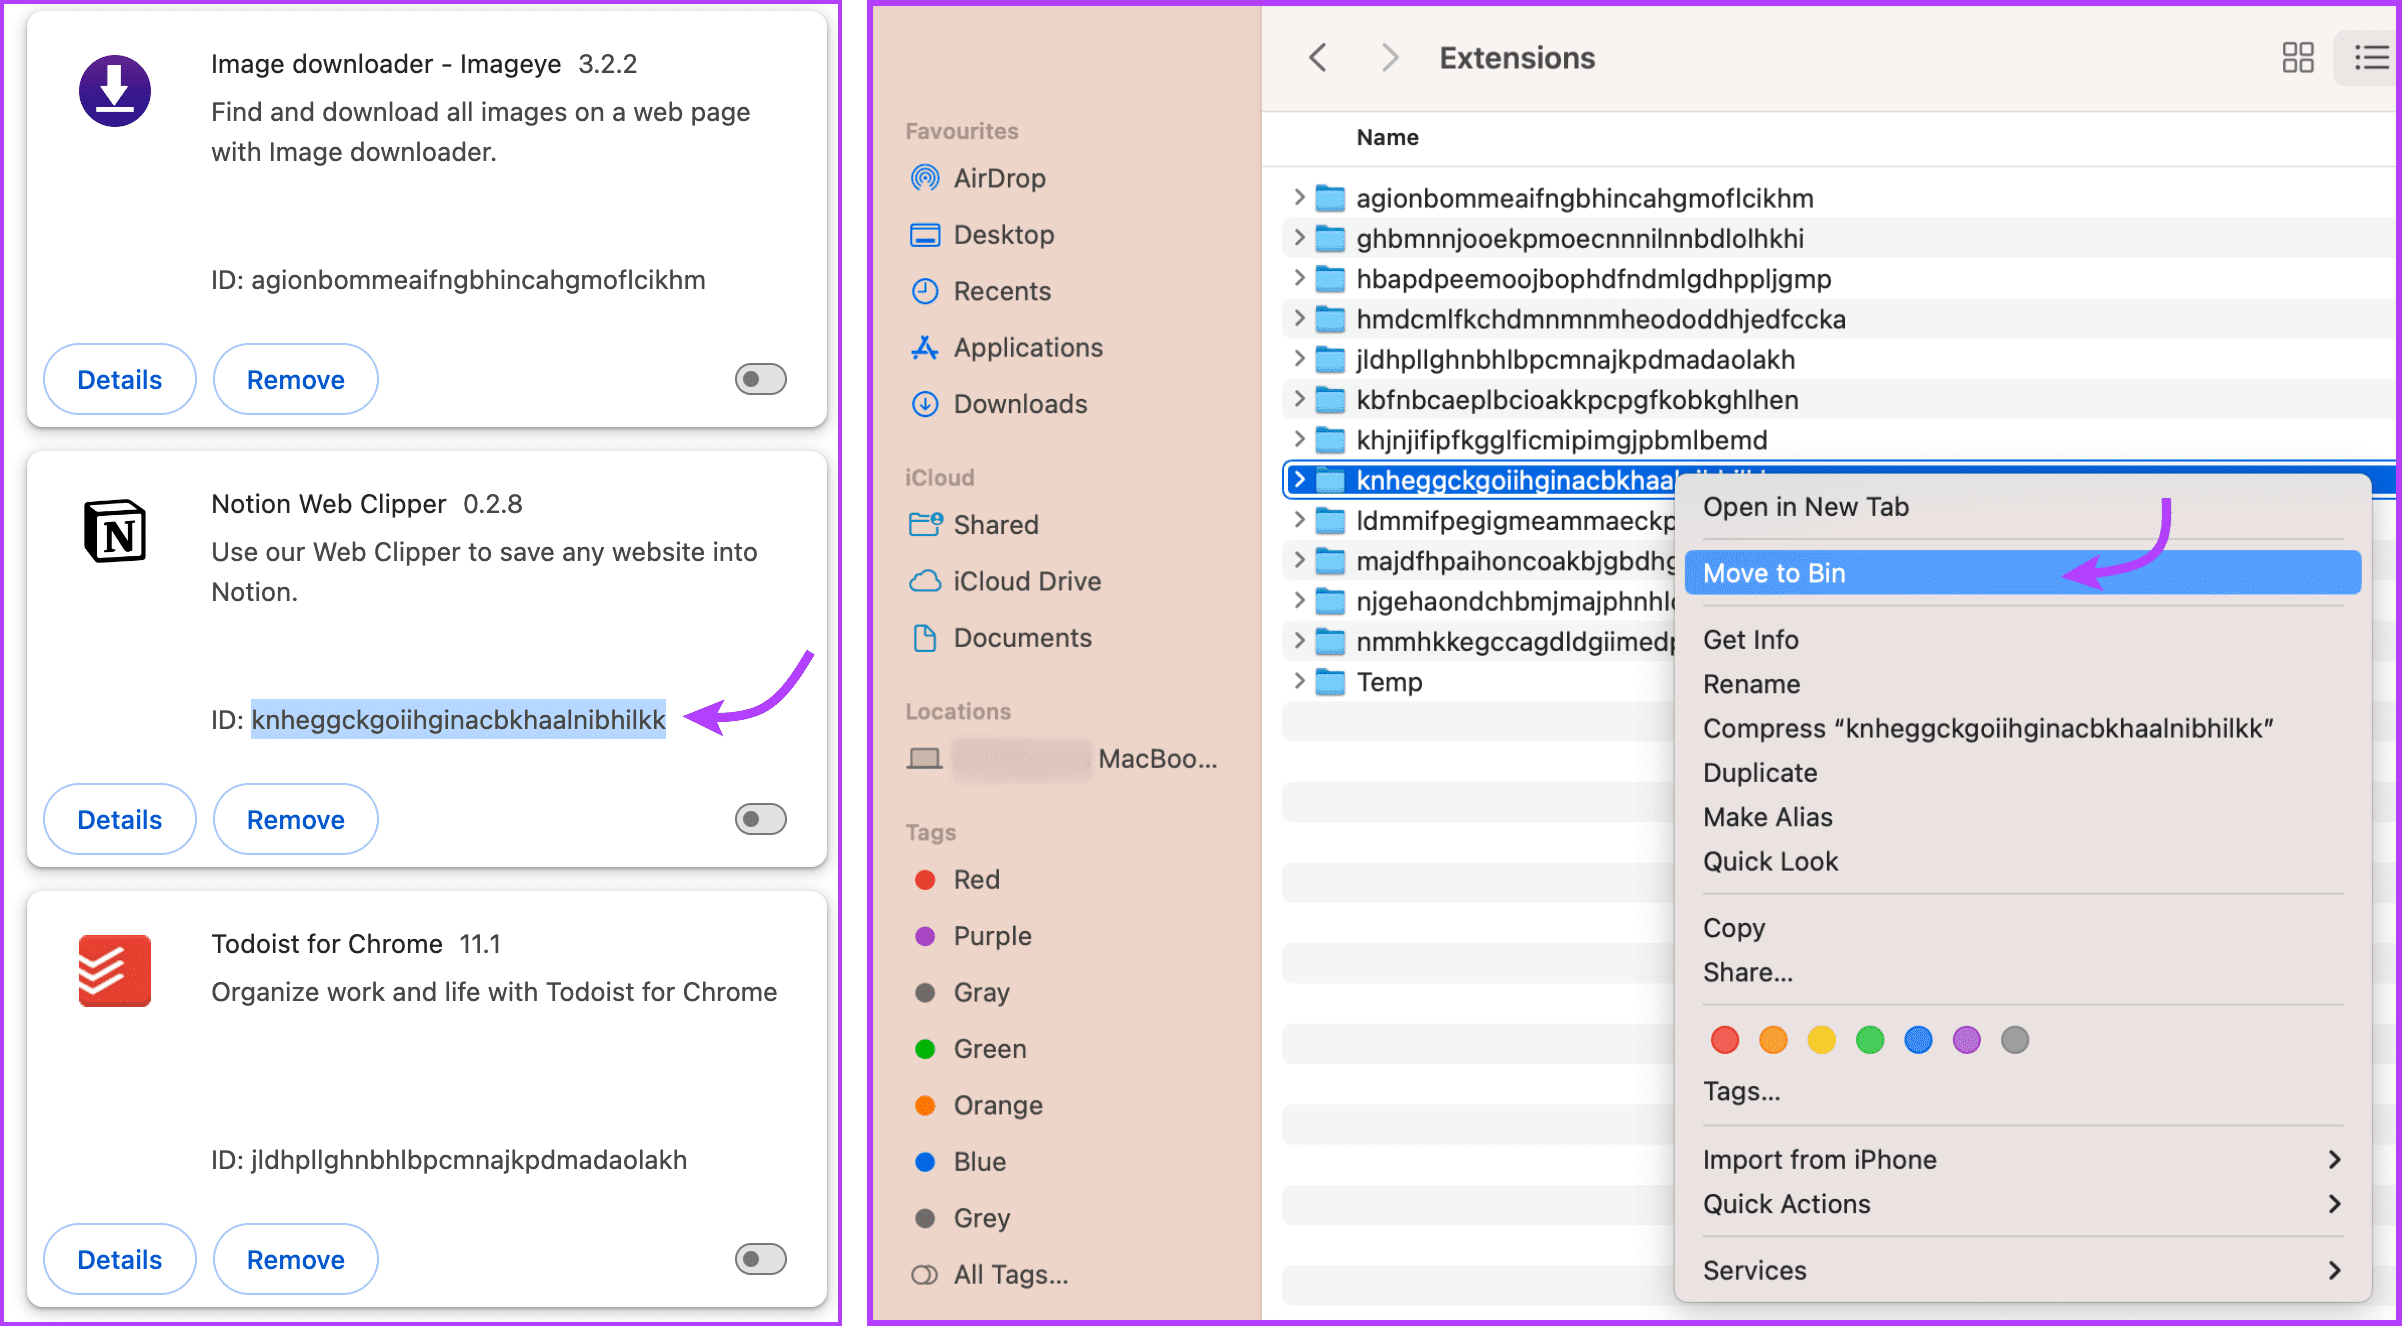
Using Finder on Mac
Step 1: Open Chrome, click the three-dot icon → Extensions → Manage extensions.
Step 2: Observe the ID of the extension you want to uninstall.
Step 3: Next, open Finder. Click Go from the menu bar, and then Go to Folder (you can also use Cmd + Shift + G).
Step 4: Here, copy and paste the following:
~/Library/Application Support/Google/Chrome/Default/Extensions

Step 5: Look for a folder with the same ID as the extension, right-click, and select Move to Bin.
Fix 3: Reset Chrome Settings
When you factory reset Chrome settings, it –
- Resets changes made to the startup page, new tab page, search engine, and pinned tabs.
- Disables all extensions.
- Clears temporary data like cookies and caches.
- Won’t affect your bookmarks, history, and saved passwords.
While the action will not delete the extension, it can disable or reset the bug or malware that is stopping you from removing the extension. Follow the instructions below to reset the settings.
Step 1: Open Chrome → click on the three-dot icon → select Settings.
Step 2: Select Reset settings from the left sidebar.

Step 3: Click Reset settings to their original defaults and Reset Settings again to confirm.

Was this helpful?
Last updated on 09 May, 2024
1 Comment
Leave a Reply
Read Next
 How to Remove Chrome Extensions Permanently
Method 1: Remove Extensions Directly From the Extension Bar The easiest way to remove a Chrome extension is to click its icon in the Chrome browser's extension bar.
How to Remove Chrome Extensions Permanently
Method 1: Remove Extensions Directly From the Extension Bar The easiest way to remove a Chrome extension is to click its icon in the Chrome browser's extension bar.
 7 Chrome Extensions to Save Open Tabs
1.
7 Chrome Extensions to Save Open Tabs
1.
 8 Best Dictionary Extensions for Chrome
1.
8 Best Dictionary Extensions for Chrome
1.
 6 Best Session Manager Extensions for Chrome
1.
6 Best Session Manager Extensions for Chrome
1.
 5 Best Extensions to Block Elements on Google Chrome
Note: The extensions may not work initially – you will have to restart Chrome after you install the extension.
5 Best Extensions to Block Elements on Google Chrome
Note: The extensions may not work initially – you will have to restart Chrome after you install the extension.
 4 Best Chrome Extensions to Identify Fonts on Web Pages
1.
4 Best Chrome Extensions to Identify Fonts on Web Pages
1.
 6 Chrome Extensions to Customize Google Homepage
1.
6 Chrome Extensions to Customize Google Homepage
1.
 5 Best Chrome Extensions for Roblox
With the help of Chrome extensions, you can enjoy more features on Chrome and on the websites you visit.
5 Best Chrome Extensions for Roblox
With the help of Chrome extensions, you can enjoy more features on Chrome and on the websites you visit.
The article above may contain affiliate links which help support Guiding Tech. The content remains unbiased and authentic and will never affect our editorial integrity.

What you should do is deleting the extension via folder. What you want to do is to open run and type %localappdata% and search extensions, open the folder find the ID then right click then go to properties then a tab will open. Then you want to go to security and go to advanced, then click on administrators and just mess around and look for the permissions and delete their permissions. I have removed it this way, it is very usefull.