Basic Fixes
- Turn off private browsing mode: The autofill feature does not work when you browse in private mode on your iPhone or iPad. If you experience this issue only in private browsing mode, try turning it off.
- Check the iCloud keychain server status: Issues with the iCloud Keychain servers can prevent your device from syncing passwords, causing the autofill feature to stop working on your iPhone or iPad. To check for this possibility, visit Apple’s System Status page and look for the icon on the left of the iCloud Keychain.
- Install software updates: Apple regularly releases updates for the iPhone and iPad to add new features and address issues. If this issue is only occurring due to a bug, installing pending updates will help.
Fix 1: Enable AutoFill Passwords
It’s a good idea to ensure you haven’t accidentally disabled the AutoFill Passwords option on your iPhone or iPad. Here’s how to check that.
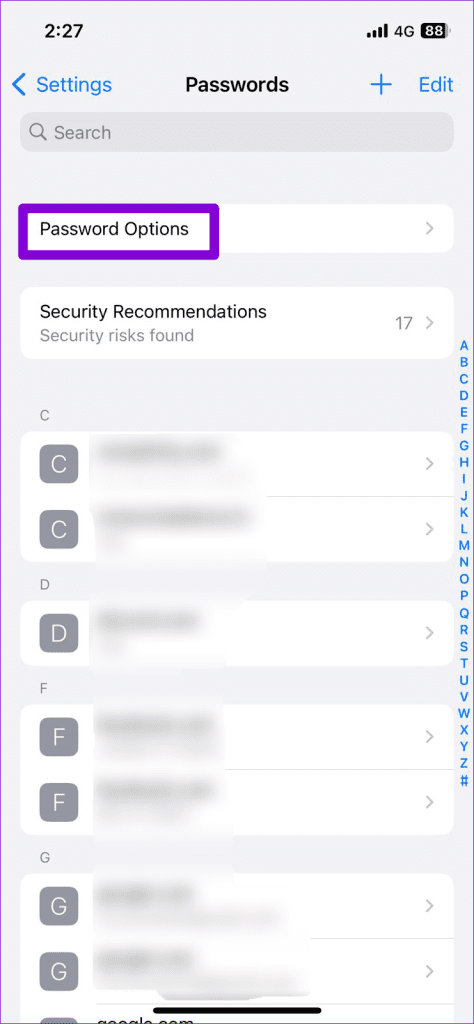
Step 1: Open the Settings app > tap Passwords > select Password Options.
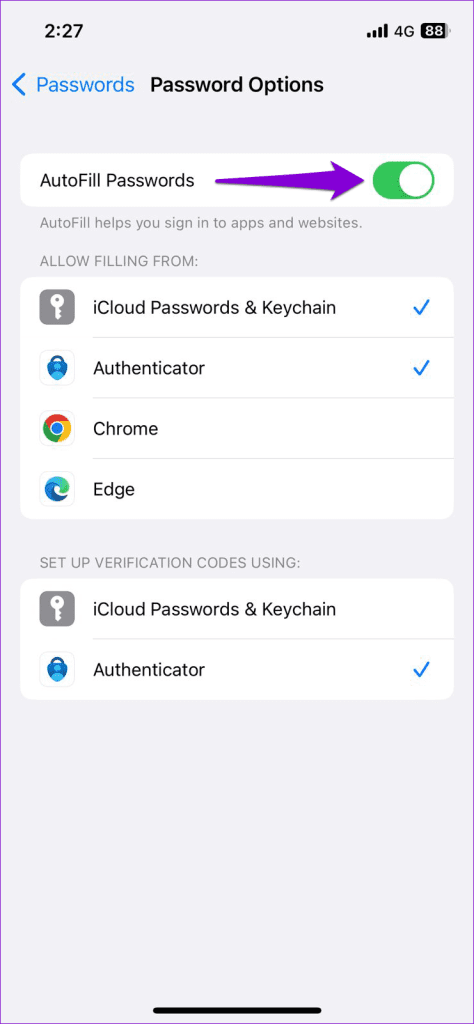
Step 2: Enable the toggle for AutoFill Passwords. If it’s already on, try turning it off and back on again.

Fix 2: Enable Sync for iCloud Keychain
Enabling the AutoFill Passwords option may not help much if you have disabled sync for iCloud Keychain on your iPhone or iPad. Here’s how to turn it back on.
Step 1: Open the Settings app and tap your name at the top. Then, select iCloud from the following menu.
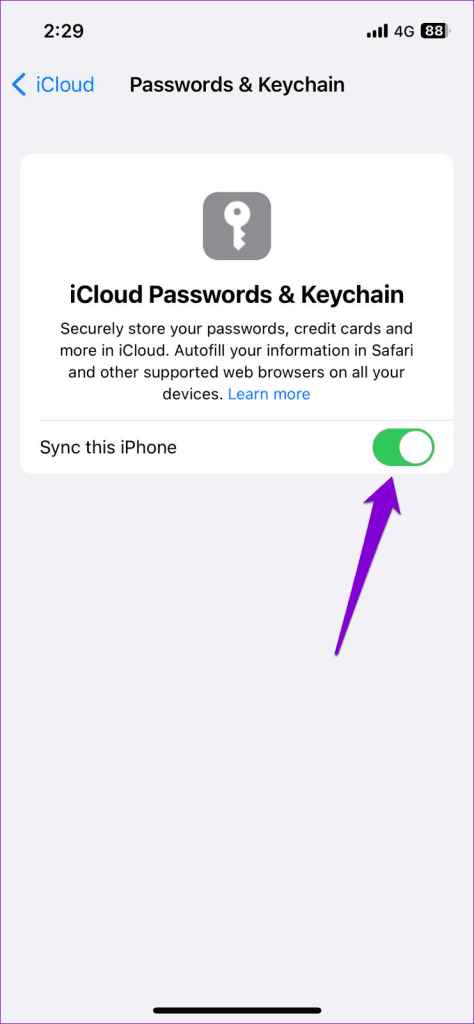
Step 2: Tap Passwords and Keychain and toggle on Sync this iPhone.


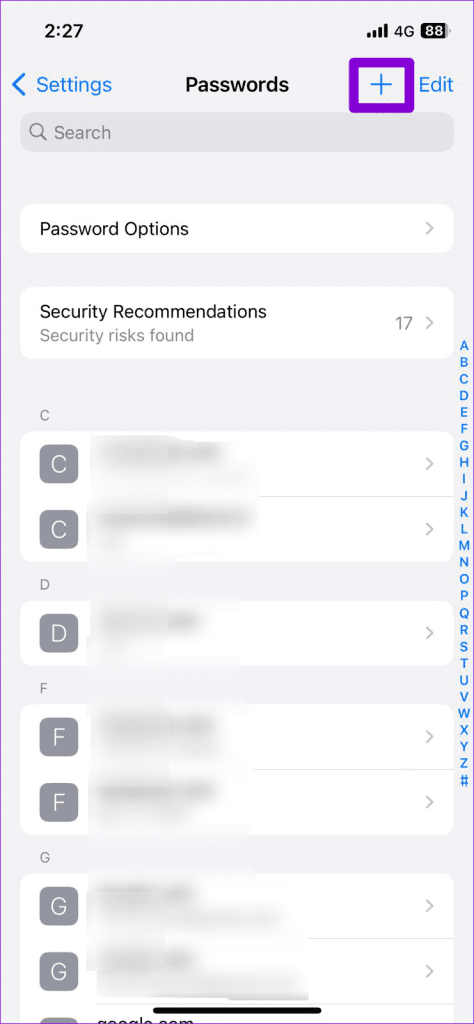
Fix 3: Remove and Re-Add AutoFill Details for Websites
Is your iPhone or iPad not filling in the password for a specific website? If so, delete the autofill information associated with that website and re-enter it. Here’s how to do it.
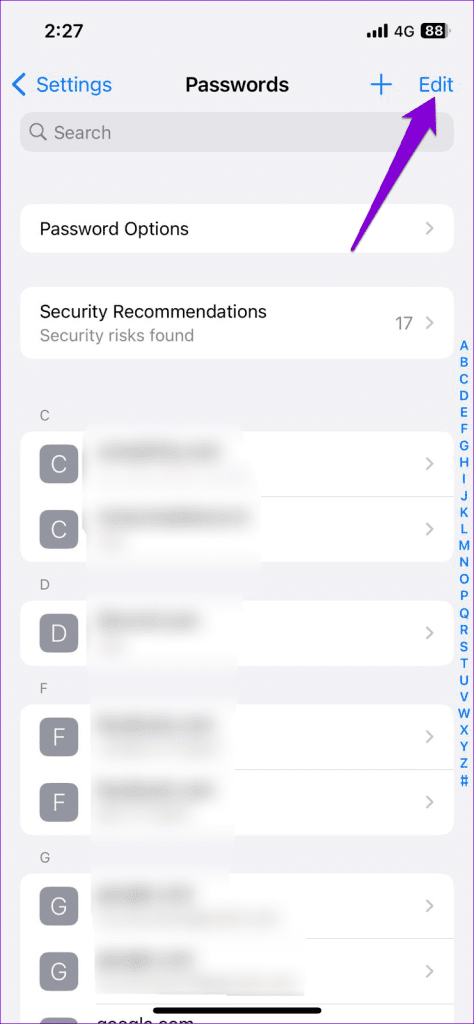
Step 1: Open the Settings app and scroll down to tap on Passwords. Then, tap on Edit at the top-right corner.
Step 2: Select the website for which you want to remove the data and tap Delete at the top-left corner. Then, select Delete Password when prompted.
Step 3: Tap the plus icon in the upper-right corner and add your website login credentials again.

Was this helpful?
Last updated on 05 June, 2024
Read Next
 4 Ways to Fix iPhone OTP Autofill Not Working
https://youtu.be/cemyOQvHUK8 Fix 1: Use the Default Apple Keyboard If you're using a third-party keyboard, switch to the default Apple keyboard when an OTP arrives and see if you can view
4 Ways to Fix iPhone OTP Autofill Not Working
https://youtu.be/cemyOQvHUK8 Fix 1: Use the Default Apple Keyboard If you're using a third-party keyboard, switch to the default Apple keyboard when an OTP arrives and see if you can view
 6 Ways to Fix Chrome Autofill Not Working Issue
Fix 1: Check Chrome’s Autofill Settings Usually, Google Chrome automatically saves your passwords, addresses, or payment methods.
6 Ways to Fix Chrome Autofill Not Working Issue
Fix 1: Check Chrome’s Autofill Settings Usually, Google Chrome automatically saves your passwords, addresses, or payment methods.
 5 Ways to Fix AutoFill Not Working in Microsoft Excel for Windows
Basic Fixes Try a different workbook: Testing the AutoFill feature in a different workbook will help determine if the issue is limited to a specific Excel file.
5 Ways to Fix AutoFill Not Working in Microsoft Excel for Windows
Basic Fixes Try a different workbook: Testing the AutoFill feature in a different workbook will help determine if the issue is limited to a specific Excel file.
 4 Ways to Fix Password Autofill Not Working on Android
Basic Fixes App developers have disabled autofill: While most Android apps support password auto-filling, some developers skip the function due to privacy reasons.
4 Ways to Fix Password Autofill Not Working on Android
Basic Fixes App developers have disabled autofill: While most Android apps support password auto-filling, some developers skip the function due to privacy reasons.
 How to Remove an Email Address From Gmail Autofill List
Method 1: Remove Saved Email Address From Gmail on Desktop You can’t view or modify saved Gmail contacts from the Gmail web.
How to Remove an Email Address From Gmail Autofill List
Method 1: Remove Saved Email Address From Gmail on Desktop You can’t view or modify saved Gmail contacts from the Gmail web.
 How to Enable or Disable Autofill in Google Chrome for PC and Mobile
Are you tired of entering your personal information every time you fill out a form or make an online purchase?
How to Enable or Disable Autofill in Google Chrome for PC and Mobile
Are you tired of entering your personal information every time you fill out a form or make an online purchase?
 How to Add or Change Autofill Data on Google Chrome
While using Google Chrome on your mobile or computer, you will surely come across websites on which you would want to sign up.
How to Add or Change Autofill Data on Google Chrome
While using Google Chrome on your mobile or computer, you will surely come across websites on which you would want to sign up.
 How to Enable and Disable Autofill on Android
Note: The steps might differ for different Android devices and Android versions.
How to Enable and Disable Autofill on Android
Note: The steps might differ for different Android devices and Android versions.
The article above may contain affiliate links which help support Guiding Tech. The content remains unbiased and authentic and will never affect our editorial integrity.