Method 1: Remove All Your Pictures From Facebook
Facebook allows users to delete up to 50 photos uploaded by them. We have mentioned the steps to follow below.
On PC
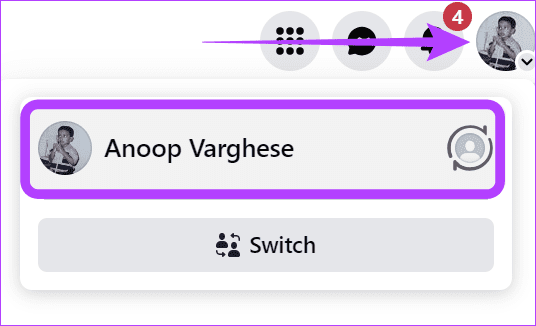
Step 1: Open Facebook on your browser and log in to your account.
Step 2: Click your profile picture at the top right corner and select your account name.
Step 3: Scroll down and choose Manage Posts.
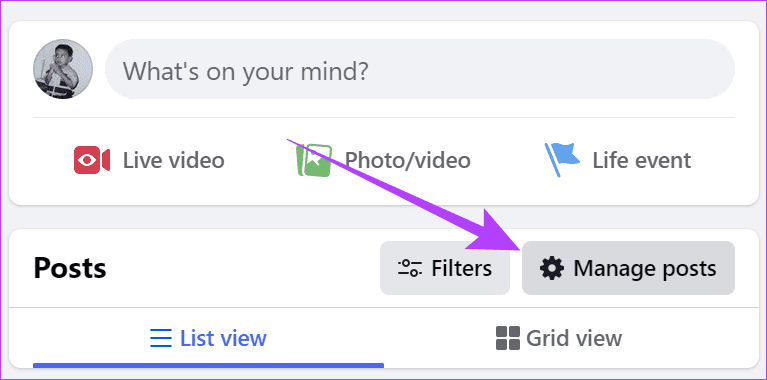
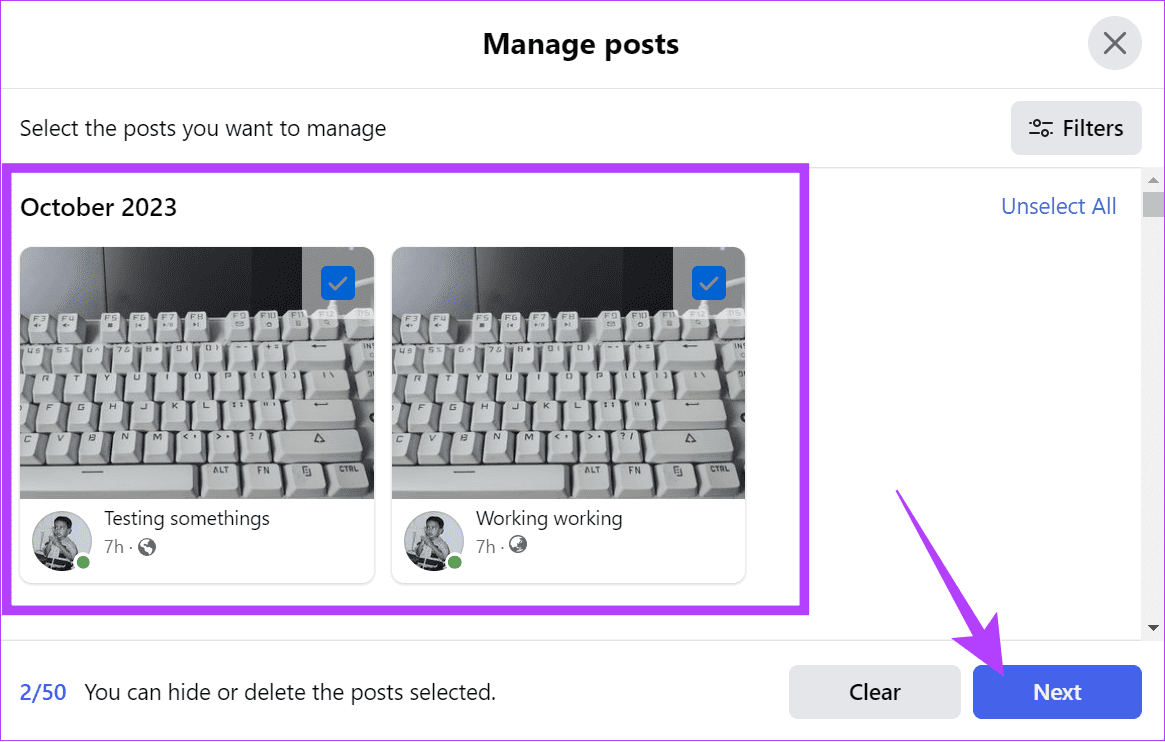
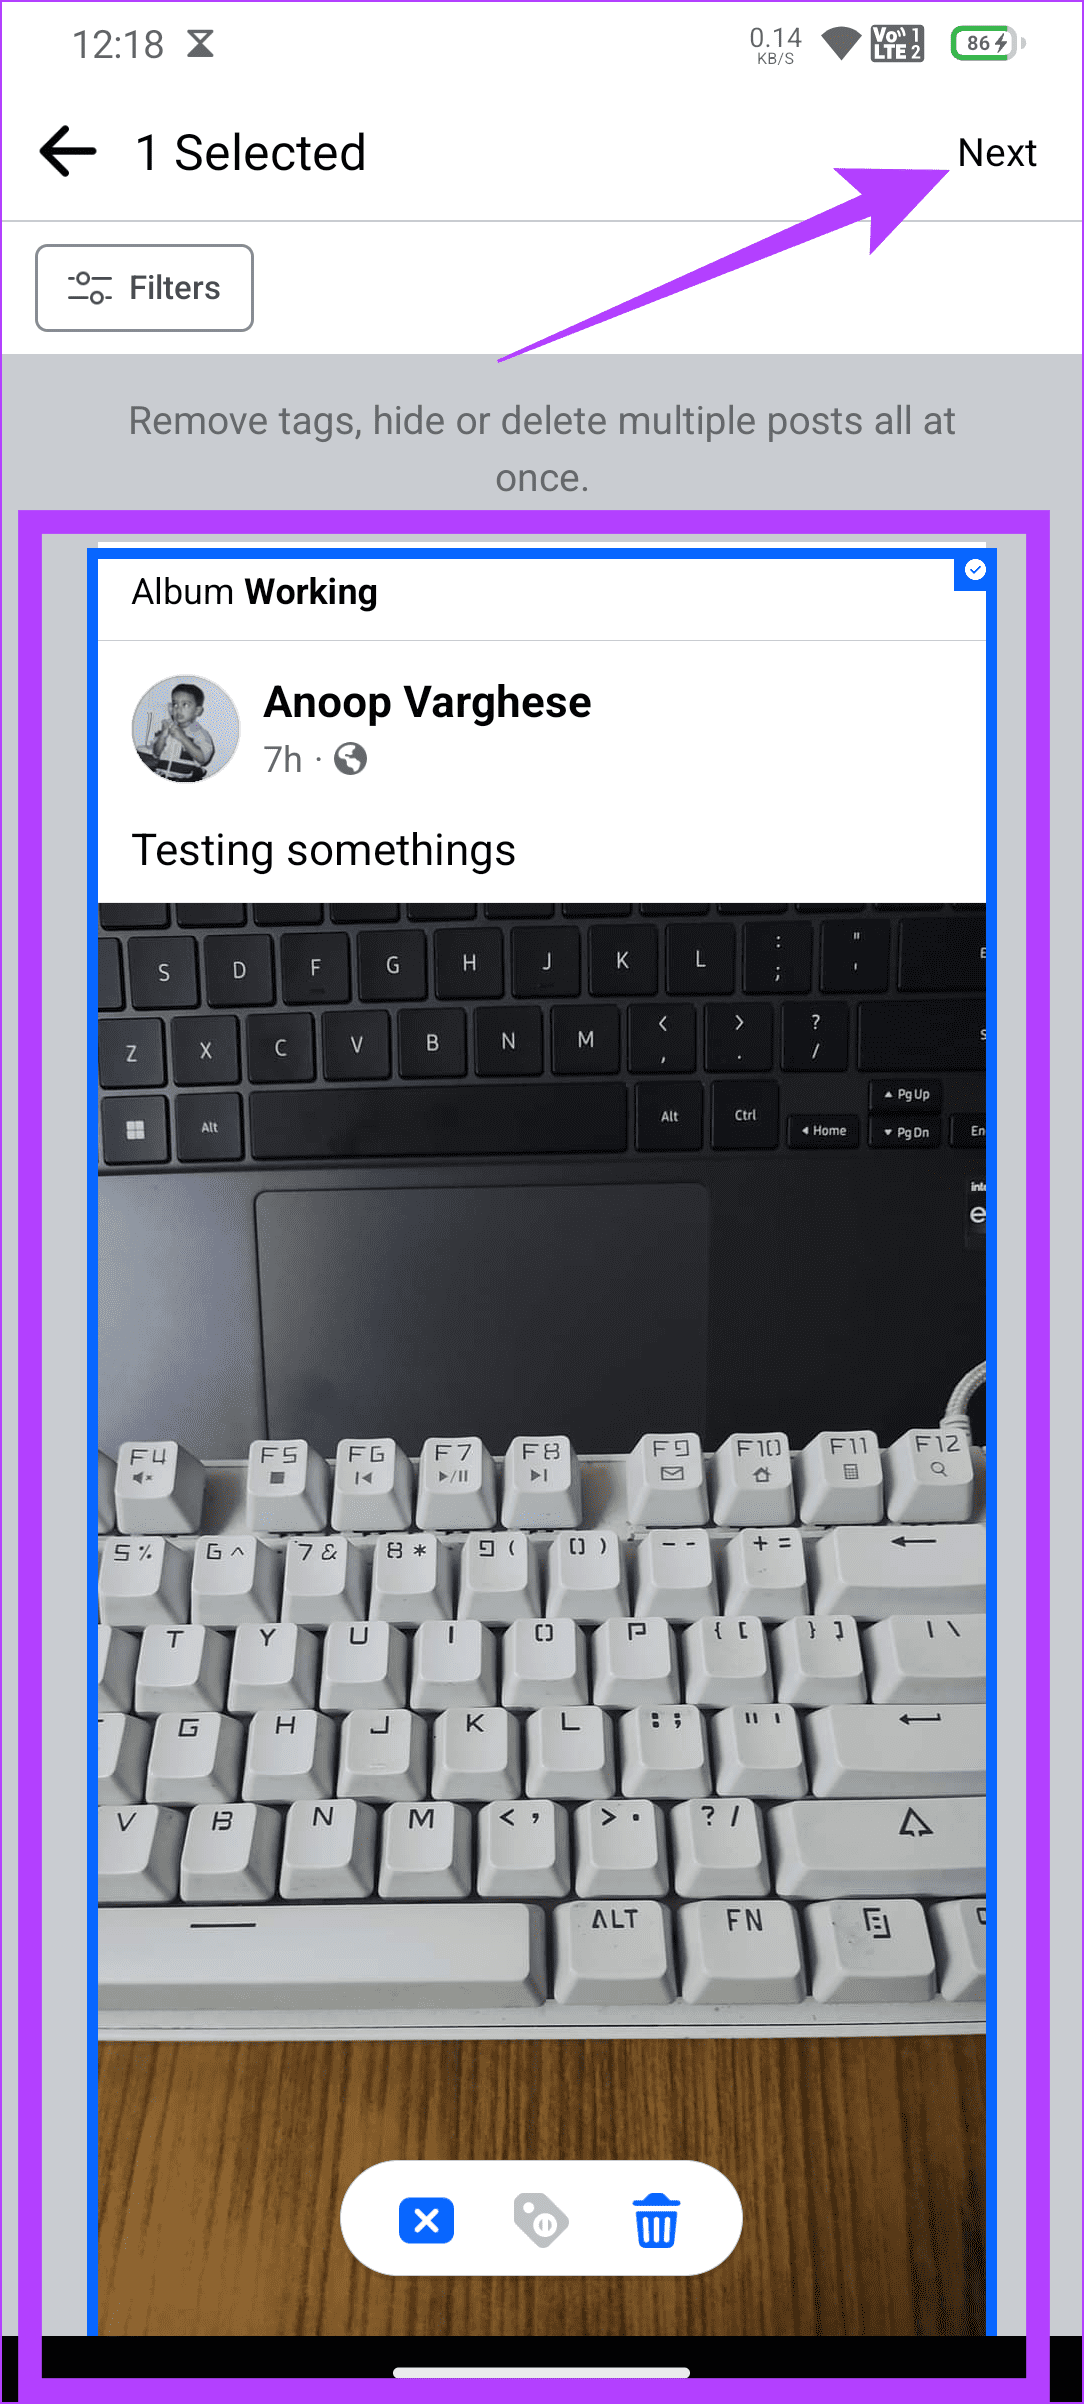
Step 4: Select the photos you want to delete.
Tip: You can filter out the posts you want to delete using the Filter tab at the top right corner.
Step 5: Once selected, click Next.
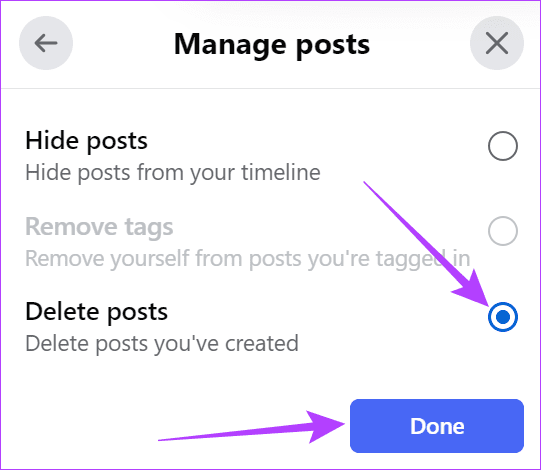
Step 6: Choose Delete posts and click Done.
Tip: You can also choose Hide posts. This will hide the post from your timeline.
The posts and photos will be instantly deleted. Hence, it’s better to think wisely before deleting the post.
On iOS or Android Device
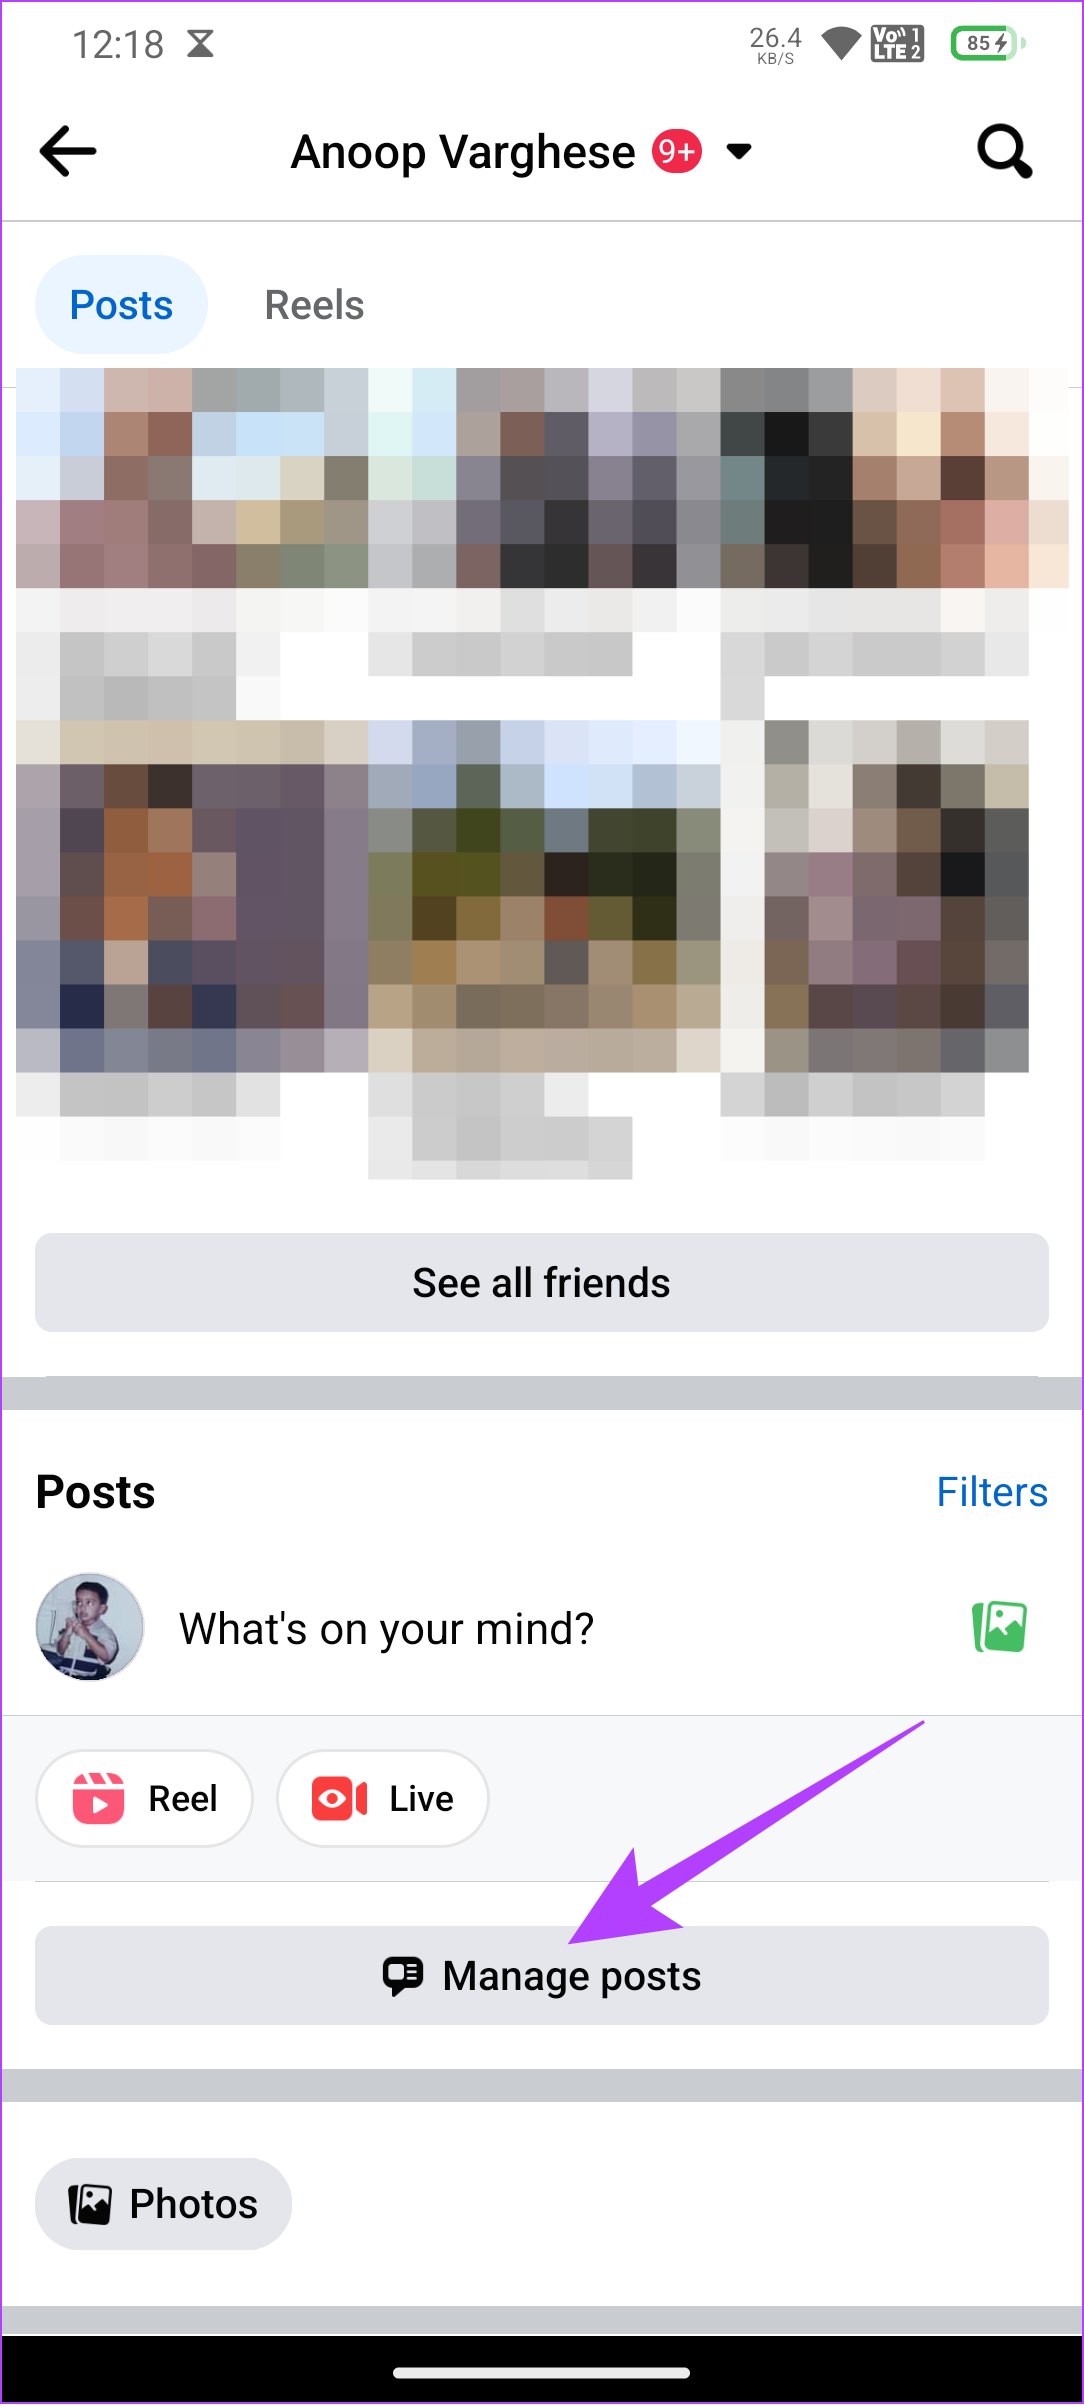
Step 1: Open the Facebook app and tap your profile picture icon to open your profile.
Step 2: Scroll down and tap Manage posts.

Step 3: Select the posts and tap Next.
Step 4: Tap Delete Posts.
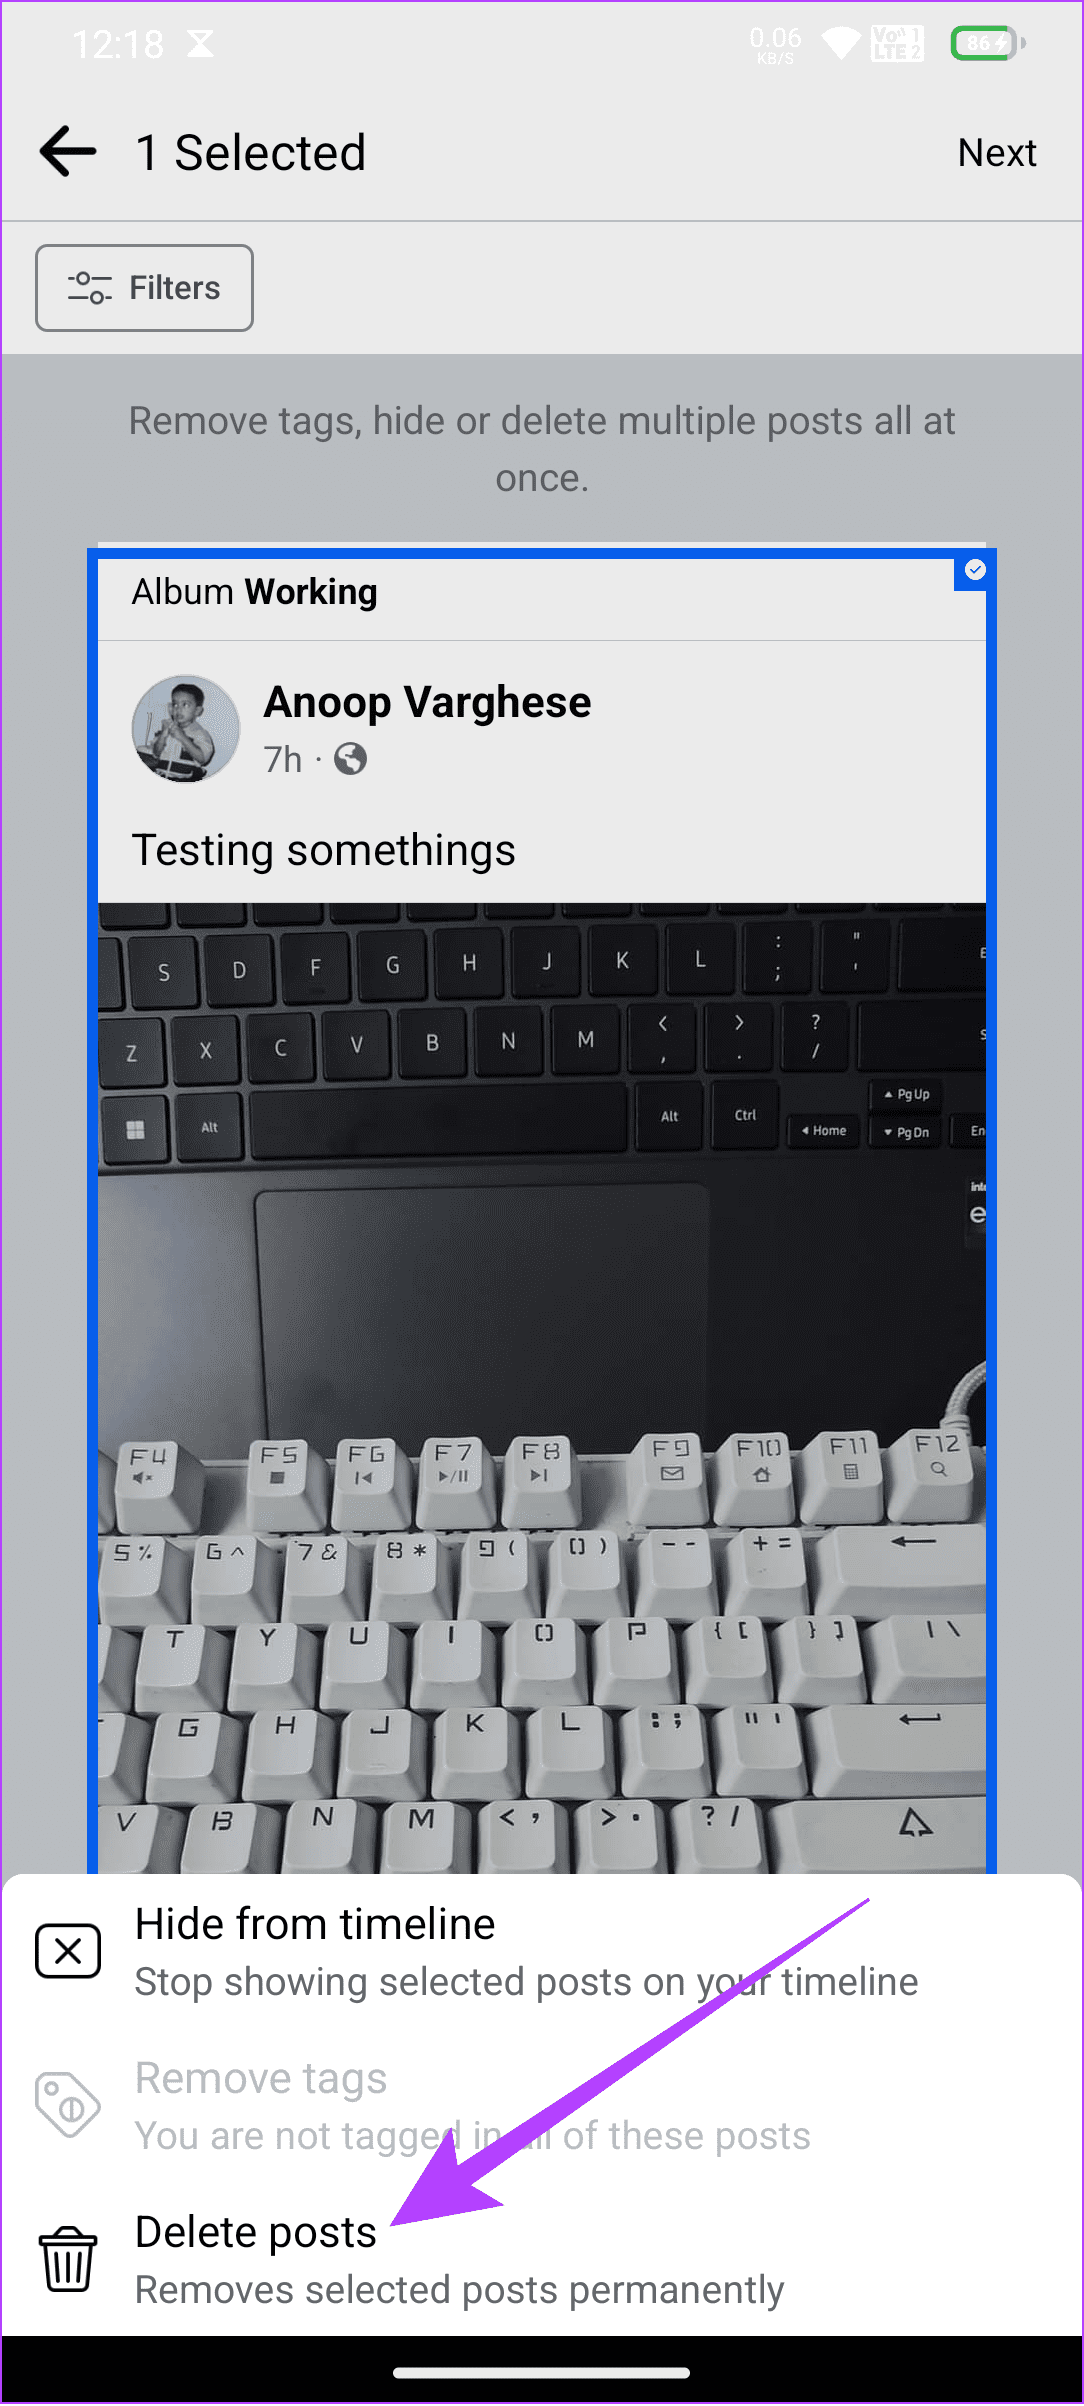
Step 5: Choose Delete Posts again to confirm.
Also read: How to hide all Facebook posts from public or friends
Method 2: Mass-Delete Facebook Photos Using Activity Logs
Besides the steps mentioned above, you can delete multiple Facebook photos simultaneously using the Activity Log option. The steps are mentioned below.
On PC
Step 1: Open Facebook on your browser and log in to your account.
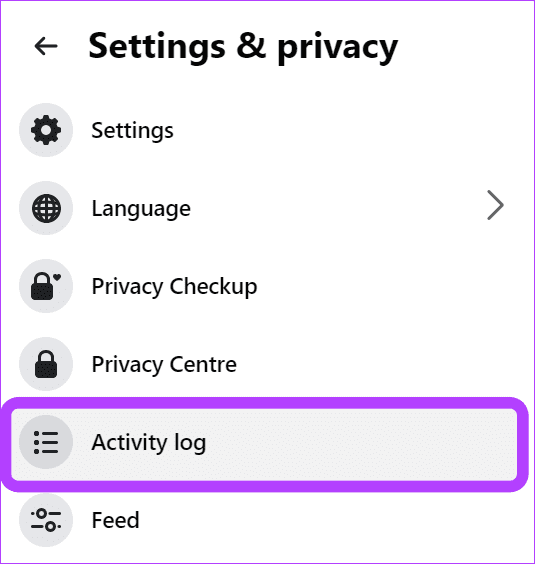
Step 2: Click the profile picture at the top right corner and choose Settings & privacy.
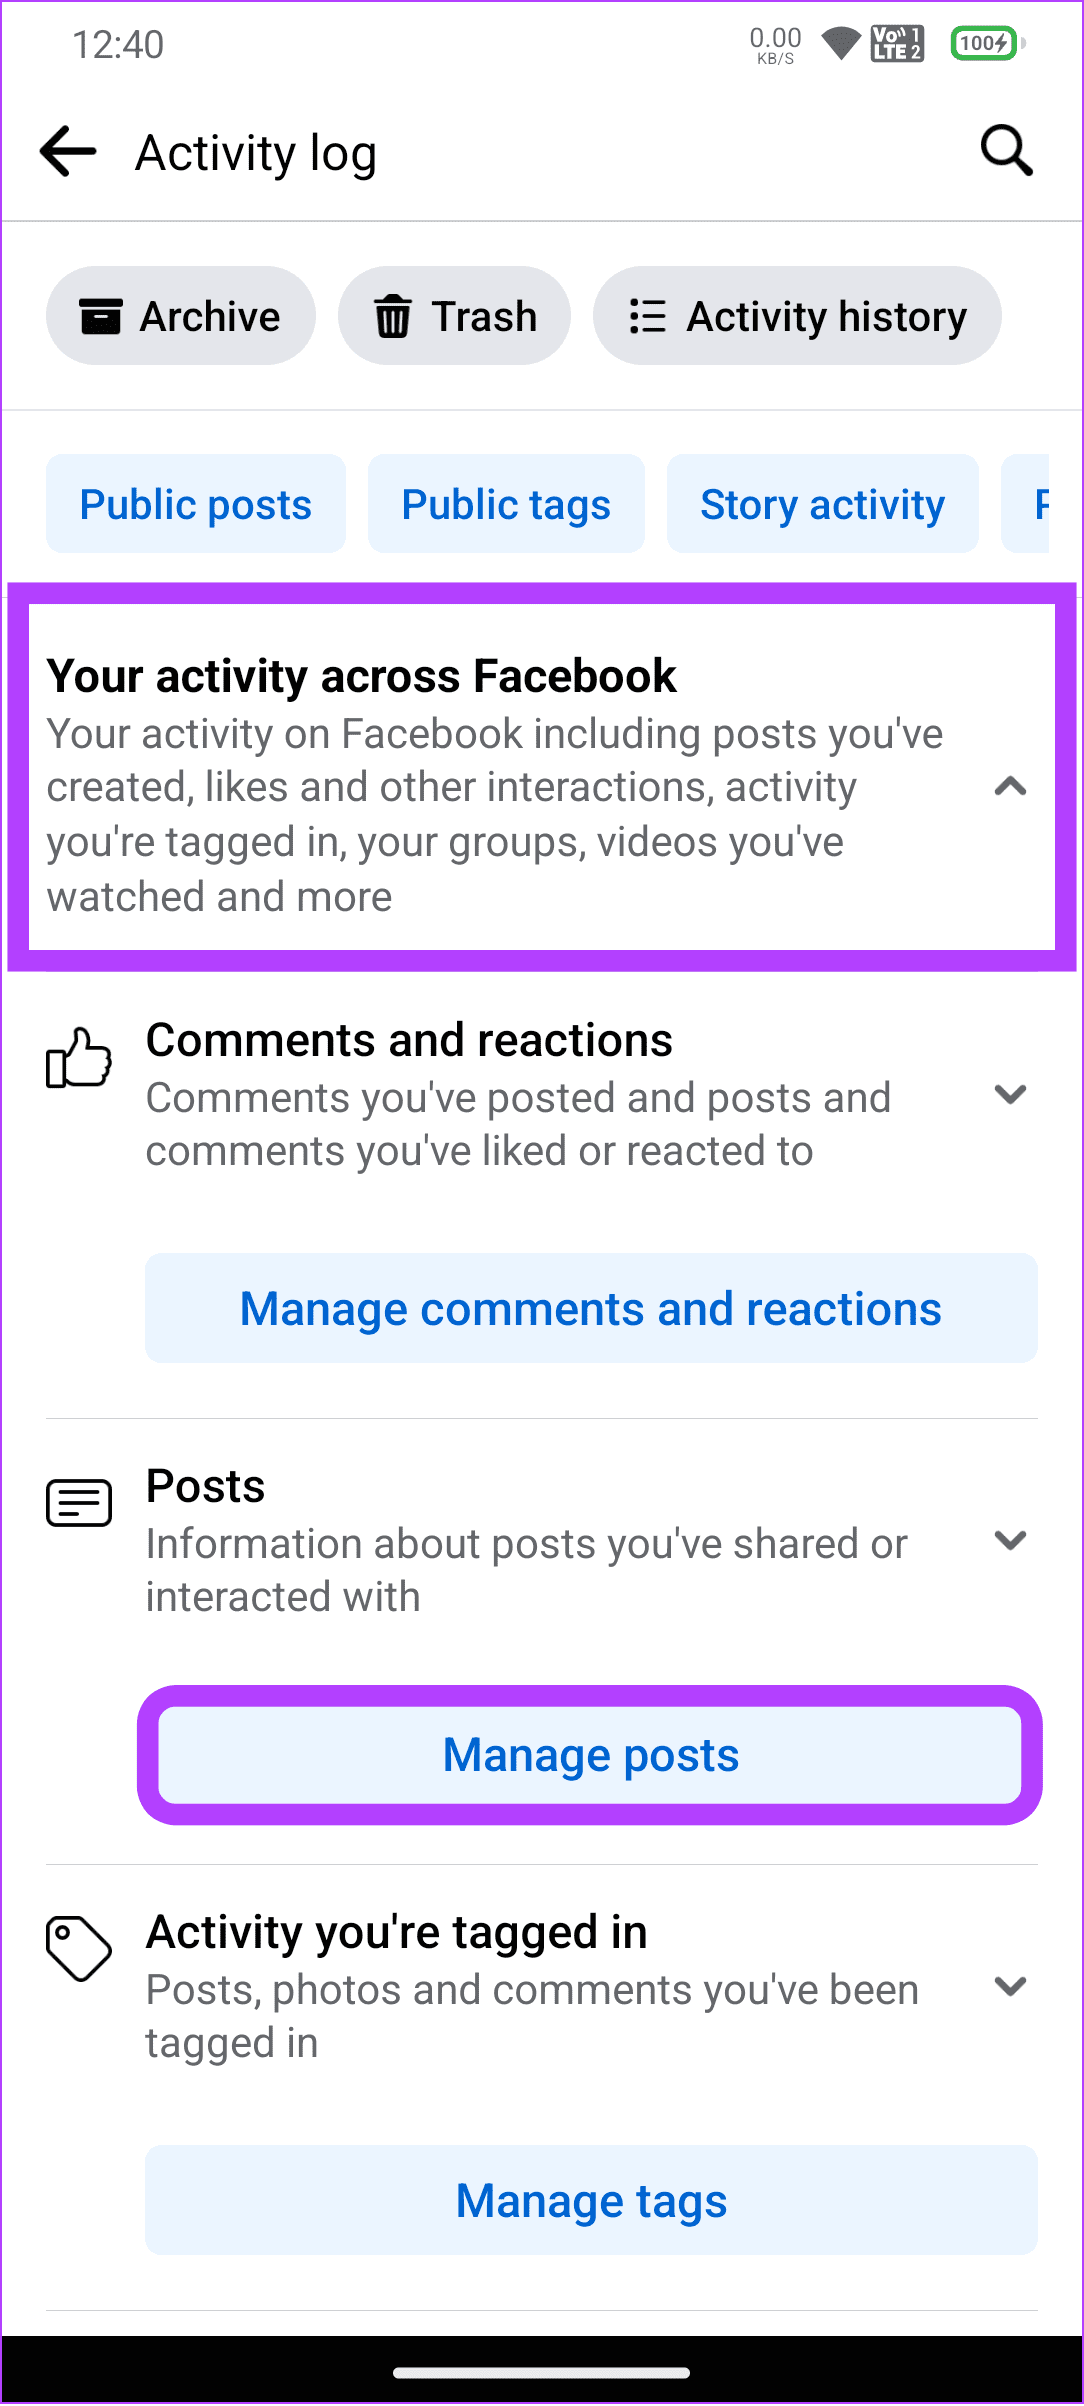
Step 3: Select Activity log.
Step 4: Expand Your activity across Facebook in the sidebar and select Posts.
Step 5: Click the three dots next to the post you want to remove and choose Move to Recycle bin.
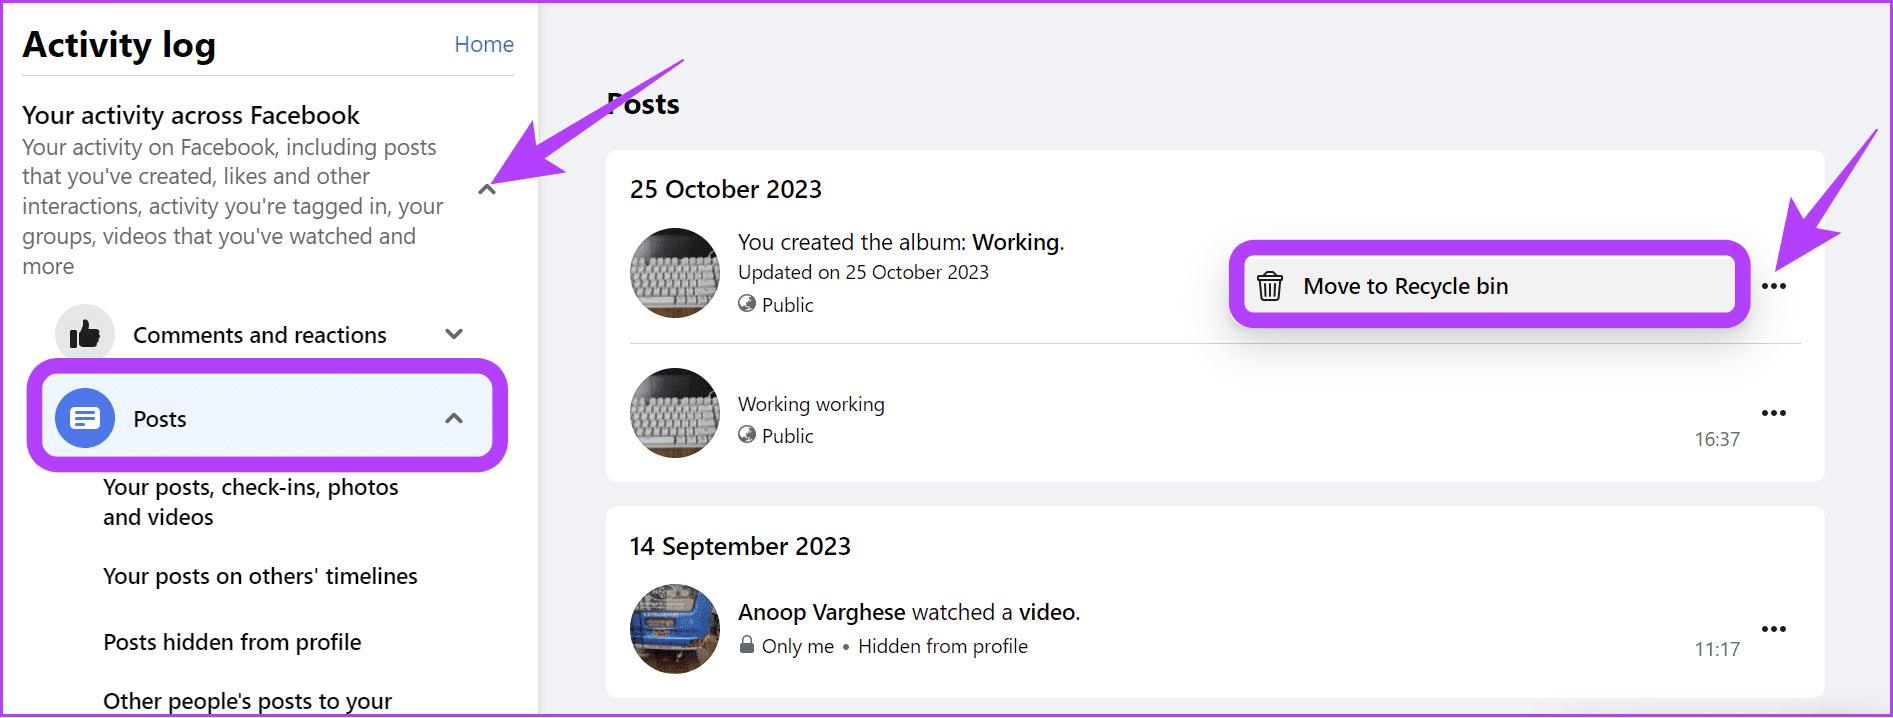
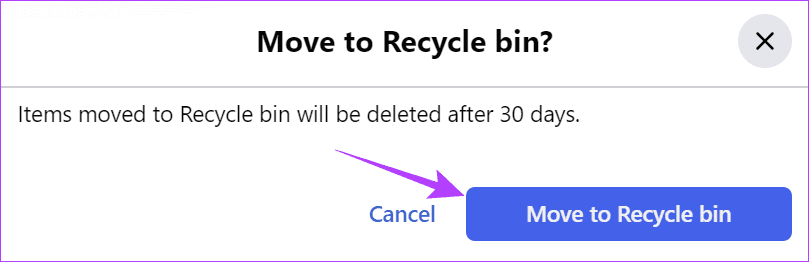
Step 6: Choose Move to Recycle bin.
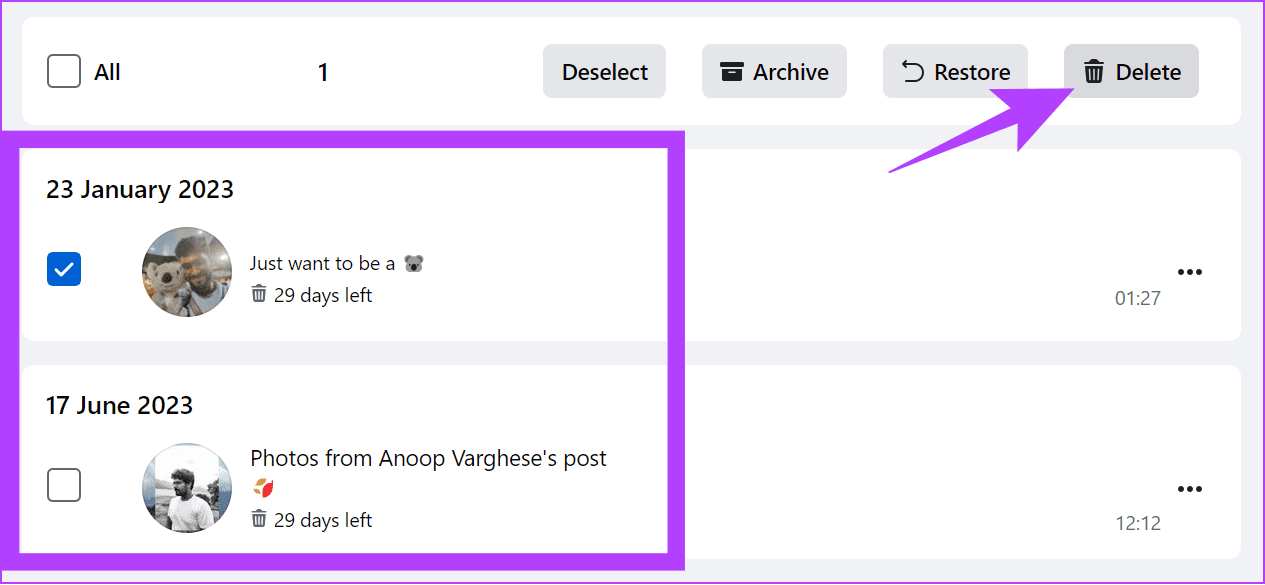
Step 8: To completely delete the post, scroll down and choose Recycle bin from the sidebar.

Step 9: Select the posts to delete and click Delete.
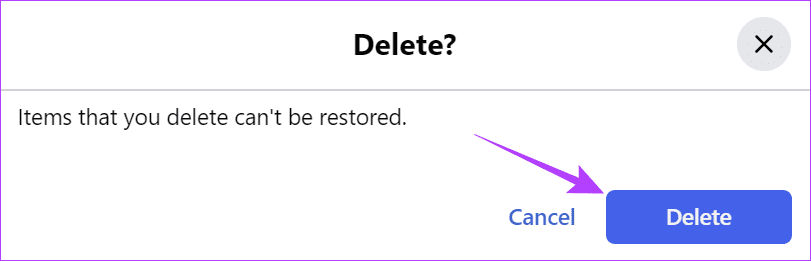
Step 10: Choose Delete to confirm.
On Android or iPhone
Step 1: Open Facebook > tap the hamburger menu > choose the gear icon at the top right corner.
Step 2: Scroll down and tap Activity log under Your activity.

Step 3: Tap Your activity across Facebook and select Manage posts.
Step 4: Tap the three dots next to the post you want to delete and choose Delete or Move To Trash.
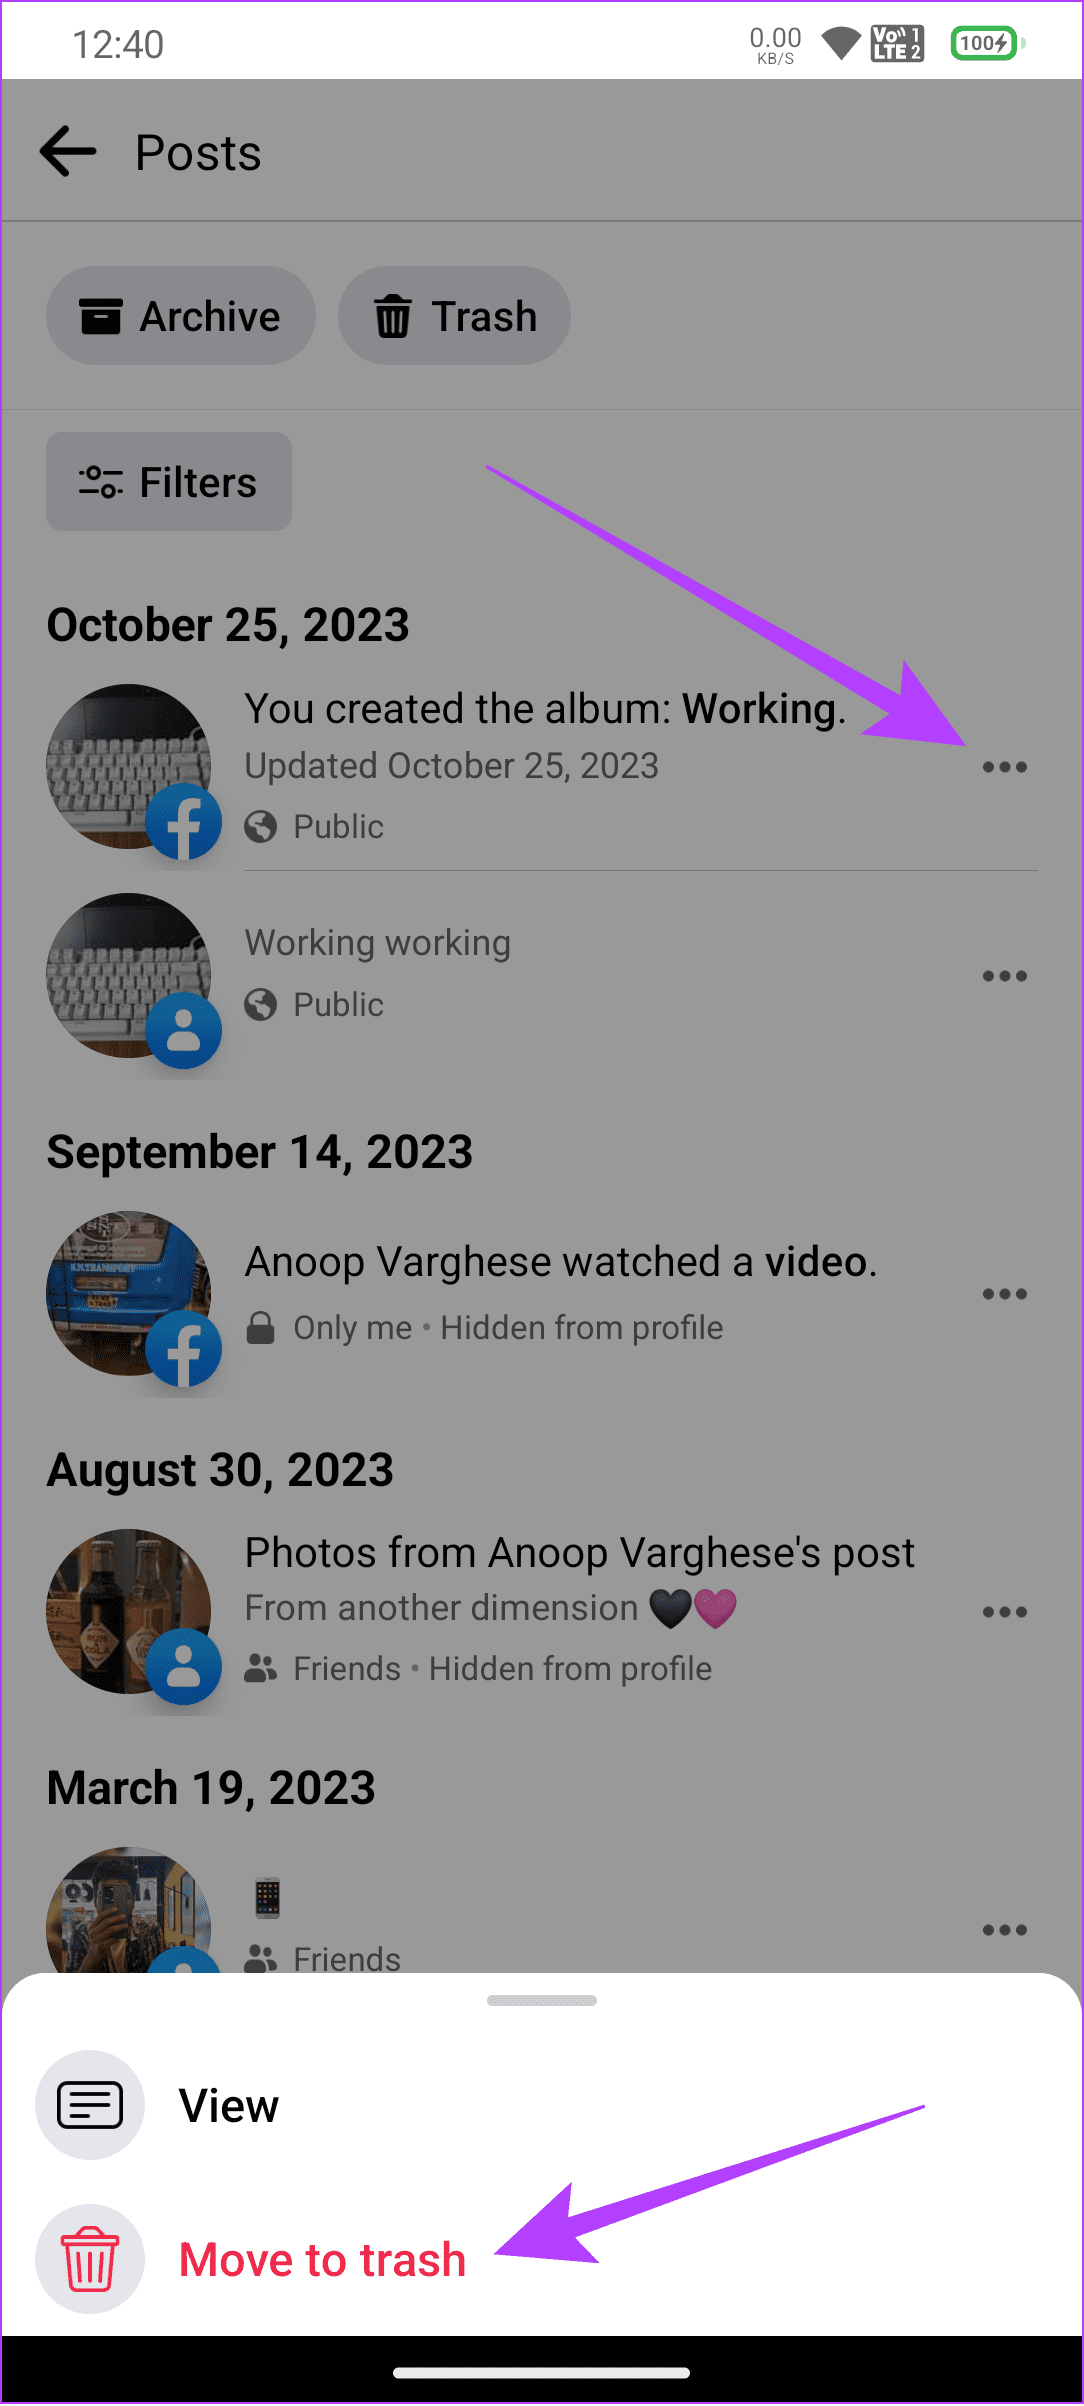
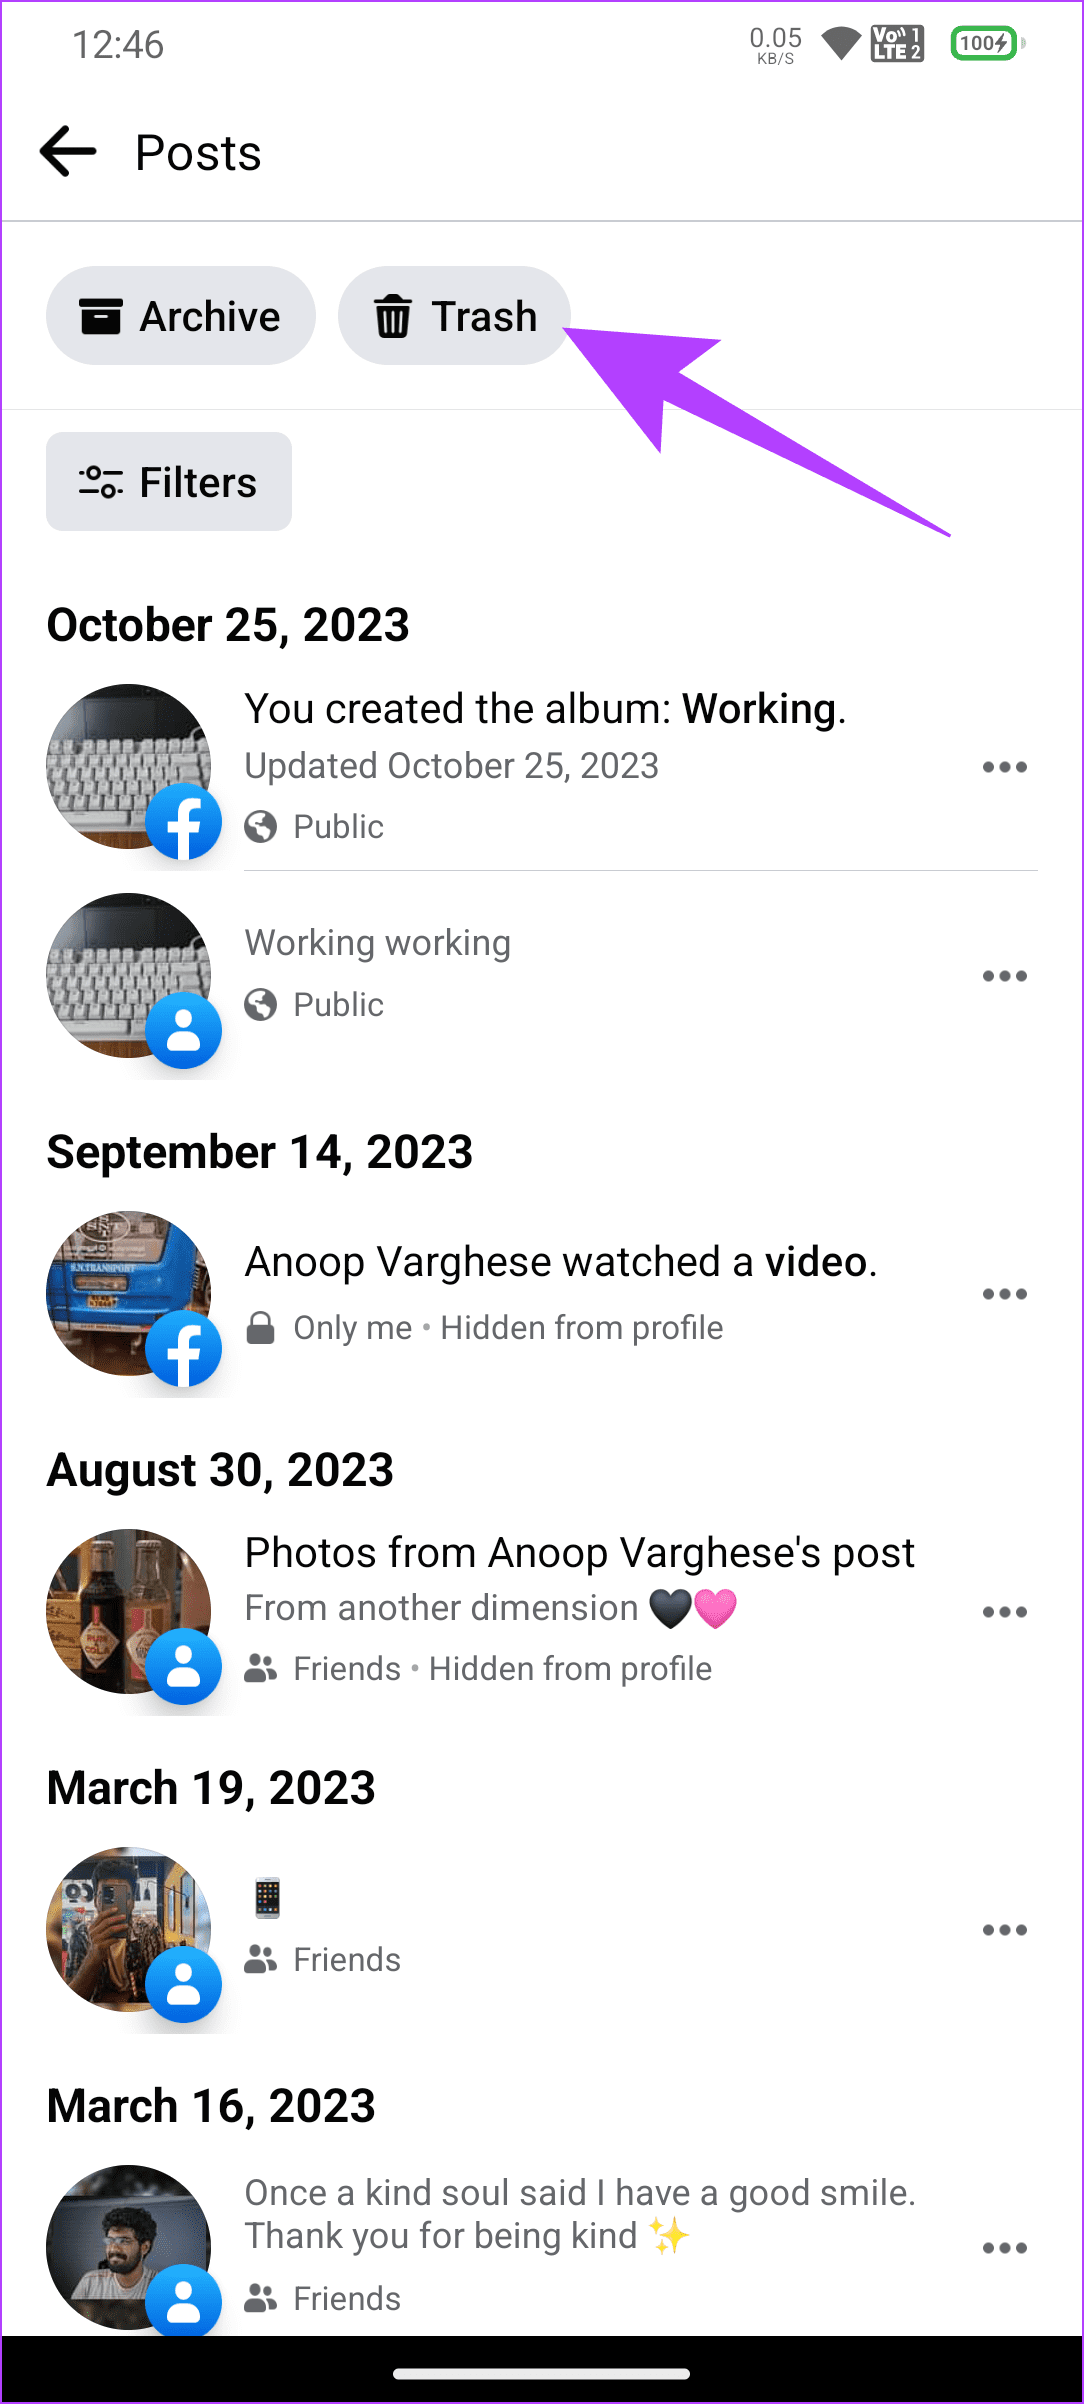
Step 5: To remove the post completely, tap Trash and select the posts you want to delete.
Tip: If needed, you can also choose All.
Step 7: Choose the three dots at the bottom right corner.

Step 8: Select Delete to confirm.
Method 3: Delete Multiple Photos on Facebook by Deleting Albums
Besides the steps mentioned above, you can delete multiple Facebook photos at once by deleting the picture albums on Facebook. However, the steps will only work with the picture album you have created. As of writing this guide, you can only perform these steps on a browser.
Step 1: Open Facebook and log in to your account.
Step 2: Click your profile icon at the top right corner and choose your profile.
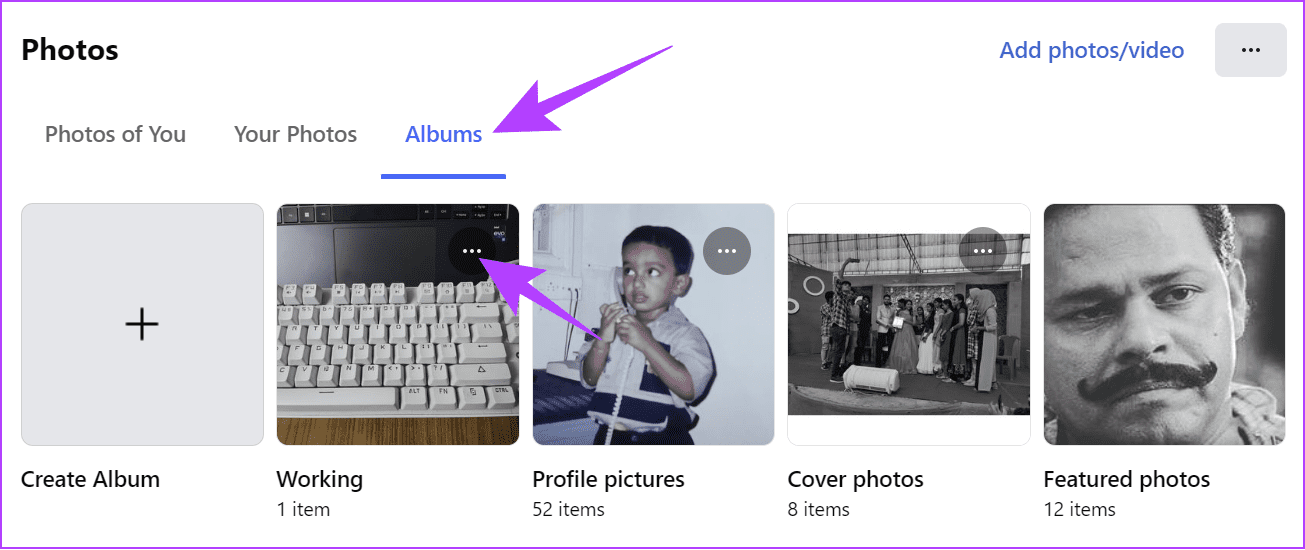
Step 3: Scroll down and select See All Photos.

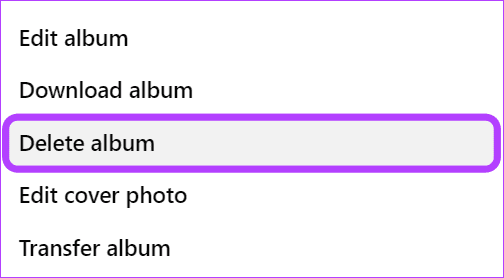
Step 4: Choose Albums and click the three dots at the top right corner of the album you want to delete.
Step 5: Select Delete album.
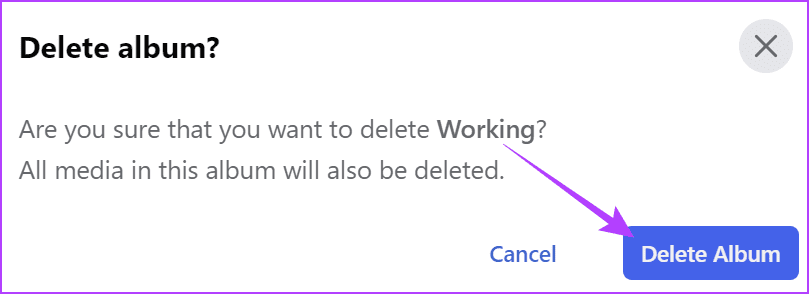
Step 6: Click Delete Album to confirm.
Method 4: Remove Tags From Pictures on Facebook
Facebook also offers the option to remove the photos tagged with your account. This helps if you don’t want the tagged photo someone uploaded to appear on your timeline.
On PC
Step 1: Open Facebook > log in to your account > click your profile picture and select your profile.
Step 2: Choose Manage Posts.
Step 3: Select the photos to remove the tags from.
Tip: You can also use the filter option to show posts based on date and select to show only posts uploaded by others.
Step 4: After selecting the posts, choose Next.

Step 5: Choose Remove tags and click Done.
Tip: You can also choose Hide posts to hide the post from your timeline.
On Facebook Mobile App
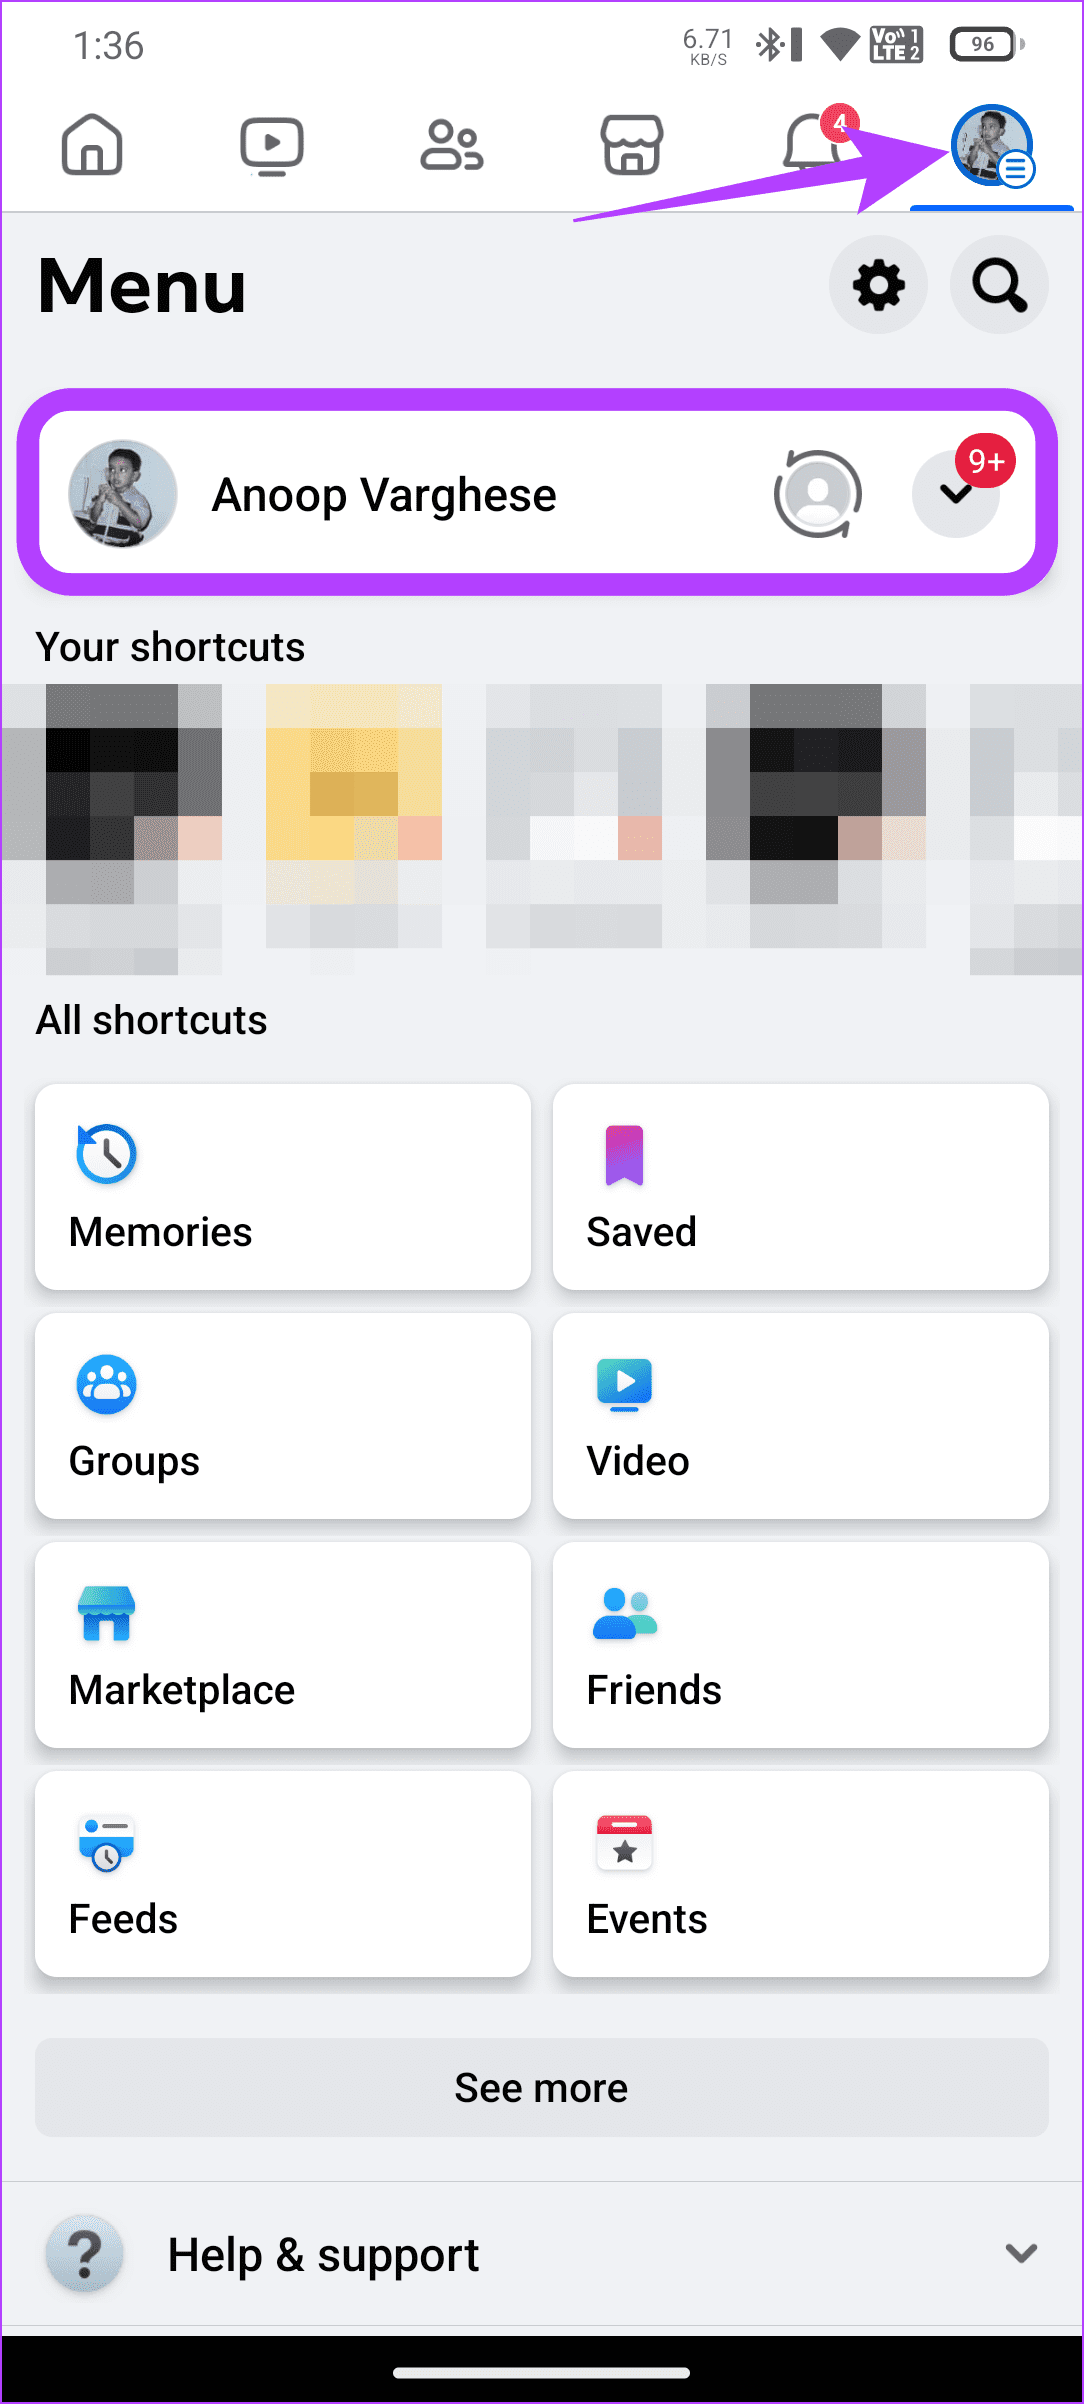
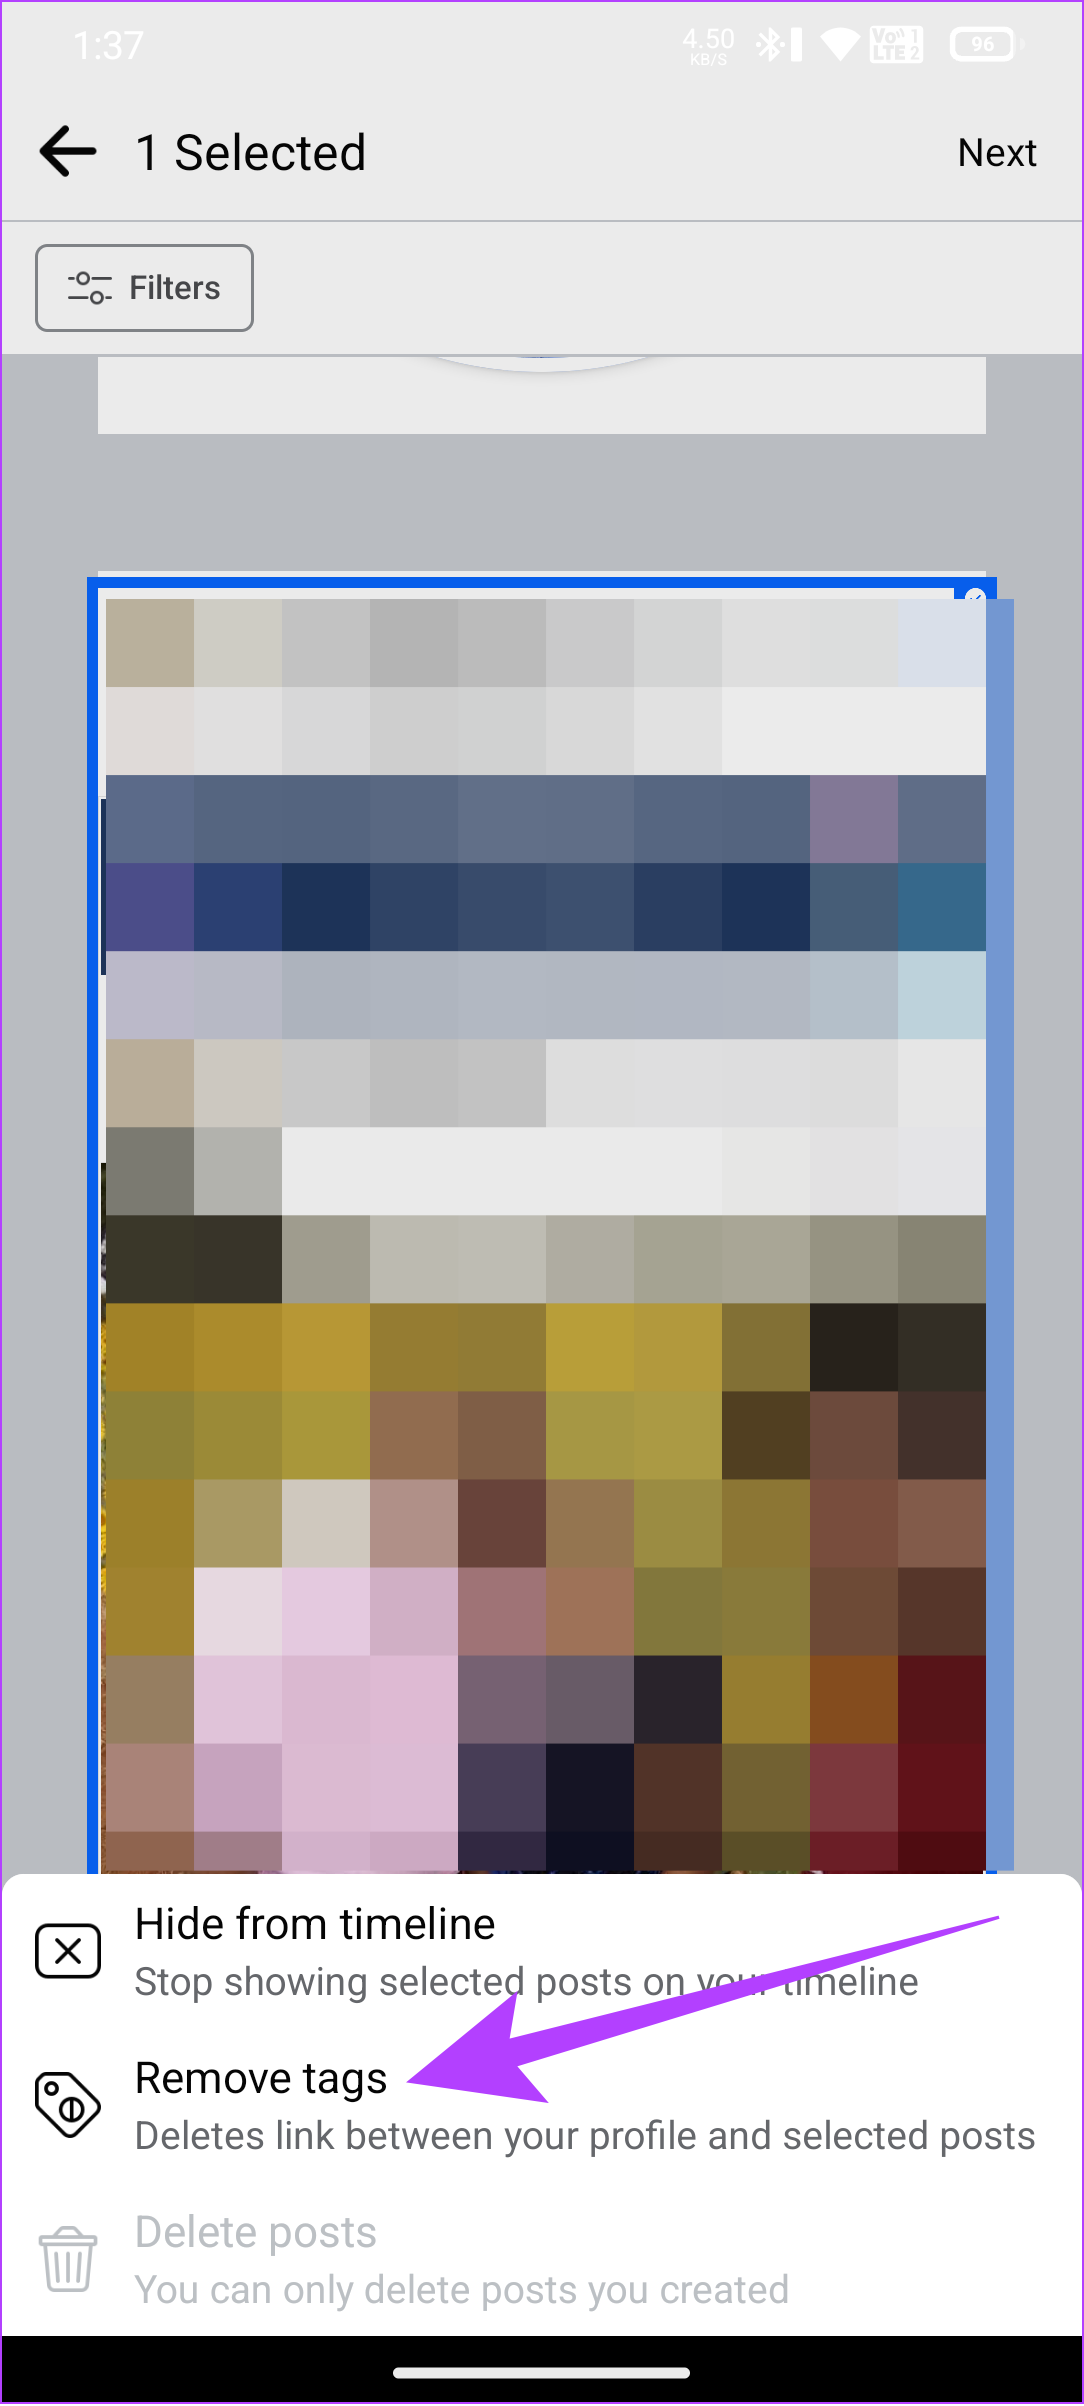
Step 1: Open the Facebook app > tap your profile picture icon and select your profile.
Step 2: Scroll down > tap Manage posts.

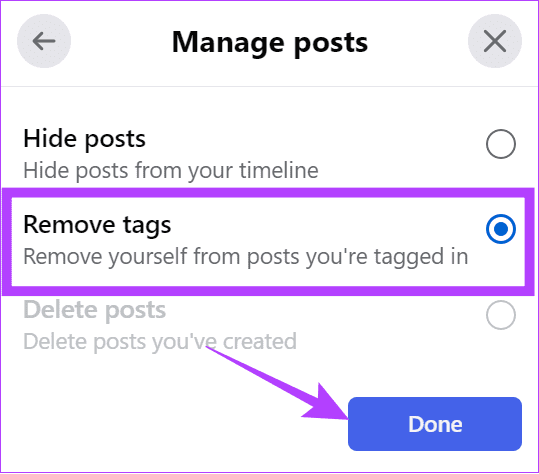
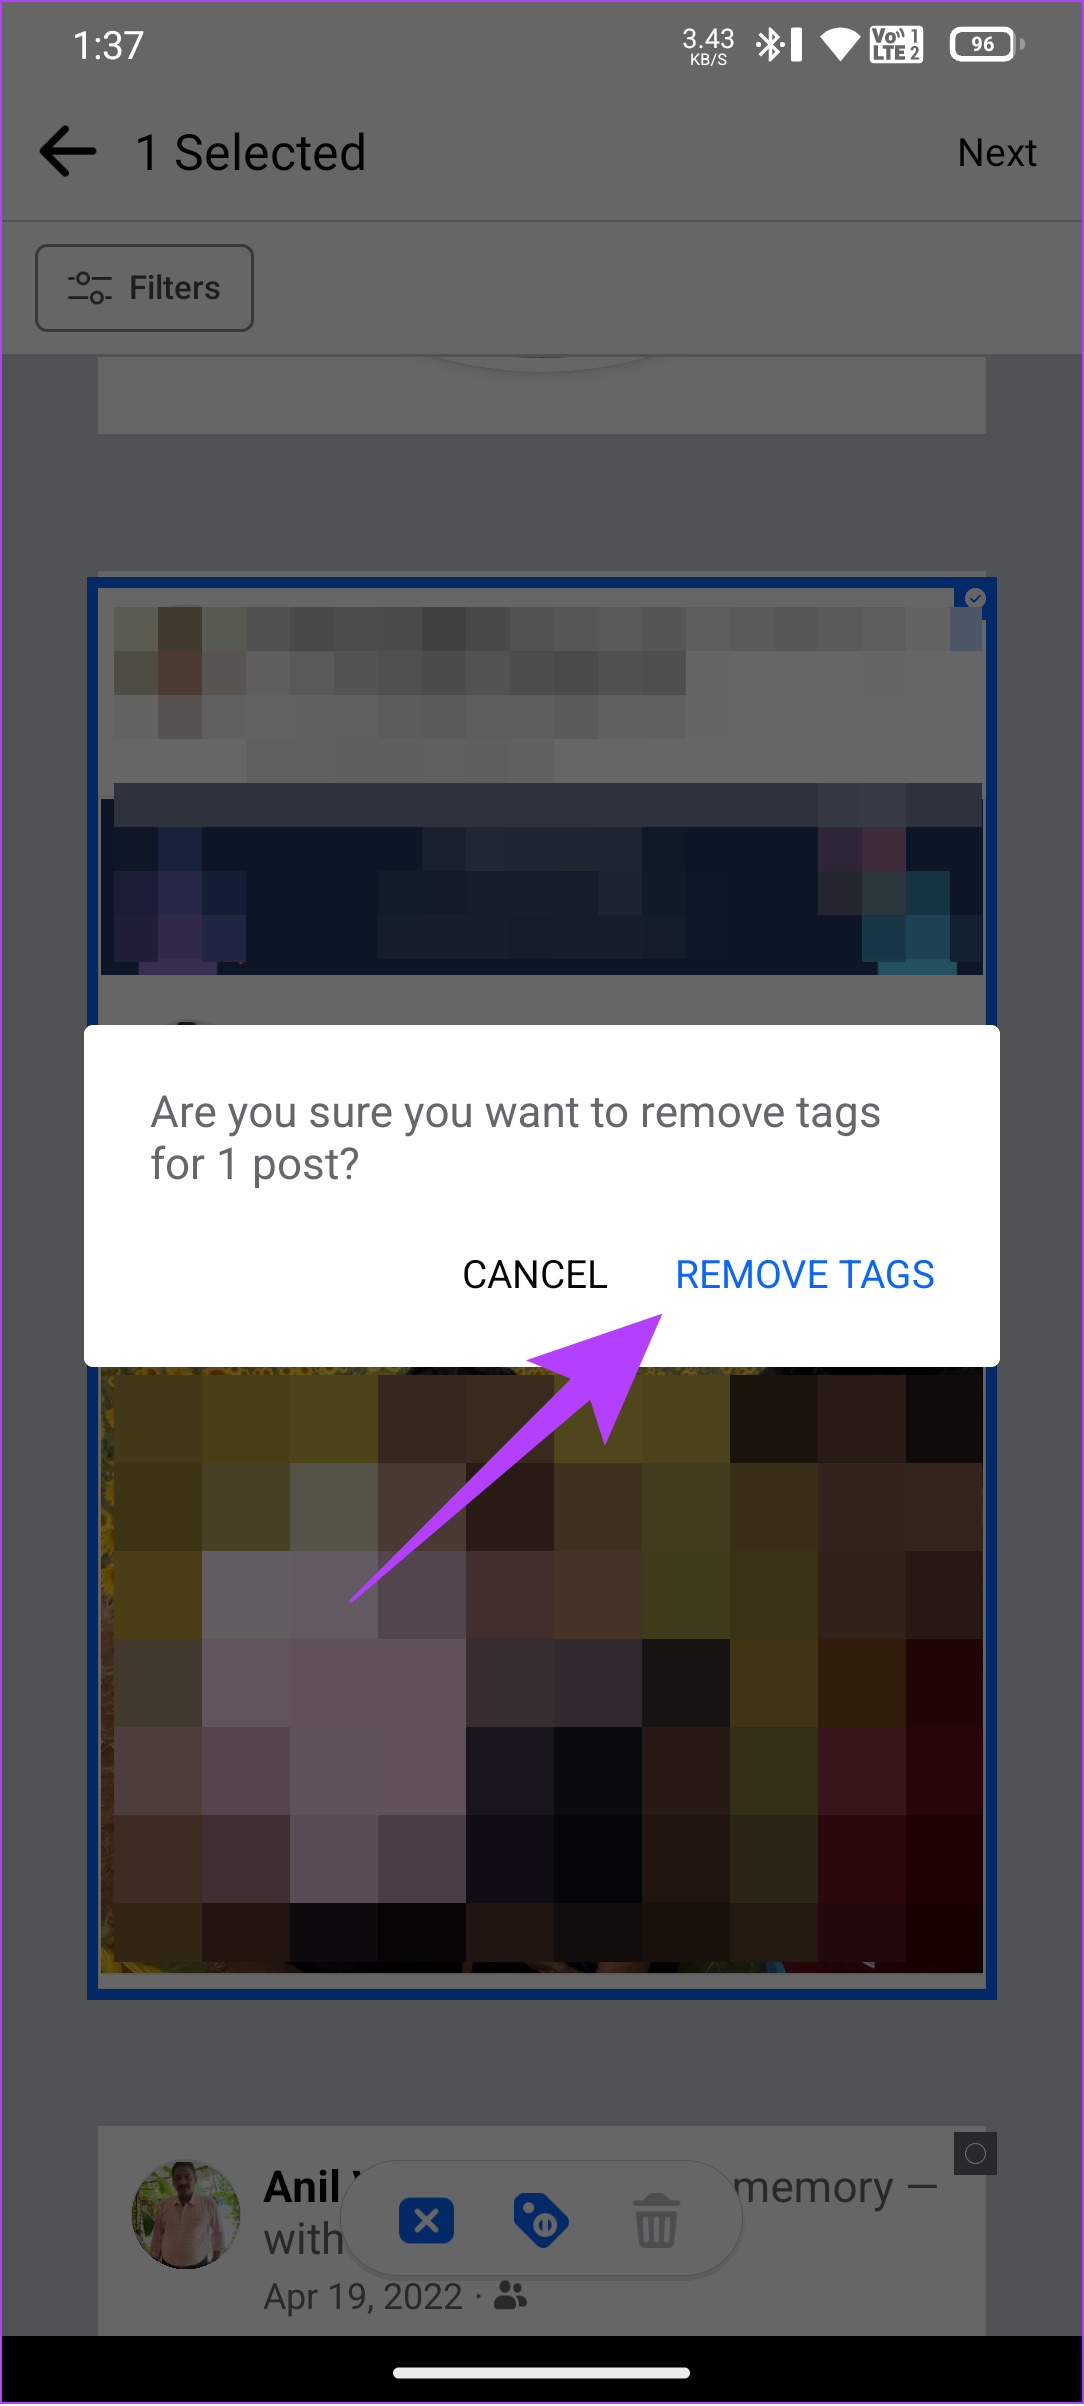
Step 3: Here, select the posts and tap Next.
Step 4: Tap Remove tags to confirm.
While Facebook doesn’t offer official ways to delete multiple (or all) photos on Facebook, these workarounds ensure the world only sees what you want them to see.
Was this helpful?
Last updated on 06 August, 2024
Read Next
 How to Add Multiple Photos to Facebook and Messenger Story
Add Multiple Photos From Android and Ios Devices Step 1: Tap on Create Story on the home screen and tap on Select Multiple.
How to Add Multiple Photos to Facebook and Messenger Story
Add Multiple Photos From Android and Ios Devices Step 1: Tap on Create Story on the home screen and tap on Select Multiple.
 How to Delete Photos From Google Photos But Not From Phone
What Happens When You Delete Photos?
How to Delete Photos From Google Photos But Not From Phone
What Happens When You Delete Photos?
 What Happens When You Delete Photos from Google Photos
If you use the gallery app on your phone without the cloud storage service, things are pretty easy.
What Happens When You Delete Photos from Google Photos
If you use the gallery app on your phone without the cloud storage service, things are pretty easy.
 How to Delete Multiple Emails in Outlook on Mobile and Web
How to Delete Multiple Outlook Emails on Mobile Let's first start with how you can mass delete emails from the Microsoft Outlook app on your mobile.
How to Delete Multiple Emails in Outlook on Mobile and Web
How to Delete Multiple Outlook Emails on Mobile Let's first start with how you can mass delete emails from the Microsoft Outlook app on your mobile.
 How to Delete Multiple or All Chats in WhatsApp
We have covered the following things here: How to delete multiple chats on WhatsApp.
How to Delete Multiple or All Chats in WhatsApp
We have covered the following things here: How to delete multiple chats on WhatsApp.
 How to Send Multiple Photos on WhatsApp for iPhone and Android
It’s sufficient to say that IM (instant messaging) platforms like WhatsApp and Messenger have become the preferred way to send or receive media files.
How to Send Multiple Photos on WhatsApp for iPhone and Android
It’s sufficient to say that IM (instant messaging) platforms like WhatsApp and Messenger have become the preferred way to send or receive media files.
 How to Add Camera Roll Photos (Multiple) to Snapchat Story
How to Add Photos to Your Snapchat Story Before we get started on adding multiple pictures from your camera roll, let us quickly look at how to add a single
How to Add Camera Roll Photos (Multiple) to Snapchat Story
How to Add Photos to Your Snapchat Story Before we get started on adding multiple pictures from your camera roll, let us quickly look at how to add a single
 How to Make Instagram Reels With Multiple Photos
How Many Pictures Can You Put in an Instagram Reel?
How to Make Instagram Reels With Multiple Photos
How Many Pictures Can You Put in an Instagram Reel?
The article above may contain affiliate links which help support Guiding Tech. The content remains unbiased and authentic and will never affect our editorial integrity.