Whether you use Microsoft Excel for planning your monthly budget or submitting complex reports to your manager, there’s no denying the usefulness of this spreadsheet tool. That makes it all the more crushing when you accidentally delete an Excel file you’ve worked hard on.
Follow these three methods and learn how to retrieve deleted Excel files with ease.
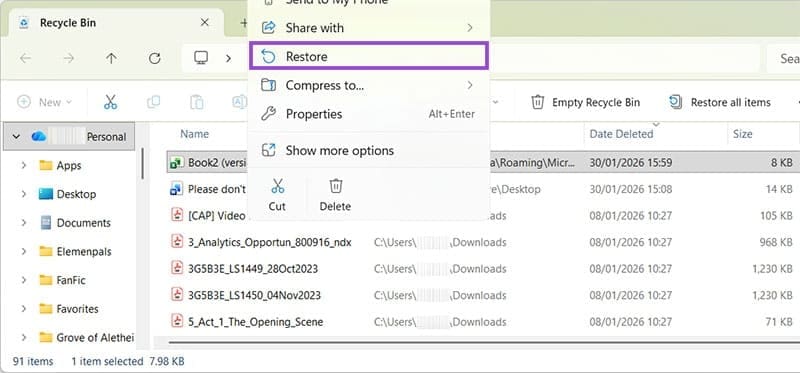
Restore Deleted Excel File: Recycle Bin Method
Step 1. If you accidentally delete a file, head to the Recycle Bin. It’s on your desktop, and looks like a trashcan with a recycle symbol on it, usually in the top left.

Step 2. Double-click on the icon. This opens a file explorer window where you can see everything that was recently deleted. Note: These items will disappear after a few days on most Windows setups. Don’t delay before trying to restore deleted Excel files.

Step 3. Right-click on the relevant file and choose the option to “Restore.” Your file will automatically return to the original save location.
Restore Deleted Excel File: Ctrl + Z
If you’re a regular Microsoft Office user, you probably know that Ctrl + Z is the quick way to select “Undo.” What you might not know is that this function works in other areas of Windows, including the file explorer. In this example, a user pressed “Delete” instead of “Share.”

If you delete something within a file explorer window, simply press Ctrl + Z to undo the action.
After delete and before Ctrl + Z:

After Ctrl + Z:

Restore Deleted Excel File: AutoRecover
Step 1. If you accidentally closed Excel without saving your work, or turned your computer off before saving, AutoRecover should have your back. Turn your computer back on, if necessary, and reopen Excel.

Step 2. Click on “Open” and look for “Recover Unsaved Workbooks.”
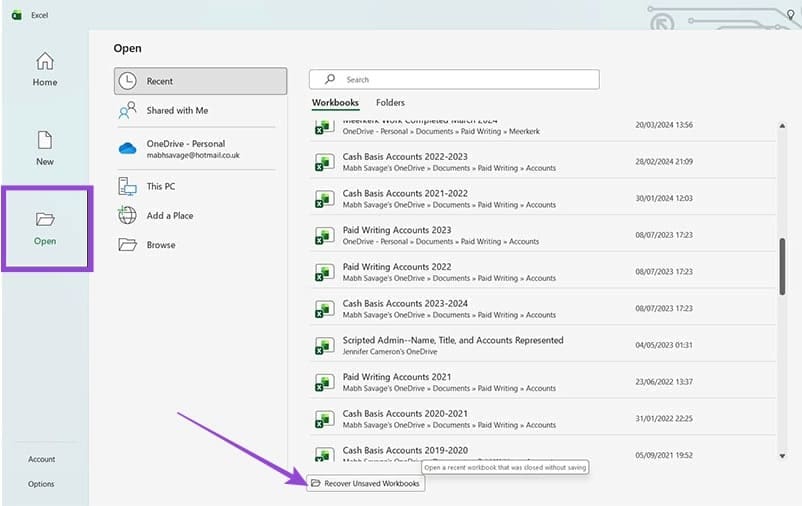
Step 3. Click here, and you’ll see a new file explorer window showing any files that were closed without saving. They will usually have a title that starts with “Book” as they won’t have a personalized name before saving.

Step 4. Double-click on the relevant document to open it in Excel. You may see a pop-up window telling you if repairs are needed for the file.

Step 5. Once the file is open, you’ll see a Document Recovery window to the left. If there were multiple recovered files, they would all appear here. You can click on them one by one and choose which you want to save and which you’re happy to discard. Right-click on a file and click “Save As” to save to the location of your choice.

Was this helpful?
Last updated on 06 February, 2026
Read Next
 How to Restore Deleted Contacts from Google
Method 1: Using the Google Contacts App If you use a Stock Android phone, it must have the Google Contacts app.
How to Restore Deleted Contacts from Google
Method 1: Using the Google Contacts App If you use a Stock Android phone, it must have the Google Contacts app.
 How to Restore Accidentally Deleted Google Play Store
Fix 1: Check Hidden Apps The Play Store might be missing from your phone because you have hidden it accidentally.
How to Restore Accidentally Deleted Google Play Store
Fix 1: Check Hidden Apps The Play Store might be missing from your phone because you have hidden it accidentally.
 5 Ways to Restore Deleted Contacts on iPhone
Method 1: Enable iCloud or Google Contacts Sometimes, contacts on your iPhone can simply disappear with an accidental tap.
5 Ways to Restore Deleted Contacts on iPhone
Method 1: Enable iCloud or Google Contacts Sometimes, contacts on your iPhone can simply disappear with an accidental tap.
 How to Use File History to Backup and Restore Files on Windows 11
File History is a useful utility in Windows 11 to back up select files and folders to an external drive automatically.
How to Use File History to Backup and Restore Files on Windows 11
File History is a useful utility in Windows 11 to back up select files and folders to an external drive automatically.
 How to Restore Files Removed by Windows Defender
Windows Defender is an invaluable tool for keeping your PC safe from harm.
How to Restore Files Removed by Windows Defender
Windows Defender is an invaluable tool for keeping your PC safe from harm.
 How to Recover Unsaved Excel Files
It’s probably happened before.
How to Recover Unsaved Excel Files
It’s probably happened before.
 How to Split a Large Excel File Into Multiple Files
Officially, a Microsoft Excel file can only be 1,048,576 rows by 16,384 columns.
How to Split a Large Excel File Into Multiple Files
Officially, a Microsoft Excel file can only be 1,048,576 rows by 16,384 columns.
 Can’t Save Excel Files on Mac? Try These 3 Fixes
Basic Fixes Check internet connectivity. If your Mac experiences internet issues, Microsoft Excel will remain stuck in the ‘Saving’ status.
Can’t Save Excel Files on Mac? Try These 3 Fixes
Basic Fixes Check internet connectivity. If your Mac experiences internet issues, Microsoft Excel will remain stuck in the ‘Saving’ status.
The article above may contain affiliate links which help support Guiding Tech. The content remains unbiased and authentic and will never affect our editorial integrity.