Use Outlook Forwarding
Step 1: Navigate to Outlook Web on the desktop browser and sign in using Microsoft account credentials.
Step 2: Tap on the Settings icon at the upper right.
Step 3: Navigate to Mail > Forwarding.

Step 4: Enable the forwarding option and enter the email where you want to forward the Outlook emails.
Step 5: Enable or disable the Keep a copy of the forwarded messages option and hit Save at the bottom.

That’s it. Now, you will see all the Outlook auto-forwarding emails to your other email address. But as I mentioned earlier, this practice forwards all emails and might crowd your inbox.
To avoid such issues, use the Outlook Rules function to set certain rules for email forwarding.
Create Outlook Rules
Step 1: Navigate to Outlook Web on the desktop browser and sign in using Microsoft account credentials.
Step 2: Tap on the Settings icon at the upper right corner.
Step 3: Navigate to Mail > Rules.
Step 4: Select Add new rule. Add a relevant name to the rule and move to the condition option.

Step 5: You can select from a bunch of conditions, such as Subject, Keyword, Market with, People, and more.
Step 6: You can add as many conditions as you prefer in the rule.
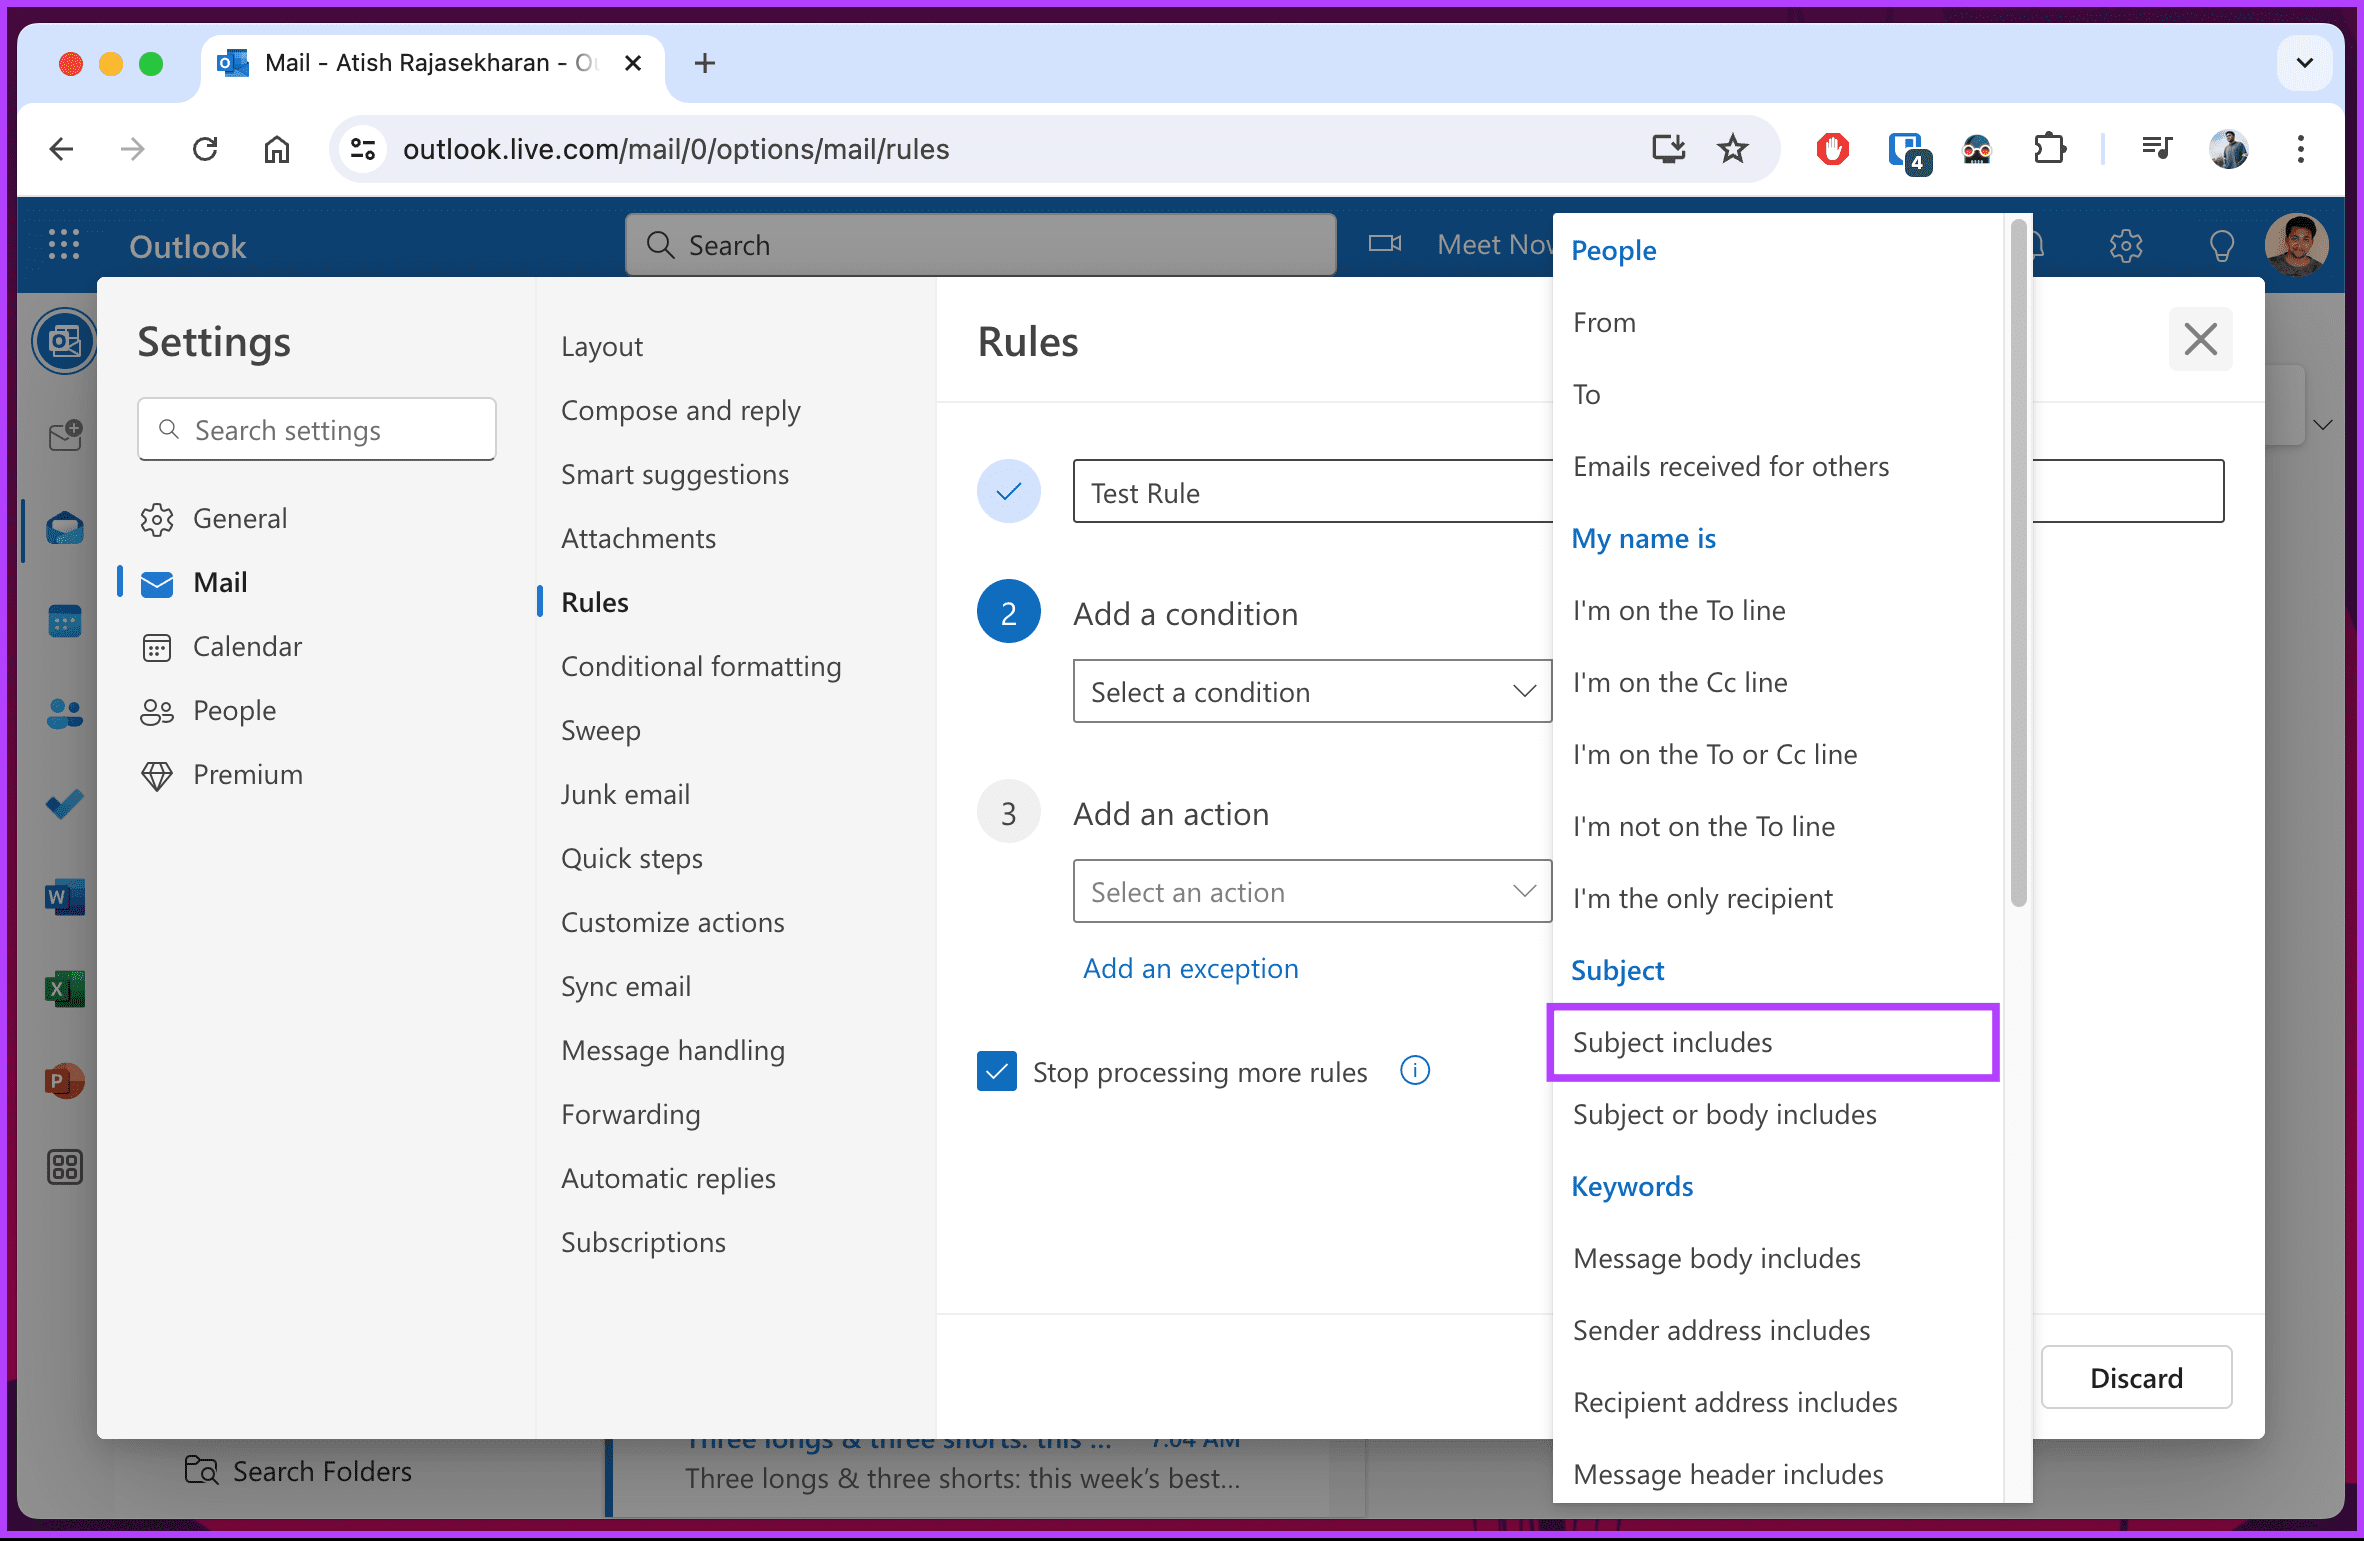
Step 7: After adding relevant conditions, move to Add an action and select Route > Forward to.
Step 8: Select the email address to which you want the emails to be forwarded.

You can also add an exception to a rule. Tap on Add an exception and set a separate condition for it. Hit the Save button at the bottom corner, and you are good to go.
From now on, whenever an incoming email arrives with a relevant subject or body keywords, Outlook will run the rule and act accordingly.
Set Automatic Replies
Outlook also allows you to set automatic replies to let the recipient know that you have received their mail and plan to reply properly soon.
Step 1: Open Outlook Web and tap on the Settings icon at the top right.
Step 2: Go to Mail > Automatic Replies.
Step 3: Toggle on Automatic replies on. Select the timeframe to run auto-reply for Outlook mail.

Step 4: You can also enable Send replies to only contacts that ignore emails from other contacts and only send automatic replies to contacts.
There you go. You have successfully enabled auto-forwarding on Outlook.
Was this helpful?
Last updated on 08 August, 2024
Read Next
 How to Forward WhatsApp Messages With Sender Info and Image Caption
Before you start, there is a minor difference between iPhone and Android.
How to Forward WhatsApp Messages With Sender Info and Image Caption
Before you start, there is a minor difference between iPhone and Android.
 How to Set Up Auto Forward in Gmail for All or Specific Emails
Auto forwarding email is quite helpful when you move to a different mailbox but still want to receive all incoming emails sent to the older mail address.
How to Set Up Auto Forward in Gmail for All or Specific Emails
Auto forwarding email is quite helpful when you move to a different mailbox but still want to receive all incoming emails sent to the older mail address.
 How to Forward Email to Your Phone as a Text
Popular Carriers and SMS Gateways to Convert Email to Text Before we move forward, we need to look at the phone carrier and their email-SMS gateway address.
How to Forward Email to Your Phone as a Text
Popular Carriers and SMS Gateways to Convert Email to Text Before we move forward, we need to look at the phone carrier and their email-SMS gateway address.
 How to Fast Forward (and Rewind) Instagram Live Stories Video Replays
Fast-Forward an Instagram Live Story Video Replay Before we proceed, it is pertinent to state that you can only forward replays of live sessions/videos that users share on their stories.
How to Fast Forward (and Rewind) Instagram Live Stories Video Replays
Fast-Forward an Instagram Live Story Video Replay Before we proceed, it is pertinent to state that you can only forward replays of live sessions/videos that users share on their stories.
 Why Can’t I Forward Messages on WhatsApp
WhatsApp allows you to forward messages from one conversation to all contacts or groups.
Why Can’t I Forward Messages on WhatsApp
WhatsApp allows you to forward messages from one conversation to all contacts or groups.
 How to Auto-Delete Emails in Microsoft Outlook
Create Auto-Delete Rule from the Email First, the Rules function is only available on Outlook Windows/Mac app and Outlook Web.
How to Auto-Delete Emails in Microsoft Outlook
Create Auto-Delete Rule from the Email First, the Rules function is only available on Outlook Windows/Mac app and Outlook Web.
 How to Automatically Forward Text Messages to Another Phone or PC on Android
Things to Know About the Auto Forward SMS App Android does not allow you to forward text messages via native features automatically.
How to Automatically Forward Text Messages to Another Phone or PC on Android
Things to Know About the Auto Forward SMS App Android does not allow you to forward text messages via native features automatically.
 How to Encrypt Emails in Microsoft Outlook
How to Encrypt Email in Microsoft Outlook on Windows 11 With a Microsoft 365 subscription, you can send encrypted emails to your contacts.
How to Encrypt Emails in Microsoft Outlook
How to Encrypt Email in Microsoft Outlook on Windows 11 With a Microsoft 365 subscription, you can send encrypted emails to your contacts.
The article above may contain affiliate links which help support Guiding Tech. The content remains unbiased and authentic and will never affect our editorial integrity.