Just when it seems you’re over the hurdle of installing Windows 11 24H2, along comes its successor a year later to make your life difficult all over again. If you’re struggling to install the latest major update from Microsoft, then we’ve got a few fixes for you to try.
Here’s what to do when Windows 11 25H2 won’t install.
Windows 11 25H2 Won’t Install – Fixes to Try
Let’s get straight into it. There could be any number of reasons the update isn’t working on your machine, so it’s worth trying all fixes until the issue is resolved:
Check Your Disk Space
Updates need space to download and install before they’re integrated with the OS. If your installation is running into trouble, maybe you don’t have enough space.
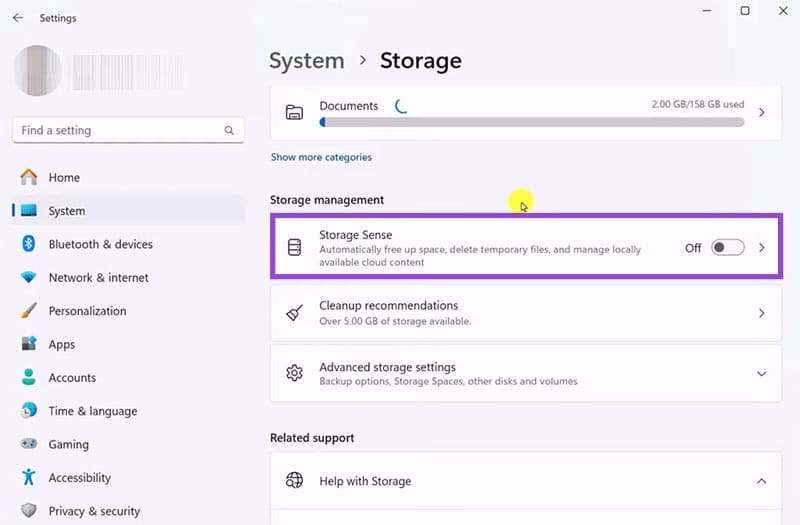
You can use Storage Sense to free up space. Find this in Settings, under “Storage.” Once there, you’ll see the overall disk space on your main hard drive. You can then clear individual areas.
Storage Sense automatically deletes unused files from your machine to keep space free. If you don’t mind this, then it’s a great way to keep room open.
Run a Disk Check and Scan
A major cause behind a failed update is some form of corruption in system files. A good one-two combo is to run a System File Checker (SFC) scan and follow it up with a DISM repair to detect and fix any issues. Here’s what to do:
Step 1. Open the Run Dialog (Win + R) and type “cmd” before pressing (Ctrl + Shift + Enter) to run as Admin.
Step 2. In Command Prompt, type: “sfc /scannow” and press “Enter.” Let the process run.
Step 3. Once the process is done, restart your machine.
If the issue persists, go for the DISM:
Step 1. Open Command Prompt in the same way.
Step 2. Type “DISM /Online /Cleanup-Image /RestoreHealth” and hit “Enter.”
Step 3. Let the process run and restart your machine afterwards.
Clear Your Update Cache
If you can’t update to Windows 11 25H2, then another reason could be a corrupted or incomplete download of the update files. Clearing the update cache will let you start fresh. Here’s how:
Step 1. Open Command Prompt and Run as Admin.
Step 2. Type “net stop wuauserv” and hit “Enter” to stop the update process.
Step 3. Open an Explorer window (Win + E) and navigate to the following directory: “C:\Windows\SoftwareDistribution.”
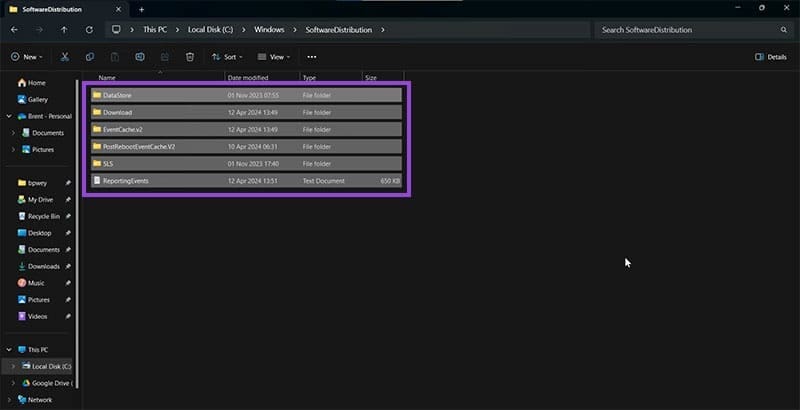
Step 4. Delete all the contents inside the folder. Restart your computer, and Windows will recreate all files again, giving you a fresh start.
Reinstall With System Recovery
You can also use Windows 11 system recovery to attempt a reinstall of the update. To do this:
Step 1. Open Settings (Win + I) and click “System” in the sidebar.
Step 2. Click “Recovery.”
Step 3. Then click “Fix problems using Windows Update,” and hit the “Reinstall Now” button.

Step 4. Let the process run.
Was this helpful?
Last updated on 10 December, 2025
Read Next
 How to Get Windows 11 25H2 if It Doesn’t Show in Windows Update
Windows 11 hasn’t had the best track record with major software updates.
How to Get Windows 11 25H2 if It Doesn’t Show in Windows Update
Windows 11 hasn’t had the best track record with major software updates.
 4 Fixes for Windows 11 Won’t Install on Your PC
We’ve seen many versions of Microsoft’s Windows operating system over the years, from the likes of Windows 95 and 98 through to the more recent releases of Windows 10 and
4 Fixes for Windows 11 Won’t Install on Your PC
We’ve seen many versions of Microsoft’s Windows operating system over the years, from the likes of Windows 95 and 98 through to the more recent releases of Windows 10 and
 How to Solve Windows 10 Game Bar Not Working and Other Common Issues
With the recent Windows 10 version 1809 update, Microsoft pushed a bunch of improvements to the Xbox Game Bar.
How to Solve Windows 10 Game Bar Not Working and Other Common Issues
With the recent Windows 10 version 1809 update, Microsoft pushed a bunch of improvements to the Xbox Game Bar.
 Five Common Office API Error Codes and What They Mean
Office Add-ins allow you to extend your standard Microsoft Office solution into something more.
Five Common Office API Error Codes and What They Mean
Office Add-ins allow you to extend your standard Microsoft Office solution into something more.
 Instagram Block vs Mute vs Hide: Common Terms Explained
What Does Blocking on Instagram Mean Similar to other social networks, blocking on Instagram completely restricts your profile from the other person.
Instagram Block vs Mute vs Hide: Common Terms Explained
What Does Blocking on Instagram Mean Similar to other social networks, blocking on Instagram completely restricts your profile from the other person.
 4 Common Issues With Nothing Ear (1) and How to Fix Them
1.
4 Common Issues With Nothing Ear (1) and How to Fix Them
1.
 10 Common Facebook Marketplace Scams and How to Avoid Them
Besides being a popular social media platform, Facebook is also a great place to buy and sell things, thanks to Facebook Marketplace.
10 Common Facebook Marketplace Scams and How to Avoid Them
Besides being a popular social media platform, Facebook is also a great place to buy and sell things, thanks to Facebook Marketplace.
 12 Best Fixes for Windows 10 Laptop Won’t Connect to iPhone Hotspot
I usually travel light with my Windows laptop and iPhone.
12 Best Fixes for Windows 10 Laptop Won’t Connect to iPhone Hotspot
I usually travel light with my Windows laptop and iPhone.
The article above may contain affiliate links which help support Guiding Tech. The content remains unbiased and authentic and will never affect our editorial integrity.