You’d think computers can routinely handle large files by now. At least, this is probably what you’re thinking to yourself if your Windows Explorer crashes every time it tries to open a big folder. You no doubt have questions, and it’s also doubtless that you want fixes.
In this article, we’ll be doing both and showing you how to proceed when Explorer crashes for large folders.
Why Is Explorer Crashing When Opening Large Folders?
Many things can cause Explorer to crash when opening big files and folders, including:
- Trouble generating thumbnails for all files in the folder
- Add-on and extension conflicts from third-party software
- Explorer is exceeding the shell heap limits and crashing
- File and system corruption
How to Fix Explorer Crashes for Large Folders
If your Windows Explorer won’t operate correctly when dealing with large folders, then try these fixes below:
Restart Explorer
A good first step is to restart Windows Explorer via Task Manager. This may fix any erratic behavior Explorer picks up while running and gives a fresh start:
Step 1. Open Task Manager directly by pressing (Ctrl + Shift + Esc).

Step 2. In the “Processes” tab, look for “Windows Explorer.” Click on it.
Step 3. Press the “Restart” button at the bottom-right of the window. Your screen might go black as Explorer restarts.
Adjust File Explorer Settings
Perhaps the biggest cause of Explorer crashing when opening large folders is overload. On bigger folders, Explorer struggles to produce thumbnails and metadata for every file and is quickly overwhelmed. On less powerful computers, this can be especially problematic. To fix this, try lessening the burden on Explorer through its settings. Here’s how to do so:
Step 1. Open up an Explorer window (Win + E).
Step 2. A new window will pop up. The biggest offender is thumbnail generation. Check “Always show icons, never thumbnails” on the list. In addition, try hiding hidden folders by clicking “Don’t show hidden files, folders, or drives.”

Step 3. Click “OK” to finalize.
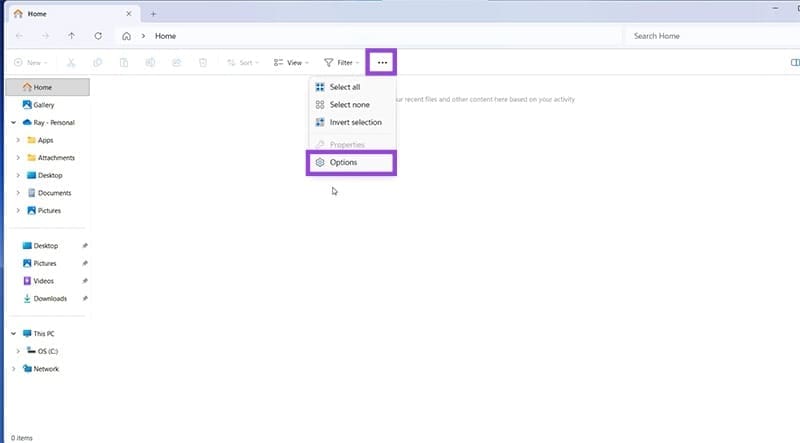
Disable QuickTime and Explorer History
QuickTime is a handy way to access recently used files and folders, but it can also overload Explorer. While in Folder Options (mentioned above), switch to the “General” tab and do the following:
Step 1. Under the “Privacy” subsection, uncheck all the boxes.
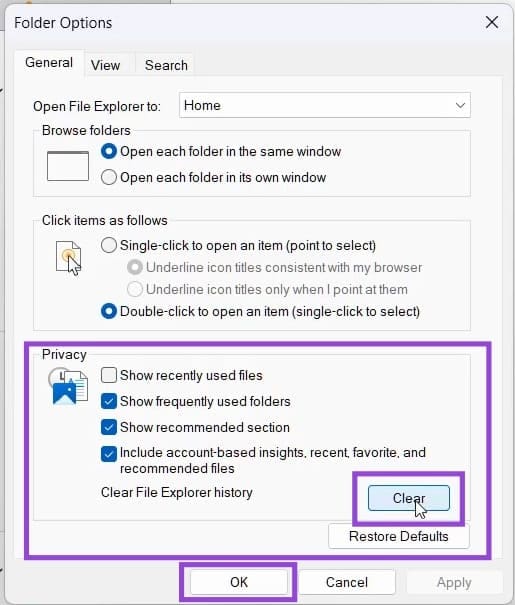
Step 2. Finally, click the “Clear” button to wipe your File Explorer history. Click the “OK” button once done.
Check for Extension Conflicts
The add-ons and extensions we add to Windows to make life easier can also make things more difficult. To check if a third-party program is interfering with Explorer, you can download ShellExView for free. Here’s what to do:
Step 1. Download ShellExView and right-click the executable, selecting “Run as administrator.”
Step 2. Click the “Type” column to sort by it. Any Extension that isn’t directly related to Microsoft (mentioned in the “Company” column) can be disabled by right-clicking it and selecting “Disable Selected Items.” Any “Context Menu,” “Property Sheet,” “Preview,” and “Thumbnail Handlers” extensions are the most likely culprits.

Step 3. Deactivate extensions one by one, testing Explorer after every check.
Was this helpful?
Last updated on 20 November, 2025
Read Next
 How to Add Columns Permanently to All Folders in Windows 10 File Explorer
File Explorer in Windows usually shows just a few columns such as name, date, and type.
How to Add Columns Permanently to All Folders in Windows 10 File Explorer
File Explorer in Windows usually shows just a few columns such as name, date, and type.
 Quickly Auto-Restart a Windows Process or Program that Crashes
No one’s ever been killed in a Windows crash, so the Microsoft jokes don’t die down.
Quickly Auto-Restart a Windows Process or Program that Crashes
No one’s ever been killed in a Windows crash, so the Microsoft jokes don’t die down.
 4 Ways to Fix App Crashes on Windows
Try Basic Fixes Install Windows and app updates: Windows updates bring all kinds of bug fixes and stability improvements to your PC.
4 Ways to Fix App Crashes on Windows
Try Basic Fixes Install Windows and app updates: Windows updates bring all kinds of bug fixes and stability improvements to your PC.
 6 Ways to Fix Google Chrome Crashes When Downloading Files on Windows
Fix 1.
6 Ways to Fix Google Chrome Crashes When Downloading Files on Windows
Fix 1.
 6 Ways to Fix Google Chrome Crashes or Freezes When Uploading Files
Common Fixes Close other tabs and background applications: It will free up system resources, saving Google Chrome from a potential crash.
6 Ways to Fix Google Chrome Crashes or Freezes When Uploading Files
Common Fixes Close other tabs and background applications: It will free up system resources, saving Google Chrome from a potential crash.
 Outlook Crashes at Startup — 3 Fixes
If you’ve experienced Outlook crashing at startup, you’re not alone.
Outlook Crashes at Startup — 3 Fixes
If you’ve experienced Outlook crashing at startup, you’re not alone.
 How to Fix Windows 11 24H2 BSOD and Crashes
Windows 11 updates are meant to make the PC easier to use and more stable in the long run, but the 24H2 update seems to go against the grain.
How to Fix Windows 11 24H2 BSOD and Crashes
Windows 11 updates are meant to make the PC easier to use and more stable in the long run, but the 24H2 update seems to go against the grain.
 How to Add File Explorer and Folders to Taskbar in Windows 11
How to Add File Explorer to Taskbar in Windows 11 The Taskbar in Windows 11 has the File Explorer icon pinned to the Taskbar by default.
How to Add File Explorer and Folders to Taskbar in Windows 11
How to Add File Explorer to Taskbar in Windows 11 The Taskbar in Windows 11 has the File Explorer icon pinned to the Taskbar by default.
The article above may contain affiliate links which help support Guiding Tech. The content remains unbiased and authentic and will never affect our editorial integrity.

