Windows 11 makes OneDrive integration seamless with the operating system, making sending and retrieving files a breeze. That said, even OneDrive is occasionally liable to some errors. Today, we’re looking at quite a common issue: the OneDrive context menu missing Windows 11 can sometimes develop.
This article will show you a few fixes you can try.
OneDrive Context Menu Missing Windows 11 – Fixes to Try
It may have been a new update that started the troubles, or they began when you moved to Windows 11. Whatever the case may be, try the fixes below:
Edit the Registry
In some instances, OneDrive may have a Registry Key missing, causing the issue. You can add this in manually:
Step 1. Open the Run Dialog (Win + R) and type “regedit” and hit (Ctrl + Shift + Enter) to run as Admin.
Step 2. Once in the Registry, navigate to “HKEY_CLASSES_ROOT\*\shellex\ContextMenuHandlers” and see if an entry for OneDrive exists.
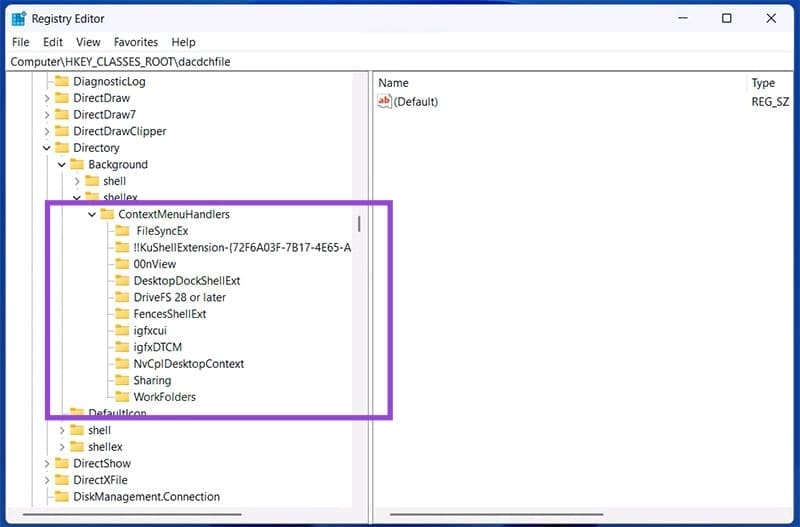
Step 3. If not, create a new key by right-clicking the folder and choosing “New” and “Key.”
Step 4. Double-click the “Default Value” in this key and change the value to “{CB3D0F6C-BCB3-4C3D-8B3E-47D12D4958E3}.”
Step 5. Restart your machine.
Restart Windows Explorer
Your first port of call (and the simplest) is restarting Windows Explorer. This solves a lot of problems effectively and can be done through Task Manager:
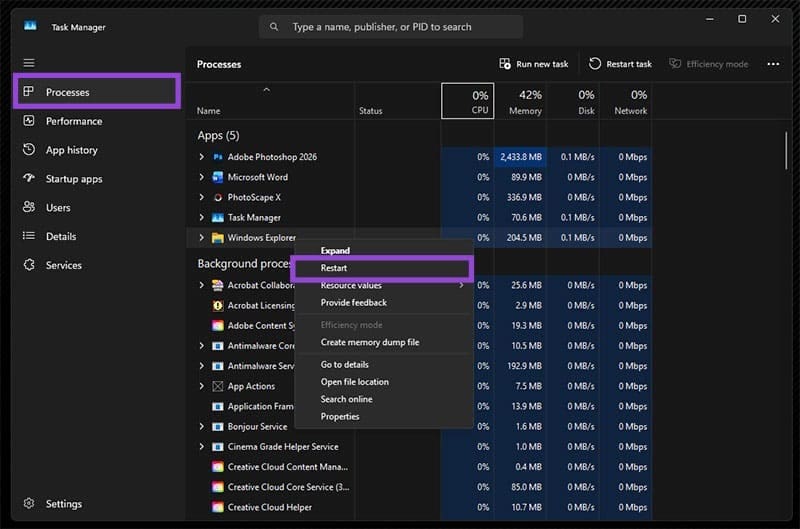
Step 1. Press (Ctrl + Shift + Esc) to bring up Task Manager.
Step 2. Find and select the “Windows Explorer” process in the “Processes” tab and select “Restart” from the top menu.
Step 3. Explorer will restart. Check to see if this resolves the issue.
If this still doesn’t work, go one step further and restart your entire machine.
Enable the Context Menu Manually
If you have the OneDrive context menu missing, you can force it yourself. It could be that a policy is preventing it from appearing. Here’s how to force it:
Step 1. Open the Run Dialog (Win + R) and type “gpedit.msc” into the box and hit (Ctrl + Shift + Enter) to run as Administrator.
Step 2. In the Group Policy Editor, navigate to: “User Configuration > Administrative Templates > Windows Components > OneDrive.”
Step 3. Look for the policy “Prevent the usage of OneDrive for file storage” and double-click it.

Step 4. Ensure it’s not enabled. If it is, check the “Disabled” option and confirm.

Step 5. Open Command Prompt (“cmd” in the Run Dialog) and type “gpupdate /force” and hit “Enter.” Let the process complete and restart your machine.
Reset OneDrive
A lot of problems with OneDrive can be solved by resetting the app itself. While you may have to re-enter your login details, the benefits will outweigh the costs:
Step 1. Open the Run dialog (Win + R) and type:
“%localappdata%\Microsoft\OneDrive\onedrive.exe /reset” into the box. Hit “OK.”
Step 2. If OneDrive cannot be found at this location, enter “C:\Program Files\Microsoft OneDrive\onedrive.exe /reset” and press “OK.” If that doesn’t work, try “C:\Program Files (x86)\Microsoft OneDrive\onedrive.exe /reset” and hit “OK.”
Step 3. The app will reset. Log in again and see if the context menu appears.
Was this helpful?
Last updated on 28 January, 2026
Read Next
 How to Fix a Slow Windows 10 Desktop Right-Click (Context) Menu
The desktop right-click menu, otherwise known as the desktop context menu, provides instant access to numerous useful options ranging from aligning desktop icons to customizing display settings.
How to Fix a Slow Windows 10 Desktop Right-Click (Context) Menu
The desktop right-click menu, otherwise known as the desktop context menu, provides instant access to numerous useful options ranging from aligning desktop icons to customizing display settings.
 2 Ways to Disable the Show More Options Context Menu in Windows 11
Method 1: Revert to Old Context Menu Using Command Prompt Command Prompt is a command-line interpreter that lets you perform various complicated tasks on your PC with a few text
2 Ways to Disable the Show More Options Context Menu in Windows 11
Method 1: Revert to Old Context Menu Using Command Prompt Command Prompt is a command-line interpreter that lets you perform various complicated tasks on your PC with a few text
 11 Steps to Restore the Windows 11 Classic Context Menu (And a Temporary Fix)
How does it always seems like Microsoft manages to break two things every time it fixes one?
11 Steps to Restore the Windows 11 Classic Context Menu (And a Temporary Fix)
How does it always seems like Microsoft manages to break two things every time it fixes one?
 Enabling the Right-Click Context Menu in Windows 11 Terminal
The Windows 11 Terminal allows you to use both the features of the Command Prompt and the PowerShell run dialog in one package.
Enabling the Right-Click Context Menu in Windows 11 Terminal
The Windows 11 Terminal allows you to use both the features of the Command Prompt and the PowerShell run dialog in one package.
 Remove “Ask Copilot” From the Right-Click Context Menu With These Tips
Copilot is a great tool for helping out in a pinch, but sometimes it really does seem that Windows is forcing it upon users at every opportunity.
Remove “Ask Copilot” From the Right-Click Context Menu With These Tips
Copilot is a great tool for helping out in a pinch, but sometimes it really does seem that Windows is forcing it upon users at every opportunity.
 How to Get Back a Missing OneDrive Icon on Windows 10 Taskbar
The OneDrive icon on the Windows 10 system tray isn’t just another meaningless icon.
How to Get Back a Missing OneDrive Icon on Windows 10 Taskbar
The OneDrive icon on the Windows 10 system tray isn’t just another meaningless icon.
 8 Fixes for “Your Device Is Missing Important Security and Quality Fixes” on Windows
Is there anything more frustrating than seeing the "Your Device Is Missing Important Security and Quality Fixes" message when waiting for your Windows updates to complete?
8 Fixes for “Your Device Is Missing Important Security and Quality Fixes” on Windows
Is there anything more frustrating than seeing the "Your Device Is Missing Important Security and Quality Fixes" message when waiting for your Windows updates to complete?
 Top 5 Fixes for Language Bar Missing in Windows 10
Windows 10 includes language packs to make it easy for people who often deal with foreign languages.
Top 5 Fixes for Language Bar Missing in Windows 10
Windows 10 includes language packs to make it easy for people who often deal with foreign languages.
The article above may contain affiliate links which help support Guiding Tech. The content remains unbiased and authentic and will never affect our editorial integrity.