How to Use Zoom Notes in Meetings on Desktop
Before we get started, ensure that you have installed the latest version of the Zoom app on your Mac or Windows PC. The best part is that you don’t need a Zoom subscription to use this feature.
Step 1: Open the Zoom app on your Mac or Windows PC.
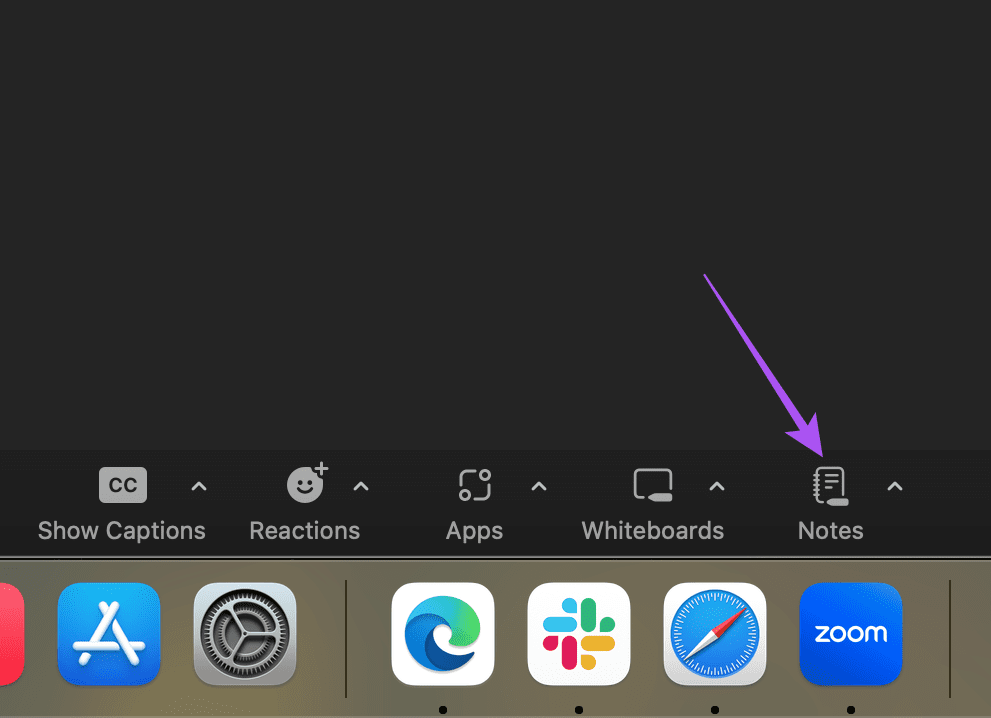
Step 2: Start a new meeting and then click on Notes at the bottom Menu Bar.
Step 3: The Notes window will open on the left side of your screen. Click on New Note to start taking down notes while your Zoom meeting is in progress.

You can edit the text of your Zoom notes like font style, color, and font size.

You can click the double arrow icon for more options like adding an image to your Zoom notes, list, text alignment, hyperlink, and more.

After you take down your Zoom meeting notes, they will get saved automatically for your profile in the app itself.
Share Meeting Notes in Zoom on Desktop
In the Zoom Notes window on the left side, click the Share icon.

You can enter the name of the user with whom you want to share the Zoom note. You can choose whether the user can edit your notes or not.
Lock Meeting Notes in Zoom on Desktop
Step 1: In the Zoom Notes window on the left side, click the three dots > Select Lock Note.
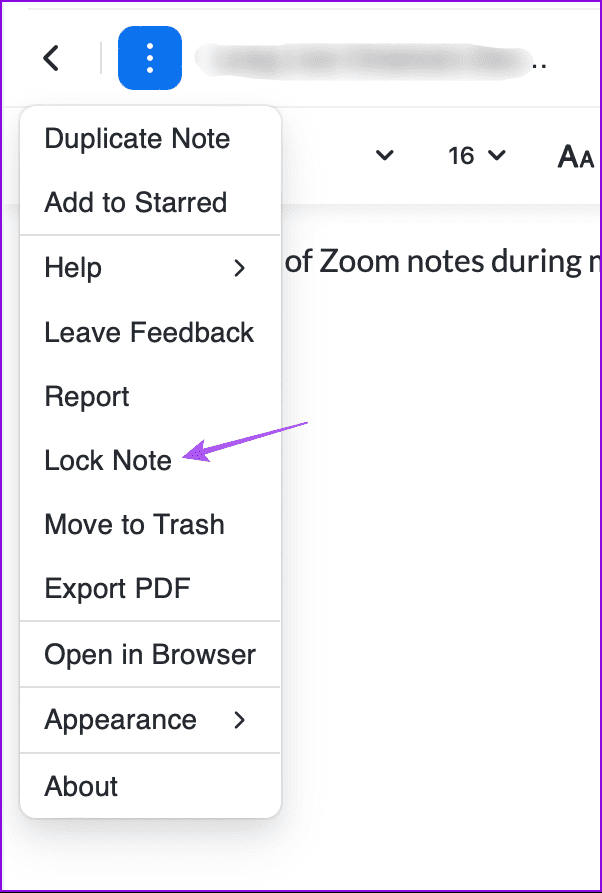
Step 2: Click on Confirm.
After your note is locked, it will be saved on your account and only you can unlock it.
Export Zoom Notes as PDF on Desktop
Step 1: In the Zoom Notes window on the left side, click the three dots > Export PDF.

Step 2: Tap on the Download icon to save your note as a PDF file.

View and Manage Zoom Notes on Desktop
After your meetings, here’s how you can manage all your Zoom notes on Mac or Windows PC.
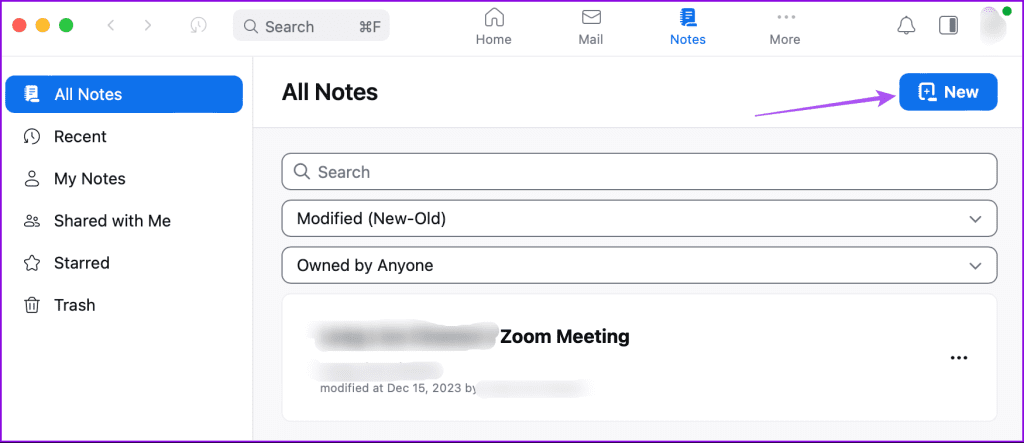
Step 1: Open the Zoom app on your Mac or Windows PC.
Step 2: Sign in to your account > Click on More > Select Notes.

You can see all the notes that you have taken down in Zoom. You again get the option to add a new note before your meeting starts.
To delete your Zoom notes, click the three dots next to their name and then select Move To Trash.
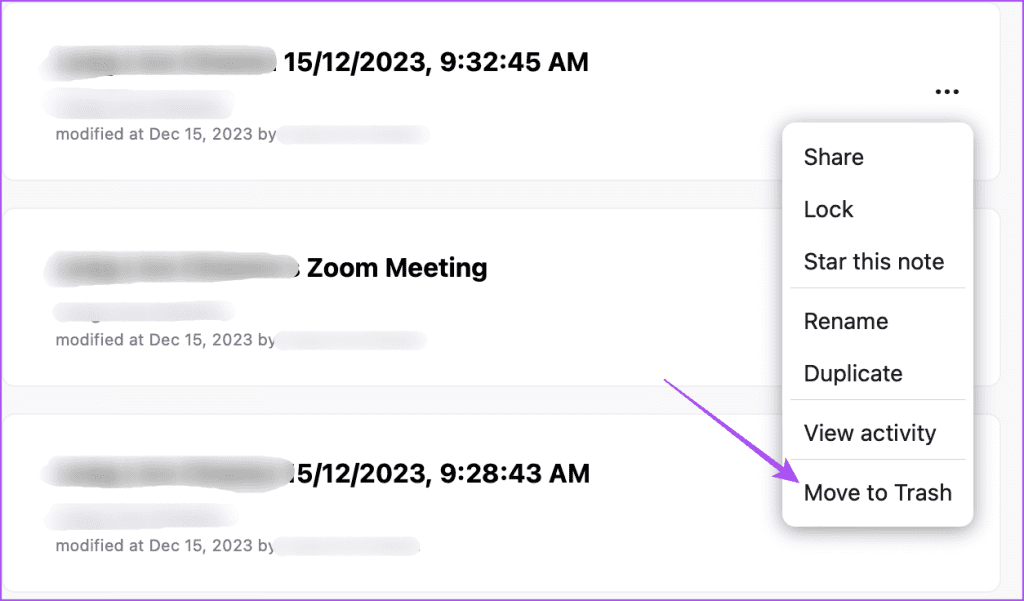
You can check all your deleted notes by clicking on Trash from the left menu.

How to Use Zoom Notes in Meetings on Mobile
If you prefer taking Zoom calls from your iPhone or Android phone, here’s how you can take notes during your Zoom meetings. Once again, ensure that you are using the latest version of the app on your device.
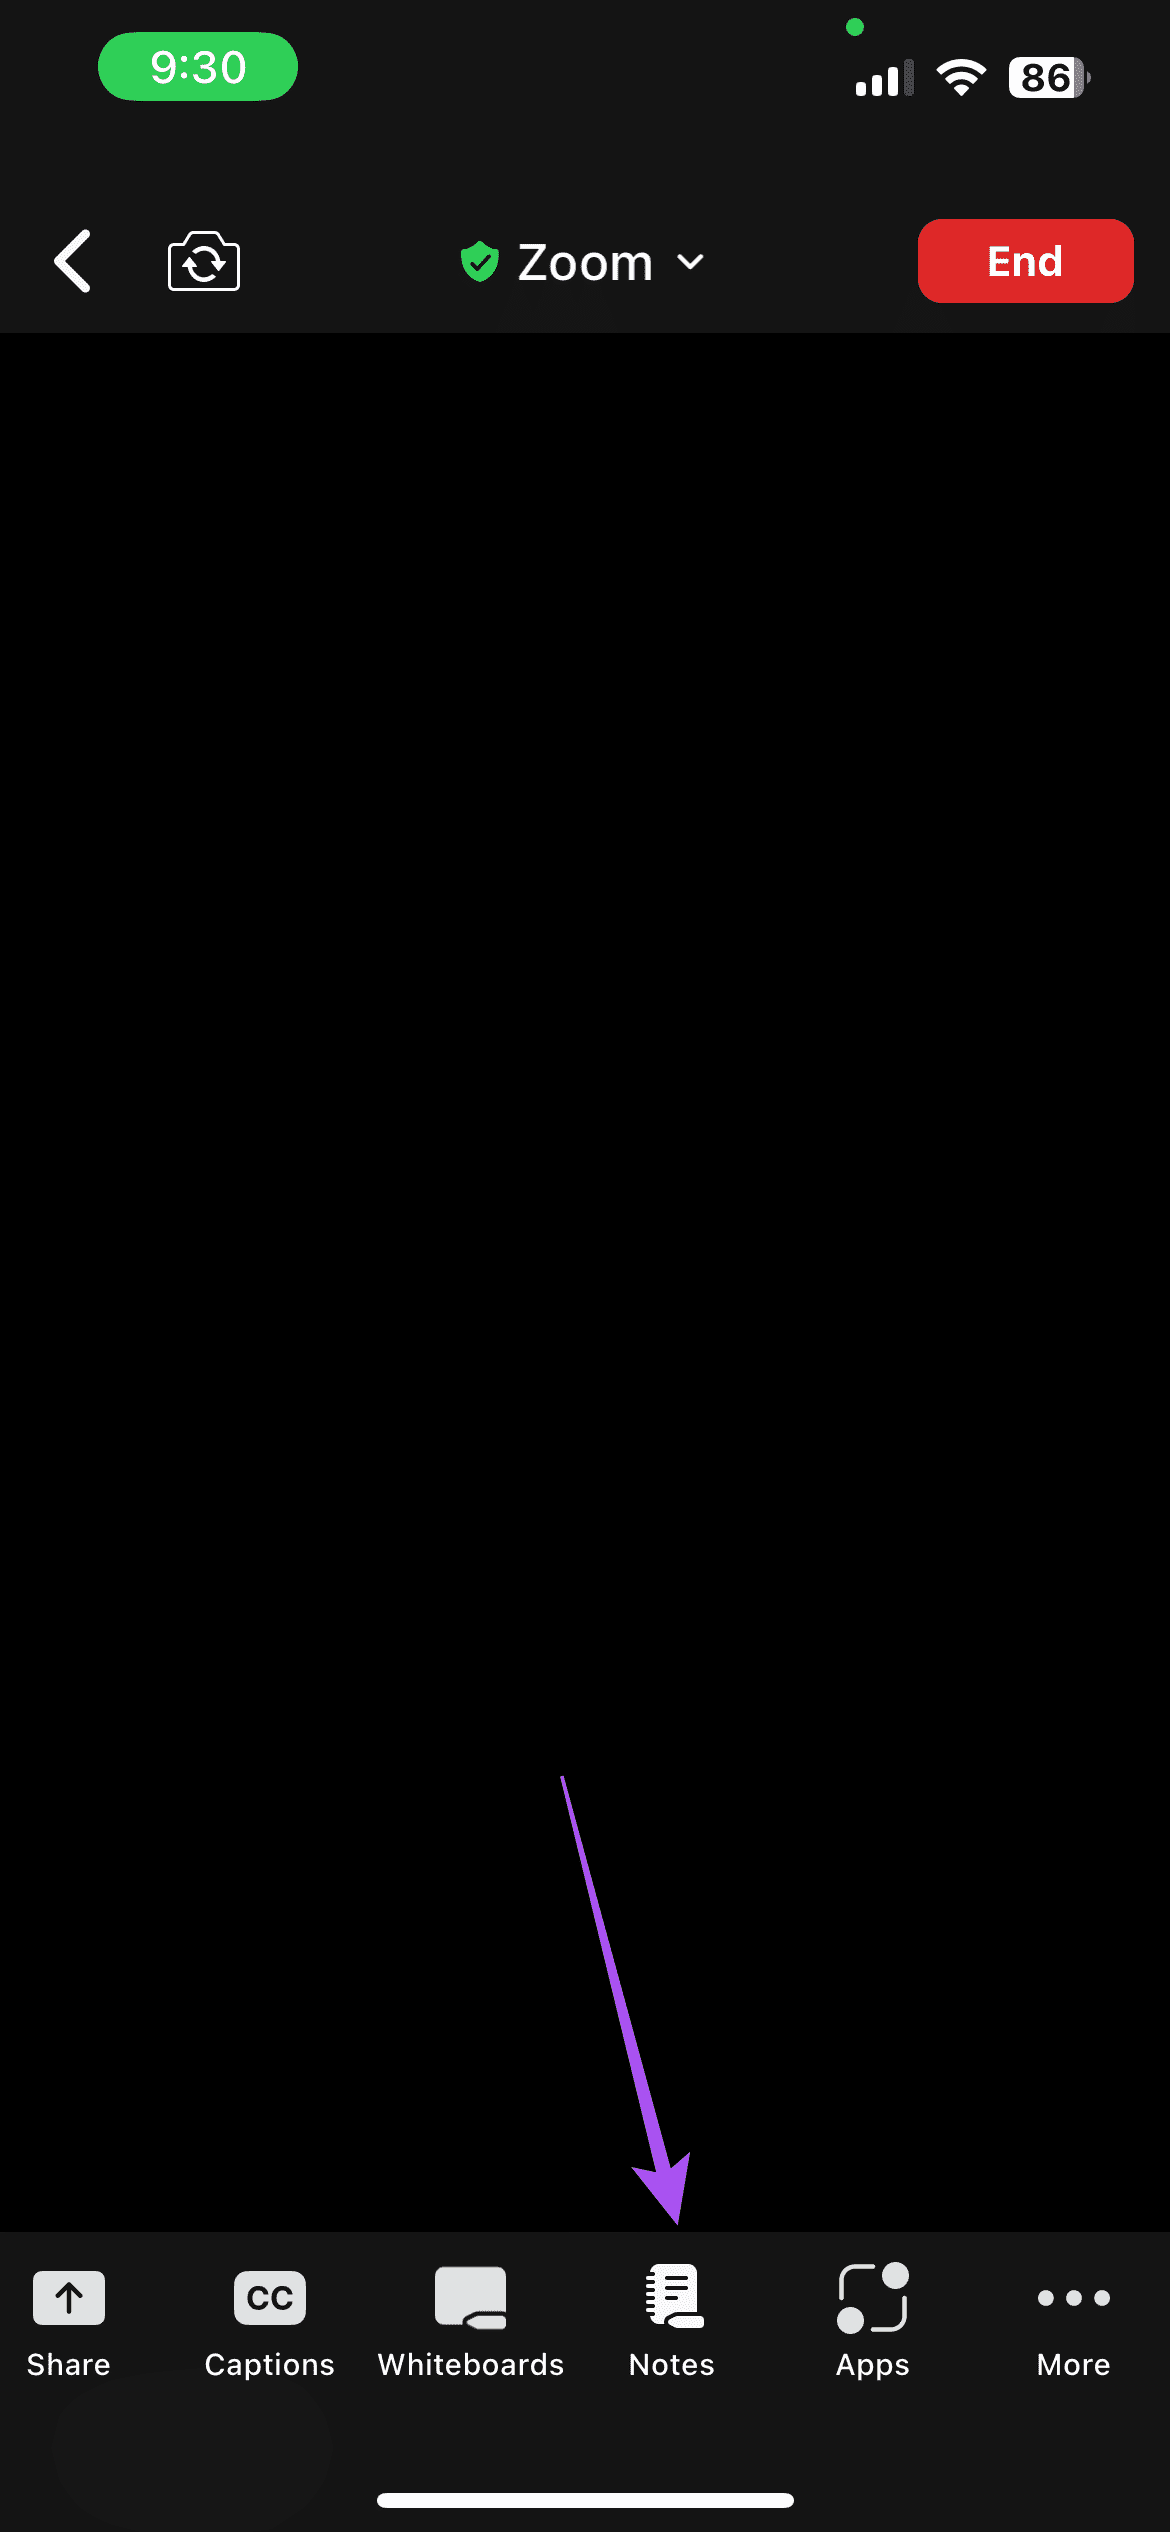
Open the Zoom app > Start your call > Tap on Notes > Select New.

Like on Desktop, you can take down your notes, edit them, add hyperlinks, images, and more on your mobile.
View and Manage Zoom Notes on Mobile
Open the Zoom app > More > Notes.
You will see all your meeting notes saved on your Zoom account.
To delete a note, tap the three dots next to its name and select Move To Trash. You can tap on Lock to prevent access to your notes.
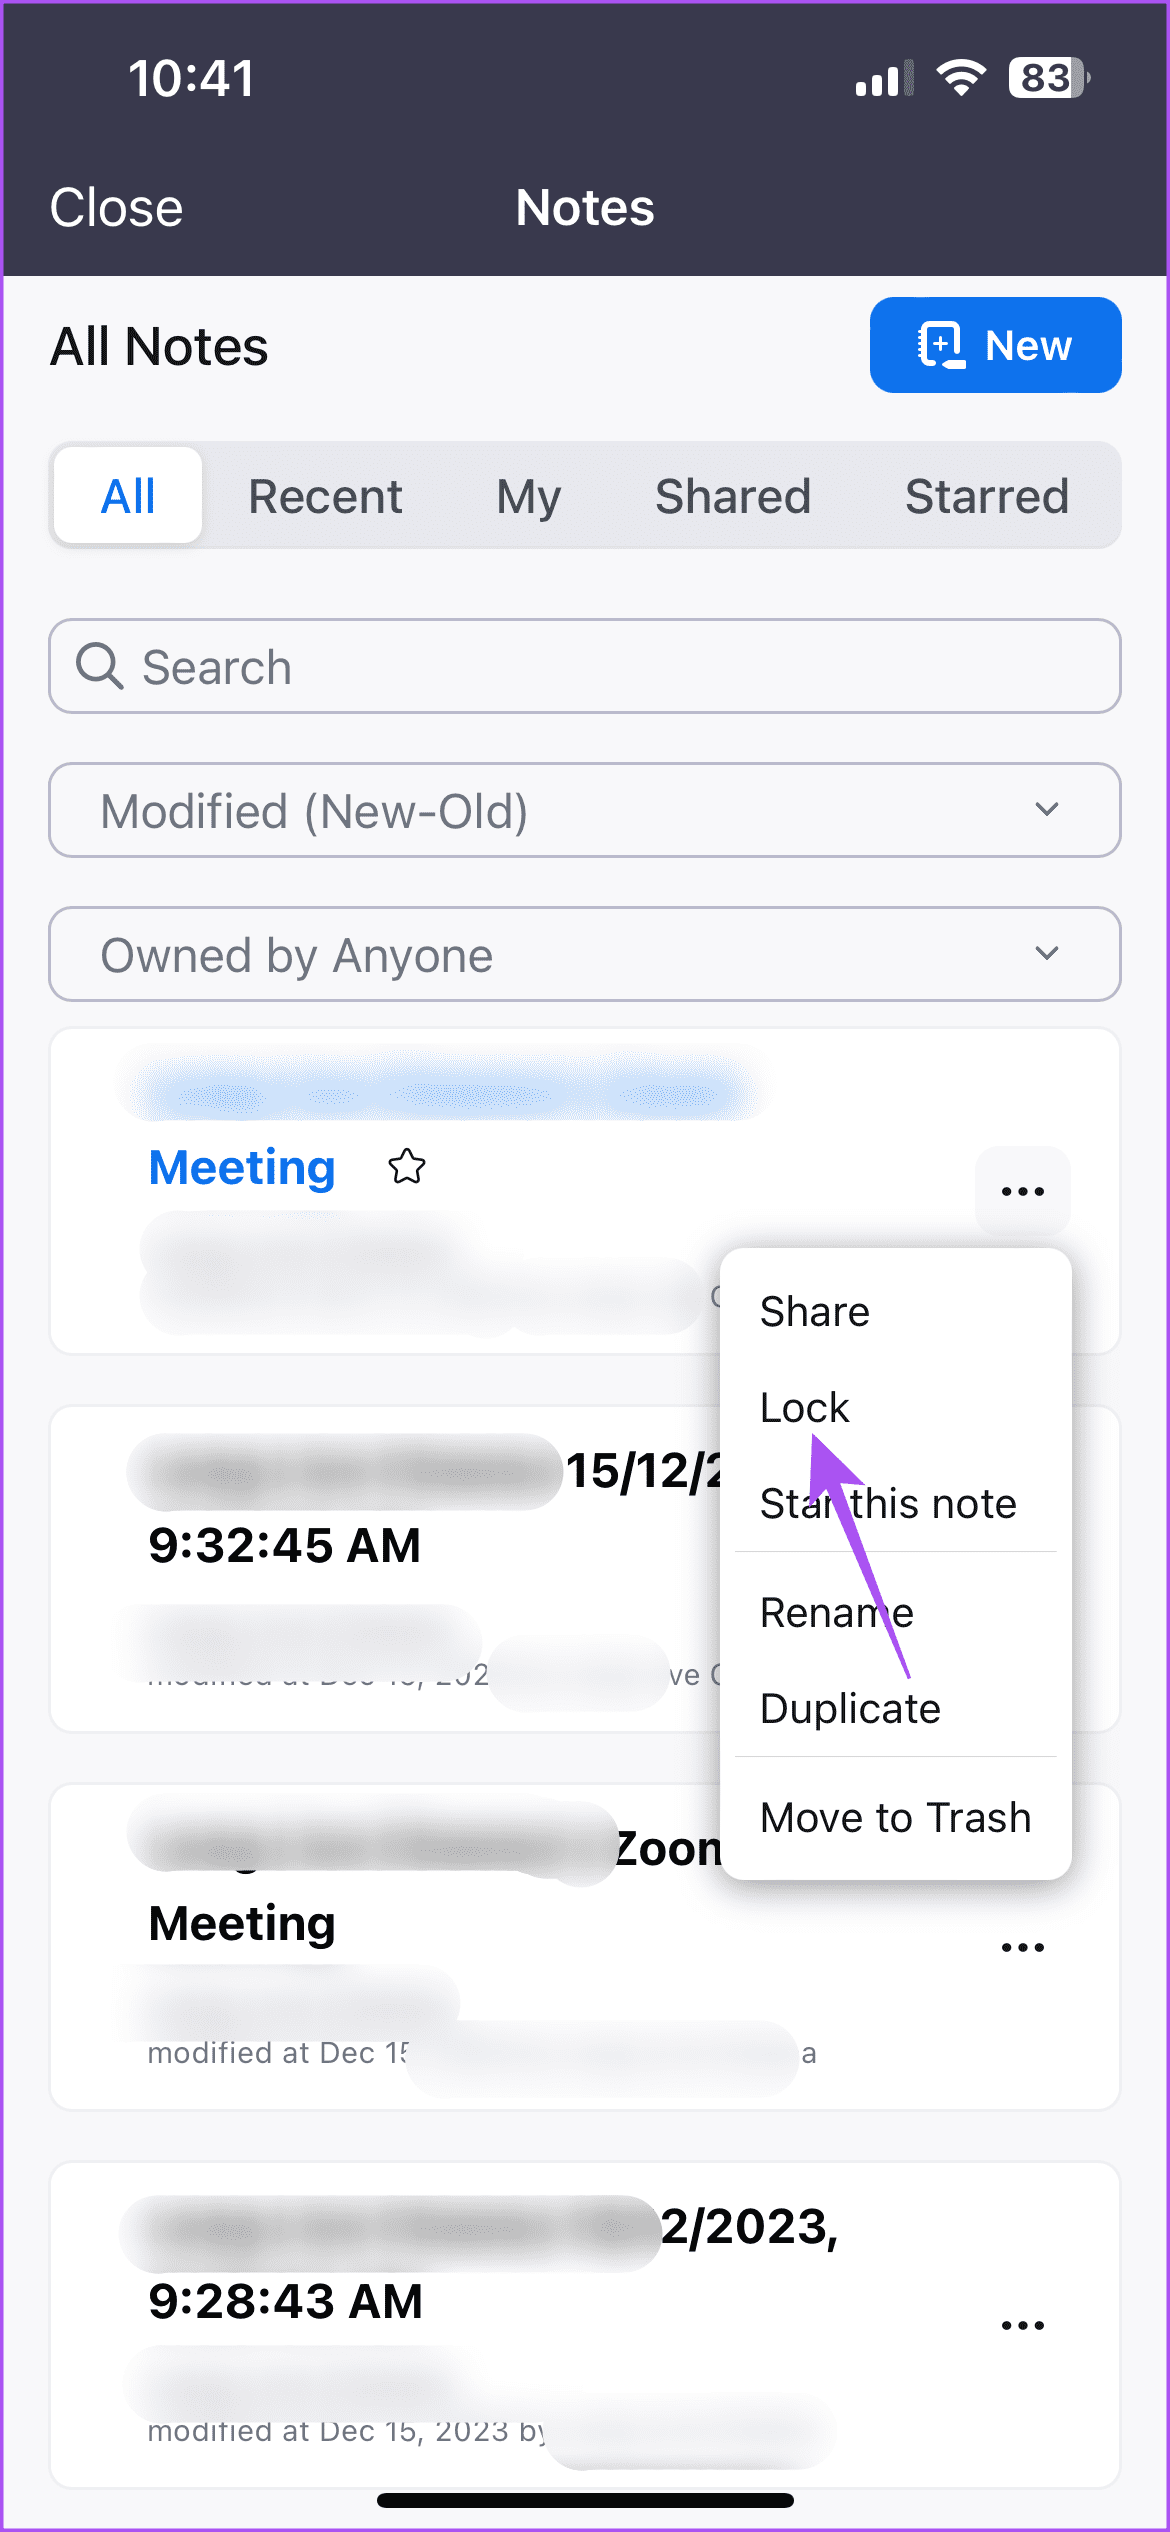
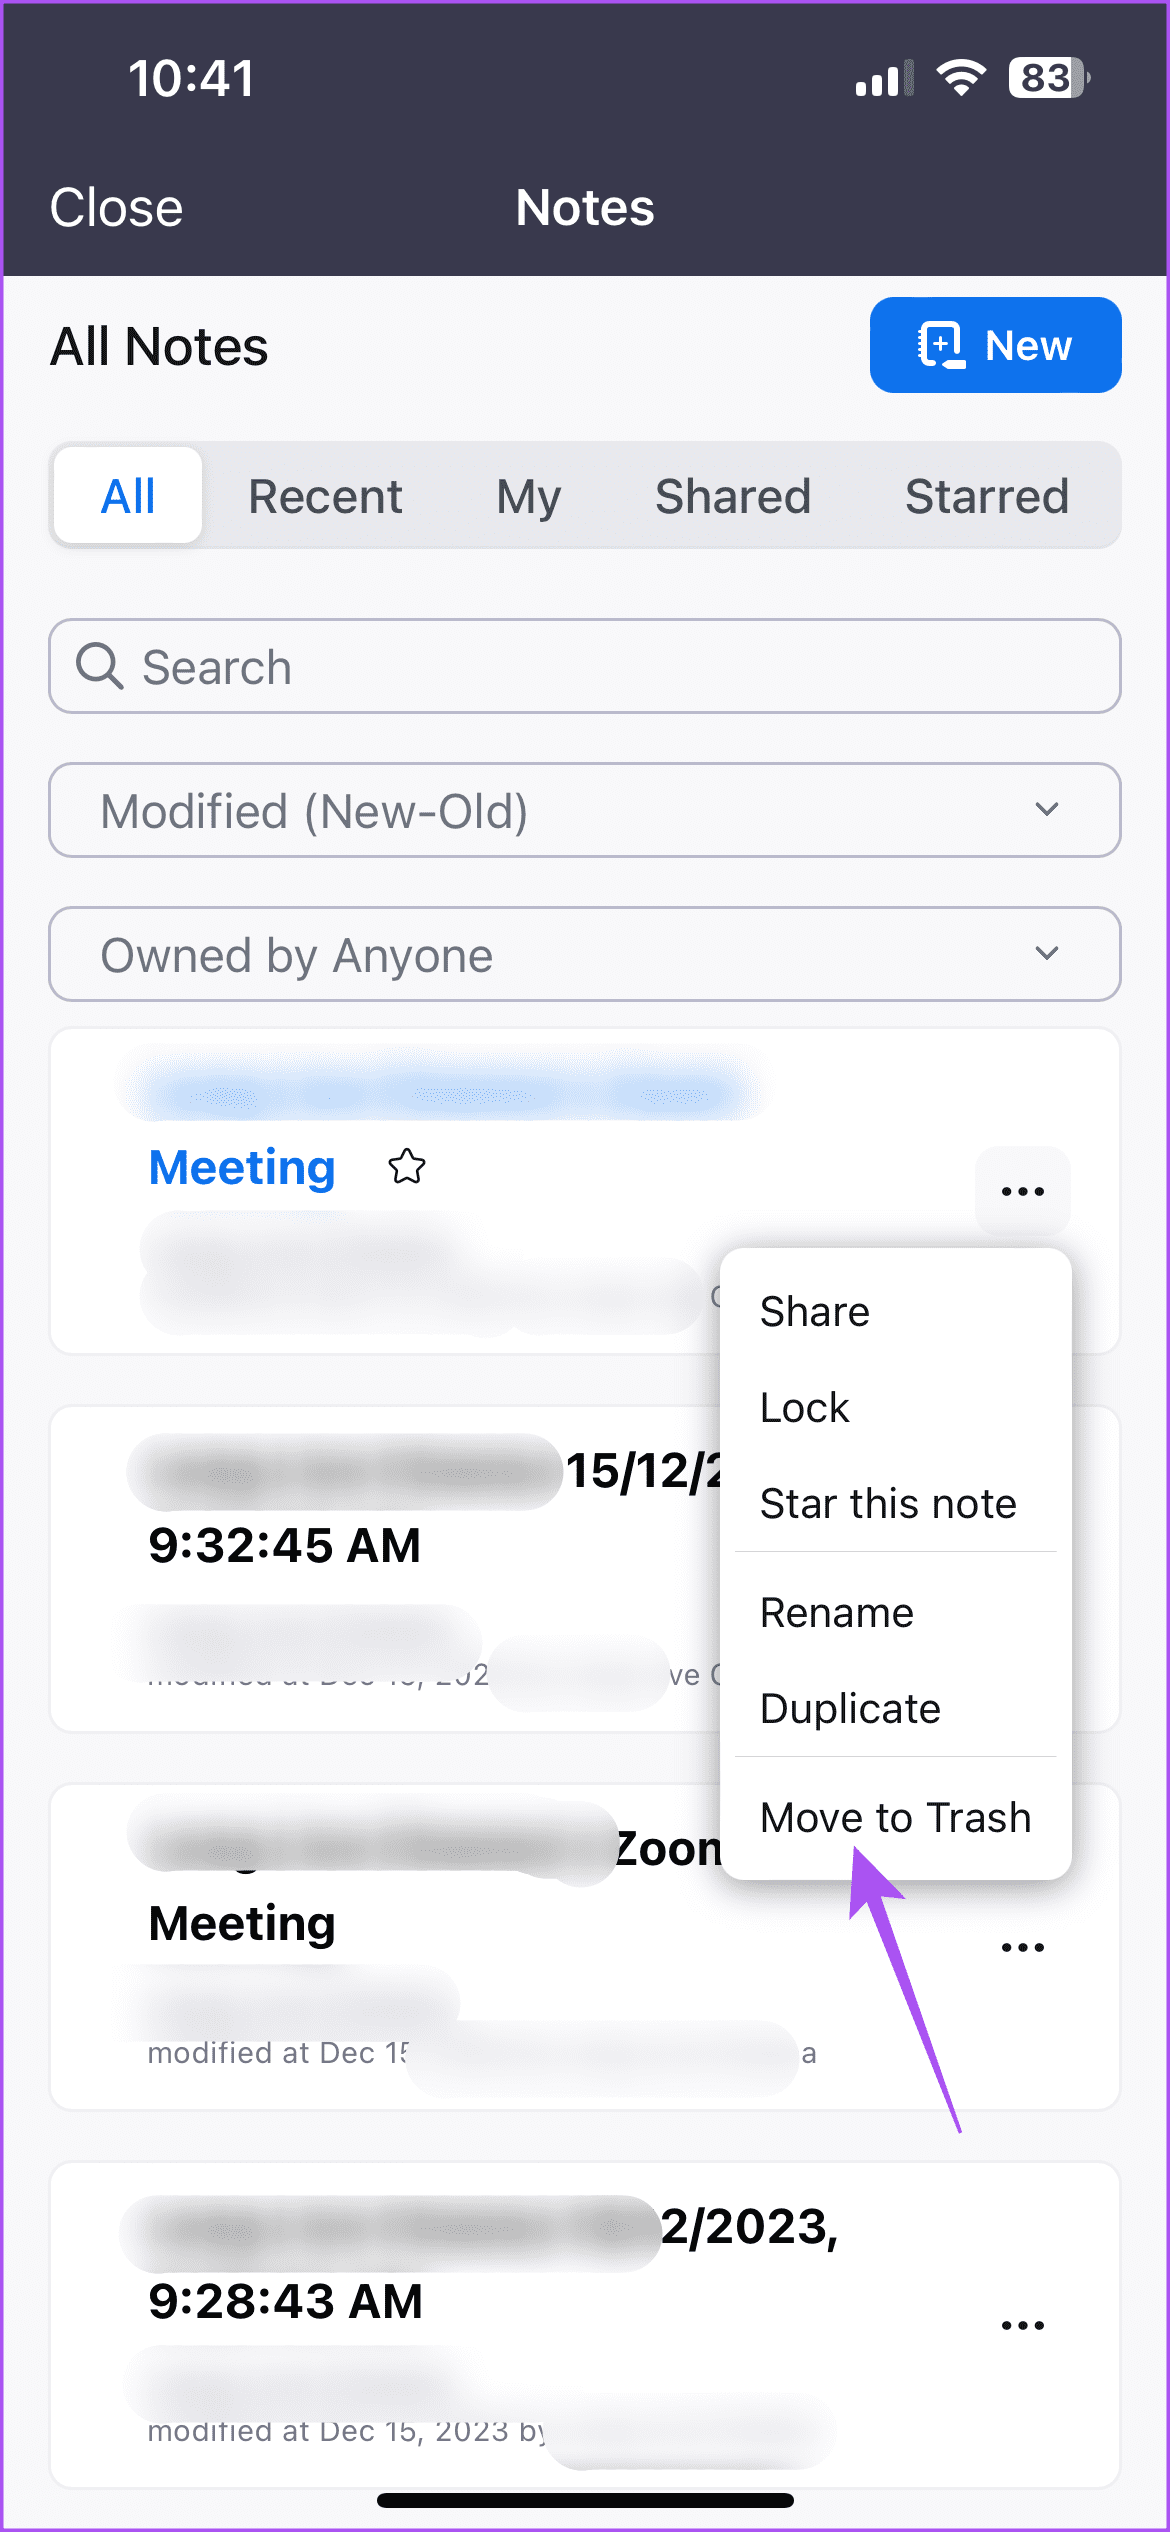
While taking down a note, you can tap on Share and then check the note-sharing settings. You can also choose copy your Zoom note link.


How to Automatically Take Notes in Zoom
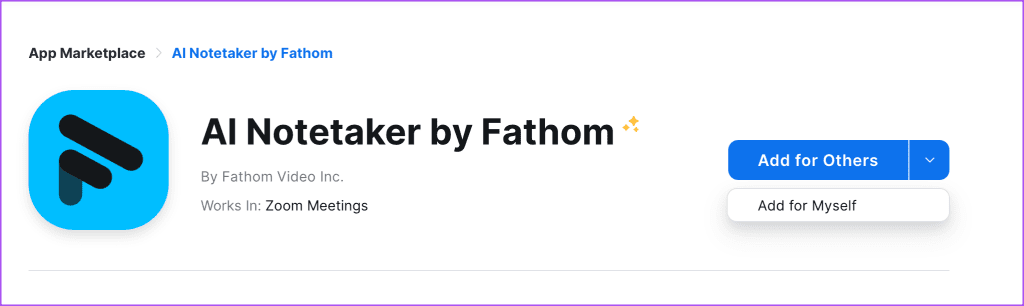
Zoom also offers the option to take down notes during your meetings automatically. You can install the AI Note Taker app on your Zoom desktop client from the Zoom App Marketplace. Here’s how to install and use it. Do note that you need a Zoom paid subscription to use this app.
Step 1: Visit the Zoom App Marketplace on your web browser and then download the AI Notetaker app for your Zoom desktop client.
Step 2: Select to download the app either for yourself or for other users having access to your Zoom account.
Step 3: Follow the on-screen instructions to finish downloading the app for your Zoom account.
Step 4: After the app installs, open the Zoom app on your Mac or Windows PC.

Step 5: Sign in to your account and then start your Zoom call.
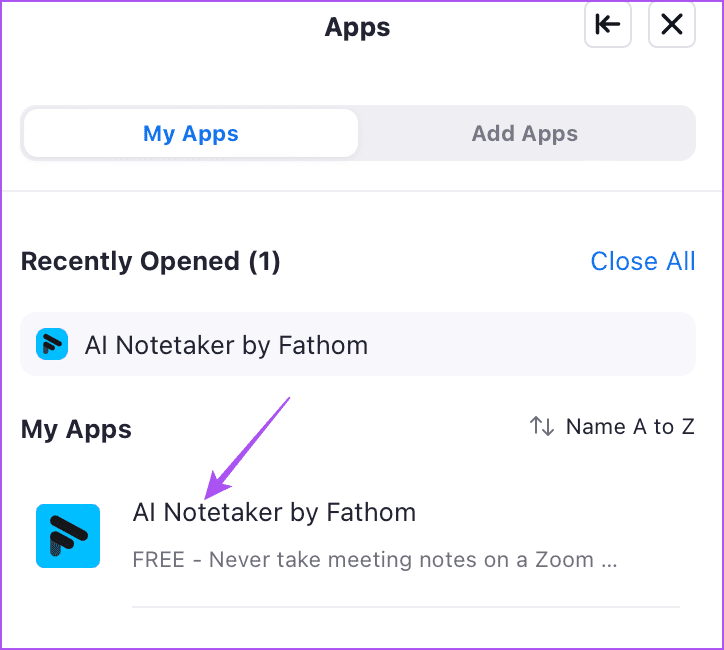
Step 6: Click on Apps at the bottom Menu Bar.

Step 6: Select the AI Notetaker app from the left menu and then start using it to take down meeting notes automatically. The app will also help to generate a Zoom meeting summary for you.
The same steps apply to mobile users of the Zoom app as well.
Was this helpful?
Last updated on 28 August, 2024
Read Next
 3 Fixes When Your Zoom Profile Picture Is Not Showing in Meetings
Basic Fix: Connect from an app or an alternative platform: Connecting from an alternative platform, such as your mobile device, maybe an easy workaround for the problem.
3 Fixes When Your Zoom Profile Picture Is Not Showing in Meetings
Basic Fix: Connect from an app or an alternative platform: Connecting from an alternative platform, such as your mobile device, maybe an easy workaround for the problem.
 How to Use Beauty Filter in Zoom Meetings
Use Beauty Filter in Zoom App on Desktop On Mac Step 1: Open the Zoom app on your Mac and go to Settings.
How to Use Beauty Filter in Zoom Meetings
Use Beauty Filter in Zoom App on Desktop On Mac Step 1: Open the Zoom app on your Mac and go to Settings.
 How to Add Zoom Meetings to Outlook Calendar and Google Calendar
How to Add Zoom Meetings to Google Calendar The easiest way is using the Zoom for Google Workspace Google calendar add-on.
How to Add Zoom Meetings to Outlook Calendar and Google Calendar
How to Add Zoom Meetings to Google Calendar The easiest way is using the Zoom for Google Workspace Google calendar add-on.
 Teams: Disable All Chat Notifications During Meetings
Method 1: Enable Do Not Disturb for Your Account One of the quickest ways to disable chat notifications during meetings is to set your status to Do Not Disturb.
Teams: Disable All Chat Notifications During Meetings
Method 1: Enable Do Not Disturb for Your Account One of the quickest ways to disable chat notifications during meetings is to set your status to Do Not Disturb.
 How to Change Name in Zoom (Desktop and Mobile)
How to Change Profile Name in Zoom on Desktop Method 1: Change Zoom Name for All Meetings Step 1: Click on the profile picture icon at the top.
How to Change Name in Zoom (Desktop and Mobile)
How to Change Profile Name in Zoom on Desktop Method 1: Change Zoom Name for All Meetings Step 1: Click on the profile picture icon at the top.
 How to Find Zoom Meeting Password on Mobile and PC
Were you trying to join a Zoom meeting when you were shown a ‘Enter Zoom meeting password’ pop-up?
How to Find Zoom Meeting Password on Mobile and PC
Were you trying to join a Zoom meeting when you were shown a ‘Enter Zoom meeting password’ pop-up?
 4 Best Ways to Put Sticky Notes on Desktop in Windows 10
Sticky Notes is one of the coolest apps ever created.
4 Best Ways to Put Sticky Notes on Desktop in Windows 10
Sticky Notes is one of the coolest apps ever created.
 How to Share OneNote Notebook on Desktop and Mobile
How to Share OneNote Notebook on Mobile (Android or iOS) OneNote's Android app doesn't let you share the notebook.
How to Share OneNote Notebook on Desktop and Mobile
How to Share OneNote Notebook on Mobile (Android or iOS) OneNote's Android app doesn't let you share the notebook.
The article above may contain affiliate links which help support Guiding Tech. The content remains unbiased and authentic and will never affect our editorial integrity.