Starting with Windows 10 version 1809, Microsoft has made it easier than ever for users to take a custom shot of any part of their screen and edit it immediately. That said, there is one area of the machine where the conveniences of an operating system won’t help: the BIOS.
All hope is not lost, though, and in this article, we’ll be showing you how to get a screenshot just before your OS boots.
A Flash on the Screen
If you’ve ever had a problem with your operating system or BIOS, you’ve likely come across walkthroughs online that show the display on the computer screen that has been captured by a camera, usually a smartphone. Why? Because the BIOS doesn’t make taking a screenshot easy. That doesn’t mean it’s impossible, though.
How to Take a Screenshot in BIOS
There are a few ways to grab a screenshot in the BIOS. You may find that one method doesn’t work for your particular model of machine. Give them all a try until you find one that works for you.
Save to USB
Before the introduction of the Snipping tool, a surefire way to capture any screenshot was (and still is) the Print Screen Key (PrtScr). The image will be copied to the clipboard as a BMP. The only problem is that no Windows tools or programs can help in the BIOS. But if you’ve got a formatted USB, you’ll be able to save your snaps. Note that older motherboards may not support saving screenshots to USB straight from the BIOS.
Here’s what to do:
Step 1. Insert a blank USB drive. You’ll need to format it to run in BIOS. Open up “This PC” and right-click the drive.
Step 2. Click the “Format” option from the context menu.
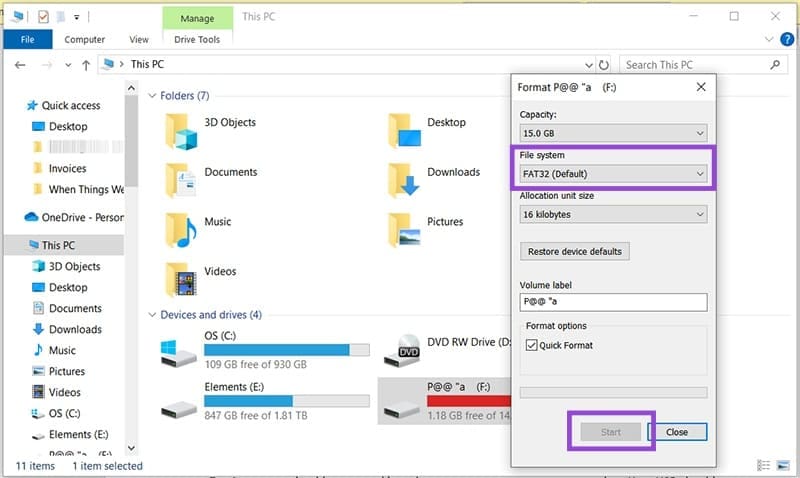
Step 3. In the window that pops up, ensure that “File System” is set to “FAT32 (Default)” and press “Start.”
Step 4. Click “OK” on the warning window and allow your drive to be reformatted.
Step 5. Restart your machine and then press the BIOS key (dependent on your PC model and shown on the screen at startup).
Step 6. When in your desired BIOS screen, press the Print Screen button (or F12, F10 or F8 on some machines).

Step 7. A message should pop up asking where you want to save your screenshot. Your USB should appear as an option if your BIOS supports this action.
Step 8. The image will save as a “.bmp” file. Let Windows boot normally, and you can access it.
KVM Over IP
Keyboard, Video, and Mouse (KVM) over IP is a remote management tool that allows users to access another PC from a different location, with access to all forms of input. More advanced versions can even turn a PC on remotely. If the connected PC can’t take a screenshot or video, then the machine on the other side definitely can.
The best KVM tools are all third-party and a combination of hardware and software. Sometimes the hardware comes separately, and is sometimes bundled with the tool. Either way, you’ll be paying something for them. There are quite a few to choose from, but some examples include: PiKVM, TinyPilot, Geekworm, and Raritan KVM.
External Video Capture Device
If you’re looking to record the BIOS outside of Windows, another method is to use an external video recording device, attached by USB 3.0 or HDMI port. Like KVM tools, you’ll have to buy these separately, but if you’re doing a lot of recording work in BIOS, they can be quite useful.
For laptops, you’ll need to ensure that closing the lid does not shut off the device and that your recorder is always set to use HDMI as a source. Once that’s done, your external device will record your entire time in the BIOS as a video, and you’ll be able to view it on entering Windows again.
Was this helpful?
Last updated on 14 July, 2025
Read Next
 How to Enter BIOS on Windows 10 and 11 PC Without Restarting
What Is BIOS and How Does It Work?
How to Enter BIOS on Windows 10 and 11 PC Without Restarting
What Is BIOS and How Does It Work?
 How to See Your Old Instagram Bios on iPhone and Android
Your Instagram Bio is your first impression and your social media identity.
How to See Your Old Instagram Bios on iPhone and Android
Your Instagram Bio is your first impression and your social media identity.
 How to Save a Screenshot as PDF in Windows 10/11
Method 1: Using Snipping Tool Windows comes with the Snipping Tool built into it.
How to Save a Screenshot as PDF in Windows 10/11
Method 1: Using Snipping Tool Windows comes with the Snipping Tool built into it.
 How to Take a Screenshot on HP Pavilion x360
When one uses HP's convertible Pavilion x360 in the tablet mode, one can't access the physical keyboard.
How to Take a Screenshot on HP Pavilion x360
When one uses HP's convertible Pavilion x360 in the tablet mode, one can't access the physical keyboard.
 How to Change Screenshot Location in Windows 11
Change Screenshot Location in Windows 11 You might want to change the screenshot storage location to Documents or any other folder.
How to Change Screenshot Location in Windows 11
Change Screenshot Location in Windows 11 You might want to change the screenshot storage location to Documents or any other folder.
 How to Convert Screenshot Into Excel Sheet
It sounds a bit like something out of a futuristic dream: taking a picture and turning it into perfectly formatted data.
How to Convert Screenshot Into Excel Sheet
It sounds a bit like something out of a futuristic dream: taking a picture and turning it into perfectly formatted data.
 4 Ways to Take a Full Page Screenshot on Microsoft Edge
Method 1: Use the Inbuilt Option In early 2021, Microsft released an update for Edge that added the feature to take full-page screenshots.
4 Ways to Take a Full Page Screenshot on Microsoft Edge
Method 1: Use the Inbuilt Option In early 2021, Microsft released an update for Edge that added the feature to take full-page screenshots.
 3 Ways to Fix Can’t Take Screenshot Due to Security Policy on Android
Fix 1: Enable Screenshots in Chrome Incognito Mode The Android OS prevents screenshots from being taken while in Incognito Mode in the Chrome browser.
3 Ways to Fix Can’t Take Screenshot Due to Security Policy on Android
Fix 1: Enable Screenshots in Chrome Incognito Mode The Android OS prevents screenshots from being taken while in Incognito Mode in the Chrome browser.
The article above may contain affiliate links which help support Guiding Tech. The content remains unbiased and authentic and will never affect our editorial integrity.