Windows 11 has brought with it many changes, and one such example is to the Microsoft staple, Notepad. This multi-purpose text editor has been the go-to for no-frills text editing, with minimal interface and formatting.
Windows 11 has rolled some of the features of Wordpad, Notepad ++, Visual Studio, and AI functionality into the new Notepad, enhancing the experience in some ways, but radically altering or eliminating it in others. If you hate the changes and just want things back to normal, this article will show you how to get back the classic Notepad on Windows 11.
A Tale of Two Notepads
As is often the case with a great changeover in Microsoft programs or apps, there’s still a chance to go back to the way things were. Such was the case for many Windows games back in Windows 7, Picture Viewer in Windows 10, and Notepad in Windows 11. Doing so just requires a little bit of setup.
In fact, the old Notepad is most likely still installed on your machine; it’s just that Windows 11 defaults to the new app every time you search for “Notepad.”
Get Classic Notepad Back in Windows 11
The good news is that you don’t need to uninstall the current Windows 11 Notepad in order to use the new one, unless you want to, that is. Both versions can run side by side, which can be useful for some workflows.
Making this happen is a two-step process, the first of which requires that you tell Windows 11 not to use its version of Notepad every time you search for it. Here’s what to do:
Step 1. Open up Settings (Win + I) and navigate to “System” in the sidebar.
Step 2. Scroll down to “Optional features” in the main window and click it.
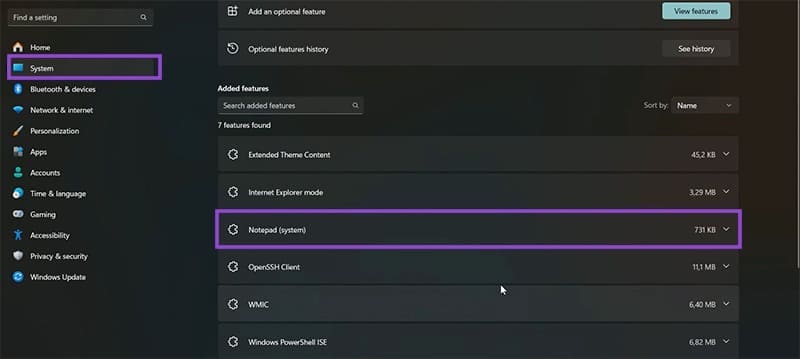
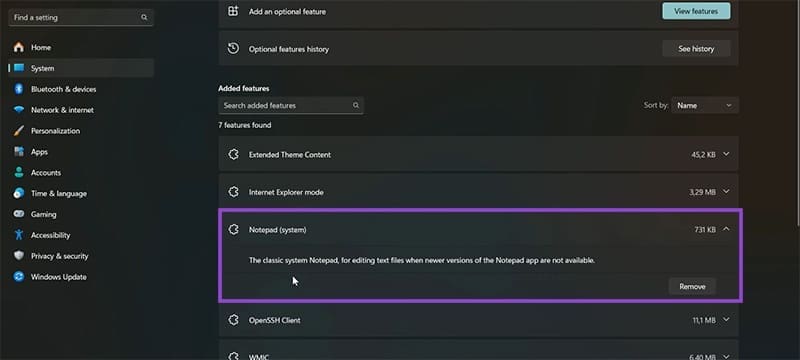
Step 3. Look through the list that appears for “Notepad (system).” If it’s there, then you have the classic Notepad available on your machine.
Step 4. Click “Apps” in the sidebar and click on “Advanced app settings” in the main window.
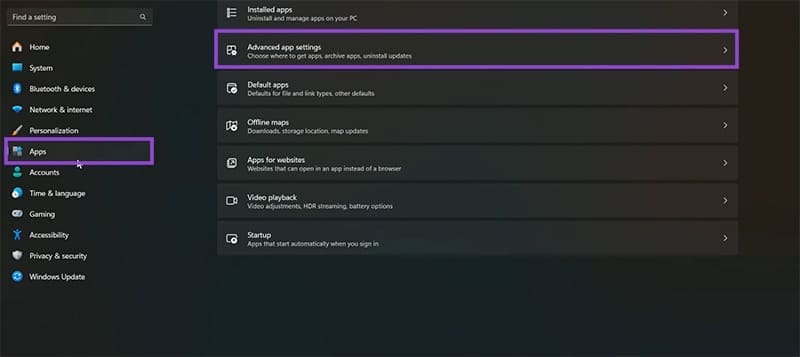
Step 5. In the next screen, click on “App execution aliases.”

Step 6. Scroll down to “Notepad” and drag the slider to Off. This will ensure that the newer Notepad won’t be opened by default.

With the app execution alias disabled, you’ll now be able to run both versions of Notepad. Now it’s a simple matter of finding the old Notepad executable file. Here’s how:
Step 1. Open up “This PC” on your Desktop or in the search bar, and click your main system hard drive (typically “C:”).
Step 2. Click on the “Windows” folder and search through the folder until you find “Notepad.exe.”

Step 3. Double-click this, and the old Notepad should run.

Step 4. If you can’t find Notepad in this folder, head into the sub-folder “System32” (also inside the “Windows” folder) and search there.
You can now pin classic Notepad to your Taskbar or send it to your Desktop as a shortcut, both operations done by right-clicking the file and choosing the option. Now you can access this Notepad whenever you need.
Was this helpful?
Last updated on 02 September, 2025
Read Next
 How to Access the Old Add or Remove Programs Panel and Other Classic Features in Windows 10
Windows 10 is a dramatic improvement over its predecessors in terms of both speed and stability.
How to Access the Old Add or Remove Programs Panel and Other Classic Features in Windows 10
Windows 10 is a dramatic improvement over its predecessors in terms of both speed and stability.
 How to Restore the Classic File Explorer Ribbon in Windows 11
Method 1: Using Control Panel This method temporarily restores the old classic ribbon in File Explorer.
How to Restore the Classic File Explorer Ribbon in Windows 11
Method 1: Using Control Panel This method temporarily restores the old classic ribbon in File Explorer.
 Top 4 Ways to Change New Outlook Back to Old (Classic View) Outlook on Windows and Mac
The new Outlook app for desktop boasts a modern and simplified design, aligning it more closely with the web version of Microsoft Outlook.
Top 4 Ways to Change New Outlook Back to Old (Classic View) Outlook on Windows and Mac
The new Outlook app for desktop boasts a modern and simplified design, aligning it more closely with the web version of Microsoft Outlook.
 11 Steps to Restore the Windows 11 Classic Context Menu (And a Temporary Fix)
How does it always seems like Microsoft manages to break two things every time it fixes one?
11 Steps to Restore the Windows 11 Classic Context Menu (And a Temporary Fix)
How does it always seems like Microsoft manages to break two things every time it fixes one?
 How to Fix Notepad Missing Issue in Windows 11/10
Method 1: Install Notepad From Optional Features Microsoft has made Notepad an optional feature.
How to Fix Notepad Missing Issue in Windows 11/10
Method 1: Install Notepad From Optional Features Microsoft has made Notepad an optional feature.
 4 Ways to Fix Notepad Not Opening on Windows 11
Basic Fixes Restart PC: Press the Windows + X shortcut to open the Power User Menu.
4 Ways to Fix Notepad Not Opening on Windows 11
Basic Fixes Restart PC: Press the Windows + X shortcut to open the Power User Menu.
 10 Notepad++ Plugins for Writers and Coders
1.
10 Notepad++ Plugins for Writers and Coders
1.
 How to Disable the Pin Tab in Notepad++
When the minds behind the open-source Notepad++ released version 8.7.2 of the software, they snuck in an interesting feature.
How to Disable the Pin Tab in Notepad++
When the minds behind the open-source Notepad++ released version 8.7.2 of the software, they snuck in an interesting feature.
The article above may contain affiliate links which help support Guiding Tech. The content remains unbiased and authentic and will never affect our editorial integrity.