Unlike with traditional overclocking, which is entirely manual and must be set up in BIOS or UEFI, modern processors can automatically raise their clock speed when they need to. And Windows 11 hides an advanced control for this behavior. Once you enable Windows 11 CPU boost, you can decide how aggressively your processor should reach for those higher frequencies versus trying to get more battery life or a quieter fan. Here’s how to enable and configure the feature.
What Does Processor Performance Boost Mode Actually Do?
Rather than raising your CPU’s maximum turbo speed or bypassing any hardware limit, CPU boost changes how aggressively Windows asks the processor to enter and stay boosted. A more aggressive mode can improve responsiveness in bursty or demanding workloads; a less aggressive one can reduce heat, fan noise, and power draw, which matters most on laptops.
This is separate from Low Latency, a newer Windows 11 feature Microsoft began rolling out with the June 2026 update. Low Latency Profile delivers short, targeted performance bursts during interactive moments, like opening the Start menu or launching an app.
How to Enable Windows 11 CPU Boost
There are a few ways to enable the boost, usually by revealing the setting that changes it.
Part 1 – Unhide the Setting Using Registry Editor
Step 1. Press “Win + R,” type in “regedit,” and hit “Enter.” Confirm the User Account Control.
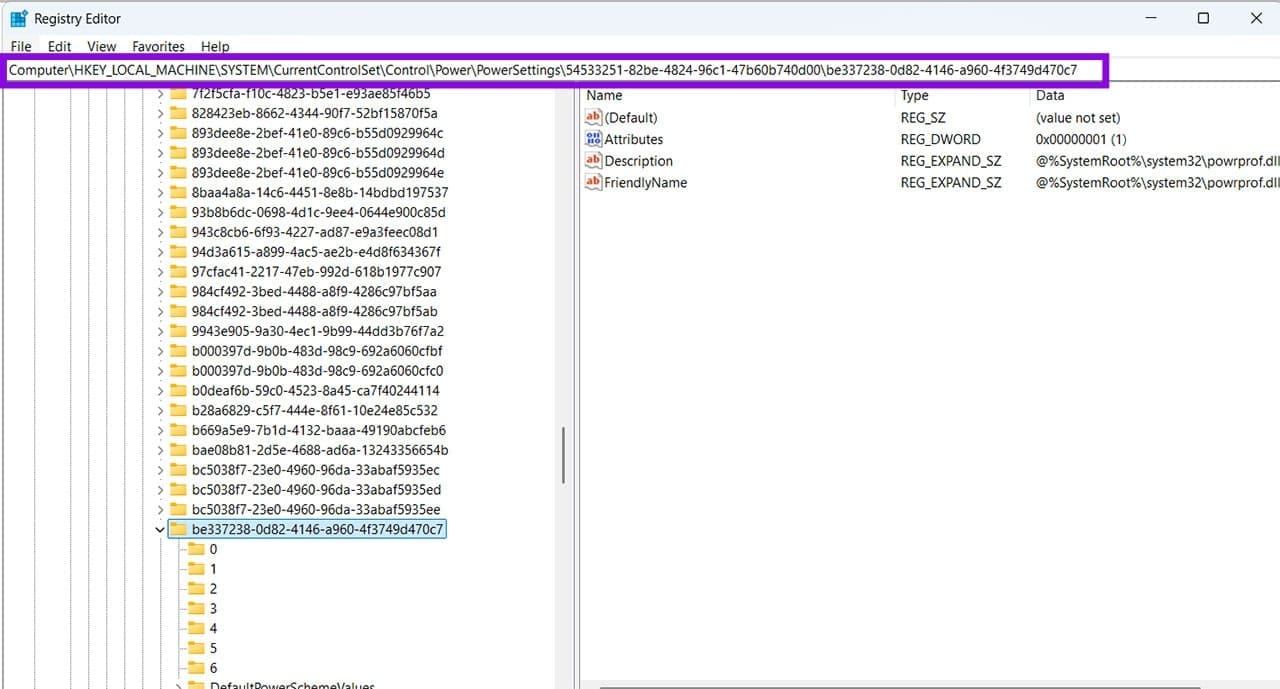
Step 2. Navigate to the following address (paste it directly into the Registry Editor’s address bar over the existing value):
HKEY_LOCAL_MACHINE\SYSTEM\CurrentControlSet\Control\Power\PowerSettings\54533251-82be-4824-96c1-47b60b740d00\be337238-0d82-4146-a960-4f3749d470c7
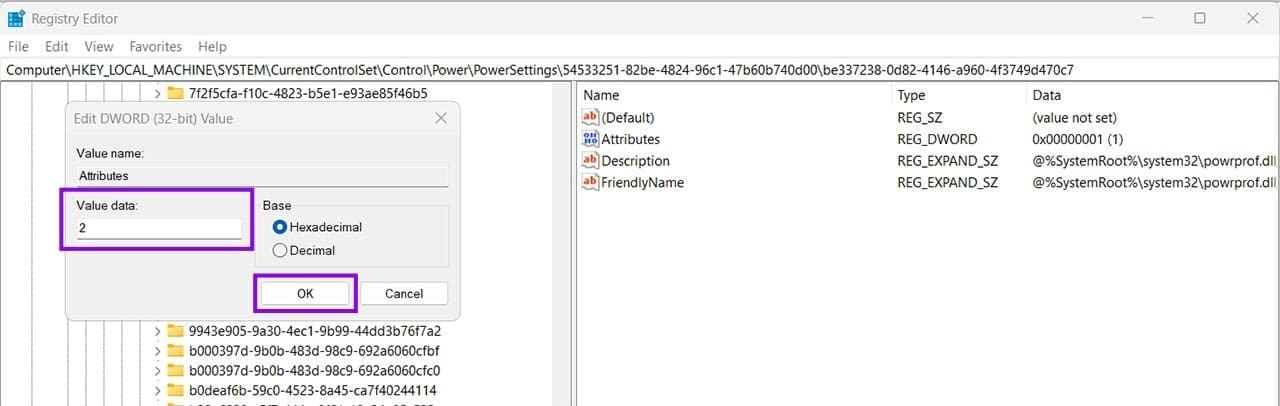
Step 3. In the right-hand pane, double-click on the “Attributes” DWORD value.
Step 4. Change the “Value data” from 1 to 2, then click “OK.”
Step 5. Close Registry Editor and restart your PC.
Restart your PC, then reopen Power Options. If the setting still doesn’t appear, verify that the Registry value was changed correctly.
Option 2 – Unhide the Setting Using a Command
If you’d rather skip the Registry, a single command does the same job on most Windows 11 versions.
Step 1. Open “Start,” search for “Terminal” or “CommandPrompt,” then choose “Run as administrator.”
Step 2. Run the following command:
powercfg -attributes SUB_PROCESSOR PERFBOOSTMODE -ATTRIB_HIDE
Part 2 – Enable the CPU Boost
With the Power Options setting unlocked, you can use the Control Panel to manipulate the settings.
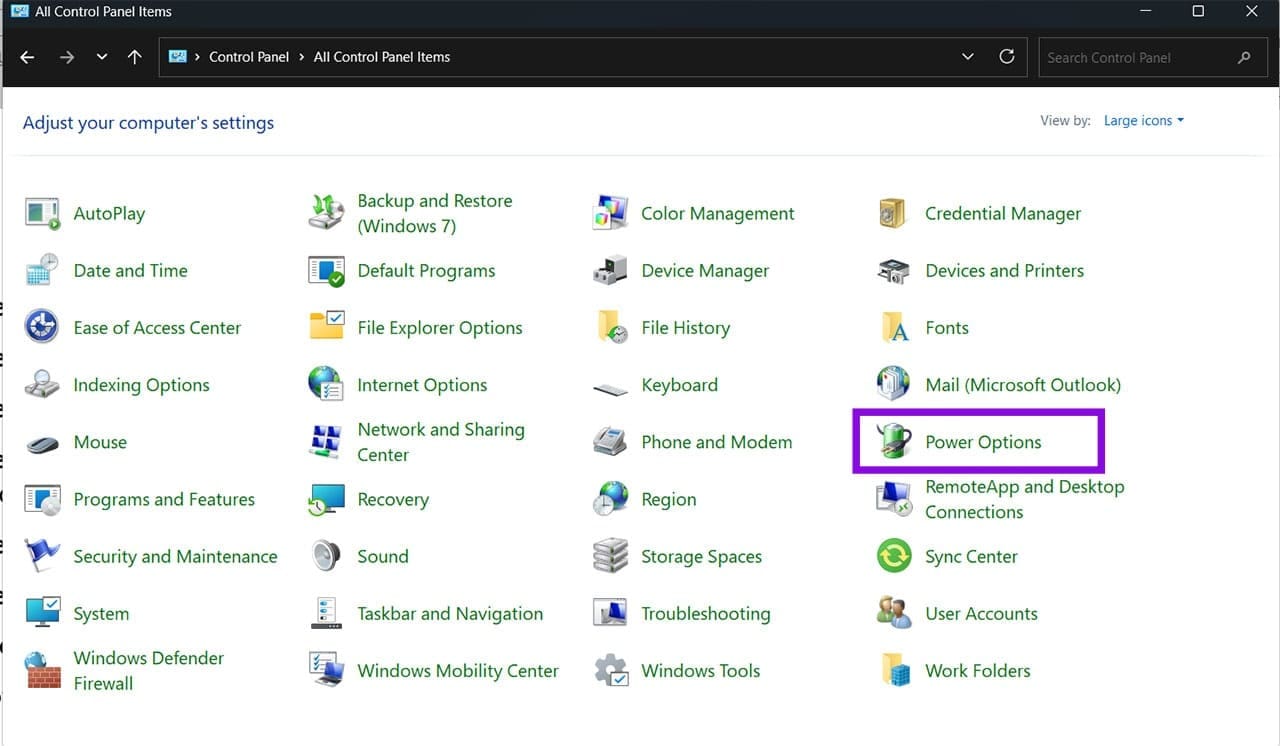
Step 1. Open the Control Panel and go to “Power Options.”
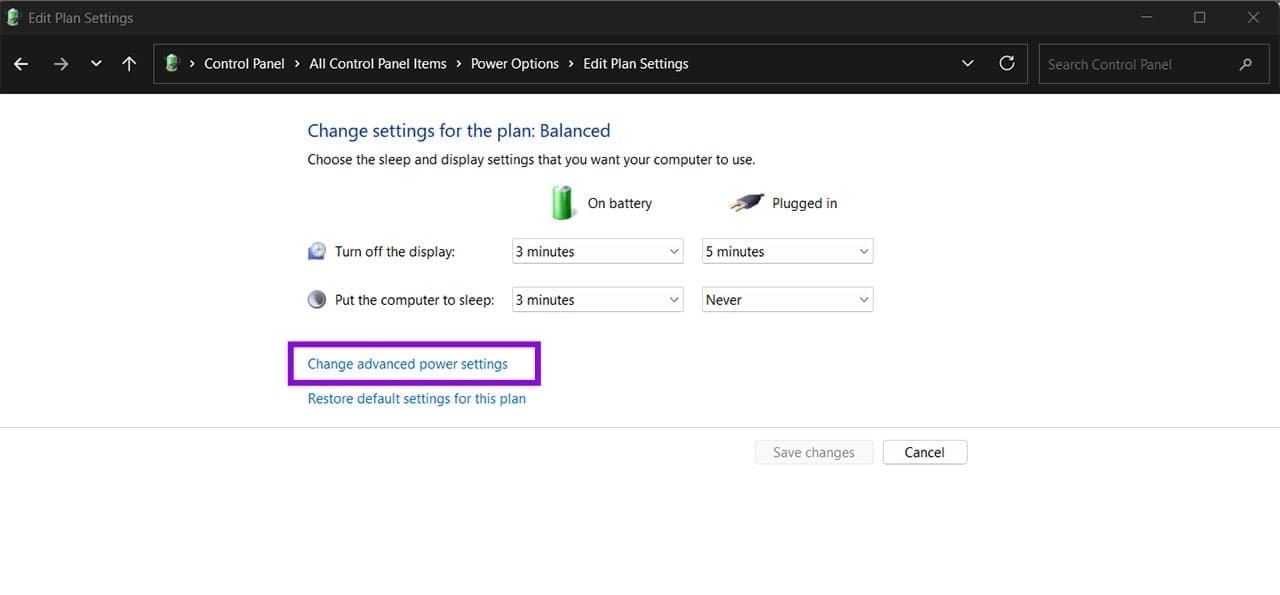
Step 2. Select “Change plan settings” next to your active power plan.
Step 3. Go to “Change advanced power settings.”
Step 4. Expand “Processor power management,” then expand the newly visible “Processor performance boost mode” entry.
Step 5. Set your preferred modes for on-battery and plugged-in performance if able.
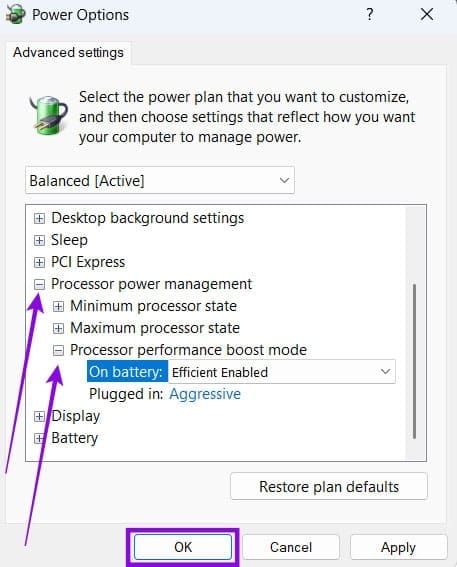
Step 6. Hit “Apply,” then “OK.”
Choosing the Right Boost Mode
Not every option below appears on every PC. They depend on the CPU model, firmware, and Windows version. The most common options are:
- Disabled: Keeps the processor at its base clock speed. Best for maximizing battery life and minimizing heat and fan noise.
- Enabled: Standard Windows behavior that balances performance and efficiency. This is the default and suits most users.
- Aggressive: Holds the CPU boost longer under load. Best for gaming desktops and well-cooled performance systems.
- Efficient Enabled: Allows boosting while prioritizing power efficiency. A solid pick for everyday productivity on laptops.
- Efficient Aggressive: Faster boost response than Efficient Enabled while still watching power draw. Good for gaming laptops and mobile workstations.
After changing the mode, give it a few days of normal use and keep an eye on performance, temperatures, fan noise, and battery runtime, since the real-world effect varies by processor, cooling, and workload.
Was this helpful?
Last updated on 04 July, 2026
Read Next
 Which Services Can You Disable in Windows 11 to Boost Performance and Privacy
There’s a lot to love about Windows, and then there are all the extras that run behind the scenes and slow down your machine.
Which Services Can You Disable in Windows 11 to Boost Performance and Privacy
There’s a lot to love about Windows, and then there are all the extras that run behind the scenes and slow down your machine.
 9 Best Microsoft Whiteboard Keyboard Shortcuts to Boost Productivity
Whiteboards are super useful to brainstorm with your team, collect ideas, or draw a plan.
9 Best Microsoft Whiteboard Keyboard Shortcuts to Boost Productivity
Whiteboards are super useful to brainstorm with your team, collect ideas, or draw a plan.
 How to Boost Graphics and FPS in Roblox
Try These Basic Tips Switch to windowed mode: You're likely to experience increased FPS while playing Roblox in windowed mode.
How to Boost Graphics and FPS in Roblox
Try These Basic Tips Switch to windowed mode: You're likely to experience increased FPS while playing Roblox in windowed mode.
 5 Ways to Fix Windows Explorer High CPU Usage on Windows 11
Try Basic Fixes Restart the Windows Explorer process: There's a chance that Windows Explorer's high CPU usage is a one-time glitch.
5 Ways to Fix Windows Explorer High CPU Usage on Windows 11
Try Basic Fixes Restart the Windows Explorer process: There's a chance that Windows Explorer's high CPU usage is a one-time glitch.
 How to Reduce CPU and RAM Usage in Microsoft Teams on Windows 11
Common Fixes Update or reinstall the Microsoft Teams app: Open the Microsoft Store, search Microsoft Teams, and click Update (if available).
How to Reduce CPU and RAM Usage in Microsoft Teams on Windows 11
Common Fixes Update or reinstall the Microsoft Teams app: Open the Microsoft Store, search Microsoft Teams, and click Update (if available).
 How to Display CPU Temperature on Windows
How to Show CPU Temperature on Windows Desktop Open Hardware Monitor is a free open-source software that makes it easy to monitor a number of hardware statistics for your computer.
How to Display CPU Temperature on Windows
How to Show CPU Temperature on Windows Desktop Open Hardware Monitor is a free open-source software that makes it easy to monitor a number of hardware statistics for your computer.
 How to Install Windows 11 on Unsupported CPU
When the Windows 11 update was announced by Microsoft, it quickly became clear that not every Windows 10 PC would be able to make the jump.
How to Install Windows 11 on Unsupported CPU
When the Windows 11 update was announced by Microsoft, it quickly became clear that not every Windows 10 PC would be able to make the jump.
 Windows Camera Frame Server High RAM and CPU Usage
Windows 11 doesn’t have the best track record when it comes to keeping RAM and CPU usage low while running background tasks and services like Zoom or other video conferencing
Windows Camera Frame Server High RAM and CPU Usage
Windows 11 doesn’t have the best track record when it comes to keeping RAM and CPU usage low while running background tasks and services like Zoom or other video conferencing
The article above may contain affiliate links which help support Guiding Tech. The content remains unbiased and authentic and will never affect our editorial integrity.