If you’re looking to install Windows from scratch, the good news is that it’s easy to do with any external drive, including an SSD. External SSDs have both the space and the speed to make a fresh boot and installation run like clockwork. In this article, we’ll show you how to get the job done.
How to Boot Windows From an External SSD
Using your SSD as a way to boot Windows is simple to do, but involves a few different steps. Let’s get started:
Format Your Hard Drive
Before you proceed with any other steps, you first need to ensure that the device is formatted properly. Bootable devices use the FAT32 file system. Unfortunately, this only allows for 4GB of storage. For larger drives like SSDs, the NTFS system works just as well.
Keep in mind, too, that formatting your SSD will clear it of all existing data, so don’t forget to back up all files first.
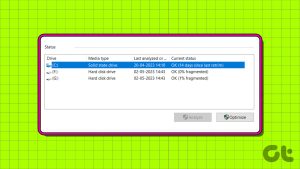
Formatting can be done through a third-party app (Rufus is a very good open-source example) or via Windows. Here’s a simple method using Disk Management:
Step 1. Connect the SSD drive. Type “Disk Management” into the search bar and choose the first option.
Step 2. Right-click the drive and choose “Format” from the context menu.

Step 3. Ensure that “File System” is set to “NTFS” and press “OK.”
Step 4. Click “OK” on the warning window and allow your drive to be reformatted.
Downloading the Windows Image File
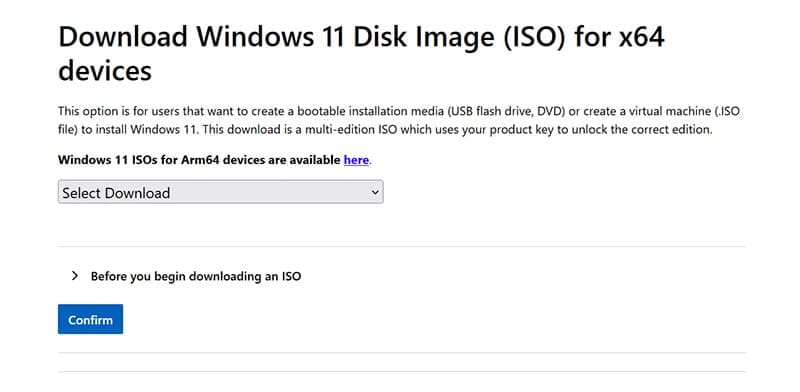
The next step is to download the contents of the ISO file and place it on the proper boot sector of your freshly formatted SSD. Microsoft has all the “.iso” files needed to install versions of Windows 10 and 11, which you can find on their website. Other third-party apps, like Fly By 11, can offer specific Windows versions and even install them for you.
Download the “.iso” image file you want and copy it to your SSD.
Booting Windows
With your SSD set up, it’s time to boot your machine. Shut down the PC you plan to use and connect the SSD. Here’s how to install things:
Step 1. Have your bootable SSD in your machine and start it. Press the BIOS key (this differs for every machine, but is usually a Function or Delete key) to enter the BIOS.
Step 2. Every manufacturer’s BIOS varies. Once inside, look for the “Boot” option (often found under “Settings”) and select it.
Step 3. Look for the “Boot Override” and select your SSD from the list of alternatives. It should show as a USB option. This will ensure your PC boots from your SSD, not the OS currently installed on the machine. Save your changes and exit.
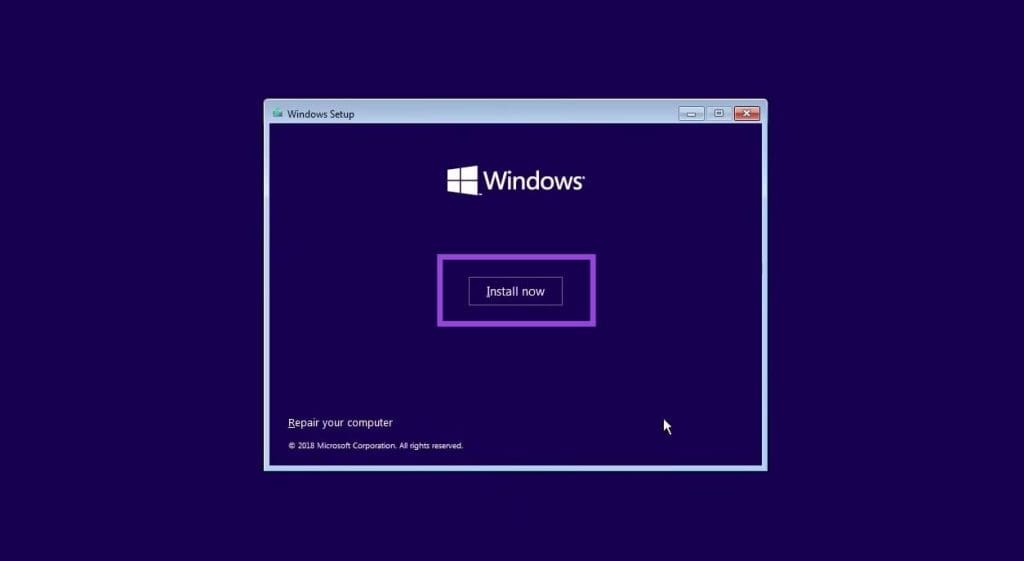
Step 4. You’ll be taken to a purple screen where you can choose your language and region preferences.

Step 5. Click “Install Now” and enter your Windows license key. You can also activate Windows later once the OS has been installed.
Step 6. Choose the version of Windows that you want to install (that aligns with your license) and click “Next.”

Step 7. Accept the License Agreement and click “Next.”
Step 8. Select the proper partition on the external SSD until there’s one location to install Windows. If this doesn’t work, choose the largest partition to install Windows on. Click “Next” once you’re done.
Step 9. Windows will then begin to install.
Was this helpful?
Last updated on 08 August, 2025
Read Next
 How to Upgrade the Firmware of Your SSD on Your Windows PC
How to Check SSD Model Number The first and obvious step is to find out if you have an SSD or not.
How to Upgrade the Firmware of Your SSD on Your Windows PC
How to Check SSD Model Number The first and obvious step is to find out if you have an SSD or not.
 How to Check if Windows Laptop Has HDD or SSD and Its Type
Method 1: Using Task Manager Step 1: Right-click on the taskbar at the bottom and select Task Manager.
How to Check if Windows Laptop Has HDD or SSD and Its Type
Method 1: Using Task Manager Step 1: Right-click on the taskbar at the bottom and select Task Manager.
 5 Ways to Fix Dual Boot Option Not Showing on Windows 11
Fix 1: Enable Dual Boot Option Using Command Prompt Sometimes, the dual boot option goes missing when upgrading the operating system.
5 Ways to Fix Dual Boot Option Not Showing on Windows 11
Fix 1: Enable Dual Boot Option Using Command Prompt Sometimes, the dual boot option goes missing when upgrading the operating system.
 How to Perform a Clean Boot in Windows and Why It Matters
What Is Clean Boot on a Windows PC A clean boot in Windows is a troubleshooting technique that helps you identify software conflicts causing issues with your computer.
How to Perform a Clean Boot in Windows and Why It Matters
What Is Clean Boot on a Windows PC A clean boot in Windows is a troubleshooting technique that helps you identify software conflicts causing issues with your computer.
 What to Do if Windows Won’t Boot With a New GPU
If you’ve just upgraded your PC with a new graphics card (GPU) and it won’t boot, there are several possible reasons for that, each with a varying difficulty of fixing
What to Do if Windows Won’t Boot With a New GPU
If you’ve just upgraded your PC with a new graphics card (GPU) and it won’t boot, there are several possible reasons for that, each with a varying difficulty of fixing
 Top 8 Ways to Fix External Drive Not Showing Up in Disk Management on Windows
Disk Management is a built-in utility on Windows to manage your hard drivers, SSDs, and other external drives.
Top 8 Ways to Fix External Drive Not Showing Up in Disk Management on Windows
Disk Management is a built-in utility on Windows to manage your hard drivers, SSDs, and other external drives.
 How to Close Your Laptop and Use External Monitor on Windows
How to Connect and Use External Monitor Your attempt to use your external monitor with a closed laptop will work if you use the correct display configuration.
How to Close Your Laptop and Use External Monitor on Windows
How to Connect and Use External Monitor Your attempt to use your external monitor with a closed laptop will work if you use the correct display configuration.
 How to Fix Wi-Fi Stops Working on Windows When an External Monitor Is Connected
Basic Fixes: Check Monitor Cable: Bad connection cables can cause your Wi-Fi to stop working when an external monitor is connected on Windows.
How to Fix Wi-Fi Stops Working on Windows When an External Monitor Is Connected
Basic Fixes: Check Monitor Cable: Bad connection cables can cause your Wi-Fi to stop working when an external monitor is connected on Windows.
The article above may contain affiliate links which help support Guiding Tech. The content remains unbiased and authentic and will never affect our editorial integrity.