There are several reasons you may want to automatically forward emails in Outlook. From productivity to branding, archiving, or collaborating. Whatever the reason, this guide has you covered. Read on to find the best method that suits your particular needs.
Forwarding Emails in Outlook – Benefits and Risks
Forwarding emails offers several benefits, but it also poses some risks, and there are a few key considerations to keep in mind.
Computer hackers are increasingly setting up email forwarding rules after gaining access to an individual’s inbox. They are doing this to redirect sensitive data to their own accounts. It’s therefore vital for you to regularly check that the email forwarding settings and rules don’t contain any unauthorized rules you don’t recognize and didn’t set up yourself.
Another consideration is that many incoming mail servers will flag forwarded emails as spam. Therefore, it’s essential to verify that your destination email account is configured to receive forwarded emails in its inbox. Additionally, some forwarding services may not handle attachments well. This can also cause issues with spam filters blocking emails.
The steps for forwarding emails vary slightly between PCs and Macs, as well as whether you are using the desktop app or the web version of Outlook. Email forwarding can be done via a Forwarding Rule or by enabling the built-in Forwarding Settings.
Method 1: Forward All Emails in Outlook on the Web (Outlook.com)
This is the easiest and most direct way to forward all emails.
Step 1. Click the Settings icon (gear symbol) in the top-right corner.

Step 2. Click on Email and then Forwarding.

Step 3. Check the box for Enable forwarding.

Step 4. Enter the email address you want to forward messages to. You can also check the Keep a copy of forwarded messages box if you want a copy to remain in your Outlook inbox.

Step 5. Click Save.

Method 2: Forward Some Emails in Outlook Using Rules
This is the method for when you only want to forward emails that meet a specific criterion. You might want to forward emails from a certain sender or emails containing a particular keyword in the subject line.
Outlook Desktop App (PC and Mac)
Step 1. Head to Settings.
Step 2. Click on Email and then Rules.

Step 3. Click Add new rule.

Step 4. Give your rule a descriptive name, like “Forward Emails from my Boss.”

Step 5. Under Add a condition, select the criteria for the emails you want to forward. For example:
Subject includes: type the keywords you are looking for.

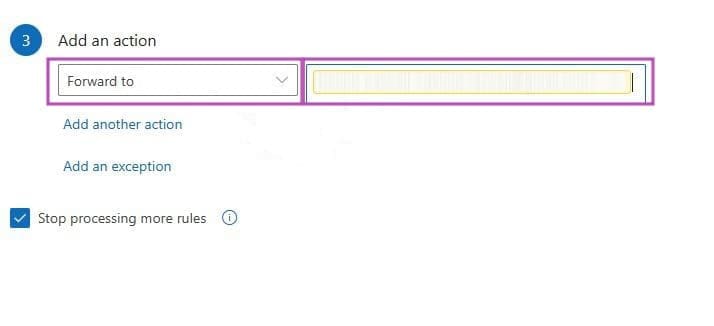
Step 6. Under Add an action, select Forward to or Redirect to, where :
- Forward to will show the message as being forwarded from your account.
- Redirect to will make the message look as though it came directly from the original sender.
Type in the email address you want to forward to.
Step 7. You can optionally add more actions, conditions, or exceptions if required.
Step 8. Click Save.
The latest versions of Microsoft Outlook have a streamlined look and feel. The process for setting up email forwarding is very similar across the desktop and web versions of the app. If you are using older versions of the desktop app, there may be slight variations in the process, but fundamentally, the methods are the same.
Was this helpful?
Last updated on 30 September, 2025
Read Next
 How to Auto-Forward Emails in Outlook
Use Outlook Forwarding Step 1: Navigate to Outlook Web on the desktop browser and sign in using Microsoft account credentials.
How to Auto-Forward Emails in Outlook
Use Outlook Forwarding Step 1: Navigate to Outlook Web on the desktop browser and sign in using Microsoft account credentials.
 How to Set Up Auto Forward in Gmail for All or Specific Emails
Auto forwarding email is quite helpful when you move to a different mailbox but still want to receive all incoming emails sent to the older mail address.
How to Set Up Auto Forward in Gmail for All or Specific Emails
Auto forwarding email is quite helpful when you move to a different mailbox but still want to receive all incoming emails sent to the older mail address.
 How to Automatically Forward Text Messages to Another Phone or PC on Android
Things to Know About the Auto Forward SMS App Android does not allow you to forward text messages via native features automatically.
How to Automatically Forward Text Messages to Another Phone or PC on Android
Things to Know About the Auto Forward SMS App Android does not allow you to forward text messages via native features automatically.
 How to Fix Outlook for Mac Not Receiving Emails Automatically
Basic Fixes Check email storage: If your email inbox storage is full, you won’t receive new messages in any app or on the web Switch between new and classic Outlook
How to Fix Outlook for Mac Not Receiving Emails Automatically
Basic Fixes Check email storage: If your email inbox storage is full, you won’t receive new messages in any app or on the web Switch between new and classic Outlook
 How to Fast Forward (and Rewind) Instagram Live Stories Video Replays
Fast-Forward an Instagram Live Story Video Replay Before we proceed, it is pertinent to state that you can only forward replays of live sessions/videos that users share on their stories.
How to Fast Forward (and Rewind) Instagram Live Stories Video Replays
Fast-Forward an Instagram Live Story Video Replay Before we proceed, it is pertinent to state that you can only forward replays of live sessions/videos that users share on their stories.
 How to Forward WhatsApp Messages With Sender Info and Image Caption
Before you start, there is a minor difference between iPhone and Android.
How to Forward WhatsApp Messages With Sender Info and Image Caption
Before you start, there is a minor difference between iPhone and Android.
 Why Can’t I Forward Messages on WhatsApp
WhatsApp allows you to forward messages from one conversation to all contacts or groups.
Why Can’t I Forward Messages on WhatsApp
WhatsApp allows you to forward messages from one conversation to all contacts or groups.
 How to Forward Email to Your Phone as a Text
Popular Carriers and SMS Gateways to Convert Email to Text Before we move forward, we need to look at the phone carrier and their email-SMS gateway address.
How to Forward Email to Your Phone as a Text
Popular Carriers and SMS Gateways to Convert Email to Text Before we move forward, we need to look at the phone carrier and their email-SMS gateway address.
The article above may contain affiliate links which help support Guiding Tech. The content remains unbiased and authentic and will never affect our editorial integrity.