If you’ve been upgrading your hardware or swapping out faulty components, you might be surprised to see that Windows 11 requires activation on rebooting your machine. But haven’t you done that already?
No fear. In this article, we’ll be showing you how to activate Windows after hardware change.
Why the Need for Reactivation?
Windows 11 will prompt you for reactivation after a major hardware change. The motherboard is the main component that’ll cause this, but sometimes a replaced CPU or hard drive can trigger the request as well. Why? Because Windows 11’s unique ID is tied to the motherboard in the case of an OEM license, and can only be used once in the case of a retail replacement one.
To ensure you’re still the owner of the PC and not abusing things, Windows will request activation again.
How to Activate Windows After Hardware Change
Attempting to reactivate Windows after changing hardware is a straightforward procedure, but you need to ensure a few things before proceeding:
- You are the owner of your PC and components.
- You have your 25-character activation key handy, just in case.
- Your version of Windows is legitimate.
- You are signed into your Microsoft account.
- You should know the license type (OEM, Retail) and edition (Pro, Home) of your copy of Windows 11.
- You have Admin privileges on the machine.
- There’s a stable internet connection.
Once all these are checked. You’re ready to get started.
Activate via Settings
Perhaps the easiest way to get the job done is via the Settings in Windows 11. Here’s what to do:
Step 1. Open Settings (Win + I) and choose “System” from the sidebar.
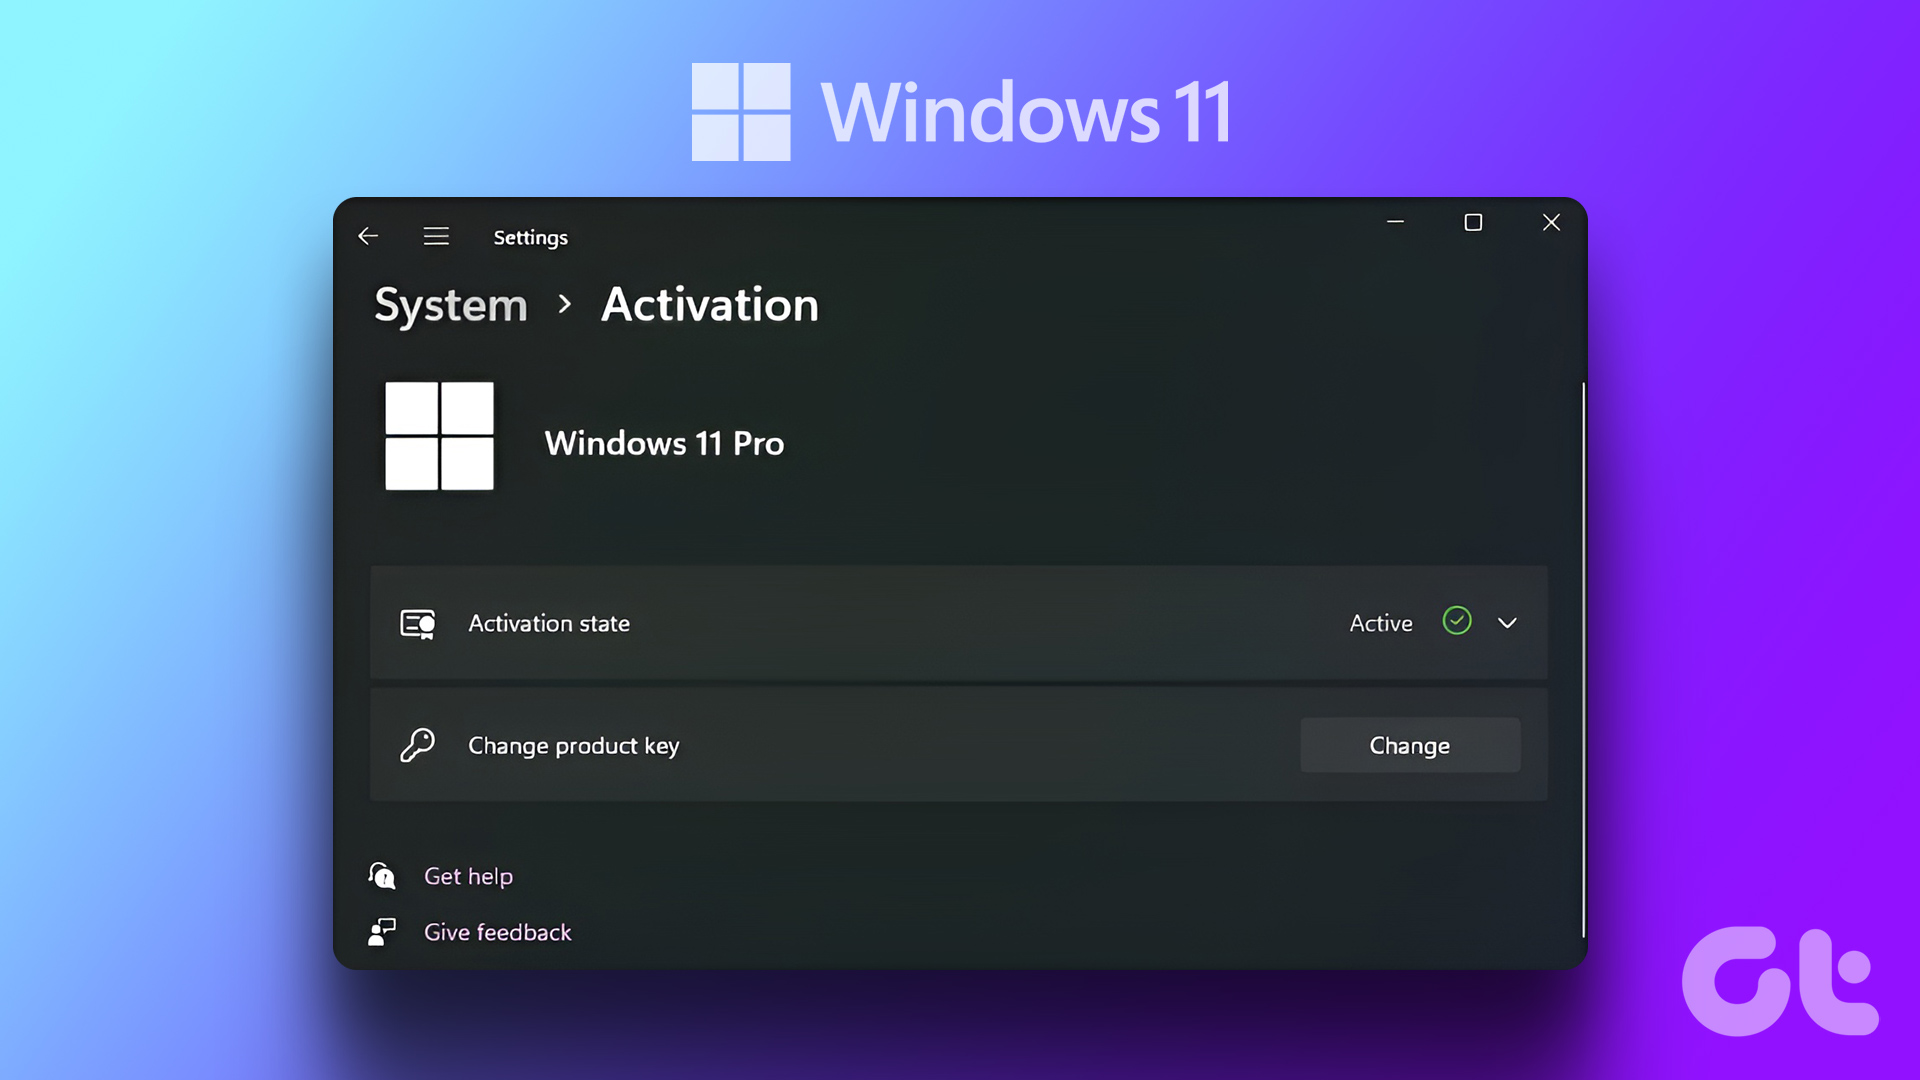
Step 2. Navigate to “Activation”

Step 3. Check the Activation status. If not active, you enter the product key manually by clicking “Change” next to “Change product key.”
On this screen, you can also check the edition of Windows 11 installed on your device. You’ll need to do this before changing your hardware components, as it won’t display afterwards. Keep in mind that if it varies from that of your license key, Windows won’t accept it.
Reactivate via Troubleshooter
The Windows Activation Troubleshooter is designed for problems like this and can easily walk you through the reactivation process. Once you’ve signed into your account and have Admin privileges, do the following:
Step 1. Open Settings (Win + I) and head to “System,” then “Activation.”
Step 2. In “Activation state,” click the “Troubleshoot” button.
Step 3. After a brief scan, you should receive a message that Windows couldn’t be activated. Click “I recently changed hardware on this device.”

Step 4. You’ll be connected using your Microsoft account. Check the device that you are currently using and click “Activate.”

Step 5. Restart your machine, and all should be resolved.
If This Fails
If you’re still having trouble with activation, then you’ll need to take some extra steps. A lost product key may require you to buy a new license from the Microsoft Store, but your best bet is to first contact Microsoft directly through customer support. You can also click the “Get Help” option in the Activation screen for more assistance.
Was this helpful?
Last updated on 18 November, 2025
Read Next
 Why You Need to Activate Windows 10 on Your Computer: GT Explains
Microsoft changed a lot of things with the launch of Windows 10.
Why You Need to Activate Windows 10 on Your Computer: GT Explains
Microsoft changed a lot of things with the launch of Windows 10.
 How to Activate Windows 11 for Free: 2 Best Ways
Are you looking to activate Windows 11 on your device but want to avoid paying for a product key?
How to Activate Windows 11 for Free: 2 Best Ways
Are you looking to activate Windows 11 on your device but want to avoid paying for a product key?
 How to Activate Microsoft Word’s Plagiarism Checker
Whether you’re a student writing an essay, a professional writing some web copy for your site, or a blogger preparing a post, it’s important to avoid plagiarism.
How to Activate Microsoft Word’s Plagiarism Checker
Whether you’re a student writing an essay, a professional writing some web copy for your site, or a blogger preparing a post, it’s important to avoid plagiarism.
 5 Fixes for “Could Not Activate Cellular Data Network” Error on iPhone
Try Basic Fixes Make sure airplane mode is off: A common reason why your iPhone may not be able to activate or use cellular data is if Airplane mode is
5 Fixes for “Could Not Activate Cellular Data Network” Error on iPhone
Try Basic Fixes Make sure airplane mode is off: A common reason why your iPhone may not be able to activate or use cellular data is if Airplane mode is
 You Can’t Activate Creator Mode on LinkedIn Anymore – Here’s What You Can Do Instead
You’re creating posts and getting some solid engagement on LinkedIn but wouldn’t call yourself a true “creator” yet, and certainly not a LinkedIn influencer.
You Can’t Activate Creator Mode on LinkedIn Anymore – Here’s What You Can Do Instead
You’re creating posts and getting some solid engagement on LinkedIn but wouldn’t call yourself a true “creator” yet, and certainly not a LinkedIn influencer.
 Top 4 Ways to Fix Windows 10 Taskbar Color Not Changing Issue
Who doesn’t love to customize their Windows desktop?
Top 4 Ways to Fix Windows 10 Taskbar Color Not Changing Issue
Who doesn’t love to customize their Windows desktop?
 5 Ways to Fix Desktop Background Keeps Changing in Windows 11
Fix 1: Check Desktop Background Settings Enabling wallpaper slideshow in Windows can cause your desktop background to change at regular intervals.
5 Ways to Fix Desktop Background Keeps Changing in Windows 11
Fix 1: Check Desktop Background Settings Enabling wallpaper slideshow in Windows can cause your desktop background to change at regular intervals.
 4 Quick Ways to Check Hardware ID (HWID) of a Device in Windows 11
https://youtu.be/F2oYyUSnUy4 Method 1: Using Device Manager The easiest way to find the Hardware ID (HWID) is by using the Device Manager.
4 Quick Ways to Check Hardware ID (HWID) of a Device in Windows 11
https://youtu.be/F2oYyUSnUy4 Method 1: Using Device Manager The easiest way to find the Hardware ID (HWID) is by using the Device Manager.
The article above may contain affiliate links which help support Guiding Tech. The content remains unbiased and authentic and will never affect our editorial integrity.