Open your dial-pad, enter *#*#4636#*#* and you will be greeted by the Android Testing Menu. This is like general knowledge in the Android community. But what is generally not explained is how to use the menu, its settings & the information contained. Let’s see in detail what is Android Testing menu and the various options.

Android Testing Menu is present since the Gingerbread era and the method of accessing it has also remained the same. The only changes were the addition of few more settings with the introduction of ICS. The menu is divided into four main sections as shown in the image above.
Note: This menu contains some settings which may change the functioning of your phone and incorrectly configuring them might subject you to network, Wi-Fi or some other problems. So if you are not sure about any settings to leave it as it is. We take no responsibility of any of the visits or calls you might have to make to the service centre.
Phone Information
This menu contains information about your smartphone’s cellular network rather than your handset. The info displayed is explained in the images below:
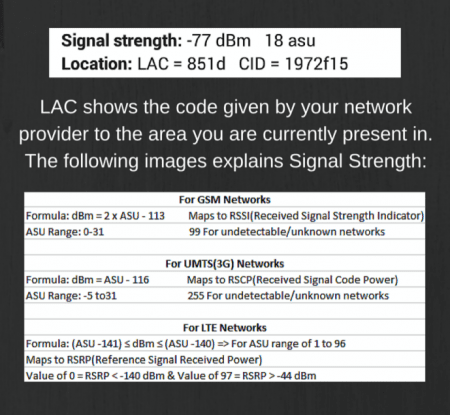
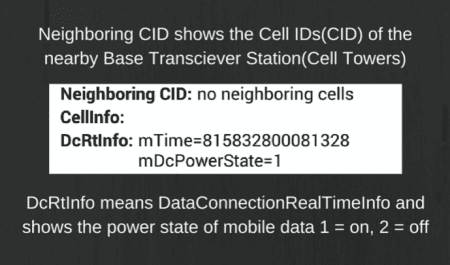
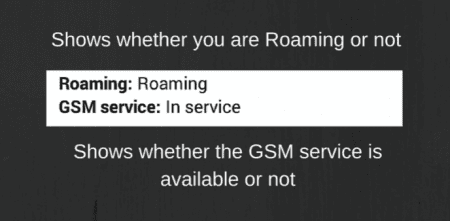
The majority of things here are various info regarding the network you are connected with only a few options to toggle which are explained below:

This one is kind of self-explanatory, toggling this option will turn off your cellular radio only. It will not affect Bluetooth/Wi-Fi/NFC like in Airplane mode which turns off all wireless communications.

CELLINFOLISTRATE is an option for how often the phone refreshes mobile network info while you are in testing menu. The value is in milliseconds and 0 means it updates constantly. Like most of the other settings, this one is also of no use so keeping it as it is, is advisable.

IMS (IP Multimedia Subsystem) is a set of specifications to offer various services such as voice, multimedia, data through IP protocol i.e. the Internet. To access it, registration has to be done using at least one IMPU (IP Multimedia Public Identity) i.e. your mobile number in case of smartphones. But this system is not applicable currently. Again the advice is to leave it as it is.

SMS over IMS is a part of VoLTE. VoLTE is Voice over LTE. VoLTE enables HD calling as calls are placed over the 4G network instead of 3G or 2G. Along with calls, SMS is also sent over LTE and turning on the SMS over IMS option will apparently do that if your carrier supports it.

The VOLTE PROVISIONED FLAG is the setting to turn ON/OFF the use of VoLTE. But it’s not as straightforward as simply tapping it will not change. You need to follow the steps given here to correctly turn it ON.

SMSC is short for SMS Centre Number. An SMS centre number is there for each network, through which all the SMSes are routed. You can update that by entering the number, in hexadecimal form and touching UPDATE. Pressing REFRESH will mostly give you refresh error. In line with our initial warning, it’s not recommended to update that number here. There are dedicated apps available for the purpose but better yet take it to the cellular provider’s store to fix it.

TOOGLE DNS CHECK is a setting which checks if the APN you are connected to, has DNS server’s address configured in the DHCP. Turning it ON will not allow blank DNS server info and your phone will probably not connect with that APN. Turning it OFF (0.0.0.0 allowed) will allow blank DNS server. You will not face this issue in daily use and these settings affect only if connect to a private APN. Leaving it in 0.0.0.0 allowed state is advisable.

I couldn’t find any concrete info regarding this but it vaguely means that turning it ON will dump or delete LTE-related files stored on the phone’s RAM. The effect of toggling this option, according to some forum users, ranges from getting an LTE speed boost to phone getting stuck in boot loop. So again, exercise caution before using it.

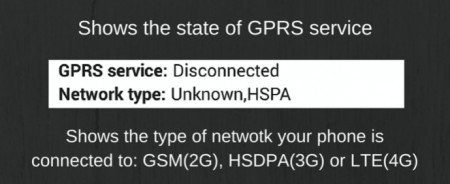
This is one of the most useful settings in the entire ATM. Whenever you are stuck in an area that doesn’t have decent LTE or HSPA coverage, your phone will drop the connection to the lower network tier. This can be frustrating because one bar of LTE or HSPA is far better than four bars of edge. To make it force to stick to either one of them you can select the appropriate option from the drop-down menu.
Note: If, after selecting a network type from the menu, you move to an area where the selected network type is not available, your phone will not auto switch to the available network and will remain in the disconnected state until you manually search for network or it reboots.
The Supplement Menu
The Phone Information section has one more menu, which is accessed by touching the three dots in the upper-right corner of the screen. Here most of the options are related to the sim. The contents are explained in the image below.

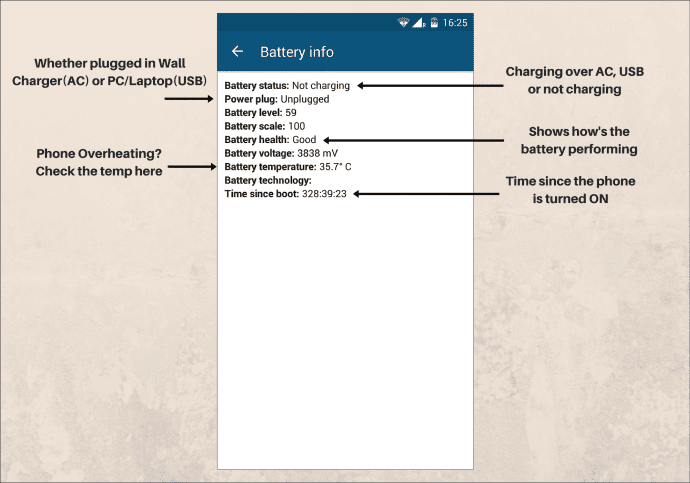
Battery Information
The Battery info screen is explained below.
Usage Statistics
This sub-menu shows the usage patterns for your phone which you can sort by Usage time (sorted based on App used for the most time in descending order), Last time used (app last used from the current time) and App name (apps arranged in alphabetical order).
Wi-Fi Information
This menu is subdivided into three menus: Wi-Fi API, Wi-Fi config and Wi-Fi status, each explained below.
Wi-Fi Config
This menu gives detailed technical info regarding the currently connected Wi-Fi network as well as past networks you connected to. Each remembered Wi-Fi network is given an ID. Apart from the Wi-Fi network ID (which has one use, shown in the next paragraph) all other info is almost useless for normal users.
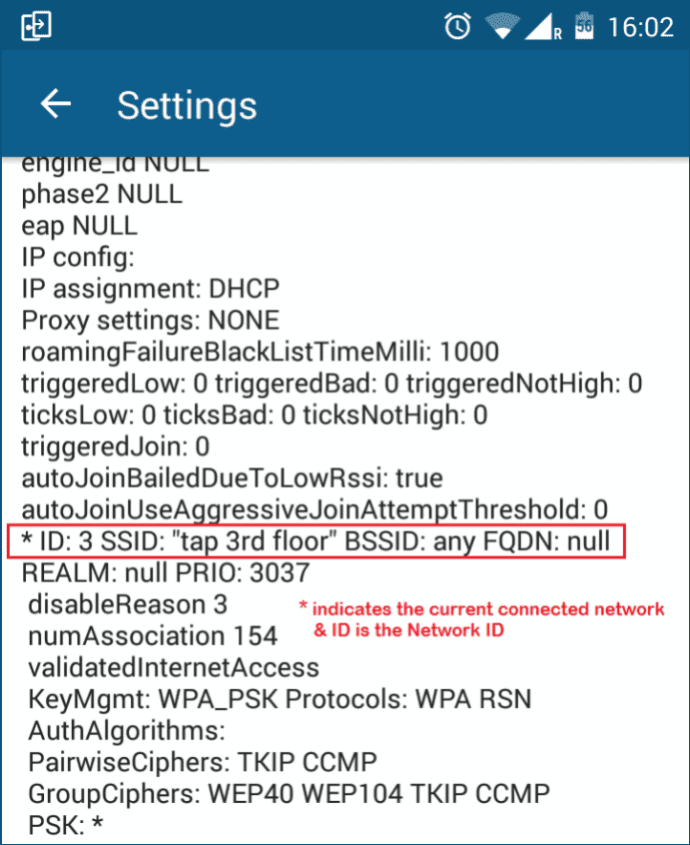
Wi-Fi API
Here you can’t do much except use the network ID, found above to enable or disable a particular SSID. The other options are explained in the image.

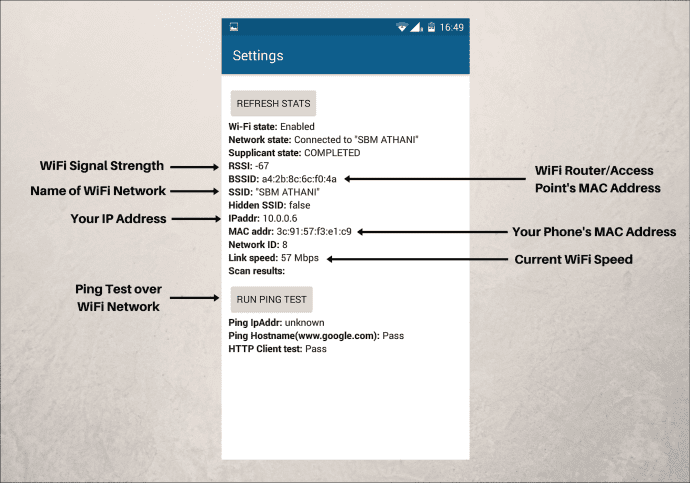
Wi-Fi Status
This shows the information of the current connected network. I will let the image do rest of the work.
Conclusion
I know this post doesn’t entirely cover the ATM but there is only so little information to begin with. Google doesn’t officially list anything about the testing menu which makes it really hard to explain it. What is left is the hearsay on the forums & chat boards, which aren’t always true. But nevertheless, we will keep updating this post as and when any info trickles out or Google makes any addition. On a closing note, if you have any doubt, feedback or suggestions do share them with us. We always love to hear our reader’s thoughts.
ALSO READ: What Is IP Rating and How to Choose the Right IP Rating for a Device
Was this helpful?
Last updated on 06 September, 2022
Read Next
 GT Explains: What Is XAPK File and How to Install It on Android
If you are someone who loves tinkering with phones, then you must be familiar with APK files and sideloading them.
GT Explains: What Is XAPK File and How to Install It on Android
If you are someone who loves tinkering with phones, then you must be familiar with APK files and sideloading them.
 Difference Between an App and a Program in Windows 10: GT Explains
Back in the day, people used to talk about programs while discussing desktop operating systems like Windows.
Difference Between an App and a Program in Windows 10: GT Explains
Back in the day, people used to talk about programs while discussing desktop operating systems like Windows.
 GT Explains: Difference Between Recovery Drive and System Image in Windows 10
Windows offers multiple ways to take a backup of your precious data on your computer.
GT Explains: Difference Between Recovery Drive and System Image in Windows 10
Windows offers multiple ways to take a backup of your precious data on your computer.
 Difference Between Process and Service in Windows 10: GT Explains
A few days ago, while I was busy writing a guide Chrome started lagging, and I had to open the Task Manager to kill the associated process.
Difference Between Process and Service in Windows 10: GT Explains
A few days ago, while I was busy writing a guide Chrome started lagging, and I had to open the Task Manager to kill the associated process.
 What Happens When You Block a Sender in Outlook: GT Explains
Emails are still popular and will be for a long time.
What Happens When You Block a Sender in Outlook: GT Explains
Emails are still popular and will be for a long time.
 Why You Need to Activate Windows 10 on Your Computer: GT Explains
Microsoft changed a lot of things with the launch of Windows 10.
Why You Need to Activate Windows 10 on Your Computer: GT Explains
Microsoft changed a lot of things with the launch of Windows 10.
 Why Is My iPhone Backup Size Too Large
How to Check iCloud Storage and Backup Apple iPhone takes a backup of the phone and stores it on iCloud, the company’s proprietary cloud service that uses Google servers.
Why Is My iPhone Backup Size Too Large
How to Check iCloud Storage and Backup Apple iPhone takes a backup of the phone and stores it on iCloud, the company’s proprietary cloud service that uses Google servers.
 Top 5 Ways to Install Android App Bundles on Android
Google is moving to adopt Android App Bundles (AAB) as a new file format and bidding farewell to the APK (Android Package) format.
Top 5 Ways to Install Android App Bundles on Android
Google is moving to adopt Android App Bundles (AAB) as a new file format and bidding farewell to the APK (Android Package) format.
The article above may contain affiliate links which help support Guiding Tech. The content remains unbiased and authentic and will never affect our editorial integrity.