Fix 1: Disable Mobile Hotspot Power Saving
Disable the power saving feature to prevent Windows from automatically turning off the hotspot when not in use.
Go to Settings > Network & Internet > Mobile hotspot and ensure that the Mobile hotspot is enabled. At the bottom of the Mobile hotspot menu, turn off the Power saving option.

Fix 2: Restart Windows Mobile Hotspot Service
If the Windows Mobile Hotspot Service has a glitch, the hotspot can automatically turn off. You can fix this by restarting the service.
Step 1: Open the Services app from the Start menu.
Step 2: On the list of services, locate and right-click on Windows Mobile Hotspot Service > select Restart.

Also Read: How to open Services on Windows
Fix 3: Increase Mobile Hotspot Timeout Limits
By default, the Windows mobile hotspot service turns off automatically under two conditions:
- Peerless Timeout: If no devices are connected, the hotspot will turn off after 5 minutes, which can be extended to 120 minutes.
- Connection Timeout: If there is no internet connection on the shared network, the hotspot will turn off after 20 minutes, which can be increased to 60 minutes.
Follow the steps below to increase the Mobile hotspot timeout limits.
Note: Before proceeding with the steps below, we strongly recommend backing up Registry files. That allows for easy recovery of files should anything go wrong, broken, or accidentally deleted during the process.
Step 1: Open the Registry Editor app from the Start Menu.
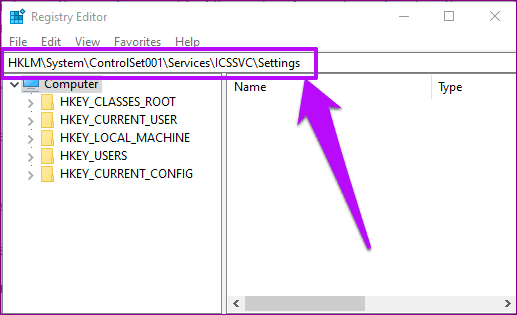
Step 2: To modify the Peerless Timeout, paste the directory below into the Registry Editor’s address bar, and hit Enter on your keyboard.
HKLM\System\ControlSet001\Services\ICSSVC\Settings
Step 3: To change Peerless Timeout, double-click on PeerlessTimeoutEnabled.
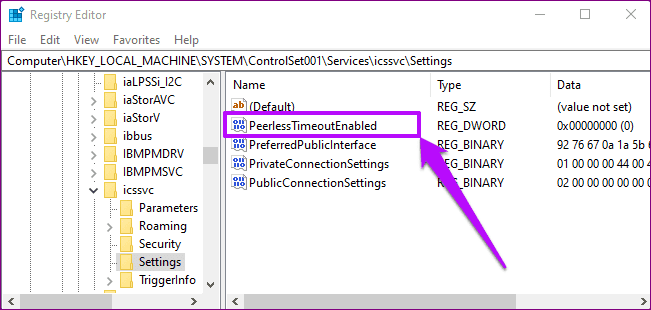
Step 4: Set the value data to 120 and tap OK.

That will change the peerless connection timeout to 120 minutes. Next, create a new registry key to change the default Connection Timeout for your PC’s mobile hotspot.
Step 5: Right-click on any space within the same (HKLM\System\ControlSet001\Services\ICSSVC\Settings) directory and select New.
Step 6: Select DWORD (32-bit) from the context menu.

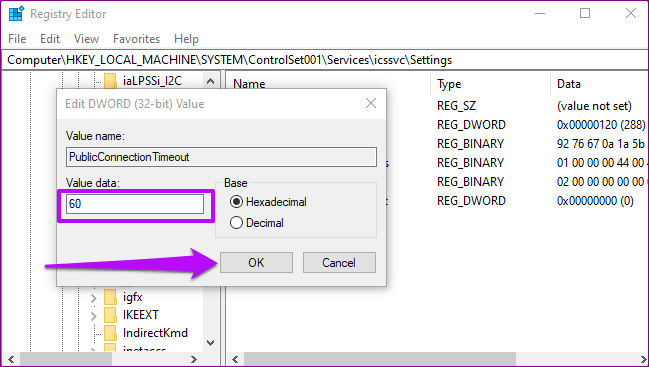
Step 7: Name the registry key PublicConnectionTimeout and hit Enter on your keyboard.
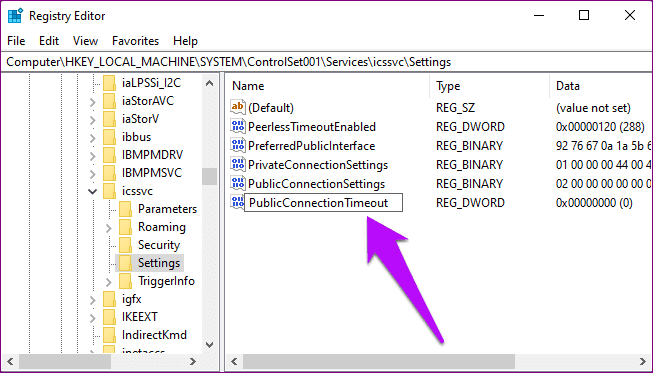
Step 8: Now, double-click the newly-created PublicConnectionTimeout registry key, change its Value data to 60, and tap OK.
Restart your computer to effect the changes.
Also Read: How to fix Windows mobile hotspot grayed out
Fix 4: Change Power Management Settings for Wi-Fi Adapter
Turn off the power-saving setting for your Wi-Fi adapter that turns it off when not in use.
Step 1: Open the Device Manager app and click to expand the Network Adapters menu. Right-click on the Wi-Fi adapter.

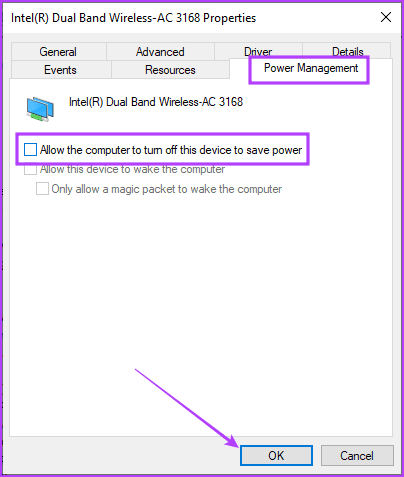
Step 2: Go to Power Management, and turn off the toggle for Allow the computer to turn off this device to save power. Click on OK to save changes.
Also Read: How to fix mobile hotspot not working on Windows 11
Was this helpful?
Last updated on 08 July, 2024
Read Next
 3 Ways to Fix Android Hotspot Keeps Turning Off
Basic Fixes Disable Wi-Fi: The personal hotspot on your Android device will not work when Wi-Fi is enabled.
3 Ways to Fix Android Hotspot Keeps Turning Off
Basic Fixes Disable Wi-Fi: The personal hotspot on your Android device will not work when Wi-Fi is enabled.
 6 Ways to Fix Bluetooth Keeps Turning Off on Windows 11
Fix 1: Toggle the Airplane Mode Toggling the airplane mode in Windows is a neat way to refresh your PC’s wireless connections, including Bluetooth.
6 Ways to Fix Bluetooth Keeps Turning Off on Windows 11
Fix 1: Toggle the Airplane Mode Toggling the airplane mode in Windows is a neat way to refresh your PC’s wireless connections, including Bluetooth.
 How to Stop iPhone Personal Hotspot From Turning On Automatically
https://youtu.be/RIBOWbQOnMU Fix 1.
How to Stop iPhone Personal Hotspot From Turning On Automatically
https://youtu.be/RIBOWbQOnMU Fix 1.
 4 Ways to Fix Windows Laptop Not Connecting to Mobile Hotspot on Android
Try Basic Fixes Switch to Airplane Mode or Restart Devices: It will ensure the removal of temporary blocks that show up if the device is turned on for a long
4 Ways to Fix Windows Laptop Not Connecting to Mobile Hotspot on Android
Try Basic Fixes Switch to Airplane Mode or Restart Devices: It will ensure the removal of temporary blocks that show up if the device is turned on for a long
 7 Ways to Fix Mobile Hotspot Not Working on Windows 11
Try These Things First Turn off Bluetooth: Sometimes, the Bluetooth connection on your PC may interfere with the mobile hotspot.
7 Ways to Fix Mobile Hotspot Not Working on Windows 11
Try These Things First Turn off Bluetooth: Sometimes, the Bluetooth connection on your PC may interfere with the mobile hotspot.
 How to Fix iPhone Hotspot Keeps Disconnecting on Windows and Mac
Why Does My iPhone Hotspot Keeps Disconnecting Before we show you step-by-step instructions to fix the hotspot issue on your iPhone, let's quickly go over some of the possible reasons
How to Fix iPhone Hotspot Keeps Disconnecting on Windows and Mac
Why Does My iPhone Hotspot Keeps Disconnecting Before we show you step-by-step instructions to fix the hotspot issue on your iPhone, let's quickly go over some of the possible reasons
 4 Best Fixes for Windows 10 Mobile Hotspot Grayed Out
Basic Fixes Check network connection: Ensure there are no problems with network connectivity or the router/modem.
4 Best Fixes for Windows 10 Mobile Hotspot Grayed Out
Basic Fixes Check network connection: Ensure there are no problems with network connectivity or the router/modem.
 Top 7 Ways to Fix Android Mobile Hotspot Not Working
We are relying on mobile hotspot more than ever in the work from home situation.
Top 7 Ways to Fix Android Mobile Hotspot Not Working
We are relying on mobile hotspot more than ever in the work from home situation.
The article above may contain affiliate links which help support Guiding Tech. The content remains unbiased and authentic and will never affect our editorial integrity.