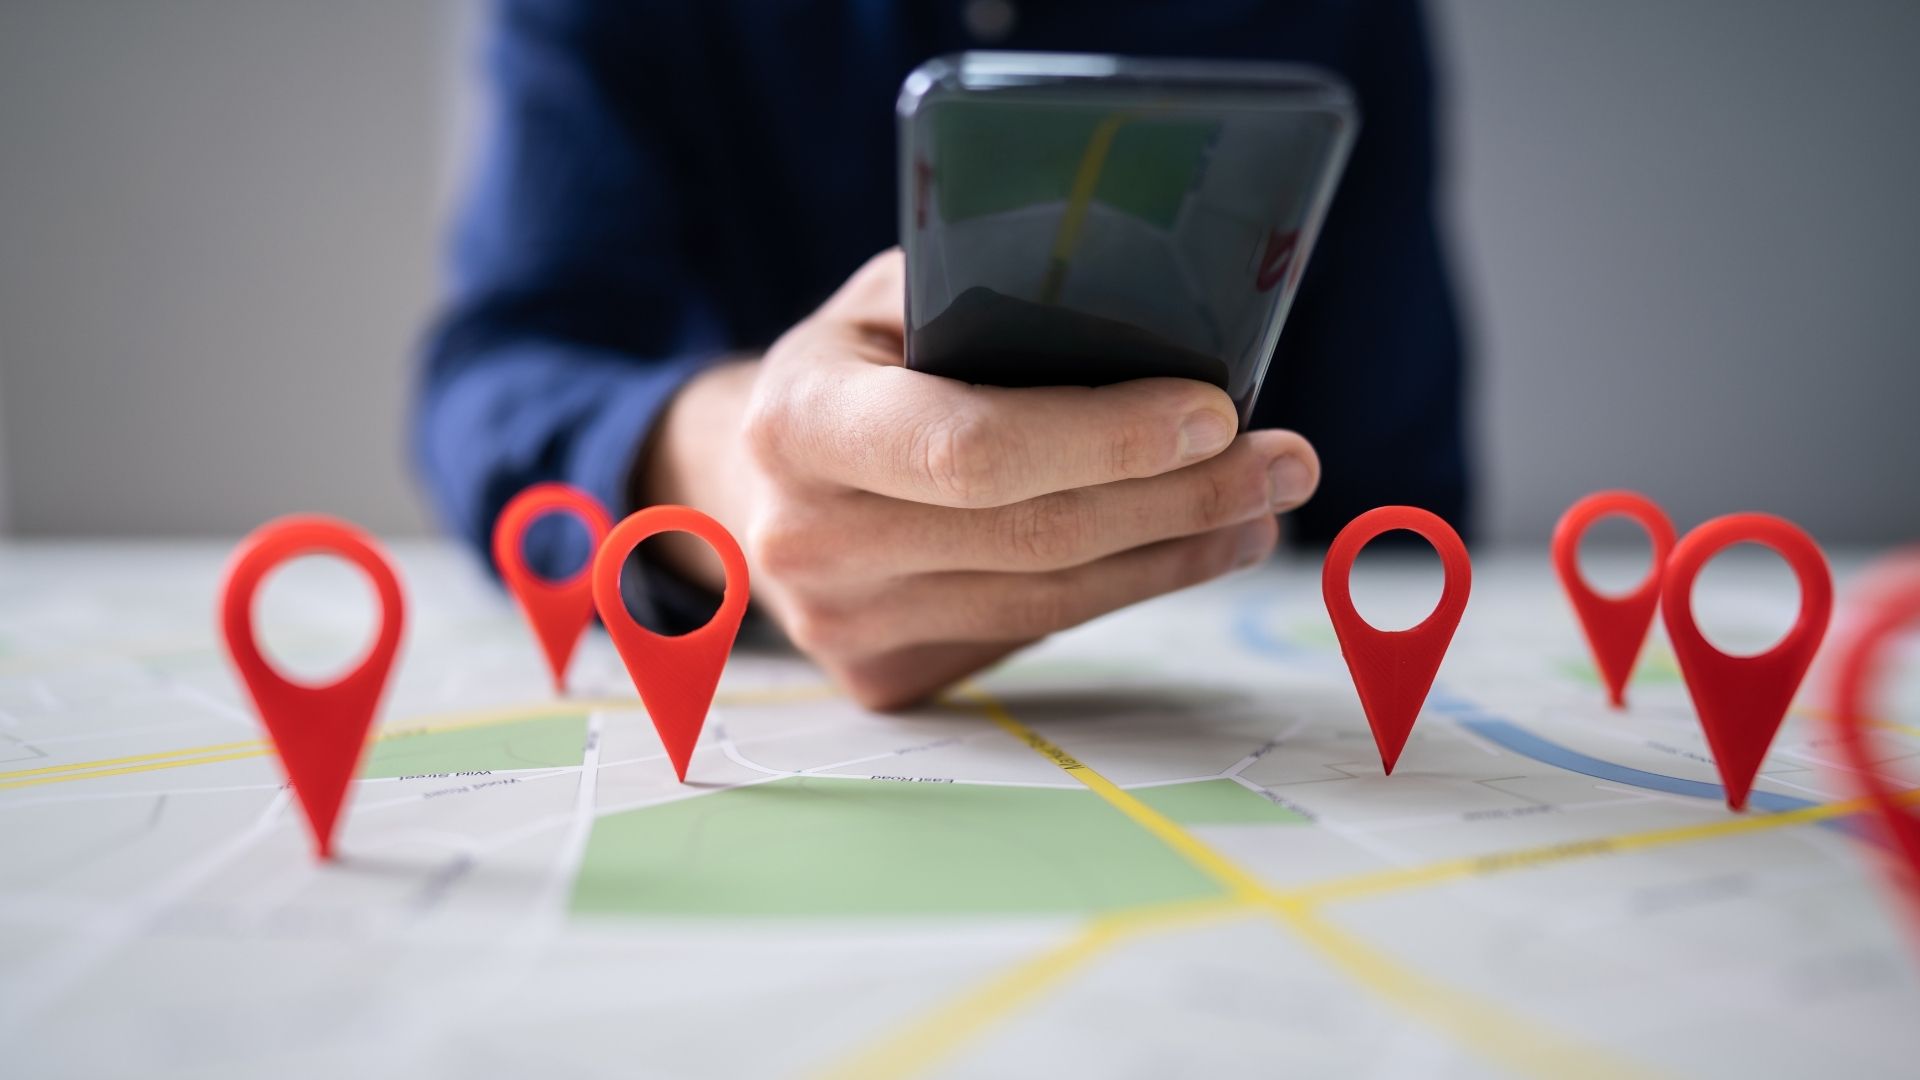
Location services on Android are quite useful in several ways. From locating nearby stores to receiving personalized recommendations from Google Assistant on your phone, location services are quite beneficial. Also, if you want a swift navigation experience with Google Maps or share your live location with friends on Snap Map, then enabling location services might not be enough.
Thankfully Android phone comes equipped with some handy features that can help improve location accuracy. We’ll talk about all of those features in this guide. So, let’s begin.
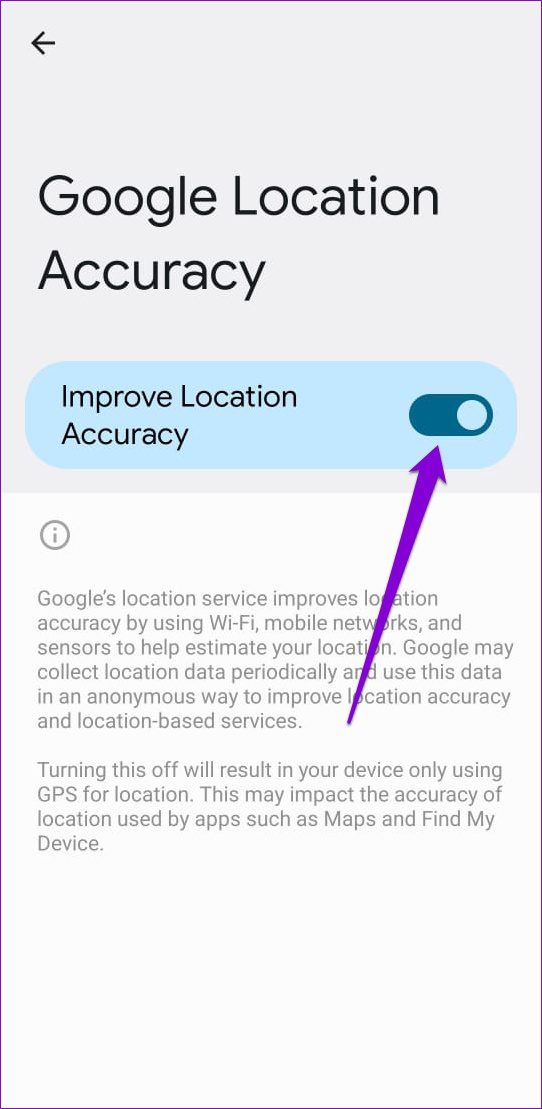
1. Turn On Google Location Accuracy
You can start by enabling the Google Location Accuracy feature on your Android. However, you’ll need to note that when you enable that option, the Android phone will constantly use Wi-Fi, mobile networks, and other sensors to determine your location as accurately as possible. That means, it might impact your battery life to a certain extent.
To enable Google Location Accuracy on your Android phone, follow the steps below.
Step 1: Open the Settings app on your phone and tap Location.
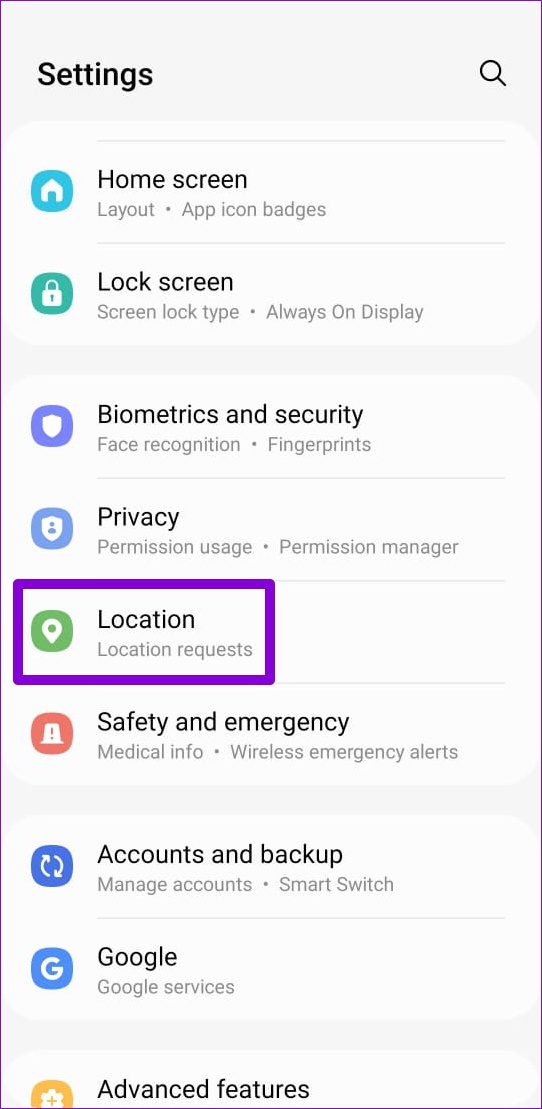
Step 2: Go to Location services and tap on Google Location Accuracy.

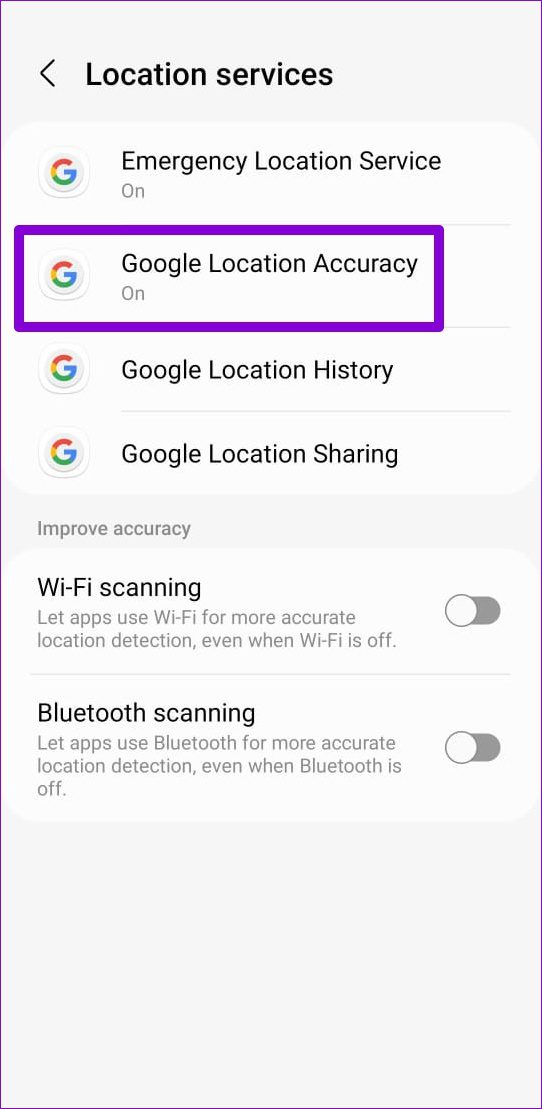
Step 3: Toggle on the switch next to Improve Location Accuracy.
2. Calibrate Compass
Besides GPS, apps like Google Maps rely on the compass (magnetometer) on your phone to detect your current location. If your phone struggles to fetch your location despite enabling Google Location Accuracy, recalibrate your phone’s compass. Here’s how.
Step 1: Launch the Google Maps app on your phone.
Step 2: Tap the blue dot icon on the map showing your current location. If you can’t find it, tap on your location (crosshair icon) option on the right.


Step 3: Then tap on the Calibrate option at the bottom. Then you’ll need to tilt and move your phone to create a figure 8.


You might have to do this a few times until the Compass accuracy improves. After that, Google Maps should become more accurate than earlier.
Alternative Method
Another way to calibrate the compass on your Samsung Galaxy phone is by accessing the secret service menu. Note that the availability of the secret service menu will differ based on your manufacturer.
Step 1: Launch the dialer app on your Samsung Galaxy phone and dial *#0*# to bring up the service menu.

Step 2: In the service menu, tap on the Sensor tile. Under Magnetic Sensor, look for the black circle at the bottom. If you see a blue line with a number 3 written next to it, then the compass on your phone is calibrated correctly.

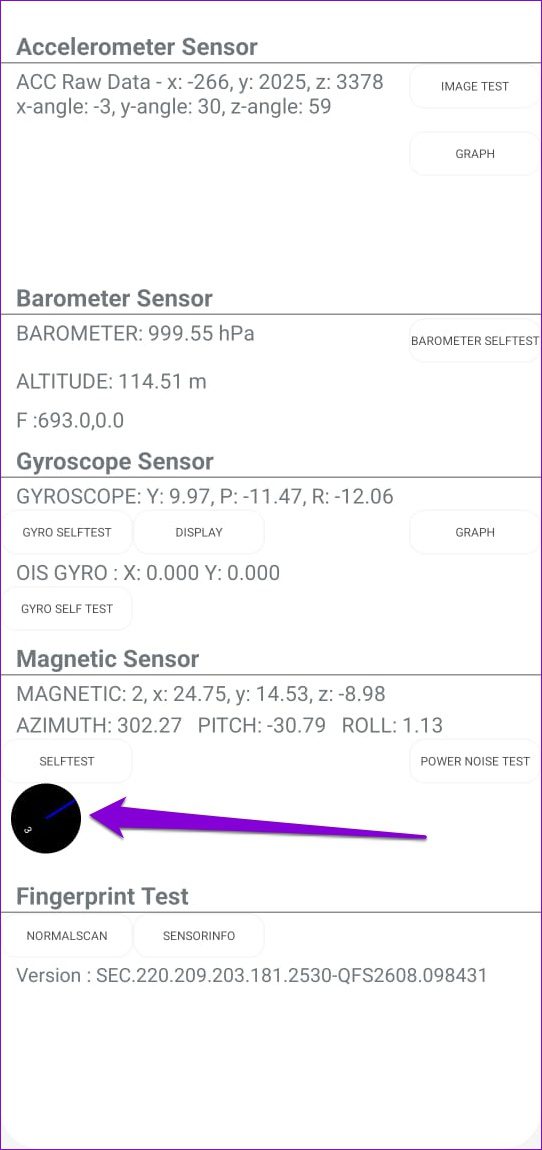
Conversely, if you see a green line with the number 2 written next to it, you can perform the on-screen gesture (shown below) to make a figure 8 with your phone. Do this three to five times and check the compass accuracy again.

3. Enable Wi-Fi and Bluetooth Scanning
Apart from enabling high location accuracy and recalibrating the compass, you should also enable your Android device’s Wi-Fi and Bluetooth scanning feature. This will allow your phone to scan for nearby Wi-Fi networks and Bluetooth-enabled devices to get a better idea of where you are at any given time. This will work even if you’ve turned off Wi-Fi and Bluetooth on your phone.
Read on how to enable Wi-Fi and Bluetooth scanning on Android.
Step 1: Open up the Settings app on your phone and head over to Location settings. Then tap on Location services.
Step 2: Toggle on the switches next to Wi-Fi scanning and Bluetooth scanning.

4. Enable Precise Location for Apps
After following the solutions mentioned above, your Android phone can detect your location with accuracy. If you’re using apps (such as Uber or Google Maps) that require accurate location data to work flawlessly, you can allow individual apps to use precise locations. Note that the Precise Location feature is only available for Android 12 or higher phones.
Here’s how to enable precise location for individual apps on your phone.
Step 1: Launch the Settings app on your phone and tap on Location.
Step 2: Go to App Permissions. You’ll find a list of apps categorized based on their location permissions.

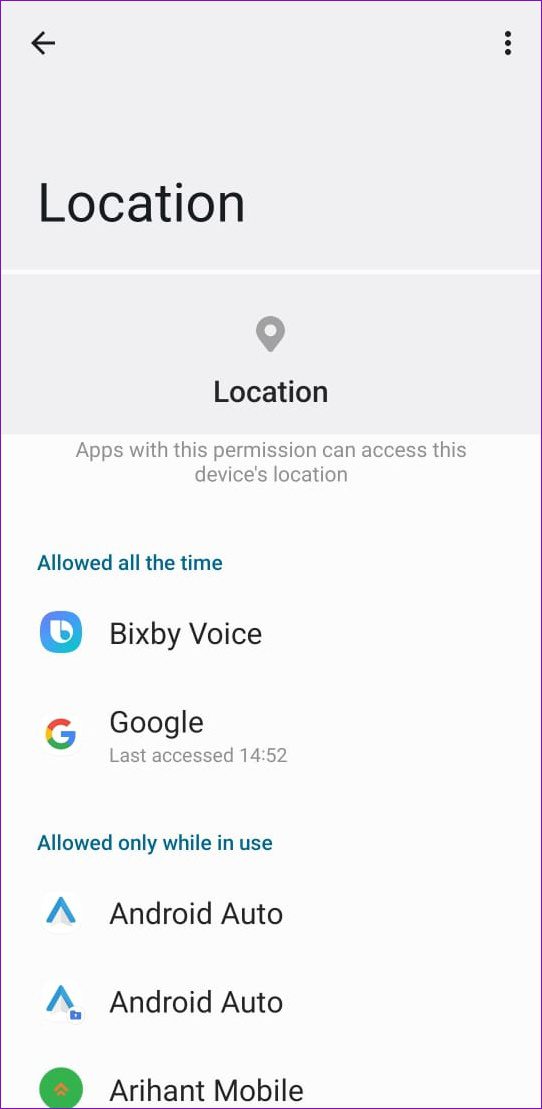
Step 3: Tap on the particular app and ensure that the location permission for the app is set to ‘Allow all the time’ or ‘Allow only while using the app.’

Step 4: Lastly, turn on the Use precise location toggle to allow the app to detect your location accurately.

Accuracy Guaranteed
Once you go through the above steps, the location accuracy on your Android will improve significantly. Of course, enabling these features might hurt your phone’s battery a little, but at least you’ll get the best location accuracy on your Android.
Was this helpful?
Last updated on 19 February, 2024
Read Next
 4 Best Sites to Test Typing Speed and Improve Accuracy
As a writer, I type a lot and been aiming type faster in the past few years.
4 Best Sites to Test Typing Speed and Improve Accuracy
As a writer, I type a lot and been aiming type faster in the past few years.
 Top 8 Ways to Improve Gaming Performance on Windows 11
Microsoft claims that Windows 11 brings improved gaming experience.
Top 8 Ways to Improve Gaming Performance on Windows 11
Microsoft claims that Windows 11 brings improved gaming experience.
 Top 13 OneNote Keyboard Shortcuts to Improve Your Productivity
Microsoft OneNote has been around for a couple of decades.
Top 13 OneNote Keyboard Shortcuts to Improve Your Productivity
Microsoft OneNote has been around for a couple of decades.
 How to Improve Facial Recognition in Google Photos
Google Photos is more than just a gallery app on iPhone and Android.
How to Improve Facial Recognition in Google Photos
Google Photos is more than just a gallery app on iPhone and Android.
 10 Best Wear OS Apps to Improve Your Smartwatch Experience
Smartwatches have become ubiquitous, mainly due to their availability at various price points.
10 Best Wear OS Apps to Improve Your Smartwatch Experience
Smartwatches have become ubiquitous, mainly due to their availability at various price points.
 Top 8 Ways to Fix Google Maps Showing Wrong Location on Android and iPhone
Google Maps is renowned for its versatility as a navigation app, offering a plethora of useful features such as route optimization, location history tracking, and more.
Top 8 Ways to Fix Google Maps Showing Wrong Location on Android and iPhone
Google Maps is renowned for its versatility as a navigation app, offering a plethora of useful features such as route optimization, location history tracking, and more.
 Top 8 Ways to Fix Location Services Not Working on Android
Location services are essential for many activities on your Android, such as navigation, receiving location-based suggestions, geotagging photos, and more.
Top 8 Ways to Fix Location Services Not Working on Android
Location services are essential for many activities on your Android, such as navigation, receiving location-based suggestions, geotagging photos, and more.
 7 Best Apple Vision Pro Accessories to Improve Your Spatial Computing Experience
The Apple Vision Pro seems like a futuristic computer that's going to replace all our smartphones and laptops.
7 Best Apple Vision Pro Accessories to Improve Your Spatial Computing Experience
The Apple Vision Pro seems like a futuristic computer that's going to replace all our smartphones and laptops.
The article above may contain affiliate links which help support Guiding Tech. The content remains unbiased and authentic and will never affect our editorial integrity.