Windows 11 automatically connects to the saved Wi-Fi networks whenever your computer is in its range. That means you won’t have to manually connect to your Wi-Fi network every time start your computer. However, if your laptop or desktop doesn’t connect to the familiar Wi-Fi network, it’s a good chance that something is wrong.
Thankfully, you can fix this obnoxious behavior rather easily. Below are some effective troubleshooting tips that you can use when Windows 11 is not connecting to Wi-Fi automatically.
1. Toggle the Connect to Wi-Fi Automatically Option
By default, Windows 11 based laptops keep trying to look for a better Wi-Fi to connect. However, if you’ve disabled that option, the computer may struggle or will not connect to a Wi-Fi network even when you’re in the range. Here’s how to fix it.
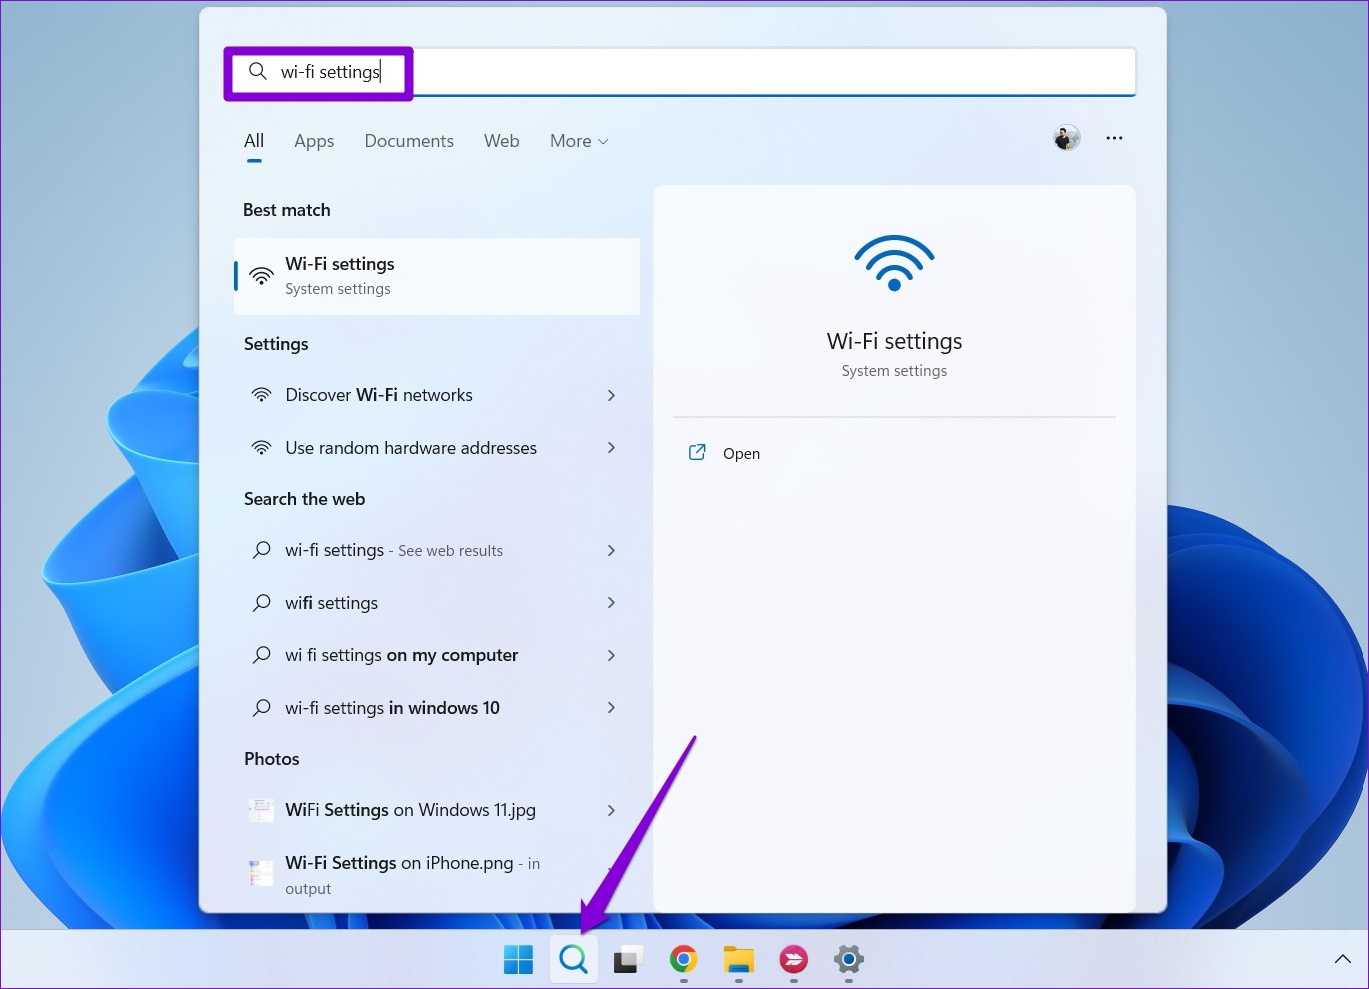
Step 1: Click on the Search icon on the Taskbar, type in Wi-Fi settings, and press Enter.
Step 2: Click on Manage known networks.

Step 3: Select the network to which you want your Windows PC to connect automatically.

Step 4: Check the box that reads ‘Connect automatically when in range.’

The next time your Windows computer is in the saved Wi-Fi networks range, it’ll connect automatically to that.
2. Use the Updated Wi-Fi Password
Windows may fail to connect to a Wi-Fi network automatically if the password is incorrect. It’s possible that the Wi-Fi password for your office or cafe’s network has changed and you haven’t updated it yet. To fix this, you’ll need to disconnect from that particular network and connect to it again.
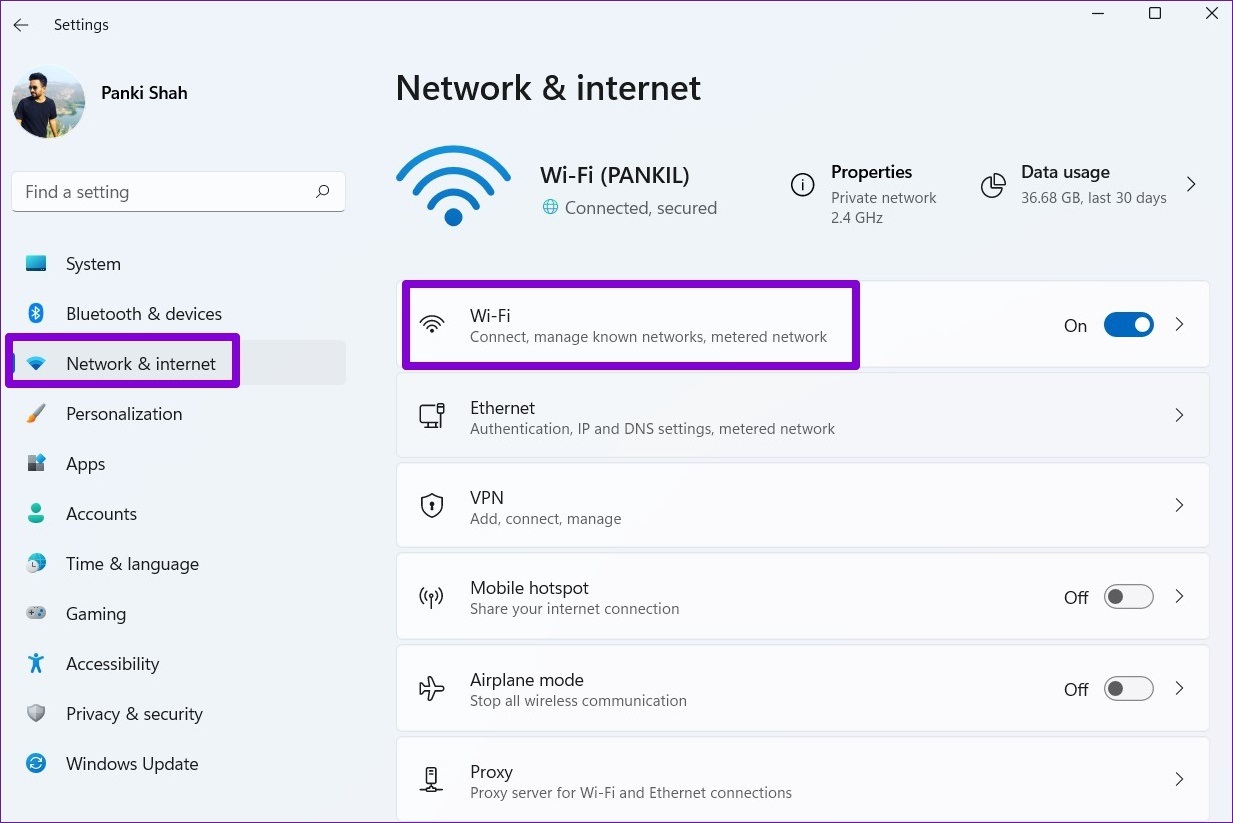
Step 1: Right-click on the Start button and select Settings from the list.

Step 2: Navigate to Network & internet tab on your left. Then, click on Wi-Fi.
Step 3: Go to Manage known networks.
Step 4: Click on the Forget button next to the Wi-Fi’s name to remove it.

Step 5: Head back to Wi-Fi settings and click on Show available networks to expand it. Select your Wi-Fi network, tick the Connect automatically checkbox, and click on Connect.
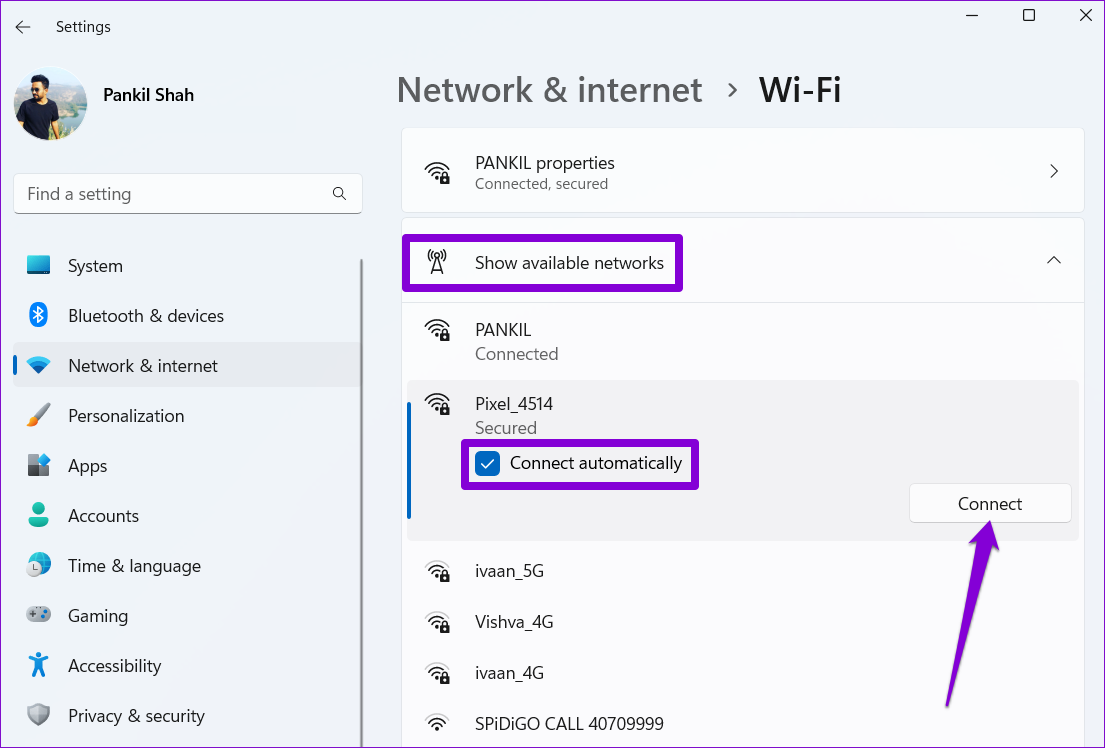
Type the updated password to connect to the network. Windows will connect your computer to that network automatically whenever it is in range.
3. Run the Troubleshooter
You may seek help of the built-in Troubleshooter to fix if your computer is still not connecting to a particular Wi-Fi network automatically despite the right configurations. Here’s how you can fix that.
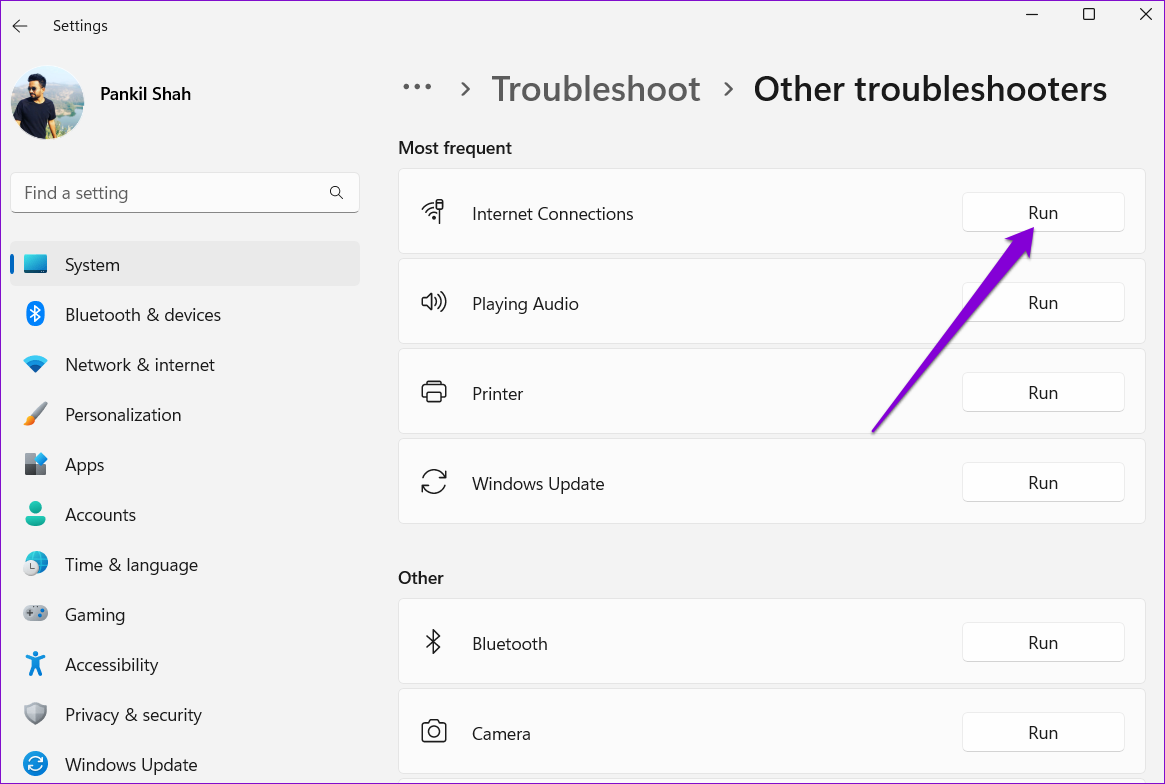
Step 1: Open the Search menu, type in troubleshoot settings, and select the first result that appears.

Step 2: Go to Other troubleshooters.

Step 3: Under the ‘Most frequent’ section, click on the Run button next to the Internet Connections to start the troubleshooter.
Follow the on-screen prompts to allow the troubleshooter to detect, diagnose, and fix any network connection issues.
4. Modify Network Adapter Properties
Often you’d want to change the power settings in Windows 11 to make your computer run longer and without issues. If you’re choosing a stricter power usage profile, then Windows will fail to connect to Wi-Fi after waking up from sleep or hibernation. Here’s how you can fix it.
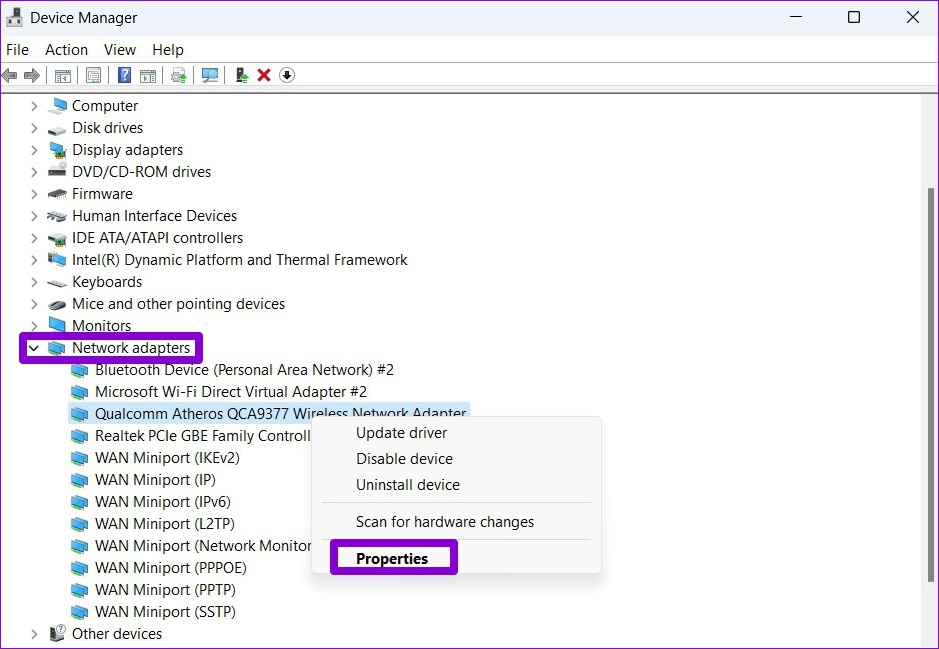
Step 1: Right-click on the Start button and select Device Manager from the list.

Step 2: Double-click on Network adapters to expand it. Right-click on your Wireless Network Adapter and select Properties.
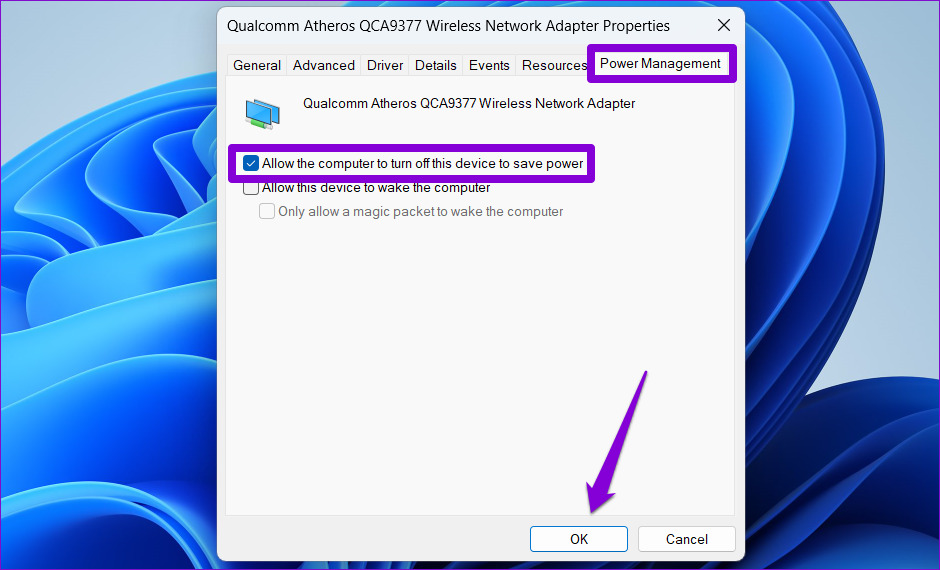
Step 3: Navigate to the Power Management tab and uncheck ‘Allow the computer to turn off this device to save power.’ Then, click on OK.
5. Update Wi-Fi Network Adapter Drivers
When was the last time you updated the Wi-Fi network adapter drivers on your computer? If you haven’t done that in a while, it’s a good idea to get right to it. You’re likely to face such Wi-Fi problems on Windows with outdated network adapter drivers. To fix them, you’ll have to update the Wi-Fi drivers on your PC by following the steps below.
Step 1: Click on the Search icon on the Taskbar, type in device manager, and press Enter.

Step 2: Expand Network adapters, right-click on the relevant Wireless Network Adapter from the list, and select Update driver.

From there, follow the on-screen instructions to update the wireless network driver and then see if Windows 11 can connect to Wi-Fi networks automatically.
6. Tweak Windows Registry
If updating Wi-Fi drivers doesn’t help, you can employ a registry trick to tackle the issue. Since the registry database holds important settings for Windows, you should consider backing up registry files before proceeding with any of the changes below.
Step 1: Press the Windows key + R to launch the Run dialog box. Type regedit in the Open field and press Enter.

Step 2: In the Registry Editor window, paste the following path in the address bar at the top to navigate to the GroupPolicy key.
HKEY_LOCAL_MACHINE\SOFTWARE\Policies\Microsoft\Windows\WcmSvc\GroupPolicy
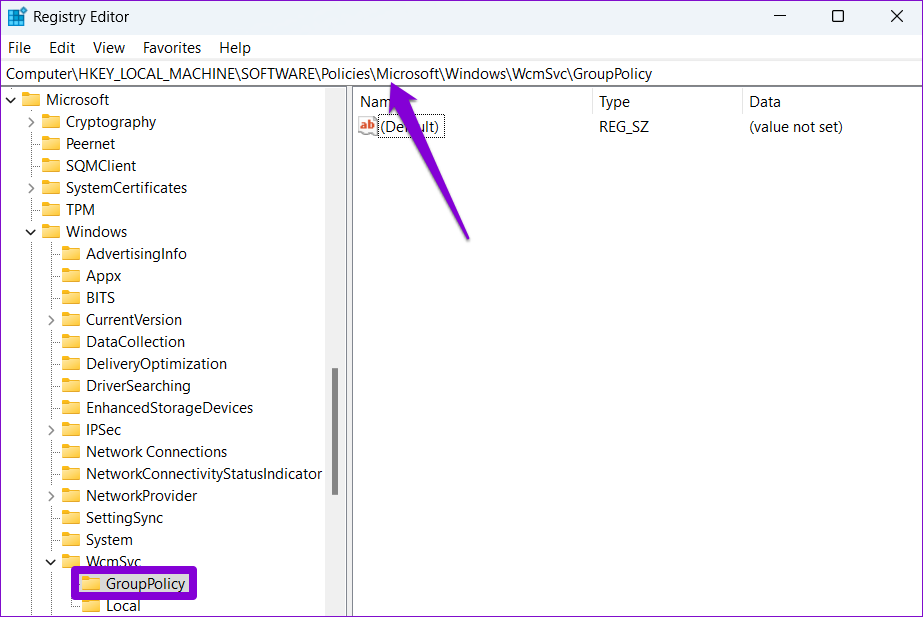
Step 3: Right-click on GroupPolicy, go to New and select DWORD (32-bit) Value.

Step 4: Name it fMinimizeConnections.

Close the Registry Editor window. Restart your computer to apply changes. Then, check if Windows 11 connects to Wi-Fi automatically.
7. Tweak the Group Policy
Group Policy Editor is a powerful tool you can use only on Windows 11 Professional or Enterprise versions. From Group Policy Editor, you can modify the Internet Communication Settings to fix this issue.
Step 1: Press the Windows key + R to launch the Run dialog box. Type in gpedit.msc in the Open field and press Enter.

Step 2: In the Local Group Policy Editor window, use the left pane to navigate to the Internet Communication settings folder.
Computer Configuration\Administrative Templates\System\Internet Communication Management\Internet Communicating Settings

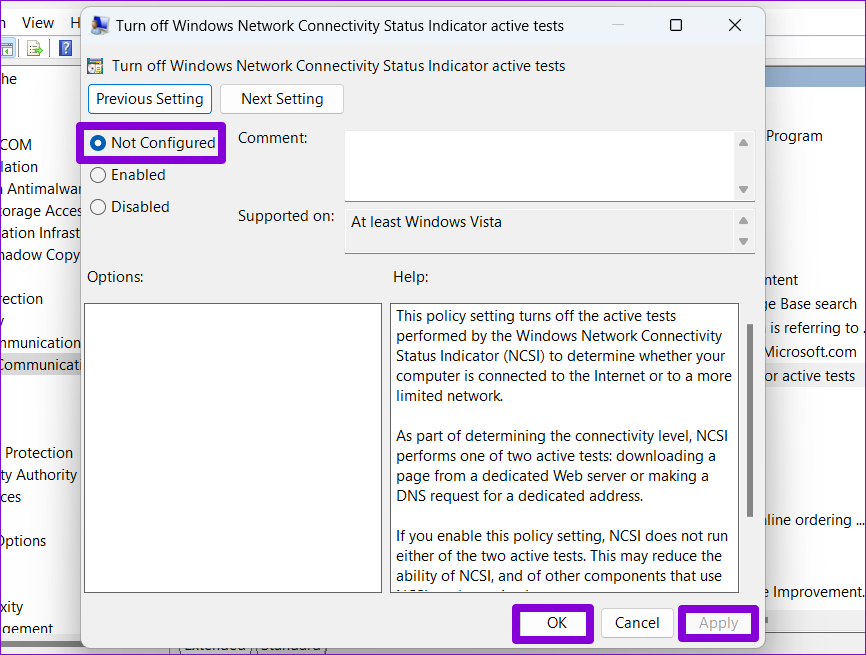
Step 3: On your right, double-click ‘Turn off Windows Network Connectivity Status Indicator active tests.’
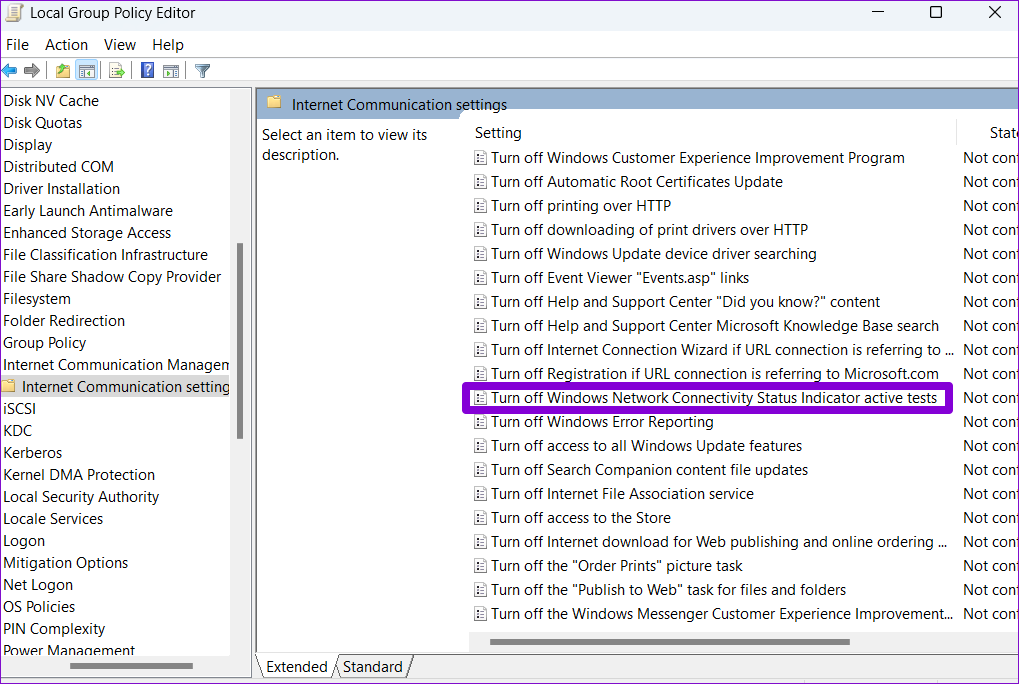
Step 4: Select Not configured and hit Apply followed by OK.
8. Reset Network Settings
If nothing works, resetting network settings on your Windows PC may well be your last option. That’ll remove all of your network adaptors data and restore all network settings to their default values. Here’s how you can go about it.
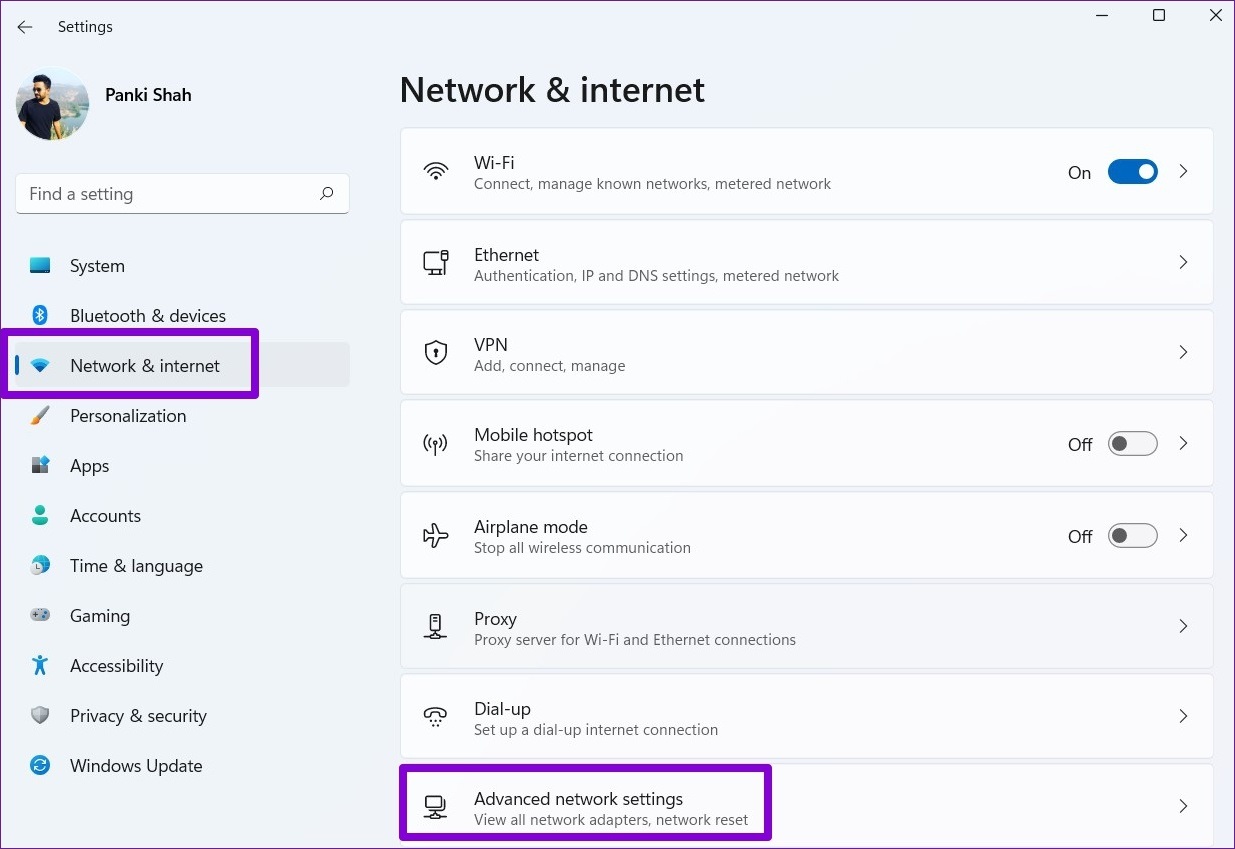
Step 1: Press Windows key + I to launch the Settings app. In the Network & internet tab, click on Advanced network settings.
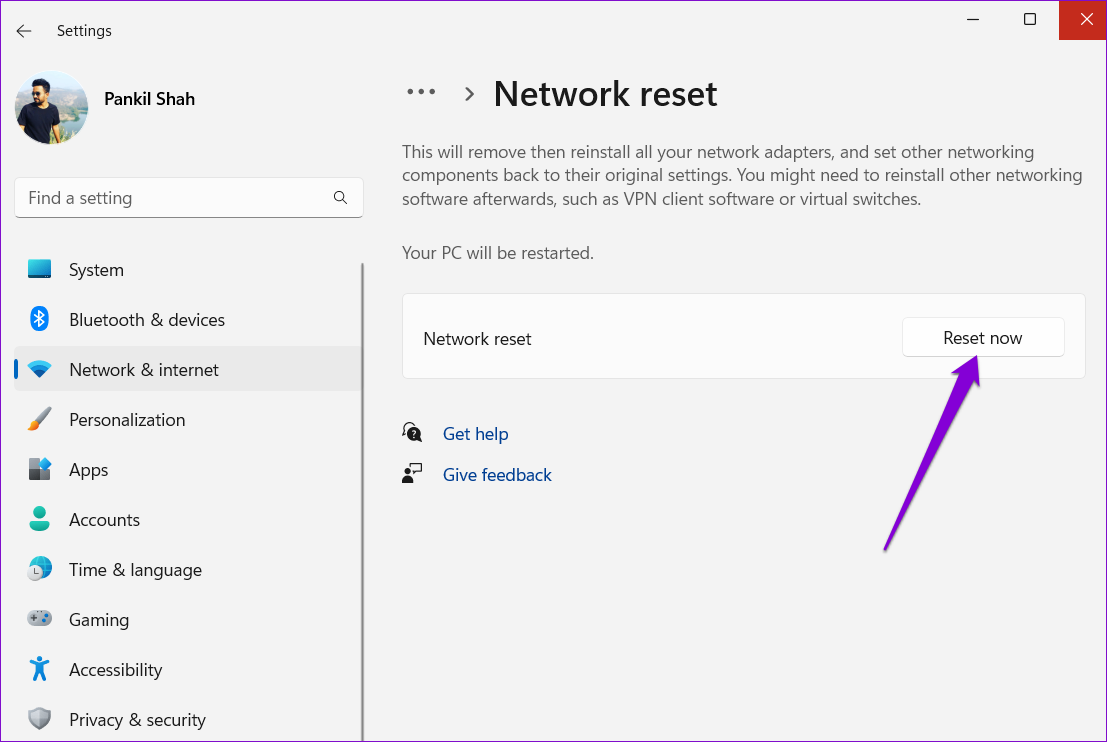
Step 2: Under More settings, click on Network reset.

Step 3: Lastly, click on the Reset now button next to Network reset.
Wait for the process to finish, reboot your computer, and connect to the Wi-Fi network you want to use. Of course, these resets all Wi-Fi network details and you’ll have to connect to all of those individually.
Connect Seamlessly
It’s frustrating when certain Windows features fail to work the way they should. However, fixing such issues shouldn’t take long if you know where to look. Let us know which of the solutions mentioned above helped you fix the issue in the comments below.
Was this helpful?
Last updated on 18 June, 2022
1 Comment
Leave a Reply
Read Next
 Top 7 Ways to Fix Android Not Connecting to Wi-Fi Automatically
Whenever your Android phone comes into range of a saved Wi-Fi network, it will connect to it automatically.
Top 7 Ways to Fix Android Not Connecting to Wi-Fi Automatically
Whenever your Android phone comes into range of a saved Wi-Fi network, it will connect to it automatically.
 6 Ways to Fix iPhone Not Automatically Connecting to Wi-Fi
When you come back home after a day outside, your iPhone is meant to automatically switch from mobile data to your home Wi-Fi.
6 Ways to Fix iPhone Not Automatically Connecting to Wi-Fi
When you come back home after a day outside, your iPhone is meant to automatically switch from mobile data to your home Wi-Fi.
 9 Ways to Fix Wireless Android Auto Not Connecting Automatically
Right from calls and music to maps and podcasts -- Android Auto comes with a host of features.
9 Ways to Fix Wireless Android Auto Not Connecting Automatically
Right from calls and music to maps and podcasts -- Android Auto comes with a host of features.
 Top 9 Fixes for Bluetooth Device Not Connecting Automatically on iPhone
After a tiring day of work, you sit back on your couch as you connect your Bluetooth earphones.
Top 9 Fixes for Bluetooth Device Not Connecting Automatically on iPhone
After a tiring day of work, you sit back on your couch as you connect your Bluetooth earphones.
 Top 9 Ways to Fix Outlook Not Connecting to Server on Windows 10 and Windows 11
While Microsoft Outlook is one of the most dependable email clients for Windows, it is not without its flaws.
Top 9 Ways to Fix Outlook Not Connecting to Server on Windows 10 and Windows 11
While Microsoft Outlook is one of the most dependable email clients for Windows, it is not without its flaws.
 Top 10 Ways to Fix Bluetooth Keyboard Not Connecting to Windows 11 Computer
While a wired keyboard offers a lag-free typing experience, nothing beats the convenience of using a Bluetooth keyboard with your computer.
Top 10 Ways to Fix Bluetooth Keyboard Not Connecting to Windows 11 Computer
While a wired keyboard offers a lag-free typing experience, nothing beats the convenience of using a Bluetooth keyboard with your computer.
 Top 12 Ways to Fix Steam Not Connecting to the Internet on Windows
Steam is one of the popular gaming apps on Windows.
Top 12 Ways to Fix Steam Not Connecting to the Internet on Windows
Steam is one of the popular gaming apps on Windows.
 Top 6 Ways to Fix Mouse Keeps Scrolling Automatically Windows 10 and Windows 11
Does the mouse keep scrolling automatically on your Windows computer?
Top 6 Ways to Fix Mouse Keeps Scrolling Automatically Windows 10 and Windows 11
Does the mouse keep scrolling automatically on your Windows computer?
The article above may contain affiliate links which help support Guiding Tech. The content remains unbiased and authentic and will never affect our editorial integrity.

My simple solution after trying all of the above was a matter of Authentication Mode. Setting the adapter (although capable) to WPA3 allows it to connect, but not automatically after a Restart, Sleep, or Hibernate, and requires manual intervention. My router is set to both WPA2 and WPA3 security. After switching the wireless adapter to WPA2 Personal, the WiFi connects automatically again.
Check your authentication mode to see if the adapter is compatible with your router.