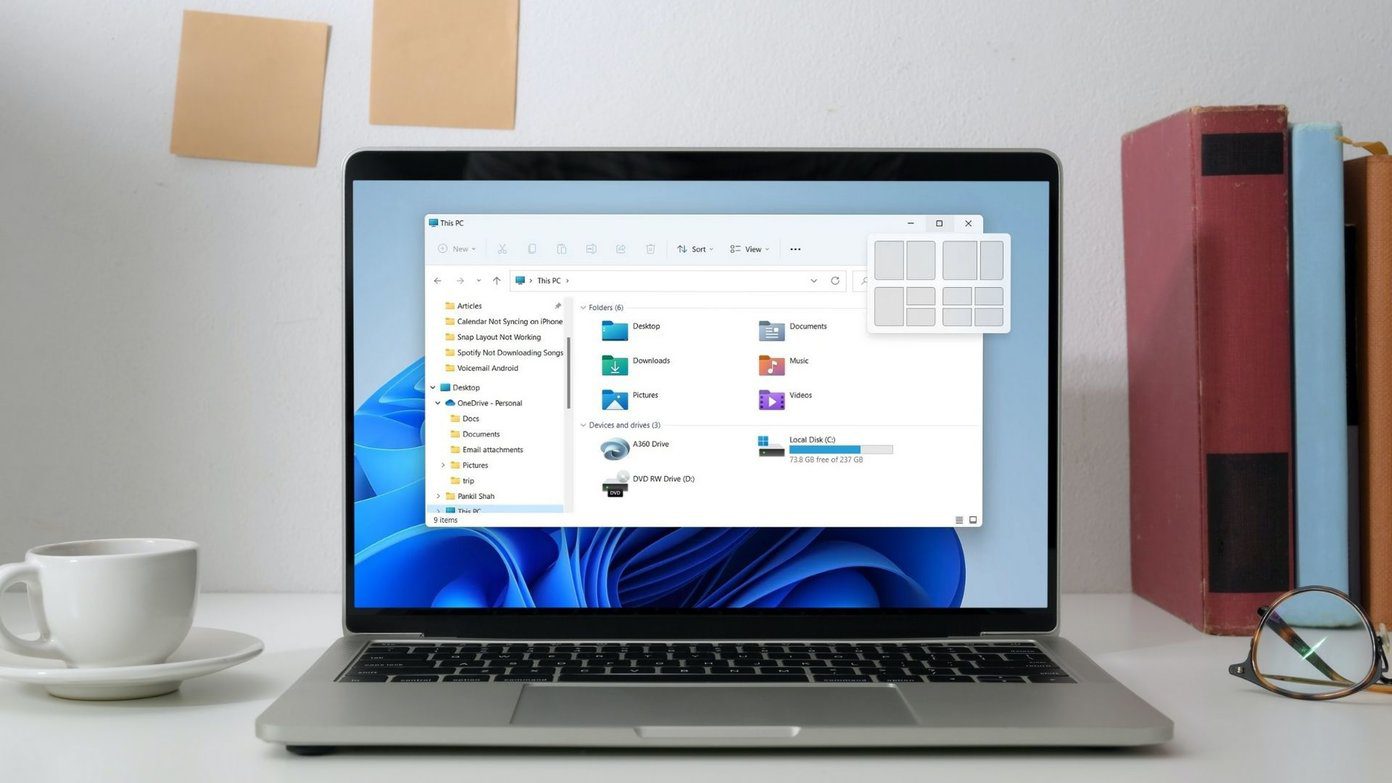
With Windows 11, Microsoft introduced a bunch of exciting features. Snap layout is just one of those features that made its debut with Windows 11. It allows you to work more efficiently by letting you organize your windows on the desktop. But if you haven’t been able to take advantage of this feature because it isn’t working, we’re here to help.
If Windows fails to snap your favorite apps and programs, we have a few troubleshooting tips that might help with the issue. So, let’s check them out.
1. Use Keyboard Shortcuts
If you can’t access the snap layout by hovering your mouse over the maximize icon, you can try using the keyboard shortcuts instead. You can press Windows key + Z to reveal the snap layout options quickly. Alternatively, you can also press the Windows key in combination with one of the arrow keys. This will snap the active window in the direction of the arrow key you press.
If Windows is not responding to the keyboard mentioned above shortcuts, you can continue with this guide.
2. Make Sure Snap Layouts are Enabled
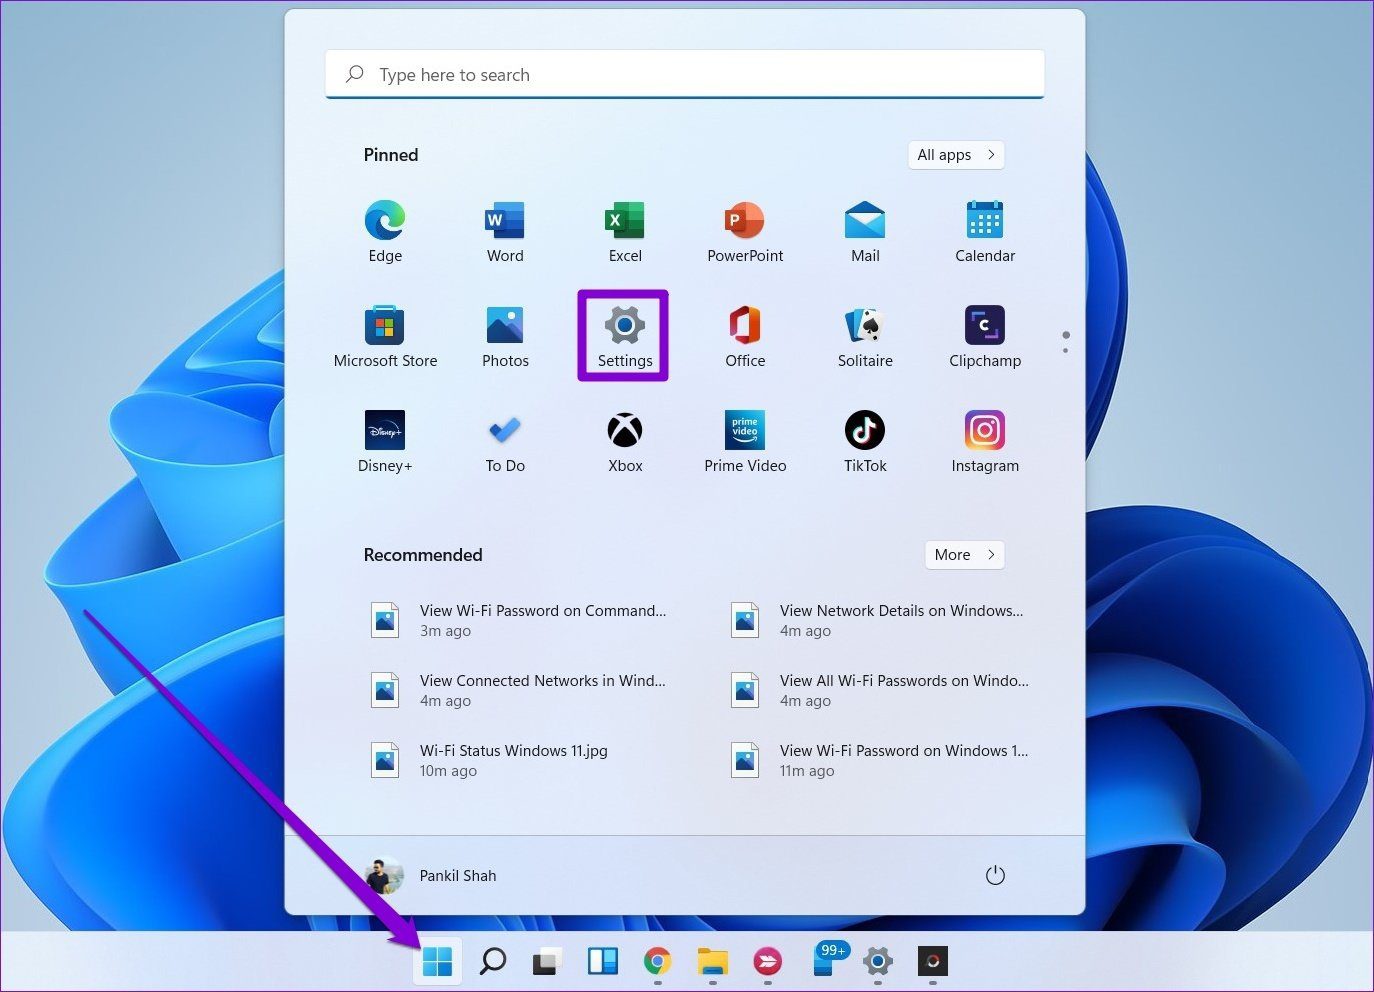
Next, you need to go through the Settings app on Windows 11 to ensure snap layouts are enabled on your PC. Here’s how.
Step 1: Open the Start menu and click on the gear icon to open Settings. Alternatively, you can also use the Windows key + I shortcut to achieve the same.
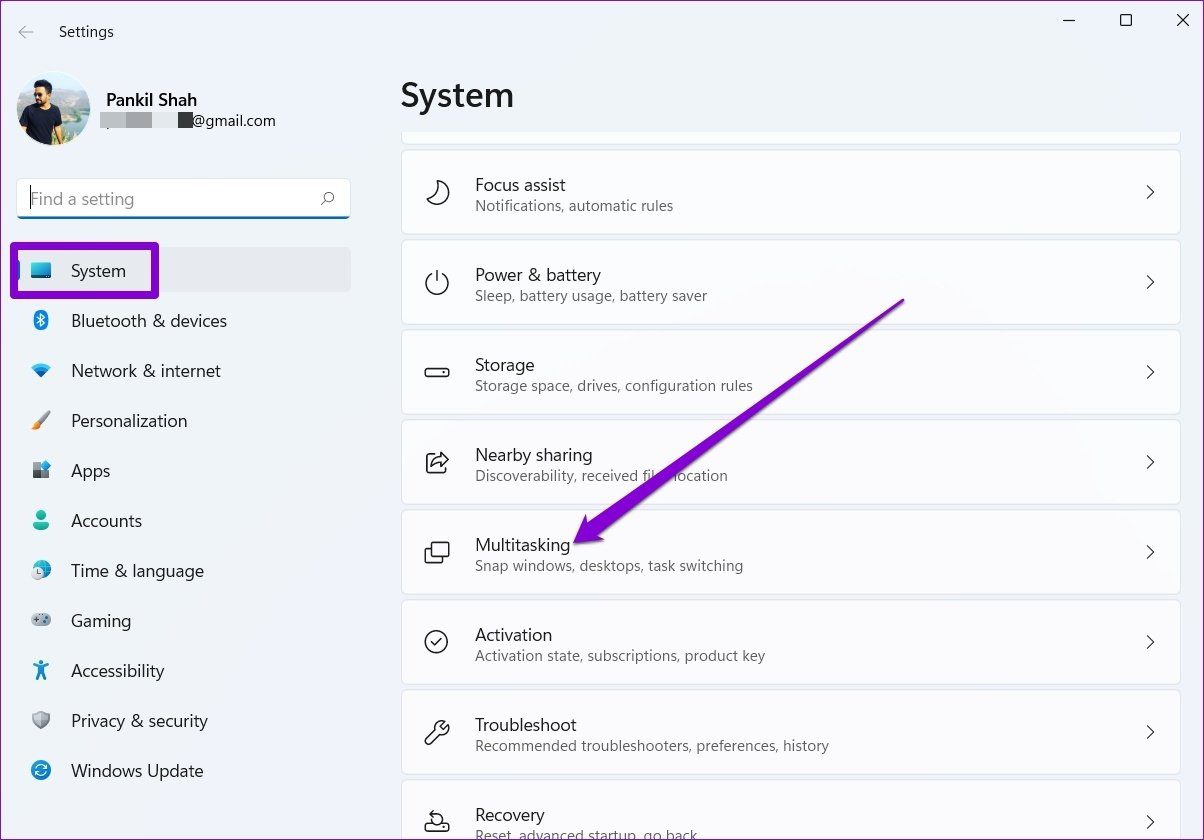
Step 2: Navigate to the System tab and click on Multitasking.
Step 3: Toggle on the switch next to Snap windows.
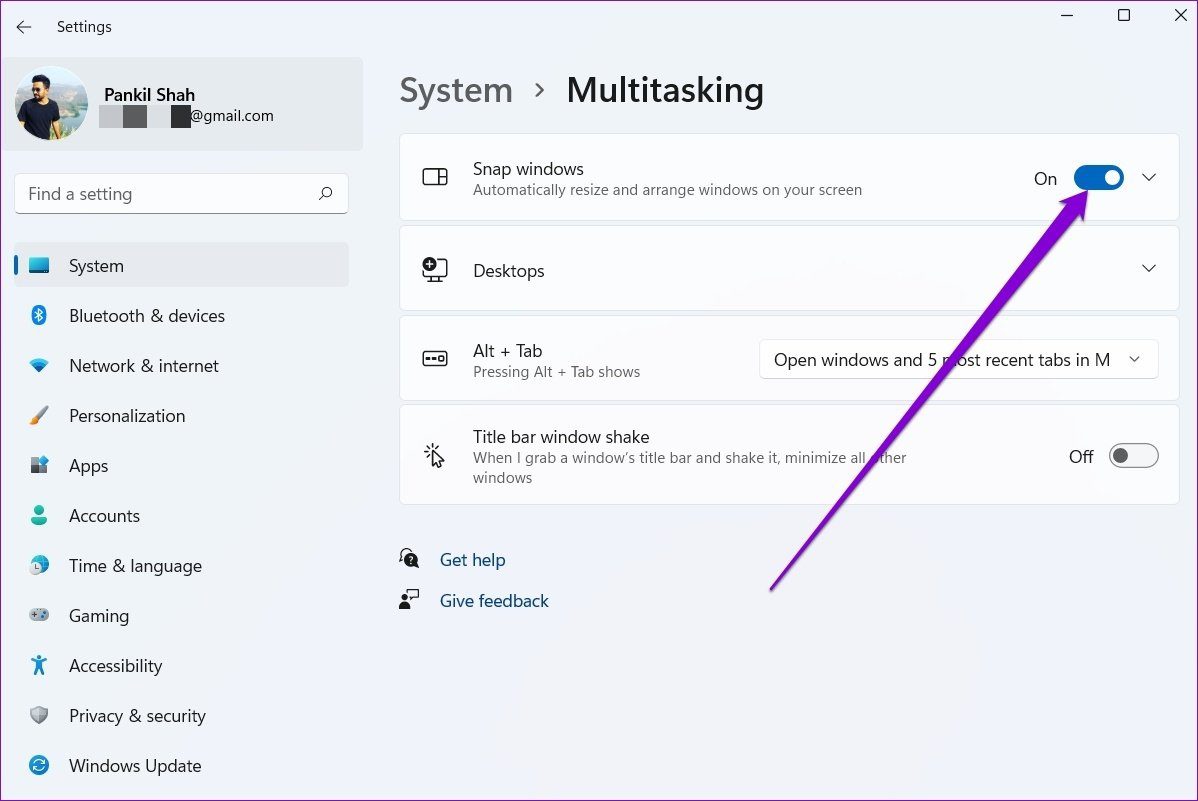
Once enabled, you’ll also need to expand Snap windows and use the checkboxes to set your preference.

3. Enable Snap Layouts via Registry
If enabling snap layouts from the Settings app doesn’t work, then you can try using the Registry Editor to enable snap layouts.
Before you proceed, it’s important to know that Windows Registry is an integral part of the Windows operating system. So, follow the steps with precision and create a backup of your Registry files beforehand.
Step 1: Press Windows key + R to open the Run dialog. In the Open field, type regedit and press Enter.

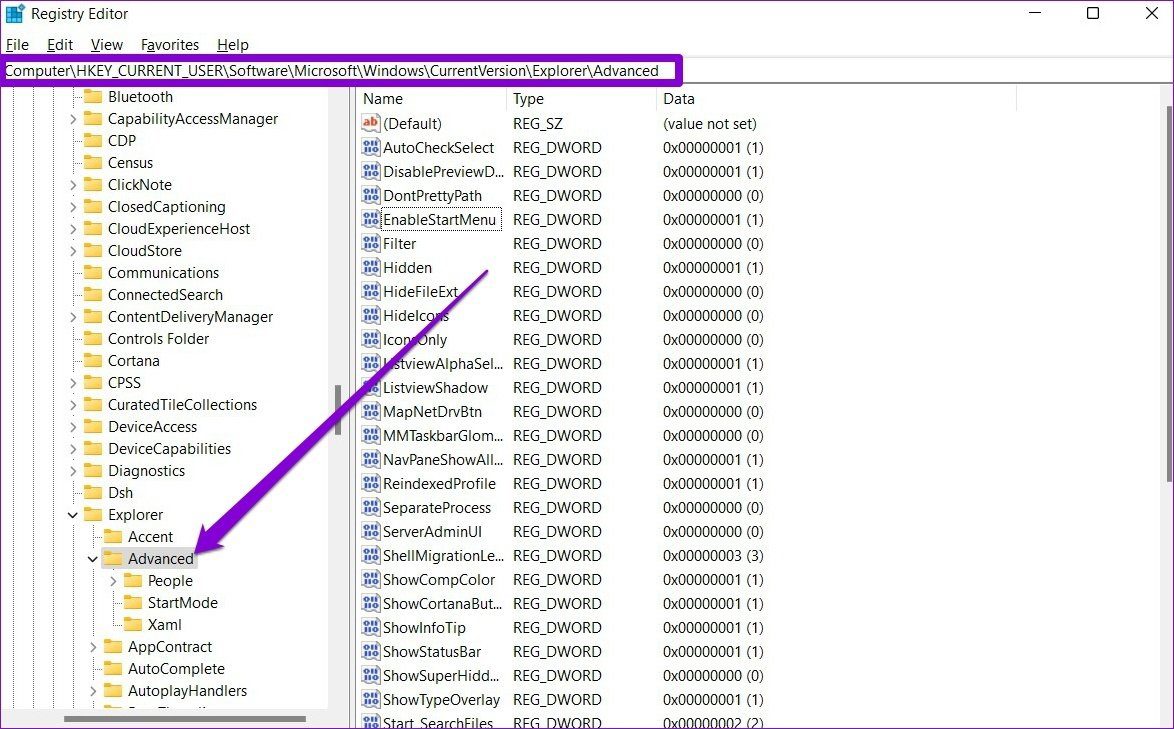
Step 2: Use the address bar at the top to navigate to the following key.
ComputerHKEY_CURRENT_USERSoftwareMicrosoftWindowsCurrentVersionExplorerAdvanced
Step 3: Right-click on anywhere on the empty space, go to New and select DWORD (32-bit) Value. Name it as ‘EnableSnapAssistFlyout’.
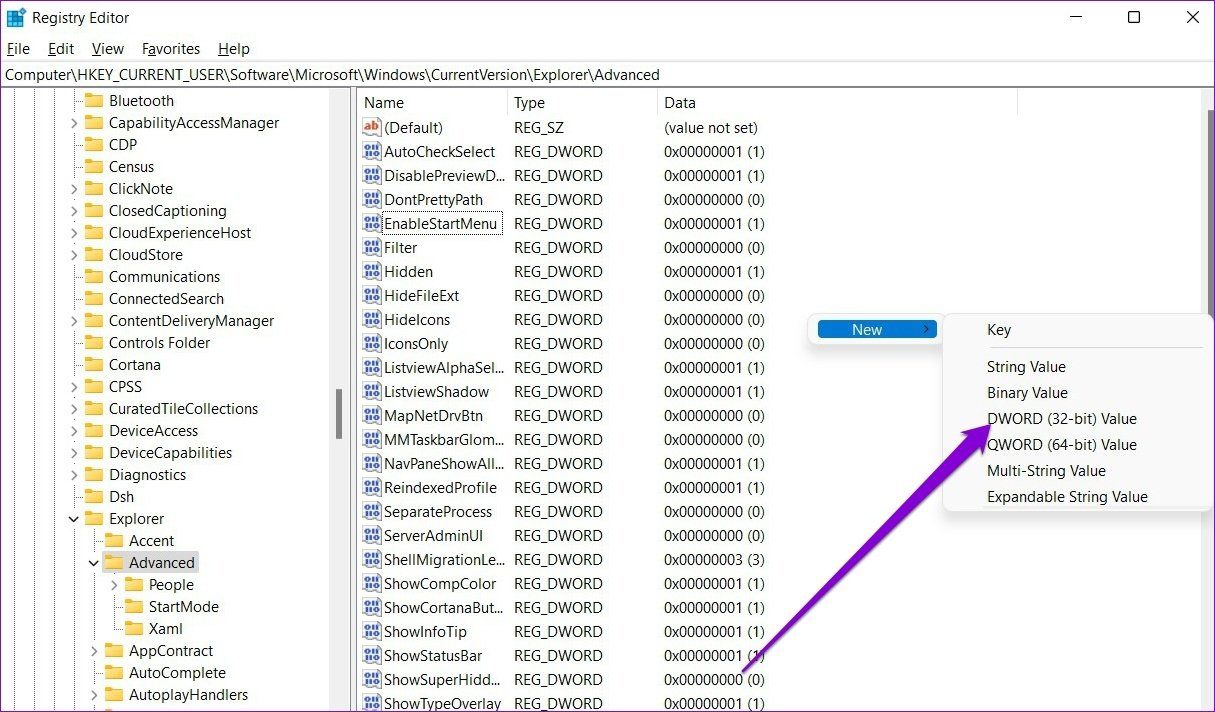
Step 4: Double-click on the newly created DWORD and change its value data to 1. Then click on OK.

Exit the Registry Editor and reboot your PC for changes to take effect. This should enable the snap layout on your PC.
4. Ensure App Compatibility
While most of the built-in apps and programs from Microsoft support snap layout, some third-party apps might not be compatible by design.
Apps that have their container to manage their window sizes will fail to respond to the snap layout. Firefox is a good example here. Earlier, the snap layout functionality didn’t work on Firefox as it already had its Control box. Gladly, the recent Firefox update has resolved the issue.
If your issues with the snap layout are limited to a select few apps, then those apps may not be compatible.
5. Remove Apps with Similar Functionality
Third-party apps like PowerToys, MaxTo, AquaSnap, Divvy, and others offer same windows management features as the snap layout on Windows 11. If you have been using any of those apps to manage window layout in the previous iterations of Windows, then those apps might be conflicting with the snap layout functionality. Hence, you can try removing those apps to see if that resolves the issue.
6. Update Windows
Check if your computer runs the latest version of Windows 11. Using an older version of Windows might make your system susceptible to the bugs and issues in it.
To check for updates on Windows, press Windows key + I to open Settings. Navigate to the Windows Update tab and click on Check for updates button on your right.

Download and install any pending updates, which should get the snap layout to work again.
Snap It
Snap layouts have been a welcome addition on Windows 11. It’s one of those features you can’t return to once you start using it. Hopefully, the above solutions have brought you back to using snap layouts on Windows.
Was this helpful?
Last updated on 07 February, 2022
1 Comment
Leave a Reply
Read Next
 How to Fix Windows Snap Assist Not Working
Windows Snap Assist is a productivity tool that portions your screen into quarters or halves, allowing you to have multiple applications open at once.If your Snap Assist isn’t behaving properly,
How to Fix Windows Snap Assist Not Working
Windows Snap Assist is a productivity tool that portions your screen into quarters or halves, allowing you to have multiple applications open at once.If your Snap Assist isn’t behaving properly,
 How to Add Music to a Snapchat Story or Snap
Snapchat is one of the more unique social media platforms.
How to Add Music to a Snapchat Story or Snap
Snapchat is one of the more unique social media platforms.
 How to Use Snap Map on Snapchat
Snapchat has always separated itself from the competition by giving features that are unique and fun to use.
How to Use Snap Map on Snapchat
Snapchat has always separated itself from the competition by giving features that are unique and fun to use.
 How to Send a Snap to Everyone at Once on Snapchat
If you're a regular Snapchatter, your Snaps sometimes become your calling card.
How to Send a Snap to Everyone at Once on Snapchat
If you're a regular Snapchatter, your Snaps sometimes become your calling card.
 Top 7 Ways to Fix Windows Key Not Working on Windows 10
Windows 10 operating system is full of keyboard shortcuts.
Top 7 Ways to Fix Windows Key Not Working on Windows 10
Windows 10 operating system is full of keyboard shortcuts.
 Top 7 Ways to Fix Telegram Notifications Not Working on Windows 10 and Windows 11
Telegram app is also available for desktops to let you connect with your friends from your Windows computer.
Top 7 Ways to Fix Telegram Notifications Not Working on Windows 10 and Windows 11
Telegram app is also available for desktops to let you connect with your friends from your Windows computer.
 Top 11 Ways to Fix Camera Not Working on Windows 11
Imagine getting ready for your virtual meeting, only to discover that the camera on your Windows 11 PC isn't working.
Top 11 Ways to Fix Camera Not Working on Windows 11
Imagine getting ready for your virtual meeting, only to discover that the camera on your Windows 11 PC isn't working.
 4 Ways to Fix Keyboard Shortcuts Not Working on Windows 11
Preliminary Fixes Disable Game Mode: Gaming keyboards often have special modes that disable keyboard shortcuts.
4 Ways to Fix Keyboard Shortcuts Not Working on Windows 11
Preliminary Fixes Disable Game Mode: Gaming keyboards often have special modes that disable keyboard shortcuts.
The article above may contain affiliate links which help support Guiding Tech. The content remains unbiased and authentic and will never affect our editorial integrity.

Thanks a lot. I’ve been looking for the way to make snap layouts works for more than one hour… before I found this note.