When you copy any text or image (less than 4 MB in size) on your PC, Windows automatically stores that item in the clipboard. You can access your clipboard history anytime and sync it across all your devices. However, if you are unable to reap these benefits because clipboard history isn’t working on Windows 11, we’re here to help.

The Clipboard history can be a time saver on Windows. But when it stops working, you need not keep pasting snippets on a notepad. If Windows fails to save your copied items to the clipboard history, you can employ the following troubleshooting tips to fix the issue.
1. Re-Enable Clipboard History
Let’s begin the troubleshooting with the classic trick in the book – disable and re-enable Clipboard history. If it’s just a temporary glitch that’s causing the issue, re-enabling the clipboard history feature should do the trick.
Step 1: Press the Windows key + I to launch the Settings app. In the System tab, scroll down to click on Clipboard.

Step 2: Turn the Clipboard history option off and then back on.
Try copying some text and press the Windows key + V to access the clipboard history panel. Check to see if Windows saved your text.
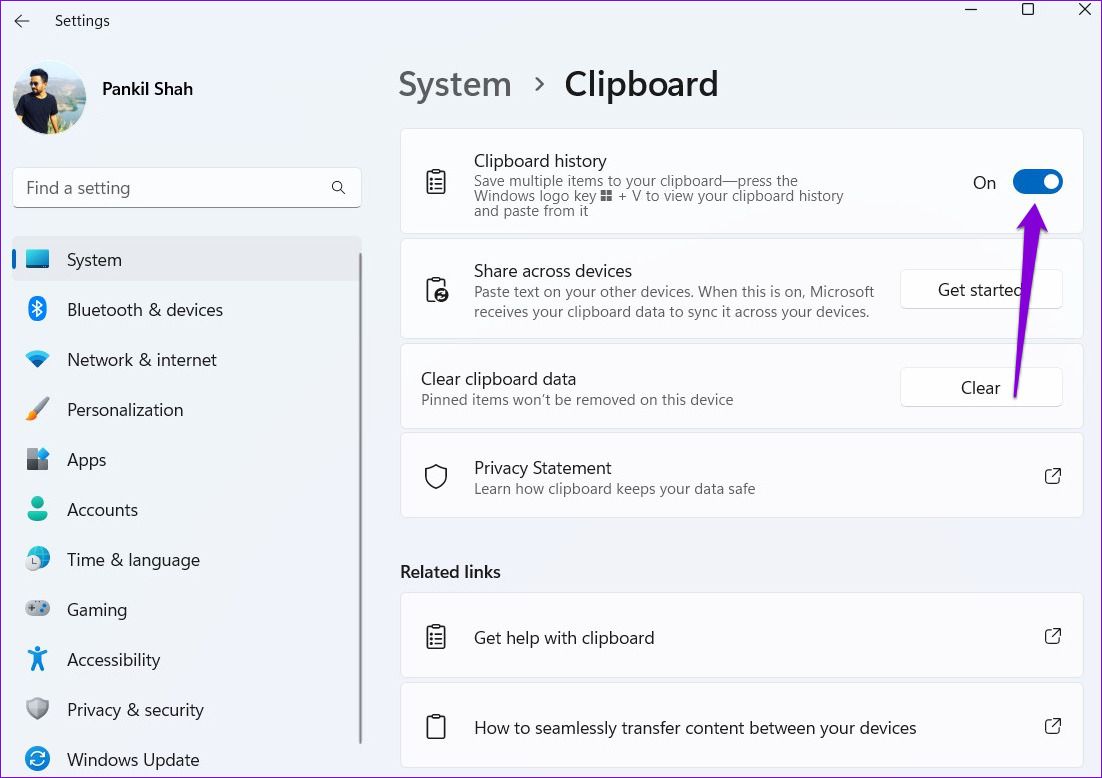
2. Enable Clipboard Sync
Windows requires you to sign in with a Microsoft account to sync the clipboard across your devices. If you’ve switched to a local account or disabled the sync feature, Windows will fail to sync your clipboard history across devices. Here’s how to enable it again.
Step 1: Click on the search icon on the Taskbar, type in clipboard settings, and press Enter.
Step 2: Enable the switch next to ‘Share across your devices’ if it’s off.

If you haven’t signed in with a Microsoft account, you’ll see a Get started button instead. Click on it and sign in with your Microsoft account to access the ‘Share across your devices’ toggle.

3. Clear Clipboard Data
Older clipboard data can also cause it to act up. So, you can clear the existing clipboard data from Windows and start afresh. Here’s how.
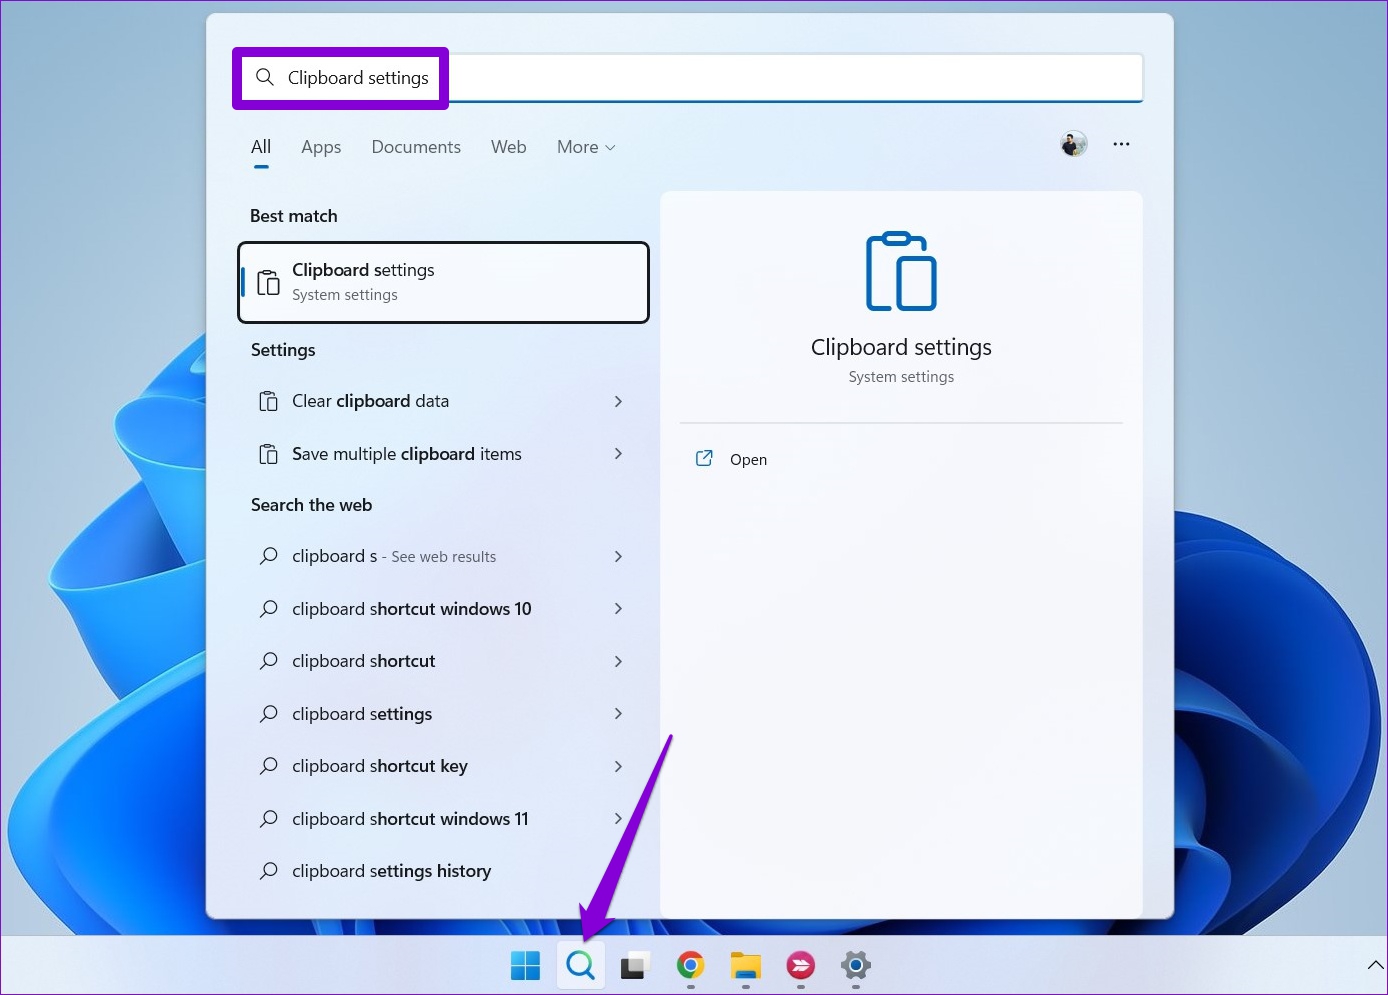
Step 1: Click on the search icon on the Taskbar or press the Windows key + S to open the search menu. Type clear clipboard data in the box and press Enter.
![]()
Step 2: Click on the Clear button next to ‘Clear clipboard data.’
![]()
After clearing clipboard data, check to see if clipboard history works.
4. Check Group Policy
Another reason why clipboard history may not work on Windows 11 is if the feature is disabled from the Group Policy. To ensure that isn’t the case, you can check Group Policy settings on your PC by following the steps below.
Note that the Group Policy Editor is only accessible on on Windows Pro, Enterprise, and Education editions. So, if you’re using Windows Home edition, skip to the next solution.
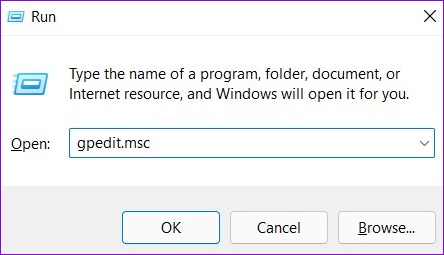
Step 1: Press the Windows key + R to launch the Run dialog box. Type in gpedit.msc in the Open field and press Enter.
Step 2: In the Local Group Policy Editor window, use the left pane to navigate to the following folder:
Computer Configuration\Administrative Templates\System\OS Policies

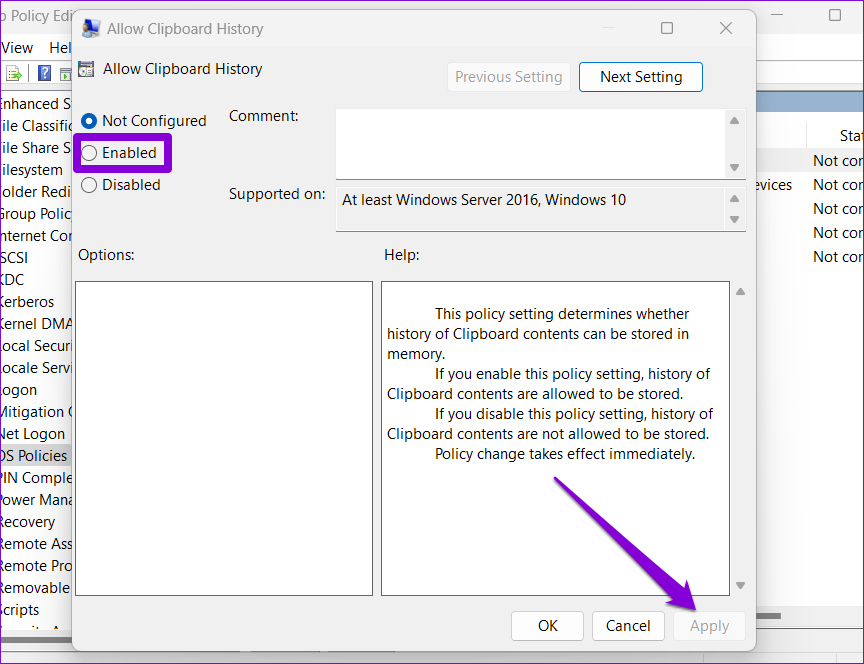
Step 3: Double-click on Allow Clipboard History on your right.

Step 4: In the following window, select Enabled and hit Apply.
Step 5: Similarly, enable the ‘Allow Clipboard synchronization across devices’ setting.
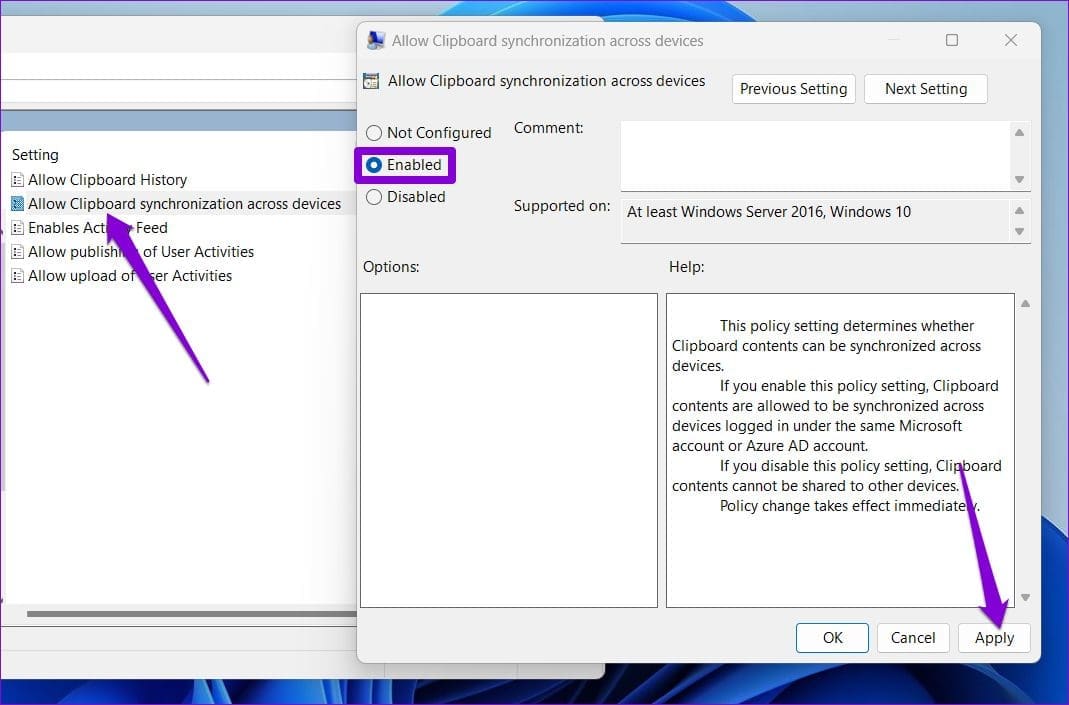
Policy changes should take effect immediately, and the clipboard history feature should start working again.
5. Tweak Registry Files
Registry files on your PC contain the details of Windows settings and its services. If you don’t have access to the Group Policy Editor, you can use the Registry Editor on Windows to enable the clipboard history feature. Here’s how.
However, before you proceed with the changes, it’s important that you back up all the registry files on your PC.
Step 1: Press the Windows key + R to launch the Run utility. Type regedit in the Open field and press Enter.

Step 2: Paste the following path in the address bar at the top and press Enter to navigate to the System key.
HKEY_LOCAL_MACHINE\SOFTWARE\Policies\Microsoft\Windows\system

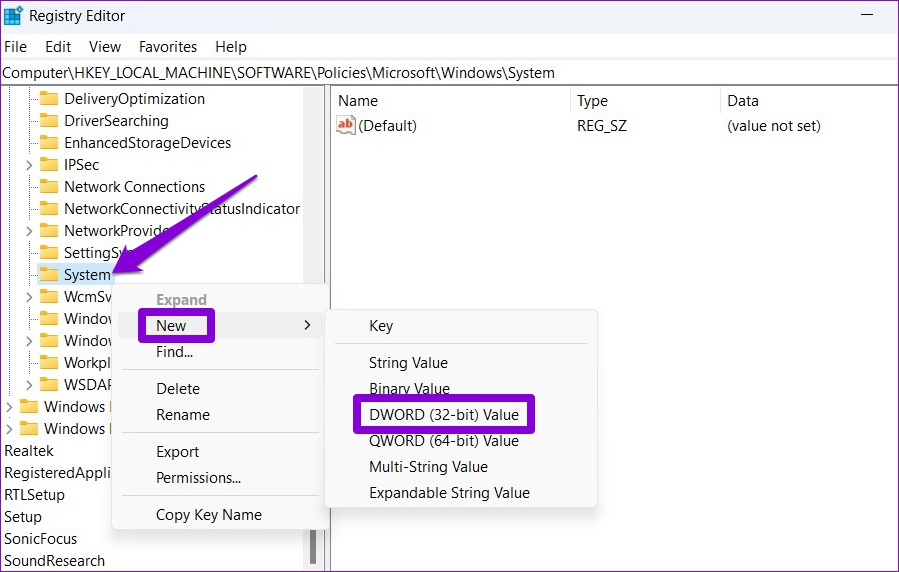
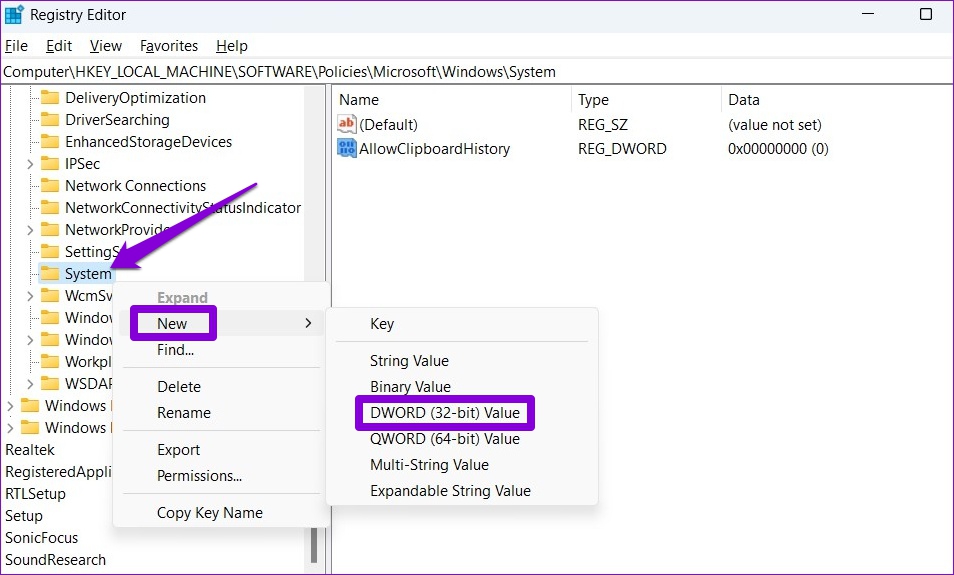
Step 3: Right-click on the System key, go to New and select DWORD (32-bit) Value. Name it AllowClipboardHistory.
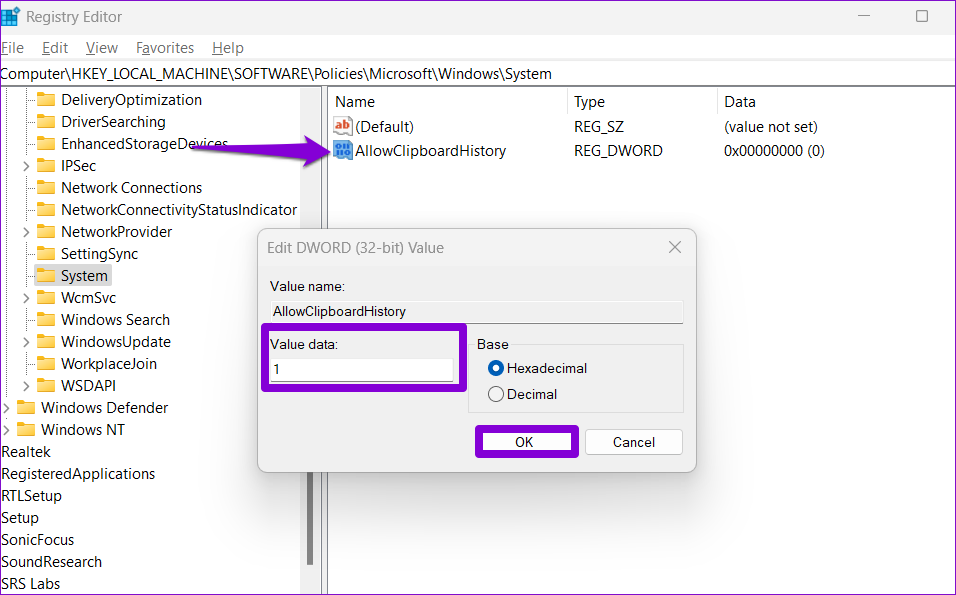
Step 4: Double-click on the newly created DWORD and change its value data to 1 before clicking OK.
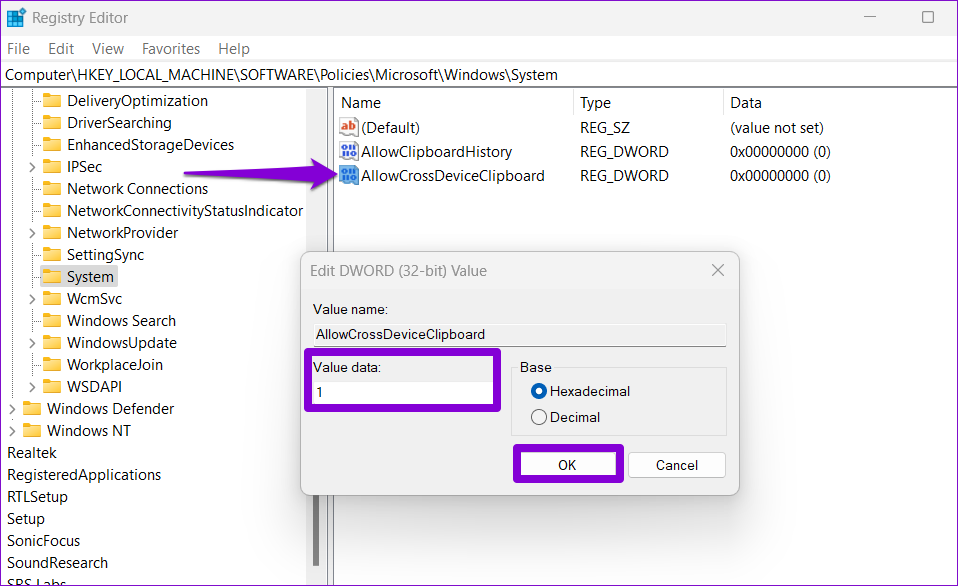
Step 5: Right-click on the System key again, go to New, and select DWORD (32-bit) Value. Name it AllowCrossDeviceClipboard.
Step 6: Double-click on the DWORD and change its value data to 1. Then, hit OK.
Exit the Registry Editor and restart your PC to apply the changes.
6. Update Windows
Windows updates can also go wrong at times. If clipboard history is still not working even after trying the above solutions, chances are, there’s an issue with the current Windows build you’re on, especially if you’re on Insider builds. To fix it, you must install any pending Windows updates right away.
To do so, press the Windows key + I to launch the Settings app. Then, head to the Windows Update section and check for pending updates.

Create History
Clipboard history can come in handy if your work involves juggling a lot of text or images throughout the day. However, such issues with the feature can ruin your experience and force you to look for third-party clipboard managers for Windows. Hopefully, the solutions above have helped you fix the issue for good, and things are back to normal.
Was this helpful?
Last updated on 23 June, 2022
Read Next
 Top 3 Ways to Check Clipboard History on Mac
Like Windows 11, macOS has a built-in clipboard manager to check a recently copied text.
Top 3 Ways to Check Clipboard History on Mac
Like Windows 11, macOS has a built-in clipboard manager to check a recently copied text.
 2 Best Ways to Check and Recover Clipboard History on Android
The clipboard is where texts you copy on your smartphone are stored.
2 Best Ways to Check and Recover Clipboard History on Android
The clipboard is where texts you copy on your smartphone are stored.
 How to Fix Windows Clipboard Not Working on Windows 10
The clipboard is a central part of any ecosystem, be it a phone or a PC.
How to Fix Windows Clipboard Not Working on Windows 10
The clipboard is a central part of any ecosystem, be it a phone or a PC.
 What Is Clipboard in Windows 10 and How to Use It: A Complete Guide
You must have used copy-paste functionality at least once whether you own a smartphone, tablet, or computer.
What Is Clipboard in Windows 10 and How to Use It: A Complete Guide
You must have used copy-paste functionality at least once whether you own a smartphone, tablet, or computer.
 How to Sync Clipboard Between Samsung Devices and Windows
Over the last few years, Microsoft's My Phone app has slowly yet steadily evolved with time.
How to Sync Clipboard Between Samsung Devices and Windows
Over the last few years, Microsoft's My Phone app has slowly yet steadily evolved with time.
 Top 5 Android Keyboards With a Clipboard
Most of the Android phones come pre-installed with Google’s own keyboard app, Gboard.
Top 5 Android Keyboards With a Clipboard
Most of the Android phones come pre-installed with Google’s own keyboard app, Gboard.
 Top 7 Ways to Fix YouTube Watch History Not Working
YouTube keeps track of every video you watch when you are signed in.
Top 7 Ways to Fix YouTube Watch History Not Working
YouTube keeps track of every video you watch when you are signed in.
The article above may contain affiliate links which help support Guiding Tech. The content remains unbiased and authentic and will never affect our editorial integrity.