In the past we have talked about
working with multiple documents on MS Word
. There we talked about a feature called
View Side by Side
and also learnt the advantage and ease it brings in when you need to work on two documents at a time. It is quite similar to the tile feature or snap windows thing that Windows has.
Are you unaware of what that means? Well, if you need to view or work with multiple applications/windows together you might be manually resizing the windows to arrange them side by side. But if you use the tile feature they will automatically fit into the screen area proportionately. Besides, it is any day better than doing Alt + Tab frequently (if that is what you use as a solution).

Today we will discuss three ways to tile windows vertically. The first way will apply to all versions of Windows while the other two are limited to Windows 7 and higher.
Tile Windows Using Task Manager
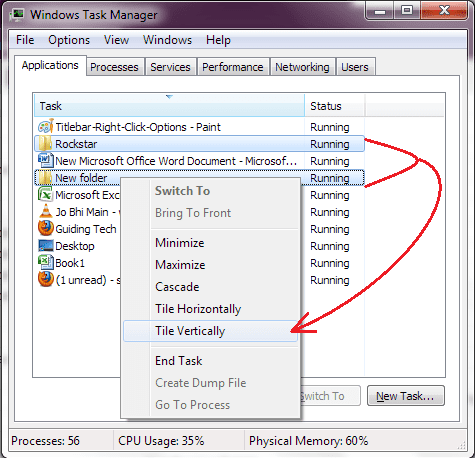
We use the Task Manager regularly for managing the processes that are in execution; the most common of which is killing a process that is Not Responding.
Now, if you have ever right-clicked on an application on the Applications tab you must have noticed multiple options in it. In order to arrange the windows just select two applications/windows (by holding the Ctrl key), right-click and then select Tile Vertically. If you want you may even Tile Horizontally.
Using Windows Snap Feature
Windows 7 introduced some tricks that a user can apply with the titlebar and the mouse. One of those is to drag a window towards the edge of the screen and make it occupy half the specified side of the screen.

This is what you need to do:-
- Hold a window (it should not be maximized) by its titlebar.
- Drag the window either towards the left or right of the screen such that the mouse hits the edge of the screen.
- Release the button when you see something of the sort shown in the image (above).
Once, this is done you can do a similar activity for another window and this time in the opposite direction.
Using Keyboard Shortcuts
While holding the Windows key (Win key) if you press the left or right arrow key, the window that is currently focused will be moved to the left or right portion of the screen respectively. So, you will need to align two windows independently by doing Win + Left arrow once and then Win + Right arrow.
Note: Learn more about Win key shortcuts in our post about 25 best Windows Key (or Win Key) shortcuts for Windows 7.
Conclusion
If you get used to even one of the above three methods you will never again arrange windows manually. And I hope you understand how much of time and effort that can save, right?
Know of more ways? Let us know.
Image Credit: Darwin Bell
Was this helpful?
Last updated on 02 February, 2022
Read Next
 Top 4 Ways to Tile an Image Without Photoshop in Windows 10
While Photoshop is a great tool for any photo-editing task including tiling an image, not everyone is well-versed.
Top 4 Ways to Tile an Image Without Photoshop in Windows 10
While Photoshop is a great tool for any photo-editing task including tiling an image, not everyone is well-versed.
 How to Tile an Image in GIMP
Not everyone likes Photoshop due to its pricing and slightly complicated nature for newbies.
How to Tile an Image in GIMP
Not everyone likes Photoshop due to its pricing and slightly complicated nature for newbies.
 6 Best USB Wi-Fi Adapters for Windows 10 PCs
Most desktop computers do not come with built-in Wi-Fi adapters.
6 Best USB Wi-Fi Adapters for Windows 10 PCs
Most desktop computers do not come with built-in Wi-Fi adapters.
 6 Best UPS for Gaming PCs This Year
Picture this: You're in the midst of an intense gaming session, fully immersed in your favorite virtual world, when suddenly, the lights flicker, and the power goes out.
6 Best UPS for Gaming PCs This Year
Picture this: You're in the midst of an intense gaming session, fully immersed in your favorite virtual world, when suddenly, the lights flicker, and the power goes out.
 6 Best Silent Mice for Macs and PCs in 2024
If you use a laptop, chances are you use the built-in trackpad for navigation.
6 Best Silent Mice for Macs and PCs in 2024
If you use a laptop, chances are you use the built-in trackpad for navigation.
 6 Best Mini PCs for Gaming in 2024
Gone are the days when Mini PCs were limited to standard office tasks like word processing.
6 Best Mini PCs for Gaming in 2024
Gone are the days when Mini PCs were limited to standard office tasks like word processing.
 3 Ways to Delete Old Windows Update Files From Windows 10 and Windows 11
Method 1: Delete Old Windows Update Files via the Settings App The Storage section of the Settings app provides a detailed breakdown of all temporary files on your PC, including
3 Ways to Delete Old Windows Update Files From Windows 10 and Windows 11
Method 1: Delete Old Windows Update Files via the Settings App The Storage section of the Settings app provides a detailed breakdown of all temporary files on your PC, including
 Top 5 Ways to Fix Windows Terminal Not Opening on Windows 11
Microsoft's Windows Terminal is a command-line tool that comes pre-installed on Windows 11.
Top 5 Ways to Fix Windows Terminal Not Opening on Windows 11
Microsoft's Windows Terminal is a command-line tool that comes pre-installed on Windows 11.
The article above may contain affiliate links which help support Guiding Tech. The content remains unbiased and authentic and will never affect our editorial integrity.