If you are running Windows 10 October 2018 update (version 1809) or higher, the chances are you must have stumbled upon the new snipping tool of Microsoft. It is called Snip & Sketch and is made to replace two screenshot tools — Snipping Tool and Screen Sketch.
It has already replaced Screen Sketch. But, Snipping Tool is alive for some time before Microsoft decides to cut its cord too.
So if you are using the Snipping tool, it’s better to switch to Snip & Sketch. The app combines the Snipping Tool and Screen Sketch into one. It offers several exciting features for taking and marking screenshots.
Whether you are a newbie or you have recently moved to Snip & Sketch, here you will find 13 helpful tips, tricks, and hidden features to use it like a pro.
1. Launch App in Different Ways
Typically, you would search for the Snip & Sketch app and launch it to take a screenshot. The method is a bit long for anyone who takes screenshots regularly.
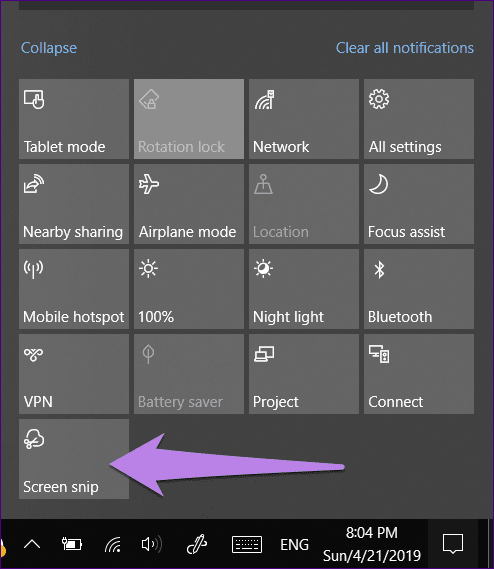
Fortunately, Microsoft offers alternate, quick ways to launch the app. First, you will find its button in the Action Center. Click on it whenever you need to take a screenshot. Another method is to use the shortcut WinKey + Shift + S to activate the screenshot tool.
Assign to PrtScn Key
The oldest way to capture a screenshot is to take the help of the PrtScn key. Guess what? You can launch the Snip & Sketch tool from the PrtScn key too. To do so, you need to assign the app to the key first.
For that, follow these steps:
Step 1: Go to Settings on your computer and click on Ease of Access.
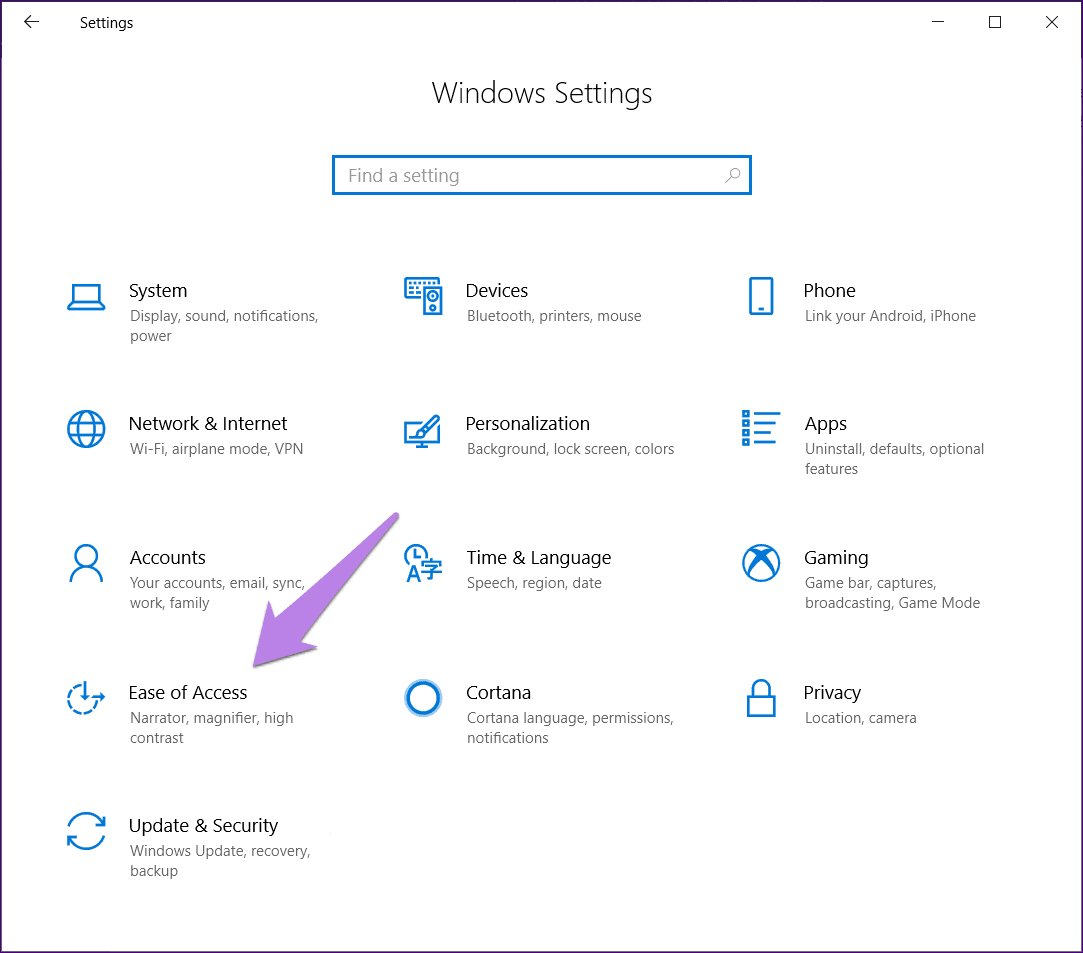
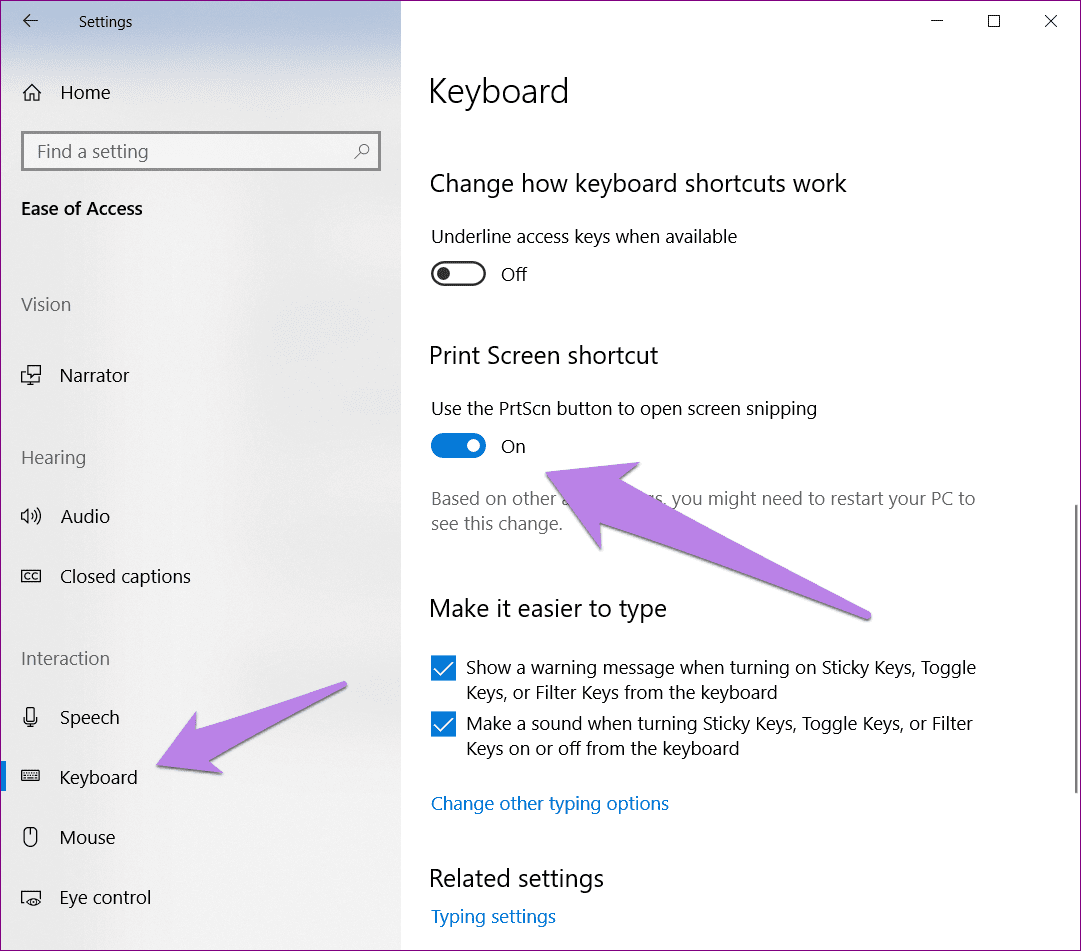
Step 2: Click on Keyboard from the left sidebar. Scroll down and turn the toggle present under Print Screen shortcut.
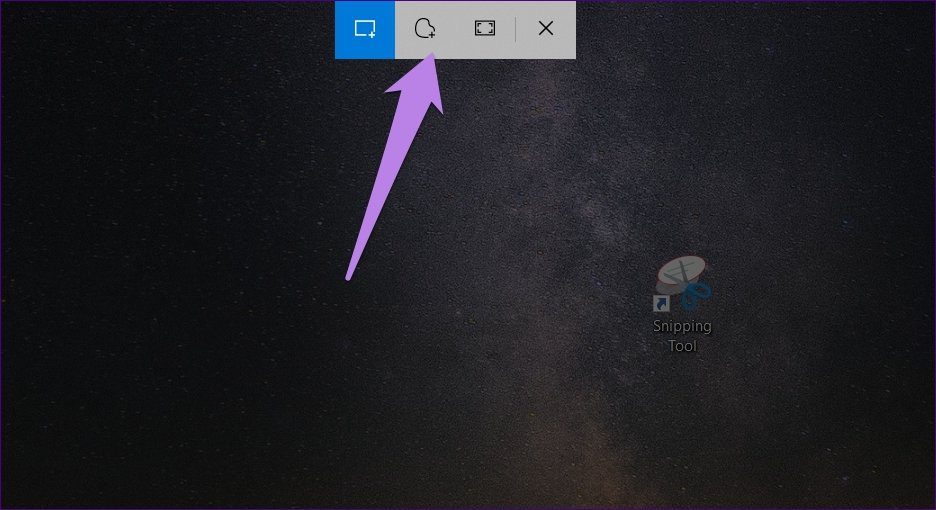
When you use the above three methods to launch this tool, the screen brightness will dim a bit, and you will see different screenshot modes.
2. Use Screenshot Modes
We don’t always want to capture full-screen screenshots. Sometimes, we only wish to have some area. For that, you can use the various modes offered by this app. Currently, the app provides rectangular, freeform, and fullscreen modes.
To use them, launch the tool using any of the methods mentioned above and click on one of them to activate it.
3. Navigate Between Screenshot Modes
If you prefer using keyboard shortcuts instead of interacting with a mouse, press the Tab key on your keyboard to navigate between the screenshot modes available at the top. Then hit the Enter key to select a mode.
4. Delay Screenshot
Many times, when we want to capture context menus, screenshotting them isn’t a piece of cake. For situations like those, you can take the help of delay mode.
In Snip & Sketch, you need to open the full app to use it. Once you launch the app, click on the small down arrow next to New and choose the delay time. After the set time, you will be offered the screenshot modes at the top. Select and capture the screenshot. Some apps even let you take screenshots automatically at regular intervals.

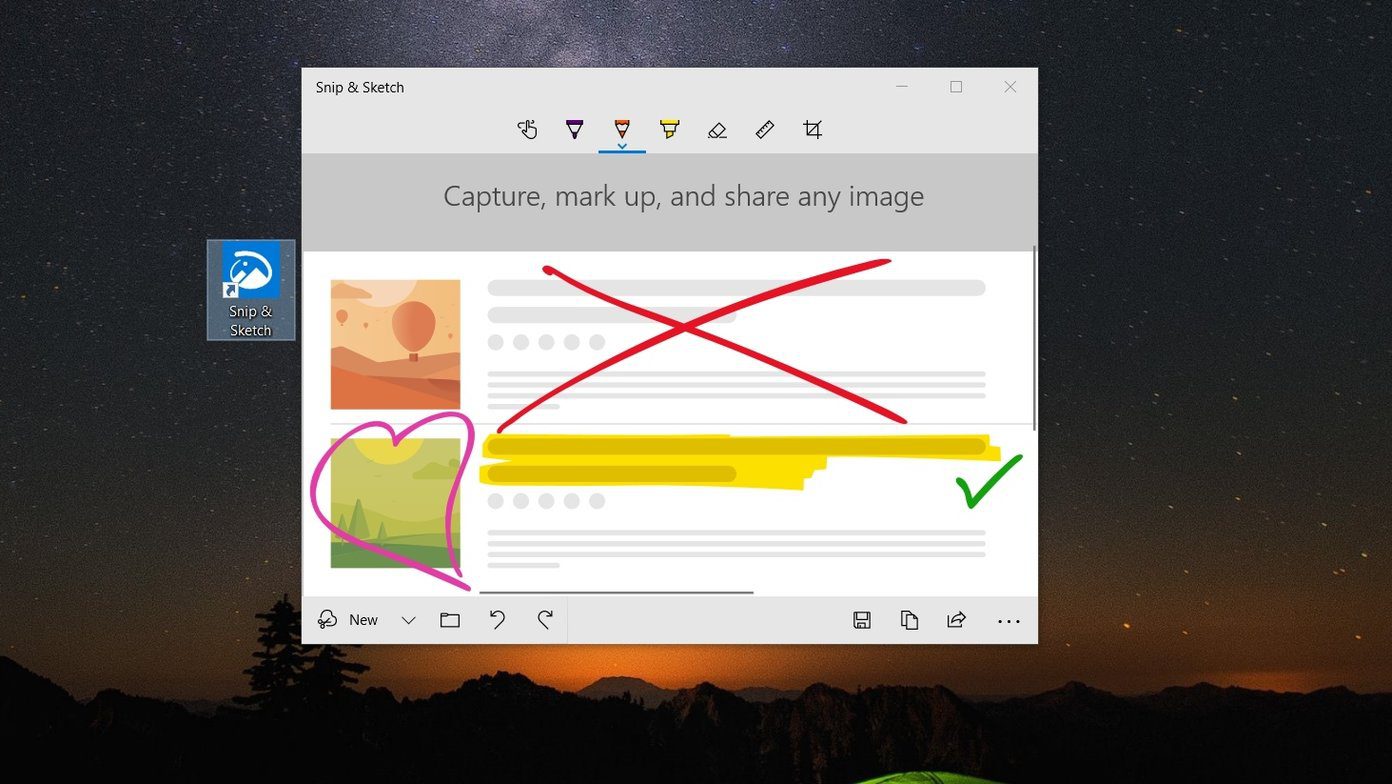
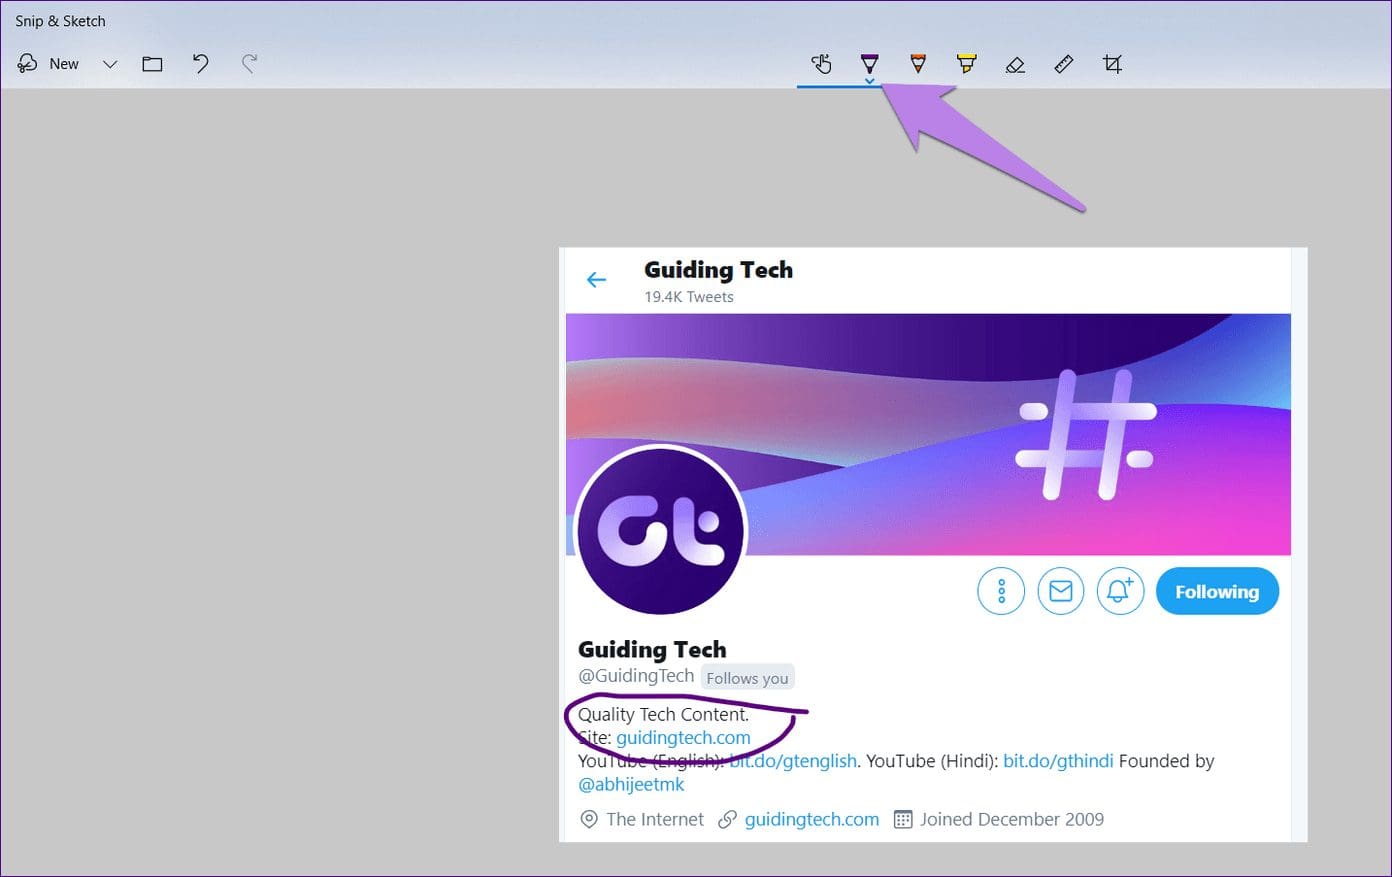
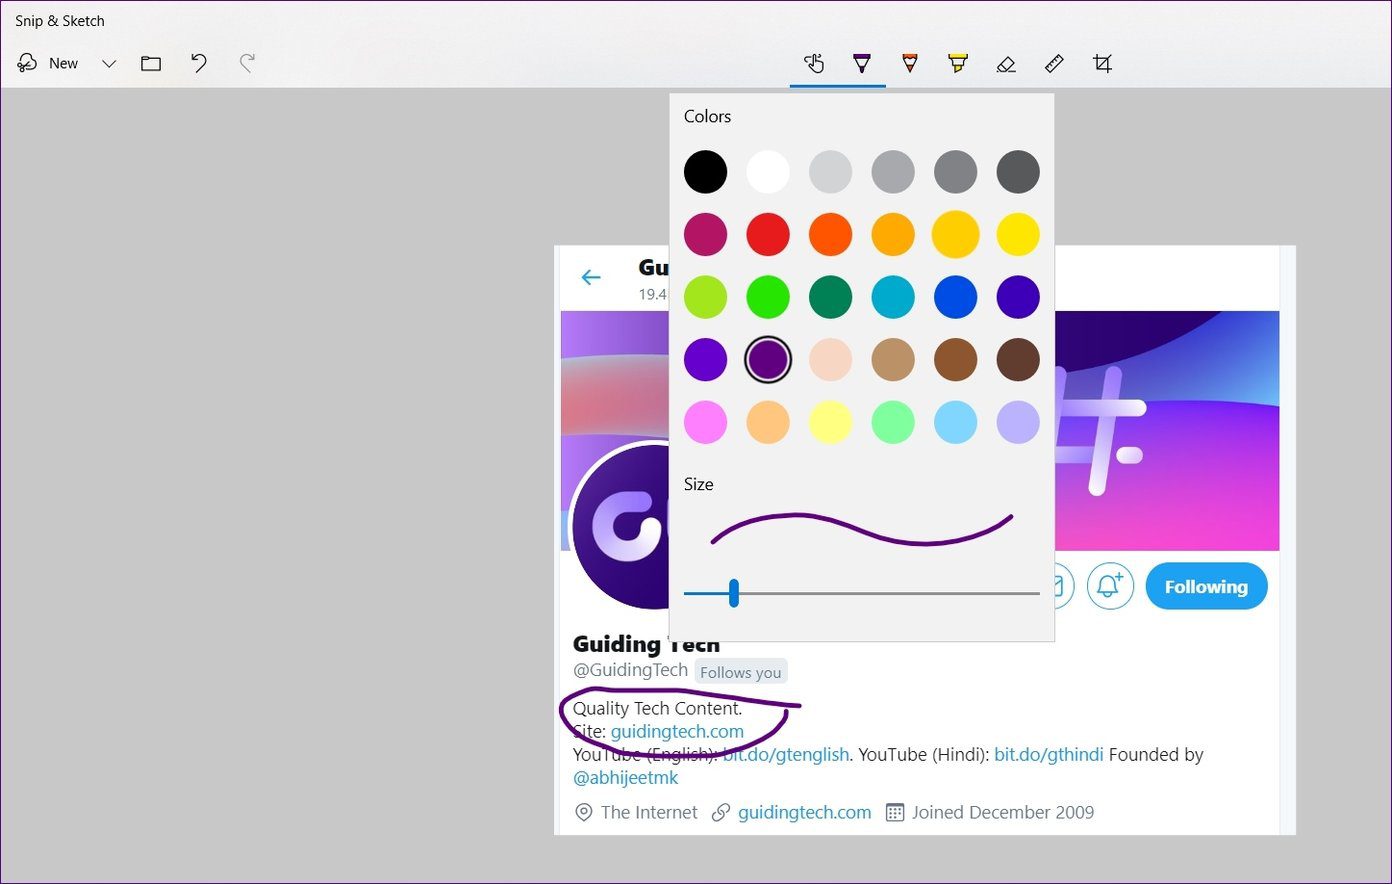
5. Change Pen Size and Color
Annotation tools are pointless without size and color options. To change the size and color of various marking tools available in Snip & Sketch, tap the small down arrow present under the pen. Alternatively, double click on the pen to open the customization options.
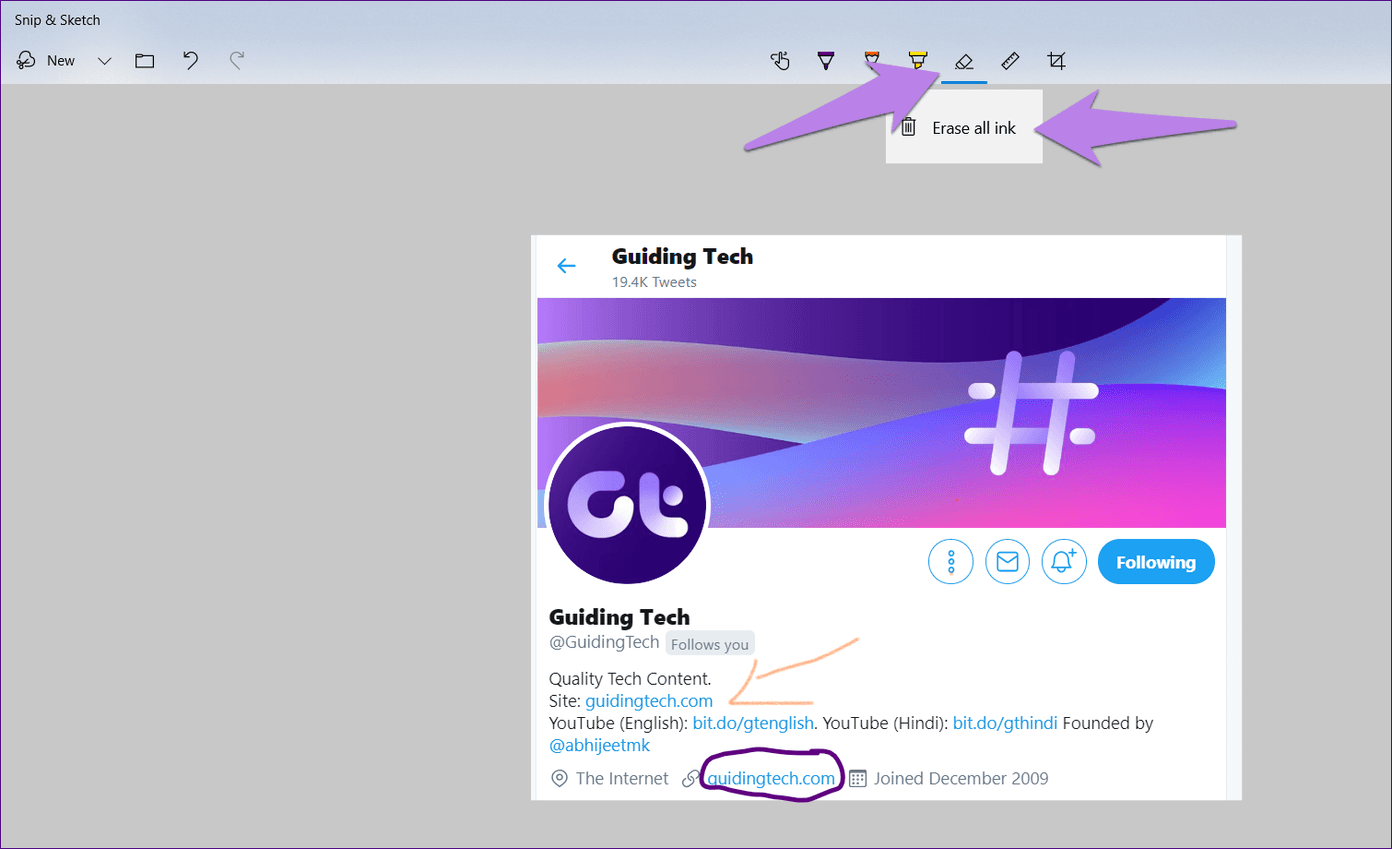
6. Erase All Markings
With the eraser, you can remove annotations based on strokes. If you have made several markings and you want to clear all of them, you don’t have to erase every stroke individually. Just double click on the eraser icon and select Erase all ink.
7. View Dismissed Screenshot
The drawback of using the Snip & Sketch app is that it doesn’t open the screenshot directly in the app. You have to click on the notification at the bottom-right corner to open it in the app or paste it into another image-editing app.
Sometimes, however, you can miss the notification. But don’t worry. You don’t have to retake the screenshot. Just open the Action Center, and you will find your screenshot notification there. Click on it to launch it in the app.
Tip
8. Enable Touch Support
If you own a touchscreen laptop, you will be glad to know that Snip & Sketch supports touch input. For that, you will have to enable the touch mode in the app. To do so, click on the hand icon at the top. When enabled, you can use your fingers, digital pen, or mouse to annotate on images.

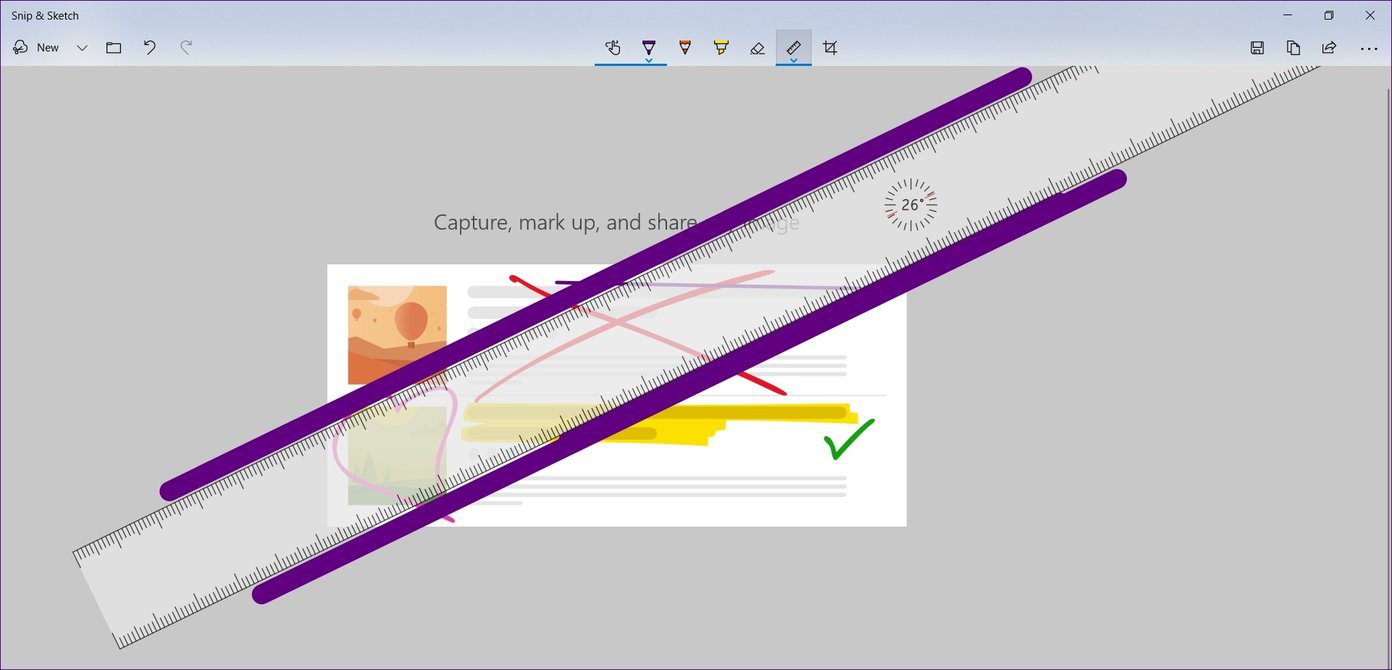
9. Rotate Ruler and Protractor
Even though I’m disappointed with Microsoft for not providing proper annotation tools like arrows, text, shapes, etc., they offer a ruler and protractor. Those can be used to draw straight lines and circles. You can even use them to measure.
The tools support touch usage and one could use them just like a regular ruler or protractor. But, if you don’t have a touch laptop that doesn’t mean you cannot use them.
To rotate the scale or protractor, keep the mouse pointer over it and then use the middle button of your mouse to change its angle. For touchpad users, again, rest the mouse pointer over it and then using two fingers scroll up and down.
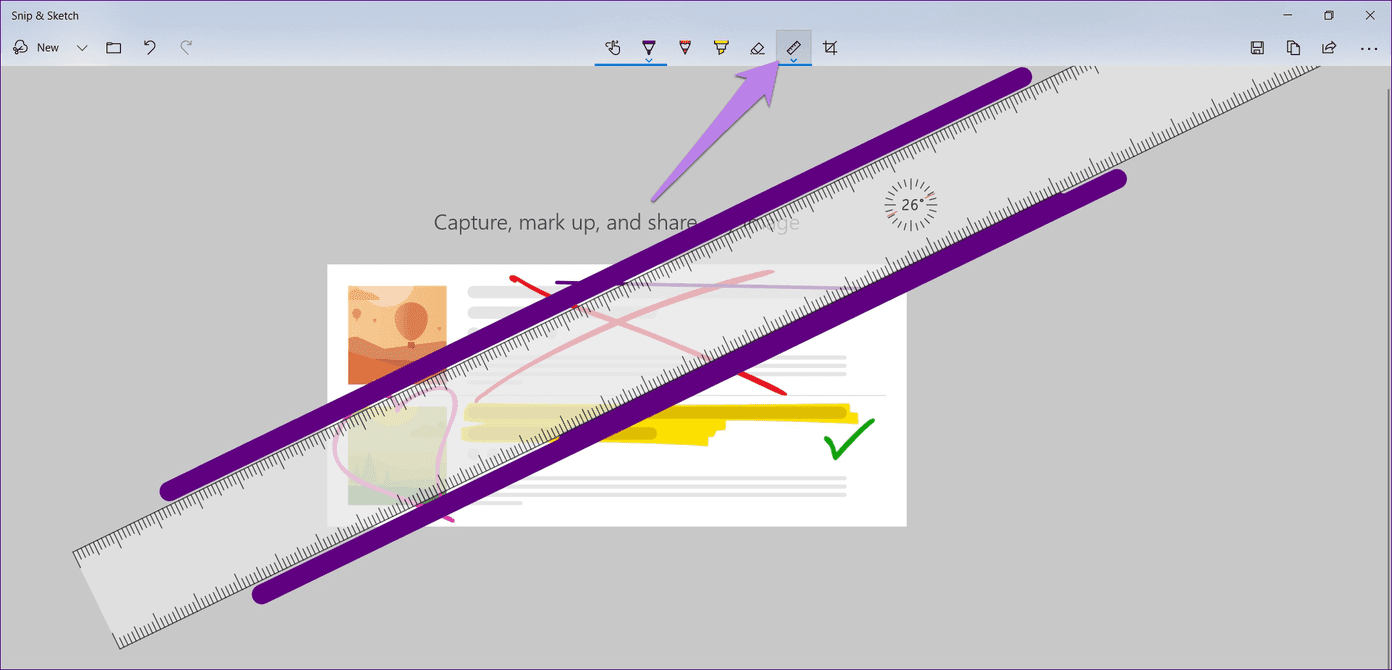
10. Hide Ruler and Protractor
After using the two elements, if you want to hide them, you will notice there is no delete button for them. So to remove them from your screenshot, double-click on the ruler icon at the top and click on the element that you have added from the menu.
11. Cancel Screenshot Action
Sometimes, when the tool is ready to take a screenshot, you realize that the screenshot is no longer needed. To deactivate the screenshot action, press ESC key.
12. Edit Old Image
One of the beautiful things about this app is that you can annotate old screenshots and images too. To open an existing photo, launch the app and click on the open icon. Then select the picture.
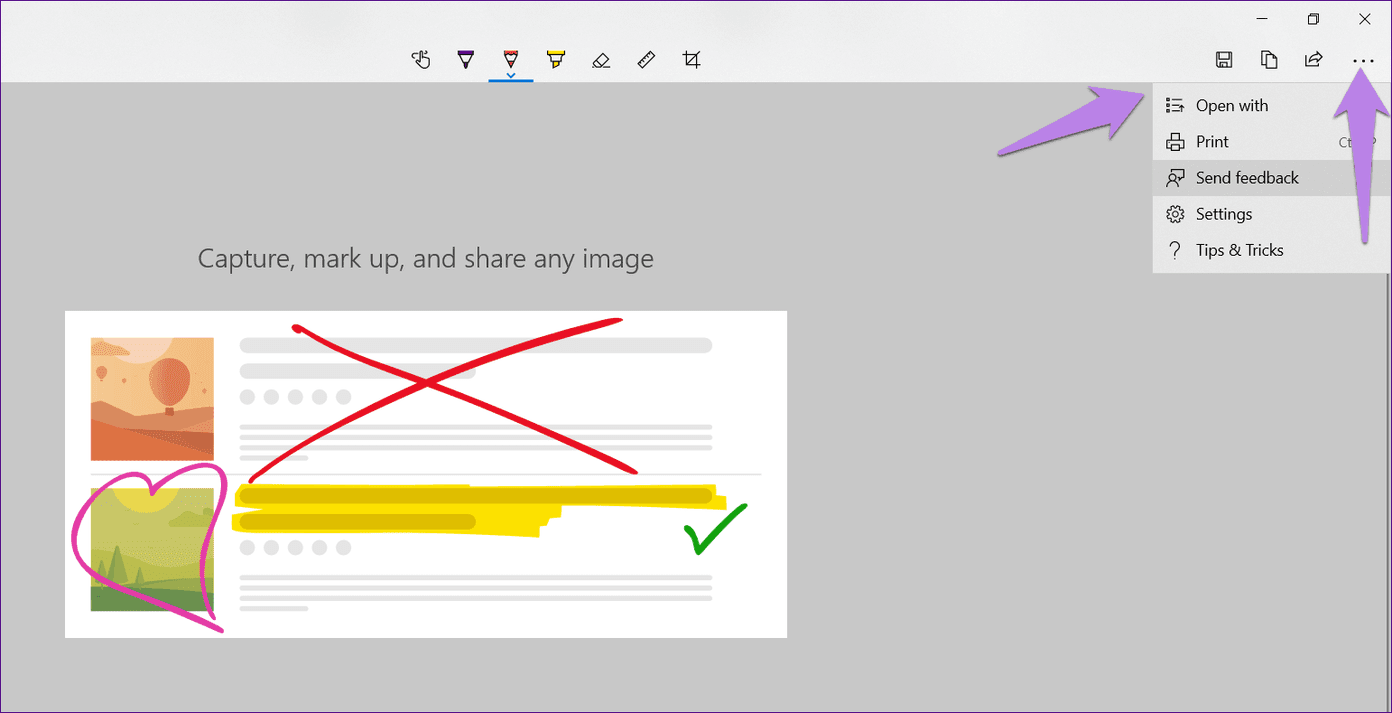
13. Open in Another App
Once you have taken a screenshot and used the native marking tools, if you want to edit your image further, you can directly open it another app. For that, click on the three-dot menu at the top-right corner and select Open with. Choose the app in which you want to edit the screenshot.
Bonus Tip: Use Shortcuts
The keyboard shortcuts make life easy. Thankfully, the Snip & Sketch app supports a number of them. These are:
Image Shortcuts
- Alt + N – Capture new screenshot
- Alt + O or Ctrl + O – Open file
Editing Shortcuts
- Ctrl + Z – Undo
- Ctrl + Y – Redo
- Ctrl + C or Alt + C – Copy
- Alt + R – Crop
Annotation Shortcuts
- Alt + B – Select pen
- Alt + I – Select pencil
- Alt + H – Select highlighter
- Alt + E – Select eraser
Other Shortcuts
- Alt + T – Enable/disable touch writing
- Alt + S or Ctrl + S – Save image as
- Alt + A – Share
- Alt + M – Open Menu
- Ctrl + P – Print image
Snip, Sketch, and More
So that’s how you can make the most of the new Snip & Sketch app on your Windows 10 PC. Interestingly, the app supports multi-window mode too. That is, you can have many screenshots open in different windows where you can work on them simultaneously.
Do you know of any other tip for the app? Let us know in the comments below.
Next up: Does Windows 10 photo app seem slow to you? Check its alternatives to open and view photos quickly.
Was this helpful?
Last updated on 13 July, 2021
Read Next
 Snipping Tool vs Snip & Sketch: How Do They Differ
The easiest way to take screenshots on Windows is by using the PrtScn key.
Snipping Tool vs Snip & Sketch: How Do They Differ
The easiest way to take screenshots on Windows is by using the PrtScn key.
 How to Forward an Image With Caption and Other Useful WhatsApp Forward Tricks
WhatsApp is one of the most popular chat apps on Android.
How to Forward an Image With Caption and Other Useful WhatsApp Forward Tricks
WhatsApp is one of the most popular chat apps on Android.
 Top 7 Useful Ways to Fix Windows 10 Photos Black Screen Error
Windows 10 got a lot of things right, but the Photos app was not one of them.
Top 7 Useful Ways to Fix Windows 10 Photos Black Screen Error
Windows 10 got a lot of things right, but the Photos app was not one of them.
 Top 9 Useful Ways to Fix Slow Gmail
Over the years, Gmail has managed to elevate the user experience by incorporating features like schedule send, confidential mode, Help Me Write, and more.
Top 9 Useful Ways to Fix Slow Gmail
Over the years, Gmail has managed to elevate the user experience by incorporating features like schedule send, confidential mode, Help Me Write, and more.
 What Does Mapping a Drive Mean in Windows & How is it Useful?
Mapping a drive simply means to connect a local drive with a specially allocated shared directory or folder on another computer.
What Does Mapping a Drive Mean in Windows & How is it Useful?
Mapping a drive simply means to connect a local drive with a specially allocated shared directory or folder on another computer.
 Top 13 PhotoScape X Tips and Tricks
PhotoScape X is a hidden gem.
Top 13 PhotoScape X Tips and Tricks
PhotoScape X is a hidden gem.
 Top 29 Microsoft Whiteboard Tips & Tricks to Use It Like a Pro
With the recent Windows update, Microsoft has given a special place to its Whiteboard app.
Top 29 Microsoft Whiteboard Tips & Tricks to Use It Like a Pro
With the recent Windows update, Microsoft has given a special place to its Whiteboard app.
 Top 10 Samsung Note 10+ Camera Tips and Tricks to Click like a Pro
The Samsung Galaxy Note 10 Plus features an array of cameras.
Top 10 Samsung Note 10+ Camera Tips and Tricks to Click like a Pro
The Samsung Galaxy Note 10 Plus features an array of cameras.
The article above may contain affiliate links which help support Guiding Tech. The content remains unbiased and authentic and will never affect our editorial integrity.